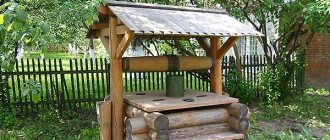
Where to start making a house
In order for your pet to like the cat house and be comfortable for sleeping and playing, you need to carefully consider its design. This is where they usually start. The dimensions should be selected so that the finished product is spacious. If you make it “back to back”, the animal will not feel comfortable in it.
Example drawing
The diagram shows only the main parts of the cat house. But scratching posts, posts on which the animal can climb, and additional open beds can also be added. If the owners have firmly decided to make houses for cats with their own hands, drawings can also be ordered from specialists.
Side walls 2 parts, front and back walls (access size is arbitrary)
Options and types of houses
All shelters for pets can be divided into 3 types:
- Bed beds - the easiest ones to make with your own hands
- Houses with a roof - to implement them you need to have a little experience in needlework
- A full-fledged complex with a house, multi-level platforms and a scratching post is the most difficult design to implement independently.
We will tell you about the first two options, show photos and videos, and also tell you how you can please the animal. What you need to choose from: glue, nails, fabric, paint, decorative details if desired. The rest is a flight of fancy.
Materials and tools
In order to make a wooden house, you need to stock up on the following materials:
- Tree. Suitable plywood with a thickness of 6-12 mm, chipboard, fiberboard. The material must be completely dry and odorless.
- Spiral rope made of jute or hemp with a diameter of 10-12 mm. If you choose a material that is curled crosswise, the cat may damage its claws. In addition, synthetics are not suitable.
- Foam rubber for upholstery. Can be used.
- Furniture fabric (thick) or a piece of carpet. A good option would be to use not new materials, but those that have the smell of the animal’s owners.
- PVA glue.
- Small nails (no more than 20 mm) and self-tapping screws.
- Strong threads, tape.
- Wooden posts or ordinary thin logs.
Silk fabrics and threads cannot be used to build a cat house. The animal will suffer from constant electric shocks. Wool fabrics are difficult to care for, retain sweat and quickly begin to rot.
In order to make a cat house from the materials described above, you will need a simple set of tools:
- hammer;
- sharp knife;
- scissors;
- awl;
- screwdriver;
- glue brush;
- electric jigsaw;
- drill.
Fabric parts can be sewn by hand or using a sewing machine. In this case, it is necessary to ensure that the seams are strong and that the threads do not protrude anywhere. Often cats sharpen their claws not only on special devices, but also on the surface of the house itself. If the upholstery is sewn poorly, it will quickly become unusable.
Cardboard tower or castle
To build a cat tower house from a cardboard box with your own hands, you need to follow these steps:
- Prepare the necessary tools: corrugated cardboard or cardboard box, pencil or pen, compass, stationery knife, glue.
- We take cardboard and draw on it using a compass the outlines of the disks for the future house. There should be seven or eight groups of five or four disks of the same size. We measure the largest disk with a radius of 21.5 cm, drawing subsequent disks with a distance of 4 cm from each other. Cut out using a stationery knife.
- Let's make the bottom. To do this, you need to cut one solid disk with a radius of 21.5 cm and another six or seven with the same radius, but not solid, but with a hole inside, 4 cm wide.
- We assemble the tower by placing one disk on top of another according to the size.
- Making an entrance: measure the required height and, for convenience, remove the excess disks of the top. Decide which form of entry you like the most, and outline its boundaries on each disk of the future entry. Using these marks, draw cutting lines on the disks. Using a knife, make cuts along the lines.
- Now, orienting the correct position of the disks along the input, we glue them together.
- When the structure is completely dry, place a comfortable pillow or cloth inside and invite the cat to a housewarming party.
Gluing rules
In order for the glued surfaces to hold securely, it is necessary to follow a certain algorithm:
- Apply glue to both surfaces and wait until it thickens. It becomes almost transparent, with isolated yellowish spots.
- Press the parts together and place them under a press.
- Leave for 40-60 minutes.
If glue and nails are used when assembling the house, then the holes for them should be marked in advance. And at the end of the opposite part, make indentations using an awl so that the nails do not go askew when driving. When using self-tapping screws, it is necessary not to mark the screwing location, but to make holes in advance.
Seven on the benches...
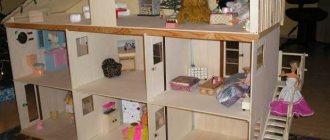
If your house is home to not one or two pets, but a whole family, you can build the option shown in the photo above. How to make a house out of boxes for cats so that it is original, roomy and to the liking of all pets? In fact, the instructions do not suggest anything complicated:
- First of all, you need to find several boxes (one for each pet). If your pets love change, you can add a few extra “cells” so that the animals can “move” if desired. The photo shows a design of 11 boxes.
- Next, using a compass or a simple pencil, mark the holes so that the ridge has access to the house. It is not at all necessary to place them strictly in the center; you can move them to the side or closer to the corner. Cut them out.
- Assemble the entire structure using glue or a stapler.
- Add soft beds, toys and invite pets.
House out of a box
Not everyone can make a home out of plywood or boards for their beloved pet. This requires certain skills in working with a jigsaw, drill and the ability to make drawings and patterns. But even women and children can make a cat house with their own hands from a box.
Step-by-step instruction
External design depends on the imagination and creative abilities of the owner. For beauty, you can make applications from colored scraps in the form of shutters on the windows. Make an imitation of a doorbell above the entrance to the house.
Instructions:
- First you need to choose a suitable cardboard box. It should be spacious, undamaged, and free of foreign odors.
- Using a pencil, you need to mark the place where the entrance to the house will be and carefully cut it out. If desired, you can make holes on all sides of the box. Design them in the form of doors and windows. This is a kind of decor for a cat's home.
- Seal the bottom of the box with wide tape
- It is recommended to cover the outside and inside of the box with felt or any other dense fabric. This will not only give comfort to the house, but also strengthen it.
- The bottom of the box, which acts as a floor, does not need to be sheathed. It is best to use carpet as bedding.
- The roof is made flat or designed in a more original way. To do this, you do not need to close the top of the box, but connect its side “ears” using tape.
We create a house for a cat. What do you need to know?
Dimensions. Cardboard houses must correspond to the parameters of the animals. For a pet with average parameters, a cubic design will be suitable, the width of which will be about 40 centimeters. A hole 15–20 centimeters wide is sufficient for entry. If the entrance is very wide, the animal will feel unprotected. The basic rule is that the pet must fit freely in the house, lying on its side.
Important! Siamese and Bengal cats love to sit on their hind legs. It is better for them to make a cardboard house with their own hands in the form of a wigwam. Its height should be at least 60 - 70 centimeters.
Benefits of a self-made cardboard house:
- Saving money.
- A self-created product will be in harmony with the interior of the room.
- An additional reason to please your pet.
- Minimum investment of time and effort.
- There is no need to throw away empty boxes.
INTERESTING TO KNOW: How to understand a cat's language
House made from a box and a T-shirt
A minimum of materials, effort and time are spent on making such cat housing. What you will need:
- cardboard box;
- scissors;
- old T-shirt;
- furniture foam rubber;
- PVA glue;
- glue brush;
- needle and thick thread.
Step-by-step instruction:
- Prepare a T-shirt. To do this, you need to turn it inside out and sew the sleeves tightly. Cut off what is unnecessary.
- Mark a place for entry. It is made round, the size of the neck of a T-shirt.
- After the entrance to the future house is cut out, cover the top and bottom of the box with tape and begin to cover the outer walls of the box with foam rubber.
- To ensure a strong fixation of the parts, apply the glue in the form of sun rays from the center of the surface to its edges. MYou can use double-sided tape. But it should be glued to the box in the same way in the form of rays.
- Put on a T-shirt. First, the neck is fixed at the entrance to the house using a thick needle and strong thread.
- Then you need to cover the entire box with a T-shirt and sew it on the back wall. Cut off what is unnecessary.
- The seam can be left as is if the house does not rotate, or decorated with colored fabric.
- Place soft bedding inside the new cat's housing, which can be easily sanitized.
The owner selects the dimensions of the cat house independently. What a new home for a pet will be like depends on the location and function that the house will perform.
If this is just a house for sleeping, then you can choose a smaller box. And if you are planning a place for games, then the sizes are selected larger. The ideal option would be to construct several boxes in the form of tunnels.
Step-by-step instruction
The designs of the houses can be varied. Below we will consider various homemade options: from the simplest to the most complex.
Sun lounger
Making a sleeping place for cats is not at all difficult. Of course, it will not become a full-fledged shelter, but the animal will be happy that it has its own bed. A small mattress, which must be equipped with soft sides, is suitable for this. Alternatively, use a box. Cut off the top and cover the inside with fabric with foam rubber. We bring to your attention step-by-step instructions for making a sleeping place for your tailed friend, which can be placed inside the house or placed in a secluded place.
You will need: an old sweater, padding polyester, holofiber (or foam rubber for stuffing) and sewing supplies.
- Step 1. Cut the neck of the sweater and sew the opening from shoulder to shoulder.
- Step 2: Fill the sleeves with stuffing so they look like a sausage.
- Step 3. Sew them together.
- Step 4. Now cover a piece of foam rubber with the sweater to create a flat, warm bottom and sew the bottom closed.
- Step 5. Sew the sleeves to the bottom so that they form a rounded “nest”.
Simple house out of a box
The basis of the house will be a box, which means that first of all you need to find a good version of it. Place it in front of your cat for her to climb into, making sure she can fit in it and can turn from side to side.
- Step 1. Make an entrance to your pet's future booth. Take a plate of a suitable diameter, attach it to the wall of the box, circle and cut a round hole along the contour.
- Step 2. Now let's start creating the roof. There are four pieces of cardboard that cover the box, cut the cardboard from the entrance side and the back side of the box, and connect the sides by the edges in the form of a roof using glue.
- Step 3. Set up the inside of the booth: place a small folded blanket or mattress in it.
Two-story cardboard houses
If an active pet lives in the house, then a one-story house will not be enough for him. Therefore, you can create a structure of two floors or a whole complex. For such manipulations you will need hot glue, as well as templates for window and door openings.
Advice!
Initially, you should prepare boxes of the required size for the first and second floors. Then attach the templates to them, trace them with a pencil and carefully cut out the openings with a stationery knife.
Cut off the top 2 flaps of the first box, and the bottom flaps of the second box. Separately in each box, glue the sides together. On the smallest one, draw a triangle and glue it from below to the other two doors.
Visually it should resemble a roof. All that remains is to glue the two boxes together, wait until the structure dries, cover it with warm material and send your pet inside.
Complex house out of a box
- Step 1. Cut off the top and bottom edges of the box so that only four sides remain. Separate them carefully, as these cardboards will be needed to assemble the roof.
- Step 2. To create the entrance and windows you will need the same plates of different sizes. When outlining the entrance, draw only half a circle, then lower two straight lines down from it - you will get an arch-shaped entrance. You can use other objects in the shape of which you want to make the doorway and windows.
- Step 3. To get a roof, tape together two previously cut pieces of cardboard and secure it on top of the house.
- Step 4. You can decorate the house to your liking: draw tiles or glue “sheets” made of paper, attach a pipe, paint the walls, glue paper flowers and grass.
Wooden booth
Very active cats can tear apart a cardboard house by sharpening their claws on it or just playing. Let's consider more permanent structures, namely wooden booths. It will be able to stand longer, and its thick walls will allow you to install more accessories, such as a scratching post or a toy.
In order to make such an apartment for a cat, it is enough to put together a box in the form of a cube, having first cut out a hole for entry on the front edge. Make sure that the surface of the boards is smooth and the animal is not scratched or splinters get into it. Line the bottom with a blanket or other fabric. You can decorate such a booth with paintings, appliqués and other decorative elements.
T-shirt tent
You will have to tinker with this model a little longer. To create it you will need:
- oversized T-shirt;
- wire hangers;
- hard cardboard;
- adhesive tape;
- wire cutters;
- awl;
- sewing supplies.
- Step 1. Use wire cutters to remove the hooks from the hangers.
- Step 2. Straighten the remaining wire - these will be the tent's arcs.
- Step 3. Take a large piece of cardboard that matches the width of the arcs and make holes in the corners.
- Step 4. Connect the arcs crosswise with tape and insert their ends into the holes on the cardboard, bend the ends of the arcs so that they do not jump out. For reliability and safety, also seal them with tape.
- Step 5. All that remains is to pull the T-shirt onto the resulting base so that the hole for the head is on the side, since this will become the entrance to the house.
- Step 6: Carefully sew up the bottom of the T-shirt.
House made of cardboard circles
To create it you will need:
- pressed corrugated cardboard;
- stationery knife;
- compass;
- glue;
- pencil.
- Step 1. Cut out eight cardboard circles with a circumference ranging from 21.5 cm to 18 cm - each half a centimeter apart. After this, divide each round blank into several more circles with a wall width of 4 centimeters - draw them with a compass and cut them out with a stationery knife.
- Step 2. Next you need to make blanks for the house: six circles 21 cm wide. You don’t need to touch the first one, but from the rest cut out “rings” with a diameter of 21 cm and a width of 4 cm.
- Step 3. Place the rings on a round cardboard base. Laying out the parts as the size decreases, you will get something like a cone.
- Step 4. Mark the location of the entrance with a pencil - you will have to make strokes on all the circles.
- Step 5. Once the entrance is cut out, start gluing the parts together. It is important not to confuse their location.
Wooden house with play complex
This is a more complex model that consists of many parts. Large animals need solid structures on which they can climb up and then jump down, while feeling comfortable without fear of falling. When making the upper shelves, keep in mind that cats do not really like it when their tails hang down: this makes them vulnerable to the enemy. That is why the shelves are made quite large.
Drawing of a typical structure with shelves and scratching posts.
- Step 1. Cut out the parts of the house according to the dimensions indicated on the diagram. Don't forget to make an entrance and windows, as cats usually prefer several openings in the house. Cover the inner sides with satin and foam rubber about 2 cm. The upholstery should cover the entire surface of the parts, with the exception of the area a couple of centimeters from the edge, so that it fits nicely with the upholstery.
- Step 2: Pin the base together. The parts are connected using nails. On the outside, they are also covered with textiles, but without a foam backing. In this case, the fabric grabs the ends and overlaps on the inside by 2.5 cm with a hem. The glue needs to be applied to the wooden surface, and then, when it has been on the surface for a little while, you can apply the cloth.
- Step 3. The posts should be about 10–15 cm in diameter, the winding is done before the adjacent part is covered with fabric, so you will then have to cut a round hole in a piece of material. You can leave the base without pasting. When winding a pole, first make several turns at the base, and then move on. The rope is pulled tight and placed on glue. The loose rope is knocked down with a hammer. At the end of the winding, 5 turns are also made in place.
If you estimate the required length in advance by making a test winding, then you can make fires at the ends - then the rope will probably not start to crumble.
Design with scratching post
To make the house multifunctional, you can equip it with a place for grinding claws. To do this, create a one-story or two-story cardboard frame, according to the instructions given above. Then it is covered with carpet, which perfectly copes with the task assigned to it.
To begin with, the side surfaces and top are tightened with one cut, which is selected in accordance with the size of the box. For the front wall on which the entrance is located, a separate solid piece is cut out.
To ensure that the finish adheres tightly to the surface, it is attached using a stapler or hot glue gun. It is better to use the second method to improve the aesthetic qualities of the house and protect the animal from injury from iron staples.
When the skin is completely glued, it is given time to dry. Then they cut a hole for the entrance, leaving a few centimeters to bend the edges of the carpet inward. The finished product is left for several days to dry completely.
Cardboard house with several floors
For variety, you can please your pet with a two- or three-story home. To do this, take cardboard boxes of different or the same sizes. Glue them together using PVA or double-sided tape.
The entrance to the second floor can be made on one side, as well as in one of the corners of the bottom. This way the cat can jump up from the first floor. You will get a tunnel element. But in this case it is necessary to select boxes of the same size.
The outer walls of the cardboard house are left without decoration or covered with thick fabric. This way it will last longer.
Dimensions of a cat house with your own hands - inserted for admission by the system
Do-it-yourself houses have one advantage over ready-made structures purchased at a pet store. There is a danger that your pet will not be delighted with the new home and will simply refuse to sleep in it.
Decorative finishing
Now that the entire structure is fastened together, you can start decorating. The boxes are different colors so I will have to drape them. First, I will cover them with thin white cardboard.
You can also use watercolor or acrylic paint to prime the surface - any light color will do for this, you don’t have to use white.
I carefully glue the sheets. If there are protruding edges of the paper, I quietly trim them to the desired length.
Next step: I drape it with burlap. I measured the box with a tape measure and wrote down all the measurements on a piece of paper. As the saying goes: measure twice, cut once (see diagram above).
I will sheathe only on two sides, since these are the front sides, they will be visible. You don't have to worry about the rest.
I mark everything on the fabric and make cutouts from burlap. I put them on the product and pierce the cardboard with an awl (or screwdriver) in advance to make it easier to thread the needle. I do preliminary fittings on site.
I did not drape or seal the box with the window, since it matches the color well.
Advice: if the needle has a sharp end, be careful with your fingers. As with the awl, use a block of wood or a book with a thick cover. Take your time. It’s better to do everything thoughtfully, avoiding mini-injuries and mistakes.