Methods of external design of a mine water well
The shaft well is made:
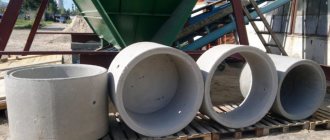
- Made from concrete rings.
- Plastic rings.
- Ready-made polymer structures.
Note. Basically, wells made of concrete rings are subject to finishing. This material can be installed both inside the structure and outside (one ring is placed on the ground surface for more convenient arrangement of the structure).
How to design a well from concrete rings?
At the moment, there are several design options for such a well:
- Use of ready-made houses.
- Building houses yourself.
- Application of a roof or cover to a structure.
- Ready-made houses, which are installed on the upper base of the well and securely fixed to it, are made of various materials and can have different sizes.
Note. Such structures can only be placed on a level base and if there is no reinforced concrete ring on the ground surface.
- You can build such a house on the basis of an installed reinforced concrete ring and finish it, or completely rebuild the house.
- Some people use decorative roofs or covers for wells on finished reinforced concrete rings.
All these methods are quite diverse in application and choice of materials.
How to build a roof for a well yourself
As an example, we will talk about the independent construction of a square house from sawn timber 10x10 cm, with a lid and a decorative roof made of corrugated board. This house is installed on a well, the walls of which are made of KS 7–9 rings, with a collar, rope and bucket. The outer diameter of these rings is 84 centimeters, the elevation of the last ring above the ground is 40 cm.
What is an artesian well and why is it best to do it. An artesian well is a well where water flows naturally, without the help of mechanical means such as submersible pumps. These wells draw water from the artesian pit. This flap consists of a deep layer of water in which the flow of water occurs due to the pressure exerted by two waterproof layers that limit the flap itself.
Water, as a rule, rises alone, reaching the so-called piezometric line, that is, where the water pressure is nothing. Artesian wells then puncture the top of the pit to cause the water level to rise to the static level of the flap itself.
To build a well we will need the following materials:
- knob;
- rope or chain;
- sawn timber 100x100 mm;
- board 25 and 50 mm thick and 100–125 mm wide;
- wooden dowels;
- loops;
- foam scrap;
- screws and nails of different sizes;
- insulation (jute, flax, linen or felt);
- cement;
- sand;
- crushed stone;
- fittings
At this moment, the water will begin to float in the ground. The rise of water is caused by pressure in the ground: the higher the water capacity, the water will rise to the surface. An artesian well is typically deep and small in diameter and is produced using drills mounted on trucks or crawler tracks. The depth of an artesian well can reach up to 100 meters due to the depth of the artesian aquifer. The water that flows over the surface is often drunk. A key feature of an artesian well is the selection of spots on the barrier that should be sealed and those that should be free.
To work you need the following tools:
- chainsaw;
- jigsaw;
- drill with hammer drill mode;
- screwdriver;
- manual rammer;
- wood hacksaw;
- axe;
- chisel;
- hammer;
- shovel;
- roulette;
- pencil;
- square;
- caulk.
Basic styles in the design of wells
People who travel a lot have probably noticed that every part of the world, if not every country, has its own architecture, its own concepts of beauty and harmony. This also applies to such small forms as wells. Let's “travel” too.
Russian village style
Everyone has probably seen a Russian well: it is a wooden frame with a swing and a canopy or with a so-called “crane”.
- The log house is most often made of logs, quadrangular, with the corners tied together without a remainder or with a remainder (see Wooden wells: rules for performing the work).
Square frame of an active well
- If you want to give the well more expressiveness, you can cut it into five, six or eight corners using a rounded log or timber - this way it looks more neat and decorative.
Hexagonal timber frame
- Such a log house can also be placed around a concrete ring, and the space between it and the wooden “caftan” can be filled with small pebbles or expanded clay. Or you can make an imitation by sheathing the frame around the perimeter with a blockhouse or clapboard.
Imitation of timber
This is the basis for designing a well in the Russian style. It will also be made decorative by such expressive ethnic elements as carved pillars supporting the roof, an openwork cornice, a roof made of shingles or straw, a cart wheel instead of a lifting drum handle, a wooden tub instead of a bucket.
In contrast, the combination of rough logs and an openwork roof looks very unusual
But such decor can be very expensive, like any handmade work, and besides, you still have to manage to find a craftsman. If you want to do everything yourself, you can get by with an imitation of a log house, cover the roof with modern materials (corrugated sheeting, polycarbonate, metal or soft tiles), and decorate the overhangs with planks with a pattern cut out with a jigsaw.
Advice. In order for the well to be combined with other buildings, it is best to make the roof from the same material and the same color as their roof.
Alpine style
Today it is very fashionable to decorate your homes and estates in the style of an Alpine chalet. If we are talking about the design of a well, then it is made without any racks supporting the canopy at all: a roof closed on all sides (see Roof for a well: manufacturing options) with a door in the slope is installed directly on the head.
Chalet style well
For reference. This design is explained by the mountainous operating conditions of the source. A stone rolling down a mountain, a fallen tree or an avalanche can damage high racks, so they are simply not made.
For decorative finishing, the lower concrete part of the well is most often lined with natural stone. Or, again, they use imitation: they cover the ring with facade plaster and “paint” stones on it, pushing the fresh solution with a finger or a stick. After drying, the “seams” can be highlighted by painting them with paint.
Such a well looks advantageous in composition with a rocky alpine hill
East well
It is also a very popular trend in the design of not only interiors, but also exteriors - that is, the facades of houses and areas adjacent to it. Perhaps residents of the middle zone are attracted to the exotic. Be that as it may, different options for finishing wells are possible, since “oriental” style is a very general name.
So:
- Dastarkhan in the shade of trees next to a simple stone or brick well without any decorations or unnecessary structures - and you find yourself in Central Asia. Of course, using only a rope with a bucket is very inconvenient and difficult, so this design style will be appropriate in two cases: if the well is equipped with a pump with a hidden water supply system, or if it is decorative.
The most budget-friendly decor option is simple masonry from old bricks
- The most expressive element of a Japanese well is a large, graceful roof with characteristic curves on massive square-section supports. While the head itself does not need decorations. It can be either stone or wood, but not draw attention to itself. The best addition to it is a rock garden. But you can get by with a blind area made of large pebbles.
Japanese style well design
- Chinese architecture is very similar to Japanese . But the presence of all kinds of dragons - drawn or carved from wood - even among amateurs leaves no doubt about their identity.
And of course the dragon must be black
Well in medieval and maritime style
A building made in a medieval style can be decorated with natural stone, laid out with cobblestones, or granite slabs placed around it.
Medieval style decoration
So:
- The roof can be made in the form of an iron dome. The minimalism of the structure will make it completely modern, and forged pillars with thermoplastic on the roof will complement the modern flavor. There’s no need to come up with anything special; it’s important that everything looks beautiful and harmonious on your garden plot.
- It can also be made in a simple marine style. To do this, you just need to wrap a thick rope around the well posts. And replace the standard bucket with a beer barrel. Also, the handle of the rotator can be designed in the form of a steering wheel. An excellent addition to the color will be an anchor, sea shells, and stones.
- A variety of planted green spaces, alternating with paved stones, a small stream, and an illuminated path can create a calming effect and will have a beneficial effect on a relaxing evening rest.
Canopy for a well with a lid - an open house
Structurally, the device is simple: there are two racks located one opposite the other. They serve as a support for the canopy, and also a gate is attached to them - a device for lifting buckets of water. For a drawing of an open house with dimensions, see the photo below.
Drawing of a well canopy with a lid and a collar
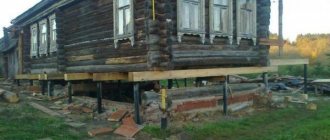
Please note that the posts can be dug in after the well ring has been finished. Depending on this, the order of work changes, but the design remains the same in any case.
The posts supporting the canopy can be located inside the lining of the well ring or outside
How to make a canopy
First, the canopy is assembled. Make two side triangles according to the required dimensions. The drawing above shows only the approximate spread of the two extreme points. If necessary, it can be made more. The length of the canopy depends on where the posts will be placed - close to the well ring or behind the casing. The approximate dimensions of the canopy with a ring diameter of 100 cm are shown in the photo below.
Dimensions of a well canopy for a diameter of 100 cm
The structure can be assembled from a galvanized profile, a metal profile pipe or a wooden beam. To prevent the profile from bending, it is reinforced at the door fastening points - you can put a wooden block or a metal corner inside.
To ensure that rain does not get inside, the expansion must be made much larger than the size of the ring - at least 20 cm on each side.
The roof over the well should be much larger than its diameter
If the racks will be attached directly to the concrete ring, the order of work is slightly different. First, a frame is assembled that covers the ring. In the photo it is made from a 30 mm thick board. The racks are also made of the same board, the place of attachment to the concrete is reinforced with overlays. They also play a decorative role.
If the canopy turns out to be heavy, it is advisable to use timber of greater thickness, otherwise it will not withstand the load.
Frame for well head
Afterwards, the previously assembled roof is attached to the racks. You can make triangles right on the spot, but it’s more convenient to prepare them in advance, assemble the rafter system, and place them ready-made on racks.
Assembled but not finished
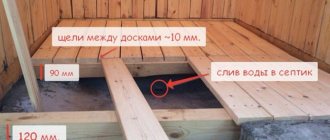
Next is finishing. Sew up with boards, clapboard, roofing material. Just keep in mind that if you use raw boards, they will dry out after some time and gaps up to 5 mm thick will form between them. There is no question of any hygiene then: rain and dust will fall in... Using a dry board is also not very good - in wet weather it will swell, the flooring will “go in waves.” In general, if you want to have clean water, build a house with doors - closed. There are more chances to protect moisture from contamination.
Do-it-yourself roof for a well: drawings and dimensions
Houses
Ready-made houses represent a simple design of wells.
They are manufactured:
- Made of wood.
- Metal (light alloy or thin sheet metal).
- Plastic, corrugated sheeting or siding based on a wooden (metal) frame.
The following is used as a roof:
- Ruberoid.
- Profiled sheeting.
- Tree.
- Metal tiles.
- Polycarbonate and so on.
Note. Since ready-made houses can be of different sizes and have different prices, choosing the best option for decorating a well is not at all difficult.
Photo of the house
Decorating a well with your own hands, namely building a house, is also not particularly difficult.
There are two options for making the structure:
- Based on a reinforced concrete ring.
- Constructing the walls of the structure yourself.
Note. In order to make a house from an installed concrete ring, it is enough to complete its external design and use a decorative roof or lid.
Building a well house with homemade walls is not that difficult.
Used for this:
- Brick (construction or facing).
Advice. The choice of the type of brick depends on the weight of the roof or cover structure and what additional elements will be located. Building bricks can support a lot of weight.
- Foam blocks.
- Aerated concrete.
- Wooden boards.
- Rounded or profiled timber.
Note. For the external arrangement of a water supply shaft, some use metal barrels without a bottom, which are installed on reinforced concrete rings and secured to them using brackets and fasteners.
It’s worth considering that additional finishing, like concrete rings, requires:
- Construction brick.
- Foam concrete.
- Aerated concrete.
In this case, roofs or covers for houses can be made from any modern material that is used as roofing. Bituminous shingles are used quite often.
Materials for external decoration of house walls
A reinforced concrete well can be designed using:
- Stone (decorative or natural).
- Plastic or siding.
- Corrugated sheeting.
- Porcelain tiles or simple ceramic mosaics and so on.
- Finishing structures with stone has been used for a long time. Decorative and artificial stones are mounted in the same way.
- Siding or plastic are also similar in their attachment to the surface and have similar technical characteristics.
- Corrugated sheets and any other sheets of metal are mounted only on a special frame.
- Ceramic tiles and porcelain tiles, which is one of its types, are also well suited for exterior decoration.
Advice. To design the structure of a house or a simple reinforced concrete ring from the outside, you should give preference to practical and only moisture-resistant materials. This is due to the fact that outside there are different weather and climatic conditions and a large number of types of finishes under various influences and high air humidity change their structure and begin to deform.
Also, when choosing a material, it is worth taking into account the design of the roof so that its design matches the style of the well.
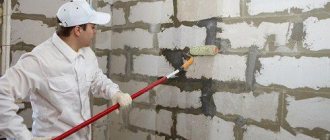
Stone finishing of the walls of the house
Stone lining (see How to line a well with stone: doing it right) structures of this type look quite interesting on a suburban area.
Finishing a well with stone
So:
- Both natural and artificial stone are used for such work.
- They are similar in their properties, but differ in mass.
- Also, the price for each type of such material is different.
- Natural stone is considered the heaviest and in some cases its installation will require surface reinforcement.
Properties of stone finishing:
- Practicality and durability.
- Durability and reliability.
- Moisture resistance and inability to perceive external influences of climatic and weather phenomena.
- Does not burn or char from high temperatures.
The only drawback is that this type of finishing is quite cold and the source can freeze in severe frost.
Advice. In this case, it is worth insulating the structure from the outside and building an airtight lid.
If decorative stone is mounted on a surface, then natural stone can be laid out, shaping the size and shape of the structure.
To install the stone you will need:
- An adhesive mortar that is intended for exterior finishing or a concrete mortar with special additives.
- A level or rule that will allow for smooth installation of each finishing element.
- A grinder for cutting artificial stone and a chisel with a hammer for giving the desired size to natural agglomerate.
Note. Natural stone has a denser structure and it is impossible to cut it with a tile cutter.
- Spatula for applying adhesive solutions to the surface.
- Primer for priming the surface before installation.
- Plumb lines for a smooth finishing surface.
- Tape measure to accurately measure the required size.
Advice. If the shape of the structure is square, then finishing is done from each corner of the structure. If it is flat, then problems may arise with fixing the material to the surface. In this case, it is best to give preference to small stones that lie freely.
Plastic or siding. Its installation methods on the outer walls of the well
These materials are also considered a common finish for the outside of a well. Making a mine well with your own hands is done with their help quite quickly and simply.
Decorating a well house with plastic
Let's take a closer look:
- Siding or plastic is produced in sheets or in the form of strips.
- On their surface they may have various imitations of other finishing materials.
- The surface itself can be smooth, structured, rough, matte, glossy, and so on.
- The materials have gained great popularity due to their efficiency and practicality.
- They do not allow air and moisture to pass through.
- They do not burn and do not absorb dirt.
- They can be cleaned with a simple rag.
Worth considering:
- Installation of siding or plastic is carried out only on the frame.
- It can be made of wood or metal.
- You can also mount sheets of material on the surface using an adhesive solution. But, it all depends on the quality of the surface.
To work with the tool you will need:
- Hammer and drill.
- Building level.
- A jigsaw for cutting wooden frame strips. You can use a saw.
- Self-tapping screws and dowels.
- Construction stapler.
Materials you will need:
- Strips or panels of material.
- Starting guides for mounting panels or lining.
- Sealant for making material joints airtight.
- External corners are made of plastic or siding, if the structure is rectangular.
Watching the video in this article will make it possible to install such materials on a well without much difficulty.
Porcelain stoneware or ceramic tiles for finishing a well
Ceramics have been used in exterior decoration for many years. Its main subtype is porcelain stoneware. They have similar properties, only the strength of the latter is several times higher.
Installing the material yourself, for this you will need:
- Make a smooth surface for the outer walls of the well.
- Prepare them and clean them.
- Prime the surface.
From the tools:
- Building level or plumb line.
- Roulette.
- Putty knife.
- Ceramic glue or simple concrete mortar.
The final stage will be the use of decorative putty, which allows you to disguise the masonry seams. At the moment there is a large assortment of such products.
Advice. If the well house is based on a reinforced concrete ring, which has a round shape, then it is better to use ceramic mosaic.
The surface of the material can be:
- Smooth or structured.
- Glazed or matte.
- Rough or antique and so on.
Choosing the best design option with tiles will not be difficult. Many people, when asked how to beautifully decorate a well without spending a lot of time and money, answer that they cannot find better ceramic or porcelain tiles. These materials create a unique design for any design.
Step-by-step instructions for making a well house
The frame must have the correct geometric shape, since displacements and distortions in the future will negatively affect the integrity of the structure. The joints of wooden frame elements can be additionally reinforced with metal corners. Self-tapping screws with a rare thread pitch with a diameter of 3.0 to 4.0 mm and a length of 20 to 30 mm are suitable for this.
When the structure is installed on the well ring, you can begin making the gate
. This device is necessary for raising and lowering the bucket.
The larger the diameter of the gate, the easier it is to screw a chain with a bucket of water onto it.
Well gate
- A round log 90 cm long and 20 cm or more in diameter. The length of the gate should be 4–5 cm less than the distance between the vertical posts
. This makes it possible not to touch the post with the edge of the gate.
The dimensions of the metal elements must exactly fit the gate openings
- It must first be cleared of bark, leveled with a plane and sanded.
- To maintain a cylindrical shape, wrap the edges of the log with wire or tighten it with a metal clamp.
- At the ends of the log, in the center, drill holes with a diameter of 2 cm and a depth of 5 cm.
Before making the gate, the log must be dry and without cracks
- Attach metal washers with similar holes on top. This is necessary to prevent destruction and cracking of wood during operation.
- Drill the same holes at the same height in the vertical posts. Then insert metal bushings there.
- Drive metal rods into the finished holes of the log: on the left - 20 cm, on the right - the L-shaped handle of the gate.
Metal parts for manual gate
- Hang the gate with metal parts on vertical posts.
- Attach a chain to the collar and hang a water container from it.
DIY house door
- Attach 3 bars (intended for the door frame) with a section of 50x50 mm to one side of the frame;
The beams are attached to the rafters and the base of the entire structure
- In accordance with the dimensions of the frame, assemble the door from identical boards. The fitted boards are fastened with bars at the top, bottom and diagonally;
It is better to do this on a flat surface of the ground. The size of the door must be selected smaller than the internal dimensions of its frame. In this case, the door will not touch the wooden base.
- Attach metal hinges to the door;
- Then install the door on the frame and secure the hinges with screws or nails;
Door hinges secured with nails
- Attach the handle and latch to the outside of the door;
- Check the door. It should not get caught when opening and closing
.
Installation of roofing material
The last step in building a well house will be installing a waterproofing layer on the roof. This will preserve the wood and extend the life of the structure. As protection against water, roofing felt or, as in our case, soft tiles are used.
Do not install slate or heavy tiles on top of the waterproofing. From such a weight, after a few years the structure may warp and collapse.
Andrey Sokolov
Hello. My name is Andrew. I am 38 years old. By education he is a lawyer. Five years ago I took up copyrighting. The process of writing articles fascinates me, as a result of which I prepare unique, meaningful and interesting material. Cooperation with this site allowed us to gain additional positive experience and the opportunity to provide high-quality information on the proposed topics.
Decorative wells
If you have a well on your property or your house is connected to a centralized water supply, this does not mean that you should abandon the well as an element of landscape design. Quite the opposite: you will have even more possibilities for its design, since you are not limited by its location, size, shape, safety, etc.
A decorative well can be either miniature or life-size. Round and square. In general, anyone. After all, it is not needed for water extraction, but only for decoration.
If you don’t want to do or invent something, buy a ready-made garden composition
All the styles and design methods described above are applicable to these small architectural forms, plus you can decorate it with flowers, climbing plants, stones, and garden figurines. Or a stork's nest. Without wasting further words, we invite you to look at examples.
Wooden barrel flower well
Decorative well made of river pebbles and driftwood
It couldn’t be simpler: car tires, birch logs and a plastic bottle
You can joke if you want
Flower beds around the well
The structure looks very beautiful surrounded by densely planted bright and colorful flowers. This is a difficult task that requires a lot of work, but the effect is obvious.
Decorating a well with flower beds
So:
- The roof of the well, its base, as well as the entire surrounding space can become a flower garden. Although flowers in pots can be hung, placed around or beautifully placed on its walls. It is better to plant flowers of those varieties that bloom all the time, or that alternate flowering - when some flowers have already faded, others bloom to replace them.
- To ensure the integrity of the image of the entire composition, sand, gravel, pebbles or natural stones are added to the soil surface. The result is an unusual platform with several levels or an area that looks like an alpine slide.