Added by: Oksana May 18
Under one name “sculpture” hides all the most unimaginable things, but first of all, these are objects of art that are usually used exclusively for decorative purposes. If they want to immortalize some outstanding person or leave a mark on history regarding a significant event, they must install monuments or complexes of several sculptures. They decorate parks and gardens, and are also installed as decorative elements on building facades .
All sculptures are divided into round and relief. The first type includes busts and statues, which can be carefully examined if you take a full all-round view. The second type is characterized by a special technique of application on a plane (high relief and bas-relief). Before you decide to buy natural travertine, decide what kind of sculpture you want. You must know in advance what environment it will be in after installation.
What will be required for production?
In order to decorate your local area, garden or landscape design with concrete sculptures, no special education, special equipment or special skills are required. What you will need is desire, spatial thinking, ability to work with concrete and a sense of beauty. Ability to operate a welding machine may be required.
Depending on the sculpture technology adopted, the following materials and tools will be required:
- Container for mixing mortar or concrete mixer;
- Entrenching tools: shovels, spatula, trowel;
- Steel or aluminum wire;
- Pliers and wire cutters;
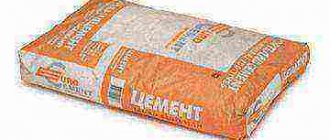
- Portland cement M400 (white or gray), sand, water, plasticizer for concrete (for example, Fairy detergent or PVA glue);
- Polyethylene film;
- Plastic construction mesh;
- Paint and primer for external work “on concrete”;
- Molds for pouring (an option for making sculptures by pouring into molds).
Selection of concrete brand, depending on the cement brand, composition of the sculptural mixture, calculation of components
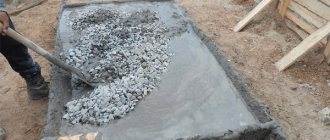
To prepare concrete, measure 1 weight part of cement, 3 parts of sand. Add enough water so that the mixture resembles thick sour cream. You can use any drinking or industrial water. Water from a reservoir with various impurities or wastewater with oily or acidic compounds are not suitable for solution.
As a measure of the components of the mixture, it is convenient to use a 10 liter bucket, which contains:
- Cement – 13 – 15 kg,
- Sand – 14 kg,
- Crushed stone – 15 – 18 kg.
Tip #1. Note! Typically, crushed stone is used for large or monolithic forms.
Options and technologies
Before you start mixing the material, you should decide on the type of technology for making the sculpture. It depends on the shape and size of the product. Simple sculptures such as: mushrooms, koloboks, figures in the form of spheres or hemispheres can be made using the technology of pouring into molds, complex “realistic” sculptures in the form of animals, flowers, trees, birds, caricatures of people and other similar products are made using a more complex - frame technology. Relatively small figures can be sculpted from concrete by hand, similar to plasticine.
Frame technology
This is one of the most complex technologies, which involves making the frame of a future sculpture from steel or aluminum wire. There are no standard recipes here, except for recommendations to use any suitable unnecessary things as a basis: boxes, wood, rags, etc.
The frame can be made from aluminum wire by knitting, from steel wire by welding, or by a combined method - welding the base of the sculpture and knitting its individual elements.
If the sculpture is planned as hollow (the preferred option), the frame is very carefully and carefully covered with a construction mesh. When manufacturing a hollow figure, not only are expensive concrete components saved, but there is also no need to order lifting devices to move it and install it in a permanent place.
The solution is applied to the frame in layers using a spatula and a trowel. Each new layer is applied after the previous layer begins to set. After the last layer has been applied and the concrete has set, but has not yet dried, defects in the sculpture (sagging, drips, burrs, etc.) should be corrected. This can be done with a spatula, knife or coarse sandpaper.
Technology of pouring into ready-made molds
The technology involves the purchase or production of special forms, similar to construction formwork. For example, to fill the mushroom cap, you can use a bowl, basin or half of a ball lined with plastic film, and for the stem, you can use a plastic bottle, which, after the concrete has set, is cut and removed.
When making the mold, you should ensure that there are no large gaps through which the solution could leak out. Also, in order to save concrete, you can put a plastic bottle inside the mold, or fill the space with unnecessary rags.
Technology for preparing concrete mortar for pouring sculpture
- The sand is sifted and mixed with cement in a ratio of 3:1. When choosing between white and gray Portland cement, you should keep in mind that paints applied to white cement will look brighter, richer and more natural. At the same time, white cement is much more expensive than the usual “gray” binder;
- Pure water and a plasticizer are added in small portions to the resulting homogeneous mixture in the proportion of 200 ml of liquid per bag of cement weighing 50 kg. Mix until smooth. Controlling the consistency of “thick sour cream”. If the concrete is too thick, add water and mix again.
After obtaining the consistency of thick sour cream, the solution is ready to be applied to the frame or shell mold.
Plaster sculptures - luxurious surroundings for the garden
A significant part of decorative compositions are made from gypsum. This is an inexpensive and very malleable material. Despite the fragility of the base, with proper care, garden sculptures made of gypsum will last a long time. They are installed under branchy bushes or near gazebos and terraces, and used in compositions as an addition to the central element.
Inflating stages
After the sculpture has been made and corrected, it is covered with plastic wrap and left for 10-12 days in a cool, dry place. Next, the film is removed, the sculpture is covered with primer for exterior use and painted with paints according to your taste, discretion and vision. Advice! To install a large, heavy solid sculpture, it is necessary to build a small foundation.
Having a summer cottage, you always want to arrange it, and in some special way. However, garden decorative elements are not cheap, and they are not durable.
People with a developed imagination can make original crafts for the garden from cement, which is not only highly resistant to various types of influence (frost, hail, sun, water), but also accessible (you can buy it at any hardware store for a reasonable price).
For decoration and design additions, you can use flower pots, flowerpots, figurines of fairy-tale characters or plant objects made with your own hands from cement. This material cannot be called capricious, and most people have a lot or little experience working with it. Still, there are several important rules that must be followed to ensure that crafts made from cement mortar are of high quality and durable.
The technology for preparing the mixture is as follows:
. The main components are prepared: cement, construction sand, water and tile adhesive (for better ductility and reducing the risk of microcracks). For 1 part of cement, take 2 parts of sand (for greater strength, you can take 1 part) and 1 part of glue. Lastly, add water in small portions to the consistency of thick sour cream. It is convenient to work with such a mixture: it does not flow and at the same time is quite plastic.
All cement products require prolonged drying. Hardening can last up to 7 days. To prevent the surface from cracking, the finished creation is covered with polyethylene. To give the product a beautiful and correct shape, the base is placed on a mound of sand or buried in it (depending on the idea), but not on a flat surface.
After complete hardening, the figure must be coated with a primer and only after that can paint or varnish be applied. If the craft has roughness and other irregularities, it should be refined with sandpaper and a file before priming.
In addition to cement mortar, concrete is sometimes used, which is characterized by the presence of large fractions (pebbles or crushed stone) and increased strength. Crafts made from concrete for a summer residence can be represented by large monolithic boulders, and this material is also convenient to use to create a base for various compositions (a platform for a fountain, a pedestal for a sculpture, a terrace for flower pots, etc.).
Another material similar in its application is gypsum. It is not as strong as cement, but more plastic and decorative. It can be used to create hollow shapes. For garden creativity, molding (sculptural), acrylic and architectural types are used. When working with this material, you need to take into account its rapid hardening. It is often recommended to add it to cement mortar when creating sculptures.
Having no experience in using cement for decorative purposes, it is better to start with something simple that does not require modeling skills and obtaining the desired consistency. The first exhibits in your garden can be cute mushrooms, colorful balls or original flower pots.
To make a mushroom you will need an old rubber ball (the size of the cap will depend on its size), a plastic bottle (it will become the basis for the stem, its size should be proportional to the cap), a metal rod to attach the cap to the stem. The ball is cut into two halves, one of which is placed in a bucket of sand and pressed evenly. Next, cement mortar is poured into the resulting form and leveled.
The bottom and neck of a plastic bottle are cut off and inserted into the filled form in the center, immersing it by 1 - 2 cm. Then, using a long iron rod, the future stem and cap of the mushroom are connected and the cavity inside the bottle is filled with the solution. The product should harden for several days, after which you need to remove the piece of the ball and the plastic cylinder.
After a few more days, the product can be coated with paint and decorated with various elements. Mushrooms of different sizes look impressive on the plot in the form of a small clearing. It is also worth noting that your imagination may tell you to use other containers (bowls, jars) and methods for making garden mushrooms.
It’s enough to just make an openwork ball that seems so light and airy. For the base, use a balloon (the size of the future shapes depends on how much you inflate the balloon). Next, any rope is placed in the prepared solution and then the ball is wrapped around it.
Do not wrap the base too tightly; you need to leave enough holes for further removal of pieces of the burst ball. When the product is dry, you can begin decorative coating.
If you cover the balloons with cement mortar with a small amount of gypsum added for faster hardening, you can get original garden lanterns or flower pots.
Using this technique you can also make vases for dried flowers. In this case, not only the outer side, but also the inner side is subjected to decorative painting.
If you pour the solution into a small hole in rubber balls, you can get monolithic balls of different sizes. Painted in different bright colors and randomly scattered around the garden, they will become a laconic and stylish decoration.
Using plastic containers, you can make a flower pot for Crassula and Crassula Ovata cacti. The container is wrapped in a plastic bag, and a bag of clay or sand is placed inside so that the container holds its shape. Next, it is covered with cement mortar. After complete drying, all auxiliary materials are removed, drainage holes are made in the bottom using a drill, the product is primed and painted.
It's very easy to make a flowerpot using a plastic bucket or vase and another suitable container.
One container is inserted into another, and the solution is poured into the space between them. The result is a high-quality product that can be further decorated by showing your imagination to the fullest.
Flowers planted in flowerpots made from crossed palms look attractive. To create such a masterpiece, use ordinary rubber gloves, which are evenly filled with the solution. For rigidity, you need to insert a thick wire rod into each finger. To ensure a high-quality product, air bubbles must not be allowed to form.
When the gloves are filled, they are given the desired shape and fixed. After a few days, the rubber is cut and removed. If you need to connect two palms, then use the same solution. At the final stage, the surface is polished with sandpaper, primed and painted.
The process of preparing the solution
The solution consists of three parts cement and one part sand. After mixing the dry materials, add water. Its volume should be 2 times less than the amount of cement. You need to add water gradually, in small portions, thoroughly mixing the cement.
To check the quality of the prepared solution , you need to take a small amount of it in your hand and squeeze it in your palm, and then make a small depression in the solution: if there is water in it, then you need to add more cement; if this lump begins to crumble, then more water should be added.
The method of using molds is one of the simplest and most accessible in the manufacture of cement figures. Even a person who has never done such work can master and perform it. With its help, you can create concrete figures such as a ladybug, turtle, mushroom or ball with your own hands. It is enough to add some details to the resulting blank and then paint it. The result of the work done will be a wonderful, hand-made concrete sculpture - a decoration for the garden or yard.
Complex figures with a frame
It’s more fun to decorate your country house with sculptures of animals and mythical characters. Such creations involve the preliminary production of a durable frame and layer-by-layer application of cement mortar.
Interesting flowerpots can be made using buckets from construction mixtures. At the first stage, a container of suitable size is wrapped with a plaster mesh and covered with a thick layer of cement. At the second stage, until complete hardening, decorative adjustments are made, making an imitation of an old stump with natural wrinkles on the bark.
A monolithic figure of a hippopotamus would look appropriate near artificial reservoirs. The place for it must be determined immediately and carefully aligned, since in the future the figure will be stationary.
Two elongated plastic basins, which must be fastened with wire, are suitable as a frame. Another option is also possible: a thick cement solution is covered on top of a pile of broken bricks or crushed stone.
The figure itself does not contain complex elements and is easy to perform. After hardening, the product is treated with fixing impregnation and dry pigment for concrete, rubbing the powder with a hard sponge.
More complex sculptures are made in several stages: 1) making a frame from wire and foam plastic or containers; 2) covering the workpiece with a plaster mesh; 3) applying the mixture in several layers; 4) formation of small details (facial features, special texture, folds of clothing, etc.); 5) priming and painting the finished work.
Flowerpots in the shape of swans will become an elegant decoration of the garden. The body frame is an old plastic basin, the neck is woven wire. The head, wings and imitation plumage will have to be made from a cement mixture, showing the skills of a sculptor.
Monolithic figures have a significant weight, so as an alternative there is a way to create lightweight large objects. You can decorate your garden with boulders of different sizes.
To make them, any unnecessary and lightweight material (cuts of polyurethane foam, plastic bottles, polystyrene foam) is tied into a tight lump with wire.
The resulting base is wrapped in a plaster mesh and covered with thick cement mortar. The more irregularities and protrusions there are, the more natural the “stone” will look.
Small garden figurines are made from a mixture of cement with the addition of gypsum or Portland cement.
Here you can use the manufacturing methods described above, as well as any basics: old toys, items of clothing, household utensils.
Natural stone: severity, nobility and power
Natural stone forms the basis for creating flowerpots and bowls for dwarf bushes or perennial flower crops. Columns, pedestals, geometric shapes and figures of living creatures are made of granite, marble and other rocks. Stone sculptures look dignified; with their help, the noble rigor of the exterior design is emphasized.
A fashionable trend in landscape design is the use of stone blocks of natural shapes as an independent composition. No less relevant are statues of noble animals, mythical creatures, and ancient amphorae.
Step-by-step manufacturing instructions: 3 master classes
To examine in more detail the nuances of the creativity presented in the article, we will consider the best master classes with a step-by-step explanation of the work being carried out.
1. Spectacular flowerpots made of cement and fabric
To make flowerpots for the garden from cement and fabric, use either pure cement or Portland cement. In this case, the mixture with water should be quite liquid. You will also need a bucket or other container for the frame, a piece of polyethylene and a piece of fabric.
The material must be dense enough and absorb liquids well, i.e. synthetics will not work here. It is better to use cotton fabric.
- Cut a piece of the desired size. If you need smooth edges, then round them;
- We wet the material generously in the solution;
- We attach polyethylene to the prepared bucket;
- Lay the fabric soaked in the solution on top and smooth it out;
- After 2 days, the cement will set and the bucket can be removed;
- The product is lightly moistened with water and left to dry completely for another 5 days.
Even large-sized plants can be planted in a ready-made flowerpot.
Experiment with the shape and coloring of flowerpots and create your own unique compositions.
2. Funny cat for the garden
First, we prepare a frame from a cut plastic bottle and wooden slats, which are fastened with wire.
The solution is prepared from cement and sand in a 1:1 ratio; additionally (directly into the hand) gypsum is added during the work. By gradually applying the solution, all the details of the sculpture are created.
The finished figure is polished with a damp hand and left to dry for 4 days. The final touch is painting with water-based emulsion or enamel.
3. Large leaf drinker for birds and pets
An equally successful and versatile garden decoration would be a sheet of cement. A plastic film is placed on a mound of sand, and then a large sheet (the mound will allow you to get a shape with a depression, rather than a flat one). If there are small holes in the sheet, they should be covered with small leaves so that the cement mortar does not leak.
Cover the workpiece with film for several days until it dries. Then the sheet is removed, primed and painted.
If desired, you can make a fabulous fountain from several similar blanks.
DIY garden crafts can bring you great pleasure. Choose the figure that best suits your character and the design of your garden. Let's try to make garden figurines from cement with our own hands. The process, surprisingly, is not as complicated as it seems. But the result is truly surprising!
See what beautiful flower containers you can make from cement mortar and an old rag. This is truly crafts made from scrap materials!
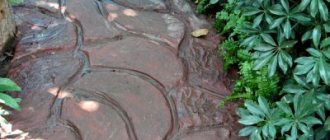
Photos of homemade garden figures and sculptures
These are stones made of concrete, but they are hollow inside. The base can be molded from clay and coated with several layers of concrete. When everything is dry, crumble the clay
To make the owl's plumage look real, sawdust was added to the solution.
The most interesting thing about these garden figurines made of concrete is that the clothes are real, they are simply soaked in concrete mortar, and after drying they are painted
Garden figurines made of wood are not necessarily carvings. There may also be some - from logs. Wonderful horse!
This is made from a concrete monolith using a knife
The cat is tall - more than 160 cm at the base of the pin. The head was made separately, then connected to the “body”
Turtles and mushrooms made of concrete - these are what novice sculptors most often make
Such sculptures require a form...
From the remains of concrete...
These are plaster figures for the garden, but they cannot be left for the winter.
Wooden sculpture for the garden and personal plot is a talent...
Concrete mushrooms - a plastic glass for the stem and a bowl for the cap. In the future hat, before the solution has hardened, dig a cylindrical hole so that the leg fits there. So the fungus will be very similar to the real one
>
Crafts for the garden. DIY garden gnomes made of cement.
These cute garden gnomes are also very easy to make.
For the gnome we need cement, a metal rod, stocking and rope. We pour the cement solution into the stocking, and insert metal reinforcement into it for strength. By twisting the rope, we form noses and legs. Let's not forget about the beard - this is an additional piece of material under the gnome's nose. Hang the gnome by the top of the cap and leave to dry.
When the cement has dried, remove the gnome and polish the top with a more liquid solution of cement and gypsum. We are waiting for the gnome to dry and we can tint or paint it. Pretty guys, aren't they?
Original do-it-yourself flower beds.
Are you not a sculptor at all? But believe me, you can make these creative flower containers.
We need a plastic container, foam plastic, reinforcing mesh. We make a cement solution by adding a spoonful of gypsum directly into the palm with the solution and thus form our “sculpture”
But not all of us are fans of modern abstract art. But you can easily make garden crafts in a classic style.
But, because You are not a sculptor yet, you need a template - it could very well be an old doll.
Because If this is not just a decorative garden figurine, but a flower bed in the shape of a girl’s head, then the top part needs to be cut off.
Then the head is painted. To add texture, the template is first painted with dark gray paint. Allow to dry and apply a layer of lighter paint. After drying, apply a layer of even lighter paint with light strokes.
This is a very simple process, and all the examples of this style that you see in the article were made by teenagers in a craft class.
Beautiful crafts for the garden. DIY garden figurines.
For those who liked the process of making concrete crafts, we will also tell you a simply stunning technique for creating garden figurines.
Yes, we will need the old doll again!
First, we strengthen the doll using hot glue and a bamboo sushi stick on a heavy stand. By the way, we can also make it from cement. We cut out angel wings from foam plastic and attach them to the doll with hot glue. Let's give the doll a new dress and, with the help of strokes of hot glue, create a more interesting texture on the wings and hair.
We coat our template with a solution of cement and gypsum. Let's paint.
Now, with the help of old toys, you can make almost any garden figurine yourself.
Cat flower bed.
This cute flowerbed cat is made from a plastic bottle and cement. We will need: cement, sand, plaster, water, large plastic bottle, wire, paint, wooden slats, varnish. The owner of this cat, Natasha Koneva, will tell us how to make such a funny figurine with her own hands. We cut off a plastic bottle - this container will be our flower garden. To prevent the cement from slipping off the plastic, we tightly wrap it with wire. We knock down a wooden frame from slats. We attach our plastic container to it. Mix the cement mortar with the consistency of thick sour cream at the rate of 1 part sand, 1 part cement. We will add gypsum only to the finished portion that we have in our hand, because... the solution with gypsum hardens instantly. We work in rubber gloves. Take a handful of solution in your hand and add a tablespoon of gypsum to it. Knead it in your hands, roll it into a sausage and attach it to the frame. So, step by step, we apply portions of the solution on top of each other, creating the necessary bulges and smoothing the surface. We sculpt our cat’s face from small balls of solution in much the same way as we sculpted from plasticine in childhood. In order for small parts to hold better, before attaching them to the body, lubricate the surface of the figure with water. With a damp hand we polish the surface of our garden figurine. To dry, cover the figurine with cellophane for 3-4 days. On the first day, the figure must be periodically additionally moistened with water. After drying, sand the surface with sandpaper. You can paint such a figurine with water-based paint, enamel, or car paints. After painting, coat the surface with varnish. For the winter, the garden figurine must be removed from the street, because... It may crack due to frost. You might also want to get yourself such a wonderful cat. The great thing about cement figurines is that they are cheap to make compared to metal or wood garden figurines. You can start with simple garden crafts, which can be no less interesting than some particularly complex ones. You can combine cement with other materials. — for the face of this little garden fairy “Ladybug” we took the head of an old doll.
Concrete fungus
Another fun idea for decorating your garden is a fungus made from concrete. In this case, the cement mixture should be like plasticine so that a future “craft” can be easily formed from it.
You can make mushroom figurines from cement
To obtain such a fly agaric:
- Make a small depression in the sand using a bowl to create a mold for the future mushroom cap.
- Place any leaf on the bottom of the resulting hole to make the cap rough.
- Place a piece of pipe or a tin can without a bottom in the center to strengthen the structure.
- Form a “leg” from a rolled piece of roofing felt or linoleum and fill this form with cement.
- Wait until both components of the garden concrete mushroom figure harden.
- Fill the top of the leg with a sand-cement mixture and attach to it the cap from which the pipe sticks out.
- Wait 3-4 days and give the sculpture any color.
You can paint the finished figurine after it has dried or during the preparation of the concrete solution
How to effectively use garden crafts.
Plan in advance where to place the figures in the garden.
This will make it easier for you to determine the exact size and color of the garden figurine.
Decide what style your garden will be.
No matter how beautiful your garden crafts are, they should be in the same style.
Don't overload your garden with crafts.
A few simple but funny garden figurines in advantageous places in the garden will make a greater impression than an ill-conceived mass of the most wonderful and interesting garden crafts.
Coordinate the size of the figurine and the garden.
Large open spaces require larger figures. And small garden figurines can be interestingly placed near tree trunks, near a small pond or fountain, along garden paths.
DIY garden crafts will add more interesting details to the overall look of your garden.
Concrete is a universal material. It is widely used in many fields: construction, architecture, landscape design and other industries. Now we will talk about creating sculptures from concrete.
Concrete sculptures are in many ways superior to figures made from other materials. Compared to stone, liquid sculptural concrete is more elastic and easy to work with. Any shapes of different sizes are created from it.
Such a sculpture will not be destroyed by any rain, wind, or other “surprises” of the weather. Concrete works of art withstand frost and sun, so they can decorate your garden all year round, requiring only a rare update of the appearance.
Concrete sculptures take several days to dry under normal weather conditions. This relatively long drying period allows you to refine the material: correct unevenness, change something, add relief, remove excess solution.
Another advantage of monolithic concrete figures is that it is difficult to go far with such a sculpture, because even small works made of concrete are quite heavy. Therefore, you can remain calm about the fact that someone will try to steal your “beauty”.
Category: “Questions and answers”
Question No. 1. What to add to concrete for strength?
Modern additives to concrete are fiber fillers. They bind the material, reduce fragility, that is, the concrete does not crumble or crack. The following fiber additives are used most often in construction:
- Polypropylene,
- Basalt,
- Fiberglass.
- Fiber fiber.
Their volume is 2–5% of the total composition.
Question No. 2. Where is it better to place concrete garden figures on the site?
The choice of location depends on the design intent. It is important that the sculpture decorates the garden and does not look like an inappropriate object. The figure must correspond to the stylistic image and meet the rules of composition.
- Dimensions are determined by the size of the space in which it is located. A correctly selected form does not get lost, like a pea on a huge dish, and does not look like a huge pile in a small area. The optimal distance from the object to the viewer is 2 – 3 heights.
- The appearance is consistent with the surrounding landscape and does not contradict the overall composition.
- If the form serves as a garden vase or a stand for mobile flower beds, then the plants should form one whole with the MAF.
Question No. 3. What flowers should I use to decorate the figure?
The most commonly planted annuals are petunia, ageratum, marigolds, antirinum, lobularia, and verbena.
Manufacturing methods
Sculptors working with concrete create their works according to two principles.
On a metal frame
Many craftsmen choose this technology because the frame preserves the original appearance of the concrete sculpture while preventing the mortar from deforming. In addition, this technique ensures durability of the final result.
The metal frame for concrete sculptures is made of large wire or welded from reinforcing bars. The more accurately the frame reflects the shape conceived by the master, the less labor will be spent on concrete modeling. If, according to the author’s idea, the sculpture should be hollow, then the frame should be wrapped in construction mesh.
The technology for producing concrete mixture is the same for both frame sculptures and monolithic ones. The solution contains cement and water. It is better to mix sand with the cement in the appropriate ratio of 1:3.
To accelerate hardening, add to the solution. The mixed solution should not be liquid. Its consistency should correspond to the thickness of plasticine. If the mixture is ready, start sculpting. The initial layer of mortar applied to the frame outlines only the approximate outlines of the future work.
Apply the second layer of concrete after the first one has set a little. This will give the figure a solid look. If you want your concrete sculpture to be lightweight, fill its body with construction foam or rags.
When you achieve the desired dimensions of the product, you can begin sculpting small parts, as well as applying a relief design. For this you will need: an awl, sandpaper, a chisel, as well as other tools that are at hand. Once the final shape of the sculpture is ready, allow it to dry completely. This usually takes about two weeks.
Then apply a waterproof primer to the job. After it dries, the figure is painted. To paint garden sculptures, it is better to use acrylic dye compositions or any other intended for outdoor work. Painting is carried out several times. Each subsequent layer is applied after the previous one has completely dried.
Sometimes the paint is replaced with a coating that imitates different types of stone. For example, sprinkle stone chips or sea sand on a slightly hardened figure.
Using forms
Craftsmen often practice pouring concrete inside ready-made silicone or plastic containers, which they purchase in special stores. Or you can make them yourself.
Original sculptures for your site
"Hands of Concrete"
At first glance, this beautiful garden decoration can be confused with a sculpture by some artist. Such a figure in the garden will create a philosophical sense of perception of the world.
Hands made of concrete
Concrete hands made from cement can not only serve as decoration in your area, but can also be used as an original plant stand. Your guests will be pleasantly surprised by such an artistic design.
You will need:
- a pair of latex or rubber gloves, medical ones can also be used;
- prepared solution (do not forget the preparation proportions: cement + sand – 3:1 + water);
- concrete putty for exterior use;
- dye for concrete.
- Fill the gloves with the solution and place the gloves in the position you want, preferably in a bowl with soft material (such as towels), this will help form the final shape of the sculpted hand. Next, we fix the position of the resulting “hand” with the help of some objects, for example, you can put a flower pot in the middle, which will then stand in your figure.
- Leave the solution in the glove until it dries completely, then remove the rubber using tweezers and scissors.
- Apply a layer of putty and level it, after the “hand” has completely dried, you can sand your sculpture with sandpaper.
If you want to make a hand with a more complex shape, for example, with straightened fingers, you can insert a frame made of pieces of wire into the glove (in the finger compartments), bending the wire tips and avoiding tears in the gloves.
Of course, you can order or buy a finished sculpture, but it is much more interesting to make it yourself. A sculptor or landscape designer lives in each of us; you just need to find time for your hobby, awaken this talent within yourself and plunge into creativity.
Mushroom
To form a concrete mushroom, you need to prepare the stem and cap separately. But you can’t do without form here. To make it, you need to roll up a piece of linoleum or roofing felt into a pipe and fix the formed pipe.
Liquid sculptural concrete prepared from a standard composition is poured inside. Reinforcement is installed in the center of the poured concrete to strengthen the product.
To form a cap, take a round-shaped basin of a suitable size and lubricate it with any oily liquid. Place a large burdock leaf inside, which will make the mushroom cap corrugated, pour the solution inside to the edges of the bowl. Then wait half an hour. While the mixture is setting, place several large nails in the middle of the head, which will give the figure strength.
When the stem and cap are completely dry, begin assembling the product. First, install the leg, slightly deeper into the ground. It is better to do this right away where the figure will always be. Place a little fresh solution on the top of the stem and place a mushroom cap on it. It will take 5 days to completely dry the product.