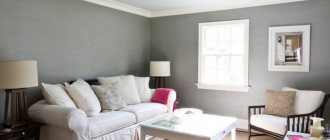
We all strive to make our home unique, original, and stylish. Doorways deserve special attention in the interior. In standard city apartments - small-sized and familiar Khrushchev-era apartments - folding or sliding doors are often installed instead of ordinary interior doors, but for the last 5-10 years, interior arches have remained a trend: made of plastic, plasterboard, aluminum profiles, natural stone, wood, brick, MDF boards. Decorating the interior with arches is a popular design technique. By installing such a structure instead of a door, it is possible to significantly visually expand the space when every corner of the room can be seen from every point without any problems.
Arches are often decorated with decorative elements: overlays, cornices, lamps, strips, banquettes, the design of which is in tune with the chosen style.
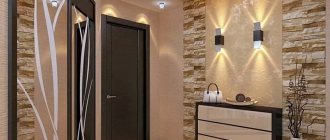
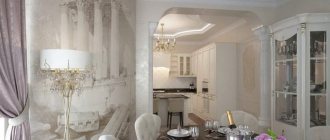
In addition to the decorative function, the designs can also have practical applications: increasing the size of arches, hiding seams and other defects. An interior arch will be appropriate everywhere: between the kitchen and the corridor, the hallway and the living room. All this is possible thanks to the variety of shapes, colors, sizes of arched openings and execution styles. In the photos presented, evaluate the design of the arches and the harmony of the interiors with them.
When thinking about the layout of the premises in the apartment, decide immediately how the transition between adjacent rooms will be designed. If it is necessary to maintain a certain style in the interior of an apartment, to combine adjacent rooms, in the absence of sufficient area and with a minimum of free space, interior arches of various shapes and sizes are increasingly being used.
This trend remains at the peak of popularity today due to the wide possibilities for decoration: you can easily find arches of any design and color, and if necessary, build similar structures with your own hands without the involvement of specialists.
We suggest starting with the main thing: choosing the appearance of the future arch, and photos with options for interior arches in the interiors of different rooms and interior spaces will help you with this.
Rectangular interior arches, photo
Materials
When choosing the material for interior arches from which the entire structure will be constructed, it is important to take into account the durability of the coating, strength, as well as its resistance to the special conditions of some rooms: for example, arches in the kitchen should not be deformed by steam, and arched openings that are located under straight lines sunlight, should not fade, maintaining its original color.
Interior arches made of plasterboard in an apartment, photo
What types of interior arches are there depending on the materials used?
For your home, you can choose different designs from the list presented:
- drywall is the most common option for arches. It easily takes the desired shape: if necessary, the plasterboard sheet can be bent or, having outlined the outline, cut to the required size. This material can have different thicknesses, so you don’t have to worry about the strength of the structure. In addition, steam, moisture, sunlight and other factors will not affect the appearance of an interior plasterboard arch;
- Interior arches made of plasterboard for the kitchen, photo
- wooden interior arches are the next most popular option. It is not easy to give such structures an unusual shape: ready-made interior arches made of wood do not differ in special design or color variety, except for the relief cut on the surface. But you can make an interior arch out of wood with your own hands, giving it the desired look and providing additional decorative finishing that would correspond to the overall picture of the design and decoration of the room. Craftsmen advise installing wooden arches in spacious rooms - due to the fact that the wood always looks quite massive;
- Beautiful interior arches, photo
- Interior plaster arches are separate curved structures, decorated with columns along the edges. When installing these elements near the walls using special glue, you will only have to putty the connecting area or cover it with a mixture of plaster. After all these manipulations, the arch is repainted in the chosen color and treated with varnish for protection;
- Types of interior arches, photos
- using polystyrene foam you can create an imitation of columns with an upper transition in the interior. Such arches are popular due to their low cost, although they also have a major drawback: low resistance to mechanical damage and fragility. Foam arches are fixed with glue, after drying they are puttied and painted to obtain the desired decorative effect. In addition, it is not necessary to paint them: a white interior arch is considered a classic and will suit any design;
- plastic arches today are not as popular as before, but in some interiors you can see such options. These are designs of simple shape, often they are devoid of decorative details and are more suitable for minimalism than for those styles where it is necessary to emphasize certain features and characteristic features of stylistic trends;
- Interior arches - modern design with a widened opening, photo
- arches made of chipboard and fiberboard are a budget-friendly and quite successful option for an apartment. Such materials allow the use of a variety of decorative coatings; they are flexible, bend well, are subject to shape correction, and do not lose their appearance over time.
Arched interior doors, photo
Finishing technique
Each of the above materials has its own finishing characteristics. Let's look at each of them step by step.
Remember that a plasterboard arch has structural complications that must be taken into account.
Wallpaper
To decorate an arch with wallpaper, it is initially necessary to treat the surface of the drywall with a primer so that the material adheres better. It is also very important to choose an adhesive that is suitable for a particular type of wallpaper. To finish the arch, you need to prepare glue that is thicker than for a regular surface. The method of applying glue is different for different types of wallpaper. Therefore, before pasting, read the instructions on the roll.
Related article: GML sleeve
The first strip is glued to the wall near the arch, and then the next one overlaps. Part of the wallpaper should protrude beyond the arched opening. Then we cut the strip, leaving an allowance of 2-4 cm. We paste over the other wall in the same way.
The next stage is pasting the arched vault. It is necessary to measure the depth of the arch and cut a strip of the same width. If your wallpaper has a pattern, then you need to adjust the pattern. If the vault of the arch is too high, the strips can be divided into several parts, and the joints are made in the most inconspicuous place.
Carefully remove air bubbles with a rag. This should be done from top to bottom, from the center of the strip in different directions. It is recommended to go over the joints with a rubber roller so that they stick more firmly.
Decorative plaster
First you need to putty the seams and unevenness of the drywall, and also hide the fastening caps. Then we prime the surface for a stronger adhesion of the plaster.
The method of applying decorative putty is quite simple - use a spatula to apply the material to the surface. You can create a simple plaster relief with a sponge; there are also various patterned rollers to create a more interesting texture.
After the plaster has completely dried, it must be treated with a primer. If desired, you can paint the surface. Regular acrylic paints are suitable for painting putty.
Stone
Cladding an arch with decorative stone is a labor-intensive process. Difficulties may arise at the stage of finishing the arch of the opening. Before you begin installation work, you must be patient and follow the instructions exactly. Initially, you need to putty the surface of the arch to eliminate irregularities, seams, etc. Then we treat the walls with a primer and let it dry for 4-6 hours. There are various technologies for producing decorative stone: gypsum-based and cement-based. Accordingly, solutions of different consistency are suitable for each type.
Related article: How to make a profile bending machine with your own hands
The cladding should begin from the bottom up and from the junction of the wall and the arched opening. It is necessary that the stone on the inside overlaps with the outside. Those stones that run along the arc are cut to the shape of the opening using a hacksaw, having previously outlined the cutting boundaries with a pencil.
After the stone is laid, we begin to grout the seams. We do this using a special grout. Apply carefully using a small spatula or syringe. When the seams have dried, you can treat the stone with a special primer, this will be additional protection from dirt and moisture.
Each of the above methods of finishing an arch can be done independently, following the instructions and recommendations for installation work. You can perfectly decorate an arched opening using any material. After all, the main thing is not what, but how. With a little imagination, you can create a unique arch design.
Shapes of interior arches, their types and features
If you are seriously wondering how to assemble interior arches, you should definitely understand the varieties of their shapes.
Planning and choosing the appearance and ideal dimensions of each individual interior arch is necessary, taking into account the architectural features and layout of the room.
Photo of an interior semi-arch made of plasterboard
Arches for interior doors are divided into several groups, the division occurs depending on the appearance of the vault: arches with a vault in the form of an ellipse, Florentine (having the shape of a semicircle), segmental arches, parabolic arches, three-centered, arches with a horseshoe vault, arches with shoulders , arches with a round vault and others.
A specialist consultant will tell you which option is best to choose when purchasing: keep in mind that such arches should not overload the interior design and contradict the chosen style direction in the overall interior design.
A long modern TV stand is an indispensable and obligatory part of the apartment; find out the advantages of such furniture and find out what types of products exist and what kind of interior they suit.
Find out the features and nuances of decorating a hall in Provence style in this article.
We invite you to find out more details about the existing types of interior arches.
Florentine is one of the varieties of semicircular arched structures, with an elongated profile, traced with stone trim not in the doorway itself, but outside it. This method of designing transitions between rooms is ideal for classic, Mediterranean style, Provence.
Semicircular arches are popular in modern styles. Simple, but smooth and refined geometry will make the interior lighter and fit perfectly into living rooms.
Segment-type arches are curved structures in which the radius of the semicircle exceeds half the width of the doorway being processed. If it is not possible to stretch the opening upward, the arch will have to be done exclusively by rounding the corners.
When designing segmental arches, consult with specialists, since such a design must have the correct proportions.
Three-center arches are a simple option for residential premises. They can be lowered: similar designs are common in the transitions between the kitchen and living areas.
Also distinguished are pseudo-three-center arched openings with a flat upper level and slightly rounded corners. Such arches will become a worthy analogue to rectangular structures, which are not always able to emphasize the sophistication of home design. Three-center arches are suitable for country, classic and Provence interiors.
DIY interior arch, photo
Parabolic arches, in contrast to three-center ones, are more elongated upward - and compressed as the height of the structure increases. Popular in Moroccan and Arabic styles.
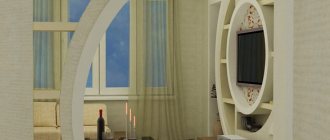
Elliptical arches will be appropriate in art deco, art nouveau, and classic designs. They allow you to divide a room into two zones and create a harmonious opening between interiors, even where there was no transition before.
Non-standard interior arches - horseshoe-shaped or round - are suitable for decorating a loggia connected to a living room. The need to create such structures is explained by the fact that it is impossible to completely demolish the window sill area. This way you will provide a sufficient level of durability to the load-bearing walls and at the same time emphasize the new design of the room.
Round arched structures are suitable for modern design trends, while horseshoe-shaped designs are more appropriate in the Mediterranean style, Provence and other trends. If desired, they can be made asymmetrical or equipped with additional decorative elements. Among these varieties are arches with shoulders: in them the width of the opening exceeds the dimensions of the arch.
You can also give preference to Venetian-style arches with a semicircular design and carvings, or opt for trefoil-shaped designs.
In home interiors, you can also install interior arches of new styles: give them any shape at your discretion, even the most delicate or ornate, using the services of specialists or creating the design yourself.
If you are not yet ready to experiment, rectangular interior arches, as well as square-shaped interior arches, will be the best solution. In addition, at any time you can choose a door that matches the style and shape.
Square interior arches, photo
Decor and design of interior arches
There are several popular methods for decorating interior arches. Using curtains is the simplest and most budget option. For example, in this way you can decorate the arch between the corridor and the kitchen in order to partially isolate the room and prevent the spread of steam throughout the apartment.
When using decorative columns, beautiful interior arches are obtained. It is enough to install them on the sides of the structure to give your room a completely different, updated look.
Depending on the size, finished interior arches are decorated with niches or additional shelves, which will add functionality to this opening design.
Interior arches with shelves, photo
To decorate an interior arch with your own hands, you can use additional finishing and decorative materials. Choose how to decorate the interior arch, taking into account the style of the interior: if it is more traditional, select elements made of wood or use thematic stucco; for modern design, it is recommended to use finishing materials that imitate brick, masonry and other surfaces.
Interior arches made of stone, photo
Built-in lighting is also popular today: it can be mounted in two ways - from the sides or at the level of the arch. This design of interior arches will allow you to fill the interior with new bright shades.
Interior arches made of plasterboard with lighting, photo
The difficulty of caring for arches in an apartment will depend on the material chosen, and the conditions in the rooms in which they are installed will also affect. For example, it can be difficult to clean the arches between the kitchen and the hallway from dirt: dust and dirt brought from the street will accumulate on the hallway side, and grease on the kitchen area.
Arch between the kitchen and hallway, photo
However, most materials can withstand wet cleaning and the use of detergents. There are some care nuances when caring for natural wood:
- To clean wooden surfaces, you should not use a cloth that is too wet: excessive moisture can cause the material to deteriorate even with protective varnish treatment;
- use polish to keep the wooden arch clean for a long time;
- wood should not be subjected to additional staining. In the factory, such arches are painted in several layers using a spray gun. Therefore, the coloring is even and uniform over the entire surface. It is impossible to achieve this effect with a brush.
Read about how to choose and which corner sofa will suit your living room interior: photos with examples and modern models will help you decide on the selection and ideal sizes for your room.
Read here about the design features of a kitchen combined with a living room in a loft style.
You can see a selection of photos with new curtain designs for the bedroom in the article at: https://prostilno.ru/tekstil/shtory-v-spalnyu.html
We recommend that you familiarize yourself in advance with how to install different types of interior arches: wooden structures should not be subjected to impacts. On such material, even scratches will be difficult to disguise (even if you choose an arch made of durable rocks - at a minimum, you will scratch the varnish coating).
Interior arches for the kitchen, photo
Now you are ready to install the arch in your home. All you have to do is choose a design, decide on the desired shape and material. Therefore, we advise you to look again at the pictures of interior arches, look through the photos in the photo gallery and think about which design will best emphasize the style of your room.
Photos of examples of beautiful arch design in the interior of the hall
It’s easier to choose a ready-made project among the best options for plasterboard arches; in the photo there is a room with arched structures of various types. Stucco adds grace and is used only on symmetrical classical forms. Expanded polystyrene and some types of plastic imitate gypsum, but are much stronger and more reliable.
Arch with stucco molding - a traditional element of the Baroque interior
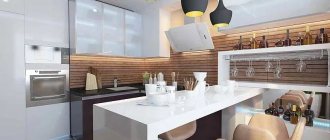
In modern kitchen-living rooms, an arch is often combined with a bar counter
Mirrors and stained glass windows add a romantic touch. The insertion of such elements into drywall must be justified. The arch becomes heavier, increasing the pressure on the floor. But how beautiful!
Options with shelves are practical. They eliminate the problem of storing cups, prizes, and cute souvenirs. The only negative is that accumulated dust must be removed regularly.
The side shelves give the structure an unusual and distinctive design.
In deep niches it will be convenient to place valuable and beautiful objects - figurines, vases or souvenirs
Any design requires lighting. The arch will sparkle with new colors, the accents in the interior will shift. Spots and spotlights are mounted around the perimeter or just under the ceiling.
Using the lamps built into the arch, you can create additional lighting and also highlight a functional area
Columns will add weight and massiveness to the structure, even if they are made of light materials. Columns serve for support, but it is better to do without them if the ceilings are low. Semicircular or square columns are appropriate in a private house with high ceilings. You will get a beautiful intermediate structure.
Arched doorway with columns in a spacious neoclassical style hall
A narrow arched opening is placed when they want to visually raise the ceilings in the rooms
In studio apartments, large arches are used to visually unify the space.
Each arch has its own characteristics; they are created for a specific interior so that the overall harmony is not disturbed. Arches create an atmosphere of mystery and solemnity; if desired, you can always find a place for such a structure.
Shapes of arched openings
Interior door arches are selected not only based on taste preferences, but also depending on certain parameters: ceiling height and opening width. The structures are made of plasterboard, wood, MDF, PVC. The easiest way to work is with drywall, as it is the most flexible material.
Currently, there are a large number of different types of arches, which differ in shape. The most common are:
- Arches made in classical style. Such designs have a regular semicircular shape and are suitable for rooms over three meters high.
A semicircular arch is a classic design for an interior opening. - Romance. The design of this form fits perfectly into a low opening from the living room or hall to the corridor. It is an arc, the rounded corners of which are connected to each other in the center by a straight insert.
Low openings are decorated with an arch with a direct insert in the center - Modern. This option is well suited for decorating a balcony or kitchen opening. In this case, the corners of the structure can be either sharp or rounded.
To decorate a balcony or kitchen opening, use a Modern arch - The portal is a U-shaped structure. It is customary to install it in rooms where horizontal and vertical lines dominate. An arched device of this type is well suited for the design of houses made of logs or timber. The portal arch in the interior opening can be of various configurations: wavy, polygonal. The choice is determined by the available materials and the owner’s imagination.
The portal arch is a U-shaped structure - A straight arch looks good in combination with interior styles such as hi-tech and modern.
A straight arch emphasizes the graphic nature of the space - Semi-arches are used for zoning areas.
You can divide the room into zones using semi-arches
Arched openings also have different designs and on this basis are divided into several varieties:
- Radial. This is one of the most inexpensive technologies that goes with any style.
- Multi-level. This option is used to decorate a specific interior.
- Openwork arches. Such designs are not suitable only if the vertical surfaces are made in a non-standard form.
An openwork arch is often used for wedding ceremonies - Dome-shaped arches are suitable for classic-type structures.
Classic interiors can be decorated using a domed arch
Having looked closely at your interior and selected the desired arch model, you can begin the step-by-step work.
Arch design options
All kinds of plasterboard arches, as in the photo of the interior design in the hall, radically change the appearance of the room. The structures are used to enclose corners for secluded relaxation, friendly tea parties, games of poker or chess.
The arch can be made in any style, which means it can be matched to absolutely any interior of an apartment or country house
Partitions and projections for mounting lighting are built into wide and spacious arches. The profile is made voluminous.
Eastern arches
Eastern style is unshakable. The shapes of the minarets are immediately recognizable. The arches are complemented with Arabic script, decorative elements characteristic of Islamic shrines. A good option is a mosaic pattern, painting with gilding. Possibly images of flowers and birds. The volume will be created by relief linings made of PVC skirting boards.
The eastern arch has the shape of a pointed dome and can be supplemented with jagged and wavy elements
Roman arches
Roman or antique arches are necessarily complemented by bas-reliefs and floral decorations. These types of arched false ceilings require high ceilings and good natural lighting.
Arches in the antique style are often complemented by columns or semi-columns
And others
Thai arched vaults are asymmetrical, straight only on one side, the other is figured. Adhering to such canons, they create fantasy forms. Decorations and shelves are appropriate; lighting is required to highlight the wavy contour.
The semi-arch is suitable for decorating fairly large openings in rooms with high ceilings
Curly - more complex arched structures, created to match the theme of interior design. Curves in the form of the outline of a musical instrument or a woman’s body are acceptable options.
Curly arches are well suited for decorating a recess located in the wall of a room
Step-by-step instructions for making your own
In order not to spend extra money on finished products, you can do the finishing of the arched opening yourself. To do this, you need to follow a clearly established scheme.
Carrying out the necessary measurements
Any construction process requires precision, which is achieved by taking preliminary measurements. You need to start from the opening itself, so first measure its width and height. The size of the span between the walls of the opening is equal to the width of the arch. In order to make a semicircle as accurately as possible, this indicator must be divided by two.
Before making an arch, you need to decide on its future configuration. If you are going to do it in a classic style, then first level the walls. Otherwise, the design will look ugly. You can remove all defects from a vertical surface with putty or plaster using beacons.
Creating a load-bearing frame
To install the frame, you should perform a series of sequential steps:
- A contour made of a metal profile is screwed along the lines of the opening with dowels. Vertical guides are installed indented from the surface of the interior wall. The size of the indentation is equal to the thickness of the drywall sheet and the plaster layer (about 0.2 cm).
- We install two such profiles parallel to each other on each side.
To construct the frame, two profiles are installed in parallel - Having finished working with the profiles, we begin installing the first sheet of drywall. If its thickness is 1.25 cm, then it is recommended to screw it with 3.5x35 self-tapping screws. If the thickness of the gypsum board is no more than 0.95 cm, use smaller screws.
Drywall is secured using self-tapping screws - Cover the second side of the frame with plasterboard.
Covering the opening with plasterboard - Make a metal profile in the shape of an arc. To do this, cut the side walls of the profile every 7 centimeters with special scissors. As a result of these actions, it is easier to give it the required shape. For an arched structure, two such blanks will be required.
An arched arc is made from the profile - Install and secure the arched profiles to the main part of the frame.
The arcuate profile is attached to the main part of the frame - To ensure that the arches are securely fixed, they are attached with hangers to a straight guide located on top. The number of hangers depends on the width of the opening. Usually three pairs are enough.
Arch frame installation diagram - In increments of 0.4-0.6 m, attach reinforcing crossbars around the perimeter of the frame, fixing them on the guides of two contours.
- As a result of the above actions, a reliable metal structure in the form of an arch from the profile emerges. In the future, it will be covered with plasterboard or plywood.
If it is assumed that the columns of the arches will not be too thick in thickness, then 2 arches can be replaced with a wide profile. Cutting and bending is done in exactly the same way. Only in this case the installation of crossbars is not required.
Sometimes wooden slats are used instead of a metal profile. The frame installation technology does not change significantly.
Bending plasterboard sheet
After installing the frame, they take on the bending of the gypsum board. Experts recommend using drywall designed specifically for arched structures. It easily takes the desired shape if the material is kneaded in the longitudinal direction.
If you decide to use regular drywall, you will have to tinker with it. The installation element is cut out to the required size in the form of a rectangle. They bend it in two ways: wet and dry.
Bend manufacturing diagram
The wet method takes a lot of time and cannot be rushed. To prevent the material from cracking when bent, it is moistened with water and punctures are made. In this form, the sheet of drywall is left to lie for some time, and then it is bent onto a template of the desired configuration.
The dry method refers to the application of cuts parallel to each other on the back side of the plasterboard. The cut goes deep into the sheet, affecting the outer cardboard layer and plaster. The cardboard layer on the front side remains intact.
With the dry method, the bend of the installation element takes the correct shape. It is important to know that cutting through gypsum boards is best done with a jigsaw rather than a hacksaw. Then the edges will not be torn.
Rough sheathing of the frame
If the bending was done using the wet method, then first of all you need to wait until the sheet of drywall is completely dry. The material is fixed first with adhesive tape and then with self-tapping screws. The minimum step between them should be from 5 to 6 centimeters.
Perforated corner prevents edge chipping
After fastening the sheathing, the edges of the plasterboard sheet are cleaned. And in order to prevent chipping of the curved edge, a perforated plastic corner is installed on it.
Leveling with putty
To make the surface smooth, you need to finish the arched structure. First, apply a primer, and after it dries, putty. To reinforce the second layer and strengthen the corners, fiberglass mesh is used.
Fiberglass mesh reinforces the corners of the arch
The last third layer of putty is applied to the mesh. After about 10 hours, it dries, after which you can begin sanding the uneven areas. If the work is done well, the surface will be free of roughness and unevenness, and the heads of the screws will not be visible in it.
DIY plasterboard arches for the hall: photos and detailed instructions
Each of us tries to make our home cozy, stylish and original. Particular attention is paid to doorways. If you use your imagination, a standard doorway can be designed in a rather original way, and, in addition to a purely decorative function, such a design will also be functional. What plasterboard arches look like in a hall, photos of popular models of arches and the method of making them will be discussed below.
Types of arches and their design features
Modern arches came to us from Asia, where they were used to decorate doorways without doors.
Now the types and design of arches have changed and new varieties have been added. From the variety of forms, several popular types can be distinguished:
- A round or square wide arch is considered classic. It is mainly used to visually increase space in a small room. Round structures are used for zoning space in a studio apartment or on a balcony. These designs fit perfectly into the classic style with high ceilings.
Arches look most impressive in kitchens and as an entrance to a hall or living room.
Arch design
An arch will only become a decoration of an apartment if it is made in such a way that it complements the style of the interior and contains the characteristic features of the room. For example, if the design of the hall is made in a classic style, it is better to make an arched opening with a classic bend.
The arch into the hall should be wide, only then is the effect of expanding the space achieved and the room looks luxurious and harmonious. Since our standard openings are narrow, to create an arch for the hall we will have to widen this passage. For the high-tech style there are no restrictions in design: openings of the most fantastic and original shapes are allowed, it all depends on your desire.
Important: you should be careful with oriental-style openings with domed vaults; it is only suitable for oriental-style interiors, otherwise such an arch will look ridiculous.
An arch portal is a very advantageous option for designing an opening. This simple square and large arch will suit any interior and will look harmonious in any design, in addition, as you can see from the photo, this arch helps to expand the space in small living rooms. Often the portal arch is decorated in an interior in the Art Nouveau style.
Important: the wider the arch, the narrower the opening between the rooms, which means that the design of adjacent rooms should be as close to each other as possible, only in this case can harmony be achieved in the interior.
In addition to doorways, you can use arches to decorate the interior of rooms. Arches look impressive in large rooms, such as a hall or living room. Using this element, you can zone a room or focus on a certain area of the room. For example, an arch can combine the loggia area and the hall; it looks elegant and luxurious. Using an arch, you can distinguish between the functional area of the room (cabinets, shelves) and the recreation area. Arches are often installed above window openings; in combination with similar arches in doorways, the overall ensemble in the design of the hall is captured.
Instructions for making a plasterboard arch for a hall: photos and step-by-step description of the work
Drywall is a modern finishing material with which you can make almost any, even the most complex, designs in the house. Drywall is compressed sheets of natural material - gypsum; it is light, plastic, environmentally friendly and inexpensive, which is why it is chosen from a wide variety of finishing materials.
An arch made of plasterboard on your own is a real idea, even if the owner of the apartment has never done this. If you use the right materials, tools and methods, you can build such a structure in a few days.
Required materials and tools:
- sheet of drywall;
- metal screws;
- metal profiles;
- bag of putty;
- fiberglass or paper tape;
- pencil, tape measure;
- power tools;
- knives, metal scissors:
- spatula, grater;
- individual protection means.
First you need to measure the dimensions of the area selected for the arch. Then a sheet of drywall is taken and, taking into account the dimensions of the future arch, the desired shape of the vault is drawn. This is an important point that should be given maximum attention, because the result of the work will depend on it. To ensure the perfect circumference of the arch, you can draw it using a self-tapping screw screwed to drywall with a thread attached, thus creating a kind of compass. The larger the radius of the arch, the longer the rope is needed.
The drawn diagram is cut out using a jigsaw or a special hacksaw for drywall, and the sheet must be carefully secured to avoid injury or damage. Important: in wet rooms it is better to use a moisture-resistant type of drywall (light green sheets), so that subsequently the shape and appearance of the arch will not change.
Frame making
To make this structure, you can use either a metal or a wooden frame, but metal profiles are the most convenient for work, so we will use them for the frame.
For the frame, narrow metal profiles are used, which are sold in any hardware store. To begin with, measure the dimensions of the arch and cut the profiles to size.
You will need two profiles along the width of the opening, which need to be secured at the top. On both sides of the wall, two profiles are attached, each long according to the radius of the arch. To secure the frame in a concrete wall, you first need to drill holes, install dowels in them and screw in self-tapping screws, and only then attach the profiles as shown in the photo below.
Fastening panels
After installing the metal profile, you can attach the first piece of drywall to the wall. A screwdriver with adjustable torque is suitable for this. For sheets with a thickness of 12.5 mm, it is recommended to choose 3.5x35 screws; for thin sheets, the appropriate screws are selected. The other side of the arch is installed in the same way. It is better to screw in the screws so that their heads remain flush with the wall, to avoid unnecessary recesses or humps. This stage is shown in the photo below.
Important: for the reliability of the plasterboard structure, it is better to screw in the screws at a distance of no more than 15 cm from each other.
The next step is to attach the curved profile to the arch arch. To do this, you need to accurately measure the length of the arc and cut the metal profile to size. Then the segment is bent. To do this: using metal scissors, partial cuts are made along the entire length of the side edges of the segment, as shown in the photo. The distance between the cuts is 10-13 cm. If there is a need to give the profile a more curved shape, more cuts are made.
Next, you need to give the profile an arched shape and attach it to the lower zone of the metal frame with self-tapping screws. If the arched profile fits correctly to the circumference of the arch, it is secured with self-tapping screws along its entire length. The same is done with the other side.
Now all that remains is to fix the curved structural element. To do this: measure the dimensions of this area and cut it out of drywall. To make the sheet curved, we suggest using the following trick: at a distance of 8-10 cm, notches are made on the sheet, while cutting the paper layer, so the element can bend.
Important: the notches must be made perfectly even and perpendicular to the side edge so that the bend is correct.
Then the notched rectangle is applied to the bend of the arch and is gradually pressed against it. It is better to move in small steps so that the shape of the bend is correct.
After this, you should make sure that the structure is made smoothly and that there are no irregularities or extra pieces left anywhere. Then they secure the sheet with self-tapping screws at the top, after which they move to the edges. The arched arc is attached with self-tapping screws at a distance of 8-10 cm from each other.
After work, everything is carefully checked, since it happens that the edge of the arc segment extends beyond the edges of the arch; if this happens, the excess drywall is cut off with a sharp construction knife.
Finishing
Now you can begin finishing the structure. First, you will need to cover the joints and edges of the plasterboard structure with paper construction tape or fiberglass film. Then you need to apply at least 3 layers of putty, and after it dries, thoroughly rub the surface with sandpaper. After this, the evenness of the surface is checked and painting can begin.
As you can see, it’s not difficult to create such an interior element if you wish, but as a result, you will not regret the effort spent and will be pleased with the new look of your apartment!
Methods for finishing arches
Those who want to decorate the arches themselves will have to work hard, cutting out each part separately. However, many do not look for complications and choose the simple path - they purchase factory-made structures from prefabricated elements.
Ready-made and prefabricated linings
There are two types of factory-made overlay: wooden and foam.
Foam elements
Foam arches are often preferred as an alternative to plaster products. The advantages of such designs are as follows:
- Quick installation. The installation speed is much higher than arched structures made of plywood or gypsum plasterboard.
- Low price.
- Easy transportation. Polystyrene foam is a fairly light material, so you don’t need to hire movers to deliver the product to your home.
- Light weight. Arches of this type can be installed even on very weak structures.
- Various forms.
Foam arches are assembled from ready-made elements and cut locally to fit the dimensions of the opening.
The negative aspects of an arched structure made of foam are: fragility, toxicity, and rapid flammability.
Wood elements
Wooden arched structures do not require advertising. They look rich and rarely do not fit any interior style. However, it should be understood that the word “wooden” does not mean that all components are made of pine, oak or other solid wood.
The arch can be made of natural wood, MDF, chipboard or plywood
Arched elements are also made from inexpensive MDF, laminated chipboard, and veneered plywood. The desired option is selected individually based on taste and wallet thickness.
Wooden elements are ordered from a catalog and then cut to length before installation
Installation of wooden structures is simple. In construction stores, arches are sold both assembled and disassembled. The first option is considered more reliable, since the work was performed by a specialist.
Decoration with finishing materials
Currently, there are many ways to beautifully and accurately decorate an interior opening. The decor is selected so that it is in harmony in color, texture, material with the home environment. The most popular options are:
- Simple coloring. The arch will look elegant and complete if it is simply painted white, brown or to match the walls. This finish is often complemented with decorative elements and lighting.
Plain paint looks great when combined with lighting - Wallpapering. This is the fastest, most affordable and easiest process. For these purposes, vinyl or non-woven options are best suited.
Slopes highlighted with wallpaper are a very stylish design move - Finishing with wooden and plastic lining. The method guarantees not only a wonderful aesthetic appearance, but also ensures the durability of the structure, protecting it from moisture and mechanical damage.
The option with lining is perfect for interiors with wall decoration made of the same material - Decorative plaster. The surface of the arch is beautiful, textured and durable. True, such finishing sometimes needs to be restored, and it requires some care.
This method looks especially advantageous in deep arches. - Stone. An arch in a house made of natural or artificial stone can only be installed with the help of a professional. The decoration captivates the eye and makes the interior unusual.
The torn edges of the arch can become the highlight of any interior - Cork is a fairly expensive but environmentally friendly material. It is easily susceptible to mechanical damage, so to extend its service life it is recommended to cover the cork with wax.
Cork finishing brings a sense of eco-friendliness and comfort to the interior - Clinker tiles. This finish will last for many years. It does not attract dirt and does not require special care.
Finishing with clinker tiles – limitless space for interesting solutions
Whatever finishing option for the arched structure you choose, the arch itself will be a highlight in the interior of your apartment or country house.
Repair Tips:
Examples of finishing plasterboard arches
It is important to choose the right decor for the arch of the hall; in the apartment in the photo it occupies a central place. The shape and configuration of the plasterboard structure is not the main thing. It is clear that additional decor can mask finishing defects, but it is necessary to start with the finishing treatment of the false ceiling.
The arched passage with a neatly executed thin edging looks stylish and complete.
painting
Hand painting has been in trend for the last two years. For painting, traditional motifs and art drawings in the style of futuristic paintings are used. Handmade design is individual and unique. A budget option for this type of finishing is to apply a stencil stamp. This does not require skill, just basic skills and accuracy. Drywall has good moisture permeability and paints apply smoothly.
Artistic painting of the arch allows you to create a spectacular decor that favorably emphasizes the interior features of the room
PVC decor
If there is an abundance of finishing materials, it is better to replace natural stone, brick and wood with imitation plastic. Natural materials are too heavy for lightweight structures. PVC is a practical material that is not afraid of wet cleaning. The decor is conveniently attached to drywall. You can do the design work yourself.
The photo shows an example of decorating an arch with wood-like plastic panels
Marble and granite are replaced with flexible stone veneer made from layered rocks. This modern material is easy to install and cut to size.
And others
The most traditional types of finishing are painting and wallpapering. Paint and varnish compositions form matte and glossy dense films. It is not difficult to choose ready-made paint to match or tint the coating. It is better to choose textured wallpaper that imitates decorative plaster.
Plastic corners are used to protect the corners of the arch from damage.
Options for modern minimalist interiors are used in luxury suburban housing and economy class apartments. Experiments with colors, textures, relief, and combinations of various patterns are encouraged.
Finishing an arch with stone is often used when decorating a country style interior.
To make the joint between the arch and the wall invisible, before applying the belt loop, the seam is reinforced with fiberglass, which can hide small defects.