What are boar tiles?
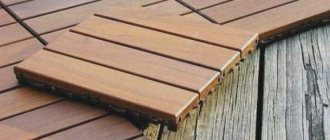
“Boar” tile is one of the types of ceramic facing materials that imitates brickwork. Initially, lamellas were produced for the exterior decoration of facades, but nowadays manufacturing companies offer a wide range of tiles intended for decorating the interiors of buildings: bathrooms, kitchens, toilets and others.
The product got its name due to the similarity of the mold for casting the tile with a pig's snout. “Boar” has an oblong rectangular shape and bevels (beveled edges) that add volume, but products are also available without bevels.
The surface of this type of tile can be glossy, matte, semi-matte or textured (artificially aged, crackled), the color scheme is varied, but monochromatic (without applied drawings or patterns).
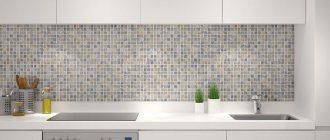
Boar tiles for a kitchen backsplash - what is it?
Interior experts agree: boar or subway tiles (another name) are a hit this season! In addition, its original appearance and timeless design allow it to complement the interior of any kitchen! So where did the name come from? Subway tiles were named after the lining of the Underground Railroad. Characteristic tiles covered the oldest stations in Paris and New York. They have a characteristic brick shape and measure approximately 15x7 centimeters. Their surface is slightly convex and shiny. The most compatible with the original are absolutely white tiles laid with minimal spacing. On sale you can now find a wide range of colors and finishing methods that will undoubtedly satisfy a wide range of tastes. Today, subway or hog tiles have a smooth, shiny surface and an oblong rectangular shape. Standard sizes are 20 x 10 cm. White tiles are the most popular, but they are also available in a wide range of other colors. Ideal for kitchen aprons.
Material advantages
The advantages of brick-like tiles include:
- Width of assortment.
It is possible to choose the material according to color and texture to suit every taste and for various interiors.
- Resistance to temperature fluctuations. When decorating a kitchen backsplash with tiles, you don’t have to worry about the integrity of the lamellas during intense heat load.
- High moisture resistance.
- Durability, resistance to chemicals.
- Easy to maintain: a wall lined with this facing material can be easily cleaned of soot or grease even with a damp cloth;
- Long service life of the product.
- Versatility of use (laying possible in any room).
The material is indispensable for those who value environmental friendliness!
Important points when choosing subway tiles
1. If the apron is located opposite the window, opt for matte tiles. Otherwise, the slightest dirt and irregularities will be noticeable.
2. Before cladding with your own hands, carefully take measurements taking into account the horizontal and subtleties described above.
3. When planning sockets and hanging elements, remember: fastenings should not fall on joints or chamfers.
4. Many manufacturers offer half square tiles with factory processing in their collections. They will help fill the gaps in the masonry without unnecessary cutting.
Original or imitation?
The price of the issue and the above nuances of subway tiles allow us to consider alternative options for designing a kitchen apron.
The most budget-friendly solution is PVC panels embossed to look like brick. This solution has its own characteristics. The main ones are fragility and “appearance”, far from the original.
The labor-intensive process of preparing and installing heavy elements can be a reason to choose standard ceramics without chamfers and other elements that complicate installation. The market offers ready-made carpets made from brick tiles and other façade textures.
What style does a hog tile backsplash fit?
A kitchen apron decorated with a “hog” harmoniously combines with many design styles:
- In a classic interior.
The tile attracts the eye, while simultaneously focusing attention on other interior details;
- Nordic, Scandinavian style.
It is a combination of glossy and rough textures (this tandem can be achieved by decorating the backsplash with textured tiles, and the walls with elegant wallpaper, or vice versa).
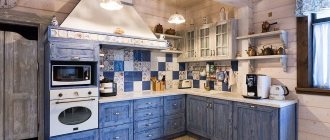
- Simple, deliberately uncomplicated country (or Provence) style.
The design of the room can be emphasized and refreshed by laying the walls with “brick” tiles. The slats complement the “rustic” image of the room;
- The interior is in an urban, industrial style.
(with a large number of details, furniture made of metal and glass) it will look more complete if you make a “hog” installation of not only the apron in the kitchen, but also a small section of the wall;
- Art Deco
The restraint and monumentalism of the Art Deco style goes well with the geometricity and strict lines of tile laying; a good result can be achieved by combining white lamellas with bright interior items, a black apron with light-colored furniture, or using tiles and decorative plaster for finishing;
- The colors of the lamellas are relevant for high-tech design: in this case, the seams are treated using grout in dark shades, emphasizing the deliberate roughness of the style.
ATTENTION! When choosing lamellas, think about the materials of what texture will prevail in the room and how the tiles will be combined with them. Beige or white products are universal for kitchen decoration - they will complement any style and will be combined with the color of other interior items. Also take into account the size of the room: dark tiles will visually reduce the space, while light ones will increase it.
Suitable interior styles for the “hog” tiled splashback
Ceramic tiles are used for classic, modern and ethnic styles. Brick laying is especially often done in ethnic Scandinavian style.
In rustic country and Provence, tiles are selected in yellow, light green, soft blue, and muted pink colors. Staggered laying, imitating brick laying, is also suitable.
If you choose a shade and texture similar to natural brick, the material will be suitable for an industrial loft.
For modernism, white or milky boar tiles in combination with a brown kitchen set will be ideal.
Tablecloth for the kitchen table - 82 photos of amazing ideas of beauty and practicality- Decoration of a gas pipe in the kitchen: how to hide it without hiding it in the wall? 54 photos of ideas and beautiful solutions
Tiles on the kitchen walls - how to choose and stick correctly? Instructions + 65 photos
In high-tech, minimalism, materials of unusual or mirror colors are suitable. This design is complemented by other metal elements.
For discreet art deco, a small hog in a black and white layout is used. This apron will go well with bright furniture and decorative plaster.
Design options
The tiles are available in two types:
- with a chamfer - the presence of beveled edges on the lamellas, which gives convexity and relief to the wall on which the installation is made;
- without chamfer – tiles with a flat surface, without beveled ends. To emphasize the severity of the brickwork, in this case it is advisable to use a grouting compound of a contrasting color.
IMPORTANT! Caring for an apron made with beveled facing materials requires more attention. Cleaning tiles with a pronounced texture will be a little more difficult than flat slats.
What tile to lay the apron in the kitchen
A kitchen apron lined with decorative tiles is not just a beautiful work area, but also practical. This is the accent of the interior of any kitchen. Therefore, you need to choose the material for cladding individually.
On the website of the online store Plitkanadom there is a free 3D Design service for these purposes. For those who have not decided on the style, color, shape and size of the kitchen, experienced consultants will always come to the rescue. They will help you assemble a backsplash from different tiles or find a ready-made solution in the collection of a well-known manufacturer, recommend interesting options for large, small, narrow and classic kitchens, and tell you all about ways to deliver tiles to Moscow and other Russian cities.
Buyers of the online store who found their ideal tiles for a kitchen backsplash in the catalog have already rated us:
- for attractive prices in a huge range;
- large selection of formats and sizes of ceramic tiles;
- assortment of design solutions (glass, mosaic tiles, stone models, brickwork, marble, products with bright pictures);
- pleasant service;
- fast delivery;
- complete free consulting support and much more.
Join those who choose high quality at an affordable price. Selecting and ordering stylish tiles with flowers, fashionable gray a la hi-tech, multi-colored options from us is very simple and always profitable.
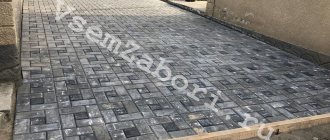
Popular tile sizes
The dimensions and proportions of the facing material are close to the proportions used in the production of bricks. The most common and popular tiles are 20x10 cm and 30x10 cm formats.
Manufacturing companies produce lamellas of various sizes, ranging from the smallest 10x7.5 cm to large 30x15 cm. The standard length of products varies from 10 to 30 cm, width from 7.5 to 15 cm, tile thickness can be 2 cm (at the center point facial plane).
Types of tiles for a kitchen backsplash
Ceramic tiles for installing a classic apron in the kitchen are presented very widely and are divided into types according to many criteria. What is important to pay attention to here first of all?
- Size. It can be wide-format (60*60 or 30*30 cm), classic (15*15) and medium tiles (10*10).
- Form. Backsplash tiles are wall tiles, and in its group there are not many shapes: square and rectangle. In some cases, when you need a real exclusive, it will be justified to choose not wall, but floor tiles for the work area, which are presented not only in standard, but also in very unusual shapes - “scales”, rhombus, octagon and other figured ceramics.
- Surface options (tile texture) - smooth or embossed (volumetric, convex), glossy, matte or semi-matte, glazed or rectified.
- The design of backsplash tiles can be very diverse. Here are colorful Turkish tiles for the kitchen, and original options for majolica or bricks, stylized solutions for marble, wood, and granite.
- Color and design. Again, there are a lot of options - from strict snow-white to dark all the way to black. Collections from recognized manufacturers are presented in both plain and contrasting models, as well as patterned tiles.
By type of material, they are distinguished between standard ceramics, multilayer tiles (elements imitating mosaics or bricks are applied to the base), porcelain stoneware and clinker. The last two options are widely presented in the sections of the Plitkanadom online store of the same name and are characterized by increased strength, resistance to temperatures, color fading and chemical attack.
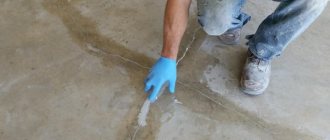
How to choose grout?
To grout the seams of a kitchen apron tiled to look like brick, it is advisable to use two-component mixtures (latex or epoxy-based) that are water-resistant: the composition can be easily cleaned from the accumulation of soot, grease and other types of contaminants.
Mixtures of this type have good resistance to chemicals, do not darken and are designed to withstand temperature fluctuations and frequent washing.
Choosing the color of the grout mixture:
- white:
The most common option allows you to make the cladding more expressive (if the color of the tiles contrasts), the grout can act as a binding element for tiles of different shades or neutralize the complex color scheme of the lamellas. For a Scandinavian-style interior, a harmonious combination of white composition with facing materials of the same color is harmonious;
- black:
The composition is suitable for light-colored tiles and will emphasize the simplicity and elegance of dark-colored materials. Finishing the apron with tiles of different colors is an original solution, but choosing the tone of the grout in this case can be difficult, so the most suitable option would be black;
- neutral grout (beige, gray, dark and light shades).
Practical to use and favorably emphasizing the slats of classic colors. Also suitable for finishing seams on brightly colored items;
- color composition.
Choosing a tone lighter than the tile will make the surface of the cladding visually more prominent.
You can choose a grout that completely matches the color of the lamellas, or you can use a material of a completely opposite shade, getting an unexpected and original combination of colors.
IMPORTANT! By maintaining the width of the space between the tiles at 1.5-2 mm, they achieve emphasis on the facing material itself. With a width of 4-5 mm, the seam is visualized as a decorative element and requires very careful and accurate design.
How to choose the right grout for joints
The grout should protect the space between the tiles from mold, mildew and bacteria. Therefore, waterproof compositions based on epoxy resins are recommended.
Interesting! Light-colored grouts with low cost tend to darken quickly.
The selection of grout depends on the preferences of the owners. If the apron should be neutral, then the grout color is matched tone to tone. If an accent is needed, then contrasting shades are selected.
Styling tools
To install and trim the lamellas, you will need the following tools and accessories:
- adhesive mixture for ceramic products;
- grinding float;
- composition for rubbing joints;
- rubber and metal (toothed) spatulas;
- building level;
- roulette;
- metal square;
- marker or chemical pencil;
- tapping cord for marking lines;
- drill (with a nozzle for mixing the solution);
- rubber mallet;
- a small angle grinder with a diamond wheel for cutting (grinder);
- metal profile or wooden strip (for fixing the first row of facing elements);
- rags, sponges (removing excess adhesive or mixture for rubbing joints).
ATTENTION! If you don’t have a construction float, process the cuts of the lamellas with a special “Turtle” grinding disc for ceramics, which is mounted on an angle grinder. Use an electric tile cutter to process beveled products - this will reduce the likelihood of damage to the product and reduce the amount of dust during work. If you are laying lamellas without a chamfer, it is permissible to use a manual one.
How to choose a beautiful design for an apron
Due to its small size in the design of a kitchen apron, the hog looks advantageous compared to ceramic tiles. In most cases, it is laid horizontally, parallel to the working surfaces, with some offset, the so-called brickwork. But it’s worth giving free rein to your imagination, because there are a huge number of styling methods.
For example, horizontal without offset: in such cases it is worth focusing on contrasting grout. Another installation method is vertical. It is also possible either in a run-up or without shifting the rows.
The vertical installation method is appropriate in cases where the kitchen does not have a top row of cabinets and the surface for installation is not limited to just a narrow apron.
Recently, designers are increasingly resorting to the method of replacing heavy upper kitchen cabinets with light open shelves, thereby expanding the apron area. In such an interior, it is also possible to lay it diagonally, at an angle of 45 or 30 degrees. At the same time, the space visually expands, so designers advise doing it in small kitchens.
Another non-trivial layout method is herringbone or zigzag. This pattern will look even more interesting if you combine two shades of tiles. The combination of several colors is a common technique when working with a hog, with different layouts. But at the same time, shades that are similar in tone are selected (for example, from light to dark).
Boar dimensions
There are several sizes, the most common is 7.5 by 15 cm. Others are used less frequently: 10*20; 7.5*30; 15*30; 28.5*8.5cm.
Using small tiles will visually enlarge the wall, but using large tiles will make it appear smaller. Thus, large sizes are appropriate to use only when finishing a large wall.
Preparatory work
Before installing the kitchen apron, you must complete the following preliminary work:
- clean the wall of old paint and plaster;
- use a level to check the evenness of the surface for hog cladding;
- degrease the wall and apply a primer, wait until it dries completely;
- measure the distance from the floor to the place where the first row of slats will be laid out;
- Taking into account the result obtained and the type of installation, apply markings to the base;
- drill holes below the line of the first row, drive in plastic dowels;
- install a metal profile or wooden plank using screws. The top of the fixing strip must coincide with the mark of the lower level of the cladding;
- make a preliminary layout of the tiles on the floor, selecting elements by color and format, check each lamella for chips and cracks;
- Prepare the adhesive immediately before starting installation. It is advisable to use a mixture that is intended for use in rooms with high humidity and temperature fluctuations. You should not dilute the entire contents of the container at once - mix the glue in the amount that you will use per hour of work. The adhesive properties of the solution decrease over time.
IMPORTANT! Always purchase facing material with a small reserve (add another 10% to the required quantity) - in case of careless cutting or falling of the lamella, you can always replace the damaged element.
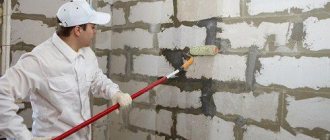
Features of apron installation
Laying a tiled apron in the kitchen has nuances that must be taken into account for a good result:
- Do not buy tiles “back to back”; you should have a reserve of 5-10% in case of damage to the trim or replacement of tiles if they fail.
- The tiles on the kitchen apron will look good only with straight seams. The seams between the bricks should be 2-5mm, this is the optimal distance that everyone likes. Therefore, masonry is often ordered from specialists in order to comply with the parameters.
- When laying it out yourself, you need to prepare the walls well using a level, primer and putty.
- The tile is mounted on the kitchen apron using construction adhesive. But its quantity is greater if the material is chamfered compared to models without chamfer. For reliable adhesion, the composition is distributed onto the back of the surface and kitchen walls.
- Corners and boxes with protruding relief are difficult to line. To make work easier, the box is painted with moisture-resistant enamel to match the color of the tiles.
- Sometimes, for laying boar tiles, they also offer square-sized materials from the same manufacturer, style and color. They allow you to fill empty spaces and cut ceramics less. If there are no such tiles, then the cut edge of the tiles should rest against the wall or corner of the apron so as not to stand out and be camouflaged.
- For a neat joint, the tiles are cut at an angle of 45 degrees. If you need to join in a corner, then install a ceramic corner.
Apron installation
- spread the adhesive using a spatula on the back of the tile. The surface of the applied composition should have small depressions and grooves;
- place the solution on the surface of the base - the “hog” is thick and heavy, so to improve the adhesion of the surfaces, a layer of glue is necessary both on the wall and on the slats;
- Apply at one time the amount of mortar required to lay 2-3 tiles;
- press the “brick” against the wall with force or by lightly tapping it with a mallet;
- the lower part of the tile should rest against the fixing profile or rail, which will prevent possible slipping of the cladding;
- to maintain the same distance between the lamellas, insert plastic crosses into the space between the tiles;
- lay out all subsequent tiles, checking the evenness of laying each row with a level or vertical plumb line (you can use a level bar);
- an hour after completion of installation, remove the dividing crosses and clean the tile joints from excess mixture with a rag or sponge;
- After the glue has dried (average time - 24 hours), remove the fixing metal profile or rail.
IMPORTANT! Lay out the first row, starting to install the slats from the part of the wall away from the entrance.
To cover a kitchen wall, the following types of installation are used:
- traditional - the lamellas are arranged horizontally or vertically, repeating the pattern of the brickwork. This is the simplest method, suitable for a beginner. There is another option for classic installation - with the elements of each subsequent row shifted by 1/3 in relation to the tiles of the lower level;
- stacked (horizontal and vertical) - tiles are placed one above the other, matching them in width or length. Vertical installation is suitable for rooms with low ceilings, horizontal installation visually expands the area of the room;
- diagonal – laying the “hog” at an angle of 45˚;
- “herringbone” – installation of elements at an angle of 90˚ relative to each other, a beautiful and original method, but requiring skill and experience;
- in a checkerboard pattern - alternating tiles laid vertically and horizontally can be made from single or double elements.
IMPORTANT! For the stacking method, the choice of color of the grout mixture plays a big role, since attention is focused specifically on the seams.
Subtleties of the “brick” apron
Externally simple, horizontal brick tile laying has pitfalls during surface preparation, installation, and grouting. These points require special attention:
- Not suitable as a temporary interior feature. The high cost and labor-intensive installation process make “hog” tiles an ideal solution “for centuries.” And dismantling such products is not an easy task.
- Pruning. When laying, you will have to do more than just cut off part of the tile to the desired size. Thickness and bevel require cutting at an angle. You will have to suffer with corner seams. Tip: choose masonry without corners with a minimum of cut joints. The cut edge is masked in the row, and the factory chamfer is applied to the corner.
- Labor-intensive surface preparation. The facing area should not only be smooth. All stages of pre-installation treatment should be carried out to ensure reliable adhesion of the weighty and thick hog tiles.
- The adhesive composition is applied to the wall and to each element of the material.
- Fine work on the joints. Even a small error in the width of the gap can ruin the entire composition. The seams are made minimal (up to 3 mm).
- Accurate horizontal calculation. With brick cladding, any deviation from the horizontal will shift the entire composition. The “joint-middle” calculation is important here. The location of the entire composition depends on the accuracy of the “marking”. Especially if the edges are on the border with horizontal surfaces. For example, boar tiles on a kitchen backsplash are usually laid flush against the countertop.
- The placement of communications and sockets should be thought out in advance. Ideally, if the width of the socket or switch matches the dimensions of the “brick” without taking into account the chamfer.
- Angles. Errors are especially noticeable in the outer corner. A plastic corner profile will save the situation with minimal inaccuracy.
- Edge defects will be masked by grout matched to the tone of the tile. It is logical to align the corners in advance.
- Quality of consumables. For example, cheap, light-colored grout may turn yellow.
Grouting joints
- Proceed to decorate the seams with the mixture only after the adhesive solution has dried;
- dilute the composition with water, scoop a small amount onto a soft rubber spatula;
- with little effort, rub the mixture into the entire depth of the space between the tiles;
- after finishing the process, use the corner of a spatula to fill out the seams - this will give them a uniform and even appearance;
- 40 minutes after grouting, carefully remove excess mixture;
- When the solution is completely dry, wash and polish the kitchen apron.
If necessary, fix the baseboard.
IMPORTANT! Do not use a spatula made of rubber or black plastic - marks may remain on the ends of the tiles that will be difficult to remove.
Recommendations for using colors in the interior
It is customary to make tile seams in cladding of any color (not just white) either as contrasting as possible, or to match the tile. Black grout color is chosen if there are other black elements in the room (for example, a black floor in the bathroom or a black countertop in the kitchen).
Shades of gray have a softer effect on perception, they are more neutral and therefore multifunctional. Gray grout does not require the additional presence of gray in the interior. But, if it is duplicated, the design will look more elegant.
Gray fugue on a kitchen apron Source amazon.com
Most often, tiles can be found on the walls and floor of the bathroom or on the walls of the kitchen (often this is a “hog” in the finishing of the apron). But, for example, a bar counter made of white mosaic with black grout also looks beautiful. This detail fits organically into a modern interior.
Existing combinations of white and black (or gray) are used to achieve a specific aesthetic result. The combination of white tiles with white grout is used in the following cases:
- If the bathroom is small and you want to make it look larger.
Design with patchwork style details Source art-oboi.com.ua
Difficulties in laying material
Careful wall preparation
The evenness of the base plane before installing the facing elements can be assessed using a construction, water or laser level. If there are no such devices, use the following method: drive a nail into the upper corner of the wall and tie a long (to the floor) nylon thread or fishing line with a weight to it.
When the plumb line takes a stable position, fix its lower part by driving a second nail into the lower part of the wall and tying a thread on it. This way you can control the deviations of the installation from the vertical plane. Horizontal deviation can be determined using a transparent flexible tube filled with water (at least a meter long). Well, or using a level.
Depending on the degree of damage to the base surface, choose how to fix the problem:
- using putty (suitable for correcting unevenness up to 1 centimeter) or plaster (from 3 to 5 centimeters);
- installation of plasterboard sheets on a pre-constructed frame (with height differences of more than 5 centimeters).
Important! Be sure to appreciate the evenness of the walls!
Accurate trimming of cladding
When decorating the outer corners of a room with a “hog”, it is necessary to fit the lamellas at 45˚ (the sawdust of the back side of the tile) using an angle grinder and diamond discs.
ATTENTION! Set the minimum number of revolutions on the grinder - this way the cutting will be precise and the risk of chipping the tiles will be minimal. After this, carefully sand the edges of the lamellas with sandpaper.
Finishing internal corners:
- when laying tiles without a chamfer, cut out the joining elements at an angle of 45˚ and align the edges, check the resulting angle for evenness;
- When installing beveled tiles, make a bevel of the product at an angle of 45˚ and, using a grinder, make a trapezoidal cutout that follows the profile of the lamella.
After cutting the tiles, be sure to clean its surface from dust and crumbs.
ATTENTION! A simple way to design external and internal corners when installing a “hog” is to use ready-made ceramic corners. You can also purchase small square elements for this purpose.
Maintaining strict horizontal laying
To install rectangular tiles, they often use the “staggered” method - in a checkerboard pattern with offset options of 20%, 30%, 50%. To maintain the evenness of the horizontal masonry, strict control of the distance between the floor and the beginning of the first row of facing elements is necessary.
A “sliding” installation line can ruin the appearance of the kitchen.
The size of the tile seam
You can often hear advice that it is necessary to leave a gap between ceramic products during installation of at least 5 millimeters. Thick seams require very careful execution and do not always look aesthetically pleasing and beautiful.
Beveled tiles require special care in finishing the seams, since the relief of the elements involuntarily attracts close attention.
The color of the grout is not of primary importance, the most important thing is that all intertile spaces must be narrow and perfectly even. When making a wide seam, it will be difficult to fulfill this condition, so a gap of 2 millimeters is considered optimal (it is especially important to adhere to this rule when using the traditional method of installing beveled tiles).
When laying a “hog” without a chamfer, the permissible size of the tile joints is 5 millimeters.
Installation of overhead accessories
In some cases, it becomes necessary to mount additional accessories on the surface of the apron: sockets, shelves, holders. Choose a place to attach parts only on a horizontal line (seam).
Be sure to make sure that the outermost part of the accessory does not coincide with the facet of the tile, otherwise the product will look as if it is “hanging” in the air.
Marking vertical seams
When installing lamellas, it is necessary to accurately calculate the number of vertical rows of the apron: the edge of a wall or floor cabinet, the connecting plinth (installed to create a smooth transition between the cladding and the surface of the slab or furniture) may align with the central part of the tile, as a result of which the fit will not be tight.
How to choose a color combination
White tiles are a versatile material that never goes out of style. If it seems boring, you can diversify and complicate the design by grouting. Whatever color of grout you choose, the background white color will not conflict with it. When choosing a grout shade for white tiles, it is useful to take into account the following notes:
- The contrasting combination, white tiles with black joints, fits into modern styles: Scandinavian, loft, modern. It is suitable for interiors that emphasize graphics, for example, pop art or eclecticism, for minimalist design.
Accent wall in the shower Source pinimg.com
- There are also restrictions on the choice of ceramics. A plain white material is ideal, but it may have a relief or a faded, as if faded, print. If the pattern is more saturated, the combination with contrasting seams will seem sloppy, loading the space.
- The emphasis on the tiles can be made using grout in gray shades, which combines well with almost all ornaments, patterns and prints.
- If it is necessary to emphasize the situation, choose white (sometimes light gray) grout. If you need to draw attention to the walls, the grout is made as dark or black as possible; it’s good if it matches the shade of the floor covering.
Light gray seams do not distract attention from the design Source tesser.ru
Useful tips
- It is more convenient to install the slats before installing the furniture in the kitchen, but in this case it is necessary to make precise markings of where the interior items will be located. It is permissible to make an apron after placing the elements of the kitchen set;
- when calculating the required amount of adhesive when laying hog tiles, remember that the product is heavier than standard material of the same size, so more mortar will be required to fix it on the wall;
- When dismantling the slats or metal profiles after the glue has completely dried, under no circumstances pull the support towards you: you may accidentally tear off the tiles of the first row. To avoid this situation, remove the rack in a downward direction.
With the help of ceramic tiles “boar” you can implement the most daring design solutions in any kitchen, regardless of its size, wall color and interior style.
The only drawback of the material can be considered the cost, which is significantly higher than the price of ordinary tiles.
Design options for boar tiles on a kitchen apron
The “hog” tile is available in 2 types: without a chamfer (a flat surface, not beveled at the ends) and with a chamfer (the ends are beveled and there is a relief). Regardless of the type, there are many different shades available. There are recommendations to help you choose the optimal shade:
- Milky and white tones are considered universal. Therefore, they are suitable for various styles, kitchen furniture, decoration, and accessories.
- Regardless of the texture of the black tiles (matte or glossy), the masonry will look beautiful against the background of a white, black glossy or wooden kitchen set.
- When selecting tiles, take into account the style of the room and the prevailing textures. For example, if the kitchen set is artificially aged, then the tiles can be installed with craquelure (small cracks).
- If the room has a neutral atmosphere, then the apron can be made of bright colors: scarlet, deep blue, grass, pistachio, ash, pink, purple, soft blue, orange, etc.
Examples in the interior
Apron care
The boar is a moisture-resistant material that does not require special care. Many household chemicals will help you deal with greasy stains on your kitchen apron. The main thing is to regularly care for the surface, at least once every 2 weeks. Of course, you should not use abrasives on the glossy surface of the apron. The seams between the tiles, if they have bevels, will require additional time to maintain. Dirt and dust can accumulate in these recesses. Again, the main thing is regularity of care.
So, boar tiles are completely suitable for laying a backsplash in the kitchen. Convex outlines will visually help increase the space. Don't forget about lighting the work surface in the kitchen. Correctly chosen light will favorably emphasize the texture of the material, especially glossy ones. The boar will be a bright accent in the kitchen.
How to lay hog tiles in the bathroom
The simplest installation method is the original purpose - “under brick”. But over time, other installation methods have appeared, which allows the most daring ideas of designers to be realized. Even by using only one type of tile, but laying it out in an unusual way, you can create an interesting design. So, tiles can be laid using the following methods:
- Traditional, imitating brickwork: laying out elements offset by half.
- Vertical brickwork: tiles are laid vertically with a half offset.
- Stacked horizontal: without offset, each element is located on top of each other.
- Vertical stacking: elements are stacked vertically on top of each other.
- Herringbone: Reminiscent of laying parquet.
- Diagonal brickwork: at an angle of 45 degrees with each element offset by half.
- Checkerboard: alternating vertical and horizontal masonry in a checkerboard pattern.
Options for laying boar tiles
Boar tiles laid out in a herringbone pattern
Most often, unusual masonry is emphasized with contrasting grout: dark tile elements are light and vice versa.
Examples of a successful combination of a boar with other types of tiles, for example, porcelain stoneware that imitates wood, or patchwork style tiles: