The vast majority of apartments, especially those built during the Soviet period, were equipped with wooden floors. But for rooms with high operational load or high humidity - such as corridors, kitchens, bathrooms, showers - tiled floors are more suitable. Ceramic tiles (tiles) are superior to wood in durability and practicality. It is much easier to keep it perfectly clean. But will the tiles fit on a wooden floor if you don’t want to disassemble it? Or is it not possible to do this?
What are the problems with laying tiles on wood?
The installation of tiled floors requires a perfectly flat, stationary base. Wood is sensitive to changes in the microclimate of the room: it swells with excessive humidity, dries out and shrinks when used at high temperatures. This type of base is not suitable for tiles: they will crack or begin to “walk”. When using small tiles, cracks will appear along the seams between the floor elements.
In turn, wood is also uncomfortable under the ceramic layer. Wooden parts deprived of natural ventilation will deteriorate much faster under the influence of dampness and microorganisms.
But modern materials and appropriate technologies make it possible to create an intermediate layer that allows you to lay tiles on a wooden floor.
Is it possible to lay tiles on a wooden floor?
Bases for tiles are usually divided into two categories:
- simple;
- complex.
The tree is classified as the second type due to the following features:
- Low load-bearing capacity: tiles and adhesive are heavy materials and not every wooden structure can withstand such a load.
- Need for aeration: tiles on a layer of adhesive are an airtight coating, and without air access the wood is destroyed.
- Short service life: a wooden base will require repairs much sooner than ceramic tiles. This means that the user will one day be forced to knock down expensive finishing material, despite its good condition.
What distinguishes wood from other materials is its mobility, which implies the ability to:
- shrink;
- bend under loads;
- transmit vibrations;
- shrink and swell with changes in humidity.
The greatest mobility is observed in the first year or two after construction, when the tree shrinks.
Tiling can only be done after this period. The above does not apply to dried lumber with a moisture content of 8-12%.
Thus, laying tiles on a wooden floor is possible under the following conditions:
- the structure is strengthened and the load is minimized so that deformation is eliminated;
- the tree has already shrunk;
- the condition of all floor elements is ideal and repairs will not be required soon;
- for the same purpose, the wood is carefully treated with antiseptics;
- there is a layer between the base and the tile that allows the wood to change sizes, but at the same time maintaining a stable shape;
- there is air access to lumber.
Let's see how all these requirements are implemented in practice.
Revision of old coating
Before choosing a method for preparing the base for laying tiles, you need to conduct a thorough inspection of it. The sequence of future work will largely depend on the condition of the old floors.
Under no circumstances should it be installed on newly constructed wood floors. They need to be given at least two to three years to shrink. So in new buildings you cannot lay tiles on wood. You must either wait or completely dismantle the floors and construct a fundamentally different base, for example, a concrete screed.
It should be noted that the tile covering is laid for a very long time. Therefore, you need to be absolutely sure that the elements of the old coating will last no less. There is no point in fussing with the tiles if they will soon have to be opened due to rotten elements of the base.
USEFUL INFORMATION: Cosmetic renovation of an apartment: what it is and what it includes
Professionals insist on a complete overhaul of old floors to find and replace all defective elements.
Be sure to check the condition of the joists and the distance between them. It should not exceed 50 cm, otherwise the base may not withstand the weight of tiles, glue and other materials.
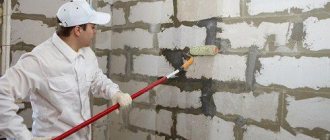
Strong boards that do not have visible defects can be used, but first they must be freed from the old coating: paint or varnish. This can be done in different ways:
- Mechanical - clean the coating using an abrasive tool: sandpaper, grinder, grinder with a special attachment.
- Thermal – heat the paint with a hair dryer. It will swell and be easily removed with a spatula. Some craftsmen manage to use a regular blowtorch for these purposes, but we must remember about the possibility of fire.
- Chemical - remove varnish or paint using various reagents. But wood, once saturated with them, will emit unpleasant odors for a long time, so this method is used very rarely.
Preparing the base
So, you should carefully disassemble the wooden floors and assess the condition of the joists. Replace defective ones, add additional joists if necessary, securely fasten them and level them.
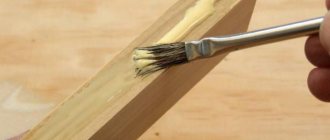
All elements of the wooden floor structure must be treated with an antiseptic. After it dries, you can update or replace the insulation. This could be a layer of expanded clay, mineral wool slabs or another type of thermal insulation. When laying, the recommendations for using the selected material must be followed.
It is necessary to leave a space of 5 cm between the subfloor boards and the insulation to create natural ventilation.
When installing the flooring back, you should not pack the boards tightly, but leave a gap of a few millimeters between them so that the wood can breathe. A 10 cm gap is left between the floor and the walls. Then it can be sealed with polyurethane foam.
The progress of further work depends on the chosen method of preparing the base. The main ones are the device of a lightweight screed, the use of plywood or polyurethane adhesives.
USEFUL INFORMATION: We equip a balcony with our own hands: modern options for interior decoration
Bonuses for using tiles
Tile covering has many advantages.
The main ones are:
- Fire resistance. If something happens, the tile will never burn. In addition, it does not emit any toxic substances.
- Easy to clean. Mold and mildew almost never grow on tiles. Their appearance is easily eliminated. Plus, the tiles are very easy to clean.
- Strength. If the tiles are laid correctly, it can be tens of times stronger than cement.
- Coating hardness. Under various severe loads and mechanical damage, the tiles do not deform.
- Resistance to other factors. Ultraviolet rays, moisture and many chemicals do not affect the tiles in any way. Tiles are also excellent dielectrics.
Related article: How to make a bar counter in the kitchen with your own hands
The main advantage of ceramic tiles is their fire resistance
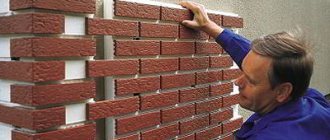
Floor coverings such as ceramic tiles are very easy to maintain.
The tile covering is ideal for creating a “warm floor” system underneath.
Required tools and materials
To install tiles on wooden floors, you will need:
- building level,
- saw,
- pencil,
- glue,
- cutter,
- rubber hammer,
- putty knife,
- gloves,
- rags.
Board base
- The boards are impregnated with a latex-based waterproofing solution. Without waiting for it to dry, lay a painting reinforcing mesh on the floor. In the future, it is additionally fixed with self-tapping screws.
- A layer of solution consisting of sand (2 parts), liquid glass (2 parts) and water is applied to the floor surface. All components must be thoroughly mixed.
The tiles are fixed with two-component polyurethane adhesive. It retains its plasticity after hardening, so it will not only ensure reliable fastening of the tiles, but also compensate for slight vibrations of parts of the subfloor.
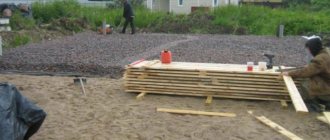
Lightweight screed
The point of this method is to create a solid and level base that is not connected to walls or wooden floors. This floating structure will ensure the integrity of the tile covering. The optimal thickness of the screed is 30 mm: a smaller thickness will not provide sufficient strength to the base, a larger thickness will significantly increase the weight of the floor.
- A layer of waterproofing is created. This can be rolled material: glassine, bitumen paper or even thick polyethylene. Waterproofing mastics or heated drying oil are often used. In this case, reinforcement with fiberglass mesh is used.
- Damper tape is glued along the perimeter of the room between the floor and the wall.
- A thin metal mesh is attached to the waterproofing layer with self-tapping screws.
- A screed with a height of 30 mm is poured.
You can use a regular solution of cement and sand, but it is better to use self-leveling mixtures: they dry much faster and are more convenient to work with.
- After hardening, the screed is primed, and then the tiles are laid in the same way as on a regular concrete base.
Plywood base
To create an even and durable base for the tiles, sheets of plywood with a thickness of at least 10 cm are used. It is better to cut them into 4 parts. Installation is carried out following the following recommendations:
- After impregnating the base with an antiseptic and laying the waterproofing layer, the plywood is fastened in a checkerboard pattern.
- A compensating gap of 5 mm is left between the individual elements. In the future, it can be sealed using sealant or foam.
USEFUL INFORMATION: How to waterproof the floor and walls in the bathroom with your own hands
Plywood is also subject to thermal expansion, which is why a compensating gap is needed between the individual sheets. A 10 mm wide gap is also left around the entire perimeter of the room.
- The plywood is fastened to the base using wood screws, recessing the caps deep into the material, in increments of 15–20 cm.
- The resulting surface is processed with a grinding machine along, across and diagonally. Then it is primed.
- A waterproofing layer is formed from latex impregnation, paint mesh and liquid glass solution.
- The tiles are attached with polyurethane glue.
Plywood can be replaced with slabs of moisture-resistant plasterboard or gypsum fiber. The technology will not be much different, but it is worth using components designed specifically for these materials.
Wooden floor. Preparatory stage
Before laying ceramic and tiles on a wooden floor, you will need to carry out various preparatory work. Floors should be checked for cracks and unevenness. Remember that installing on a low-quality surface simply does not make any sense. Therefore, first we will consider the various situations that may arise.
If the old boards on the floor are rotten, they need to be replaced
Chipboard, plywood or OSB board will help to level a wooden floor
If the old coating creaks and bends
The algorithm of actions in this case should be as follows:
- Old floors must be completely removed.
- It is necessary to dismantle the lower floor using a nail puller.
- Beams are installed on the substrates and set in a horizontal position using a building level.
- The beams and lower floor are treated with a special impregnation.
- After the impregnation has dried, expanded clay is poured between the beams.
- Now you will need to very carefully secure the board to the subfloor across the beams in those places where it comes into contact with them.
- You will need to lay parchment paper on the subfloors and strengthen the substrate on it, which should be made of gypsum fiber board.
- The resulting structure is primed, after which tiles or ceramic tiles can be laid on such a floor.
- The old covering is dismantled, and a layer of waterproofing is laid between the ceiling and the wall at the joints.
- A horizontal line is installed along the perimeter of the kitchen, after which the surface level is marked along it. You also need to set up beacons.
- The screed is filled with concrete.
- Expanded clay is poured between the beacons. The wooden floor is filled with mortar and left in this state for one day.
- After this, the floors are cleaned of excess expanded clay, primed and refilled with the mixture. It is left in this position for 3 days.
- The screed is primed. Next, you need to lay a special self-leveling mixture. Now ceramic or some other tiles can be laid.
Related article: Advantages and disadvantages of gypsum fiber and plasterboard sheets
Wooden floors require careful preparation before laying tiles
If the covering is in good condition, chipboards are laid on the lower floor
In this case, the actions should look like this:
- All joints between the chipboard and the wall are waterproofed using polyurethane foam.
- The chipboard is processed twice with heated drying oil. Since drying oil is flammable, you need to be very careful when working with it.
- Taking a wide brush, you need to treat the chipboard with a thick layer of latex.
- The painting mesh is laid out on the surface and left in this state until it dries.
- After this, the mesh is secured to the chipboard using self-tapping screws.
- The surface must be treated with a solution containing coarse sand, water and liquid glass.
- After the composition has dried, tiles can be laid on the surface.
Laying tiles
Tiles are laid on wooden floors in the same way as on a concrete base:
- Laying begins from the middle of the room or from the far corner opposite the entrance.
- For lightweight screeds or gypsum boards, it is recommended to use cement adhesive mortars; for plywood or boards, use two-component polyurethane adhesive.
- The glue should be prepared in small quantities and in strict accordance with the manufacturer's recommendations.
- The correct installation of each tile is immediately checked by the building level.
It is better to use mixtures containing silicone as grout. This will increase protection against moisture on the wooden base.
Excess glue or grout is removed from the surface of the tile immediately with a wet cloth. Don't let them dry out.
Tiling work in a wooden house
How to lay tiles on a wood floor in the kitchen
Tiling work in houses made of timber and logs is initially considered difficult. A wooden base that is movable and changes volume under the influence of moisture and temperature is, in principle, not intended for laying ceramic tiles and porcelain stoneware.
The technology allows this work to be carried out only if stable, level foundations (floating concrete screeds or vertical frames) are laid at the end of the active shrinkage stage of the wooden house.
Due to labor intensity, extra expenses and slower commissioning of surfaces, it is advisable to carry out these works in rooms with high humidity loads (kitchens, bathrooms, toilets), unheated utility rooms and areas of intense floor contamination (corridors, hallways, terraces).
In addition to laying a stable foundation, during their implementation, measures are taken to strengthen and enhance the antiseptic protection of all hidden wooden elements, protecting structures from moisture, steam and freezing. Special attention is paid to the selection of the tile products themselves (their moisture resistance and bending strength must correspond to the expected loads), glue and grout.