Photo gallery of finished tracks
The photo below shows options for arranging garden paths with flagstone, which you can take note of.
Decorating alleys on a summer cottage with natural stone adds sophistication, neatness to the estate, and from a practicality point of view, it is a durable, affordable material, the masonry of which is easy to do yourself.
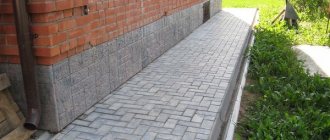
Flagstone paving on garden paths with concrete base
Paving flagstone on a concrete base
After the labor-intensive and physically difficult process of making a drainage base and concreting the base of the garden path, it would seem that only a trifle remained - paving the flagstone . But, like any finishing work that determines the final appearance of our product, this process requires knowledge of certain nuances. To decorate garden paths, as a rule, natural stone is chosen - flagstone, also called plastushka. This name does not come from the mineral, but from the appearance of the building stone, or rather its flat shape. Which is undoubtedly very convenient when decorating, since it requires almost no additional processing.
Pitfalls of a concrete foundation
The concrete base ensures the longevity of paving slabs - this is true. But most finishing specialists do not want to get involved with this technology. Why? This makes sense: if you make just one mistake when laying it on concrete, the paving slabs will fall off the base in the first winter. This will happen if water is not drained away from the paved base.
Water is the main enemy of paving slabs. Getting into microcracks and pores, moisture expands when freezing and tears the material from the inside.
When laying paving slabs on concrete, it is necessary to ensure effective drainage and drainage of the site
When laying tiles on a sand-crushed stone base, water flows out immediately. Water does not linger in the pores of the paving material, but is immediately absorbed into sand, crushed stone, and then into the soil. But this cannot happen with a concrete base. If installed incorrectly, water passing through the paving joints will accumulate between the concrete and the tiles. And this will lead to the fact that when it freezes, the tile will turn out and be torn off from the base.
Therefore, it is so important that the laying of paving slabs on a concrete base is carried out according to all the rules. Let's look at all the stages of this complex process, without neglecting the construction of the concrete base. If you already have it (concrete platform, path), you can skip this point of the plan.
What is flagstone? Selecting the type of flagstone stone.
Specialized site for stone
Flagstone is a flat stone of arbitrary shape. It is formed from rocks that break up into flat slabs along parallel areas. Flagstone of the following types is found on sale: sandstones, quartzite-sandstones, shales, limestones and dolomites. The choice of natural stone for paving garden paths is a purely individual matter. Each stone, as a creation of nature, has its own individual character, history and healing properties. Many of them are powerful magical amulets. I will only note that not all stones are ideal for floor paving in paths. Thus, the most affordable flagstone, sandstone, which is well suited for vertical decoration, very quickly begins to delaminate on paths. Of course, a lot depends on the quality of the stone itself, but it’s not always worth the risk. The same drawback applies to slates; among them, only green slate is used for paving.
Natural stone is sold in pallets and per square meter. m.
Limestone is very easy to process, but is absolutely not suitable for lining paths; the stone is too soft and requires additional treatment to prevent moisture penetration, even with vertical cladding. A good option is to choose dolomite. Marble is a noble, almost eternal material; in the winter it becomes extremely slippery, and also accumulates radiation, but quartzite can be an excellent alternative. Flagstone is sold in large construction stores or specialized places - stone sites. A stone of approximately the same fixed thickness from 10 to 70 mm is selected, formed into pallets and sold from 1 square meter.
Selecting glue for gluing flagstone.
When choosing an adhesive, you need to make sure that it is intended for external cladding of the floor with natural stone, and not just walls, and that concrete and cement screed are suitable as the base. I recommend considering only specialized adhesives; universal ones do not always provide the desired result; you have to “pay” for universalism. We select, if necessary, special brands for paths with intense load or heating, look at the shelf life and operating temperature range, especially important if the work is carried out in the autumn-spring period. If necessary, we use the necessary additives produced only by the glue manufacturer. Please note that most adhesives for working with natural stone must be mixed twice after a certain period of time, so read the instructions carefully.
Getting ready to paving flagstone on the garden path.
Place for installing a built-in lamp
Flagstone paving is possible not only on a concrete base, but also on an old concrete path. If, when casting concrete, you missed the moment of creating places for installing lamps, then it’s time to arm yourself with a hammer drill or grinder to minimize further damage when lighting the finished path. Then we prepare the concrete base for work. If it was cast a long time ago or we want to cover an old concrete path, then it must be washed and treated with a primer. If there is still residual moisture in it, then nothing additional needs to be done.
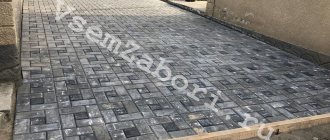
Flagstone garden path
When paving flagstone on concrete bases, we select a stone 25-40 mm thick. We lay out the flagstone along the path, selecting the pattern and uniformity of the gaps. We trim the edges with an angle grinder - a grinder with a diamond wheel. If possible, it is better to do this with water supplied to the cut site. If not, then the circle should be for dry cutting. Usually it also indicates the types of stones for which it is intended to work. For dry pruning, it is better to do it in a remote place; there will be a lot of dust. Don’t forget to protect your eyes and safety precautions in general. This is perhaps the most time-consuming part of the work, but the entire aesthetics of the future garden path will depend on its result. The glue will harden quickly in air and there will be no time left for trimming and finishing. We wash the flagstone from dust and deposits on the side where we will apply glue or mortar. To do this, we need good water pressure, and possibly preliminary manual treatment with a brush.
Paving flagstone on the concrete base of a garden path.
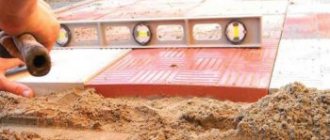
Mix the glue according to the manufacturer's instructions. We apply it to the concrete base. We lay out the flagstones in accordance with the selected pattern. We start with the thickest tiles; thinner stones are brought below the level using a thicker layer of glue. Carefully press the flagstone into the adhesive mixture so that there are no voids left underneath. The glue must occupy the entire space, otherwise water may accumulate in the voids, which in winter will squeeze out the tiles when it freezes. We try not to apply too much, so that when pressed, the adhesive solution only fills the seams. We immediately remove the remaining glue from the front side of the natural stone, otherwise in a few days you will need a metal brush. We set the height of the tiles to the level and ensure the slope of the path for good drainage. Let it stand until the glue acquires operational strength, the period is indicated by the manufacturer.
What to look for when choosing a material
It’s not difficult to make practical and beautiful paths on your site yourself.
It is important to choose the right flagstone for paths. Depending on the base material, the thickness of the stone should vary from 12 mm to 80 mm. If paving will be done on concrete, then there is no point in laying stones that are too thick. On the contrary, on a cushion of sand or crushed stone, you should choose flagstone for paving paths with the greatest thickness. It is inconvenient to lay very large or too small stones, so it is better to use medium-sized material, approximately 300-350 mm.
The color of the stones is also of no small importance for linking individual elements of landscape design into a single whole. Flagstone sidewalks and paths serve precisely this purpose. In addition, the color of the plastic can determine its strength. The most reliable stones are greenish and dark brown. You should not use wet material; after drying, it may turn out to be fragile and brittle.
Finding the right flagstone for your home needs is very difficult. It has different characteristics, structure, thickness, density, color, texture and even relative humidity! Many summer residents, having purchased finishing material, were disappointed within a few weeks after the start of use. Now we will give some practical advice that will help you make the right choice.
- Thickness. Flagstone paths can be varied, from 6 mm thick to 80 mm and even more. If you are planning to make a path on a cement screed and only for pedestrian movement, then the ideal thickness is 10 mm. This will be enough to withstand jumps, falls, kicks and other physical impacts. If you plan to drive a car up to 1.5 tons, then you need to buy 20 mm layers. In the case of moving a truck – 25-30 mm, depending on the weight. The material can be laid on the ground or a sand cushion. Then the thickness for a pedestrian increases to 20 mm, for a passenger car - 30 mm, and trucks cannot move at all. Thick blocks of 50-90 mm serve only as decoration (pools, waterfalls, walls in the garden, etc.), they have no practical value.
- Color. The choice depends only on the taste of the consumer, but several points must be taken into account. Green flagstone has a high density, as it is made from dense rocks, and light yellow stone has high layering. It is better not to use it for finishing; it must be varnished.
- Texture. Some types of flagstone have stains when cut, which were formed thousands of years ago when it was laid on the bottom of the sea. This stone is more valuable and costs 35% more. But the surface also looks much better, especially after varnishing.
- Strength. As a rule, it depends only on the correct installation; the material itself is practically no different. Pay attention to the solidity - the fewer layers, the stronger.
- Humidity. Do not buy a product that looks and feels very wet. It could have been in the basement or outside for many years. Its strength is significantly less than that which was stored in a dry place. Street use should only be after coating with protective mixtures, and this is not done for the sake of economy. You can’t take it in large packages either, or you need to check it. There may be water inside it, and all the tiles will crumble in your hands when laying.
Laying flagstone on paths
Beautiful and durable paths made of flagstone on a personal plot or summer cottage allow you to simultaneously solve several functional problems:
- they combine a residential building and outbuildings into a single complex with convenient and practical passages:
- contribute to the preservation of beautiful grass cover on lawns and gardens without the formation of paths;
- Thanks to this coating, you will no longer have to walk on damp ground in inclement weather or after rain.
improve the overall appearance of the site, influencing the design of the area;
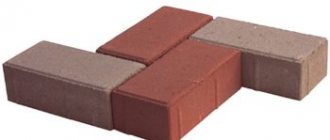
How to choose the right paving slabs
The best solution is tiles with high frost resistance. In addition, the tile must have compressive strength.
High-quality tiles should not be very bright
This parameter greatly influences the price offer, but if you consider that this coating option will last longer, then its choice is obvious.
When purchasing a paving surface, carefully examine it for cracks and chips. If such instances exist, consider the material itself. If air pores or small recesses are visible in the tile, then you should not buy it; the service life of such a coating will not last up to two years.
Pay attention to the color design. If the tiles are made using very bright colors, the service life of the material is reduced. This is due to a violation of technology; the percentage of dye is significantly exceeded, which will lead to cracking of the tiles.
Using flagstone as a road surface
A variety of materials are used to cover garden paths. This can be a simple backfill with small colored crushed stone or monolithic concrete, rubber or wooden coverings, paving slabs or paving stones, but nothing better than inexpensive and durable natural stone has yet been invented. And flagstone is just such a material - a beautiful, fairly durable and relatively inexpensive stone.
It is a slate slab material made from sandstone or limestone, divided into flat slabs of different sizes and configurations with a thickness ranging from 15 to 150 mm. Thin slabs are often used for exterior and interior wall decoration, but thicker ones are perfect for road surfaces.
The advantages of garden paths made of flagstone:
- beautiful appearance and wide range of colors;
- smooth and, at the same time, rough surface;
- excellent environmental performance;
- good strength, frost resistance, resistance to moisture and abrasion;
- long-term preservation of color shade;
- simple laying technology and mechanical processing if necessary.
All this makes this material one of the best among road surfaces.
How to make flagstone paths at your dacha with your own hands - three reliable ways
The country path carries not only a huge functional load, but also has great aesthetic significance. Neat and well-groomed alleys will decorate any area, while untidy and dirty paths will bring dissonance to even the most sophisticated landscape. Natural stone looks very harmonious and natural in the garden.
There are several parameters that you need to pay attention to when choosing a stone. An important characteristic is its thickness. If the flagstone is attached to a concrete screed, then slabs with a thickness of 12 mm are suitable for the pedestrian zone, and from 20 mm for the access road. If you plan to lay it on a sand or gravel bed, you need to choose a thicker stone - from 40 to 60 mm.
The color of the slabs also plays an important role. The bright variety has a softer and more layered structure, and the densest stone is green in color. Light yellow material has very low strength, and it is better not to use it at all for laying paths, but only for finishing. If you find that the stone is wet to the touch, refuse to purchase, as it may crumble during installation.
Material for paths
Pay attention to the size and edge of the tiles. Too large or very small are not very convenient to work with; it is advisable to purchase flagstone for paths, the sides of which are 33–35 cm long. You should not choose material with jagged edges; in the future, when laying, it will be very problematic to select the appropriate stones for joining. But if you want to give the path a more natural look, then uneven edges, on the contrary, will come in handy.
This is the simplest, but not very reliable installation method; it is only suitable for small paths that are not subject to heavy loads. Once you have determined where the alley will lie, mark the area, drive in pegs and stretch the cord. To make a flagstone path in your country house look natural, try to avoid right angles, round corners and make smooth lines.
Dig a trench along the marked contour. Its depth should be 5 cm greater than the thickness of the stone. Then level the base and pour a 5 cm layer of sand onto the bottom of the ditch. To compact it, pour water from a hose on it, but not too much. It should be moist but not wet. Lay the tiles in a random order on well-compacted sand, leaving approximately 1–2 cm between them.
After the stone is laid, fill any voids with sand. If you want green grass to grow picturesquely between the elements, instead of sand, add fertile soil and sow the seeds.
You can sow grass in the joints
This technology is a little more complex than the previous one, but a path with a gravel base will be more durable and will last much longer. In addition, this installation method is suitable for clay soils prone to heaving. After marking the area, you need to dig a trench 10 cm deep and install a fence along it. It can be made from boards pre-treated with a primer or antiseptic, or ready-made curb blocks.
To prevent weeds from growing on the flagstone path, line the bottom of the ditch with geotextile, and hide its edges under the curb. Fill the top with a layer of gravel about 5 cm, then the same layer of sand, pour water on it and walk over it several times with a hand tamper. Next, lay the stone as indicated above, and fill the joints between the slabs with medium or fine gravel. You can clearly see how to pave paths in a dacha with flagstone in the photo.
Stone laying technology
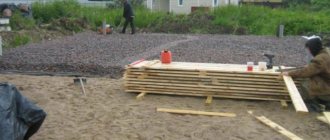
This is the most versatile method of laying stone. It is suitable for narrow paths, high-traffic paths, driveways and parking areas. The depth of the trench in this case should be about 40 cm. Before making a concrete base, it is necessary to install wooden formwork on both sides of the pit and secure it with stakes. It is advisable to use wood no thicker than 25 mm for its manufacture, which can be bent at the places where the path turns.
After installing the formwork, level the ground, fill it with 10 cm of gravel and lay the reinforcing mesh. Now you can start pouring concrete; its thickness should be about 30 cm. To prevent the base from cracking in the future, it is necessary to make expansion joints every one and a half meters. Use thin plastic as a separator. The concrete base is ready, leave it for a few days to completely harden.
Laying on hardened concrete
We suggest you familiarize yourself with How to fill paths in a dacha
All that remains is to lay the flagstone. To ensure good adhesion of the stone to the concrete, the stones must first be thoroughly washed and cleaned of deposits and dirt with a stiff-bristled brush. Laying is done using construction adhesive for exterior use. It is applied in a thick layer to the base, and then flagstone is placed on the coated area so that there are no voids left between the elements. Excess glue must be removed immediately with a rag; after drying, this will be much more difficult to do.
Flagstone is a natural stone, so a garden path made from it will naturally fit into the country landscape and will look harmonious in any corner of the site.
Flagstone refers to a sedimentary rock type. It is formed as a result of compaction under pressure of layers of stones of other types. It is mined in quarries by chipping from the deposit layer. It is a slab with smooth or chipped edges. Color, relief, density and thickness depend on the breed. The latter value ranges from 2 to 15 cm. Thin material is suitable for finishing walls, denser material is suitable for decorating driveways and pedestrian areas.
Flagstone garden paths are very popular. They are distinguished by durability and a variety of textures. And it’s not difficult to lay natural stone with your own hands.
What types are there?
Since the characteristics of the material depend on the type of sedimentary rock, the following is often used to create a path:
- sandy;
- granite;
- slate.
Less commonly, limestone or dolomite.
The first type is the most affordable. The thickness of the slab is 1–4 cm. It is found in gray-green, yellow, red, dark gray colors.
In terms of durability, granite flagstone occupies a leading position. Its service life reaches 300 years. Stone thickness from 8 cm and above. Resistant to any environmental influences. Color – creamy gray with black specks.
You can make a path from slate with a thickness of 1.2 to 5 cm. In terms of strength, it is significantly inferior to granite. However, it is convenient to select the shape, and it is easy to process the edges. Colors – light yellow, brown, gray.
You need to remember one rule: the brighter the shade of the slab, the more layers the material has, the softer it is, and the faster it will begin to crumble.
If you want to buy and lay out a flagstone garden path yourself, then consider a few tips:
- The stone deposit must be in the same climatic conditions as the masonry site, otherwise it will negatively affect the durability of the coating.
- The color of the flagstone is no less important. Dark green is considered the most durable, while light yellow crumbles quickly. The surface should be in muted tones.
- The choice of thickness depends on the purpose and method of paving. For pedestrian areas, 1.5 cm is enough, for laying access roads - from 4 cm and above. When laying on cement, the thickness can start from 2 cm, and to create a path on sand, this figure must be multiplied by two.
- The texture of the stone is also important. A smooth, rough surface is optimal.
- It is better to buy raw materials from one batch - the shade of each slab will be approximately the same. But stone from different batches can differ significantly in color.
- The material must be dry. If stored for a long time in a damp place, it will quickly begin to crack and crumble.
To roughly calculate how much material will be needed for garden paths, it is worth considering that one ton 4–6 cm thick is enough for 10 m2.
Manufacturers set the price for material per 1 m2. However, the final figure depends on the thickness of the slab. So, 10 mm yellow sandstone will cost from 496 rubles/1 m2, 18–25 mm thick – 595 rubles/m2, from 25 to 35 mm – 728 rubles/m2, more than 36 mm – 860 rubles/m2.
The popular breed lemezite or burgundy slate costs 330 rubles/m2 for a slab thickness of 10–18 mm, 25–35 mm – 550 rubles/m2, over 45 mm – 760 rubles/m2.
The average price of goldite is from 240 rubles/m2.
When ordering the services of craftsmen for the construction of a turnkey garden alley, the price list will be approximately as follows:
- leveling, trench digging, other earthworks – 250 rubles/m2;
- backfilling with sand and crushed stone cushion – 150 rubles/m2;
- creating formwork, pouring concrete mortar – 400 rubles/m2;
- preparation from scratch of a sand base – 600 rubles/m2, gravel-sand base – 1100 rubles/m2, concrete – 1500 rubles/m2;
- washing of stones – 150 RUB/m2;
- trimming the edges of the material – 300 RUR/m2;
- laying flagstone by selection - 800 rub./m2, chipping - 900 rub./m2.
If the entire scope of work is carried out by specialists, then the average price of a flagstone path will be 2,400 rubles/m2.
Owners who plan to build paths in their summer cottage with their own hands need to choose the material for the future foundation correctly. It can be sand, concrete or crushed stone.
In addition, it is worth knowing about two types of masonry:
- Suture. The flagstone is selected so that 24 hours after paving, the gaps between the elements are no more than 1 cm.
- Seamless. Each stone fits closely to the other by cutting off excess parts with a grinder. The pattern of the path turns out more natural and beautiful than in the first version. However, the process is labor-intensive and will require a lot of time.
cutting tiles to size
To ensure that the edges of the flagstone are smooth and the tool lasts longer, you need to purchase a circle marked stone as an attachment disk for the grinder.
On a pillow of sand
The main advantages of this installation method:
- creation speed;
- ease of paving;
- practicality;
- affordable price of materials;
- easy to repair.
checking the laying horizon using a level
Minuses:
- such a base cannot withstand heavy loads;
- Over time, the stones may begin to shift.
The laying technology looks like this:
- The site is being marked. Pegs are driven into the sides, along which the rope is pulled.
- The top layer of soil up to 30 cm is removed. The bottom is compacted.
- Geotextiles are laid. It will extend the life of the track. The base will not subsidence, and weed roots will not destroy the integrity of the alley.
- A 15 cm sand cushion is poured, moistened with water, and compacted. The surface is leveled.
- To prevent the edges of the path from moving, curbs made of stones, wood or plastic are installed on the sides.
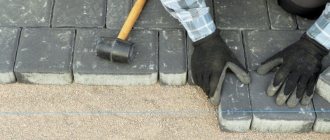
- Each tile is pressed into the base with a rubber mallet. Seams between elements should be no more than 2 cm.
- The gaps are filled with sand or lawn seeds.
A properly designed project determines the success of the work
To arrange paths on your summer cottage, you can invite specialists from a construction company who will develop a design project and complete all the necessary work in a short time. But this can be very expensive. It is much more profitable, and much more fun, to arrange your site yourself. This work is not that difficult and, with one or two assistants, you can handle it quite well.
You need to start with making a project or at least a clear construction sketch. To do this, draw a plan of your site with a schematic drawing of all existing buildings, trees, bushes, flower beds and other elements. Make several photocopies and distribute them to your family members so that anyone can draw their own version of the path layout. Then, putting all your thoughts together, create your own, the most compromise and convenient option.
When drawing up a project, keep in mind that the width of the paths should be such that it is enough for two people, but not more than 1.2 meters. Slopes are directed away from buildings. If materials of different color shades are used, indicate them on the diagram.
Now, using the drawing, you can correctly calculate the area of all road surfaces and determine the required amount of material to purchase.
Purchasing material
After the amount of material required for construction has been determined based on the project, flagstone for paving paths can be purchased. Purchasing is not as simple as it might seem at first glance. Here you need to know what types of stone there are, as well as the external distinctive features of the quality of the slabs.
When choosing flagstone, try to find out as accurately as possible the deposit in which it was mined. The closer to your home it is, the better the material will match in terms of frost resistance for your climate zone. After this, pay attention to the color shade of the stone.
The strongest flagstone is greenish in color, while light yellow is the softest. The rule here is that the brighter the tiles, the more layered and softer they are. In addition, you can test the strength by touch by trying to crumble the edge of one of the tiles.
The thickness of the slabs, even within the same batch, can vary greatly. Therefore, try to choose materials that are as uniform in size as possible. The thickness of the tiles for pedestrian paths must be at least 15 mm, and if a car can run over it, then at least 4 cm. The presence of smooth edges is a desirable, but not mandatory condition. With the help of a grinder you can always process them. But so that the amount of waste remains within reasonable limits.
A very important quality factor is the moisture content of the material. If flagstone was stored outdoors for a long time, its strength could be significantly reduced. This can be determined by simply feeling the stone lying in the second or third row.
In addition to flagstone, you need to buy: cement, sand, medium-fraction crushed stone and curb fencing, if its installation is planned.
Practical tips for laying paving stones on concrete
It is important to lay the tiles correctly, but besides this, there are also many nuances that relate to the installation of paving stones. First, you need to consider the risk of working with moving soil. Here it is worth compacting the soil with a vibrating saw. In addition, there are other nuances of the technology.
Damaged tiles can always be replaced without dismantling the entire covering
Practical tips and rules for performing work:
- It is necessary to pay attention to soils with high humidity. During freezing, they will increase their volume, so the technology for laying the sidewalk is different.
- Weather conditions must be taken into account during operation. Wind, rain, and hail directly affect the hardening of concrete.
- The first treatment of seams should be done exclusively with sand. In this case, it is better to sift it.
- For high-quality work, it is worth using additional tools: concrete mixers, vibrating saw. This way the crushed stone will be firmly compacted, and the concrete will have a uniform consistency.
- If you plan to create paintings or unusual patterns, then you should try on the tiles and think about everything in advance.
- If you do not have the skills to lay tiles, you should seek help from professionals.
The durability of the coating depends on the care of the tiles. To do this, it is worth cleaning periodically. If the paving stones are cracked or other defects appear, they can be repaired. You just need to replace the old tile covering with a new one.
Tool for the job
To make flagstone paths with your own hands, you will need the following construction and measuring tools:
- durable colored cord, pegs and a measuring tape at least 5 meters long for marking;
- building level at least 1 meter long;
- shovels and bayonet shovels;
- low wide container for mortars and mixtures;
- trowel and metal plastering rule;
- metal hammer and rubber mallet;
- steel or copper brush;
- vibratory ramming machine for compacting soil and bulk layers;
- concrete mixer if the total area of the paths is large and you do not want to mix the solution by hand.
If you don't have a full set of tools, you don't have to buy everything. You can simply rent it for the duration of the work.
Paths on a sand cushion
For this type of path, the trench should have a depth of 50 mm greater than the thickness of the flagstone. Sand should be poured onto the finished bottom in a layer of 5 cm, leveled and compacted while wet. If the sand is dry, then it is spilled with water, but not too much. Do-it-yourself flagstone is laid on the prepared sand cushion so that seams up to 20 mm in size are formed between the individual stones. The sheet is placed in random order.
We invite you to familiarize yourself with the scientific name of Urea
Horizontalness should be checked with a building level. For convenience, you can pull the ropes in the transverse direction. The seams between the stones, upon completion of installation, must be filled with sand. If you want to combine stone with greenery, then instead of sand you should use peat soil for backfilling and sow lawn grass seeds.
Types of work when installing flagstone paths
The construction of sidewalks and garden paths from flagstone involves the following types of work:
- marking;
- excavation;
- installation of a base for the walkway;
- laying tiles;
- finishing works.
Following the correct technology is very important, since if you make a mistake at one of the stages of work, you can get a poor-quality result.
Marking using pegs and twine.
Warnings and Tips
The upper border of the tiles should be lower than the level of the lawn, then the paving surface will not be damaged during the process of mowing the grass.
Layers of paving slabs
Installation should only be done in dry weather. In the presence of short-term precipitation or regular downpours, the solution will not be able to set.
It is not recommended to sprinkle the sidewalk with sawdust. It is also not recommended to rub joints using a mixture of sand and cement.
Lane markings
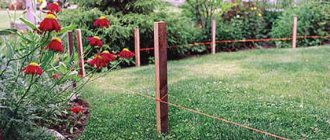
Marking is carried out according to a previously drawn up drawing using pegs, a rope stretched between them and a construction tape. The maximum distance between pegs is 5 meters. If the cord sags, the distance must be reduced. To mark smooth turns, make a compass from two pegs and a cord. By hammering one peg into the geometric center of the circle, you can use the second peg to draw a smooth and even arc.
Soil development
In the case when the surface of the earth is fertile or sandy soil, then under the foundation you need to dig a trench slightly wider than the marked path and about 30 centimeters deep. This depth is necessary for backfilling and laying:
- a layer of crushed stone for drainage;
- sand bedding;
- concrete or cement base;
- The thickness of the flagstone covering itself is 20-50 mm.
The bottom of the trench is covered with a thin layer of sand. It is leveled and compacted well along with the soil. The removed fertile layer is best scattered around the garden or used in flower beds and flower beds.
Schematic illustration of a concrete base.
Installing curbs and pouring concrete base
Unlike other materials, laying a path made of natural flagstone on a base of pure sand is not recommended due to the uneven load on individual elements of the coating. For paths of this type, the supporting base is made of concrete or a dry cement-sand mixture, which after some time will become monolithic. The construction technology for both options is the same (except for the material of the top layer).
Initially, the bottom of the trench is covered with a layer of crushed stone 10 cm thick, which must be compacted, sprinkled with a layer of sand no more than 5 cm and compacted again. This layer will serve as good drainage for the effective removal of flood, surface and groundwater.
If you planned to install borders, then it must be done after laying the textiles, supported by the drainage layer. If the height of the curbs is not enough, sand must be added along the edges.
The drainage layer must be covered with woven or non-woven geotextile with one-way flow. It will let water flow down without allowing it to rise up. In addition, geotextiles effectively prevent the germination of weeds, the seeds of which may remain in the soil.
Next, a layer of concrete mixture is poured or a dry mixture of cement and sand is poured. The thickness of the layer in the first case is at least 7-8 cm, and in the second - 8-10 cm. The surface must be well compacted using a vibration machine.
Laying flagstone on a prepared base
While the concrete is hardening, lay the slabs without adhesive next to the future path. This way you can choose the layout of the slabs so that they fit well together. Try to cut the material less, choosing its shape more. The peculiarity of flagstone paths lies precisely in its uneven pattern of seams.
Slate flagstones are fixed to a concrete base using an adhesive mortar, similar to ceramic tiles. To save money, it is allowed to add sand to the adhesive composition in a 1:1 ratio. The adhesive layer is applied in excess, which when installing the tiles in place will be squeezed into the seams and to the sides.
Exposed glue must be removed immediately with a wet cloth, since dried glue will be difficult to remove later. Verification of horizontal laying and the coincidence of the horizon of adjacent slabs is checked with a building level.
Final works
They include thorough cleaning of the surface and leveling the level of the adjacent area to the height of the laid paving. Installing a flagstone covering is quite a physically labor-intensive task, but not at all difficult to perform. Many people are quite capable of doing this kind of work on their own.
Required amount
How to lay paving slabs on a concrete base? How many materials are needed? How to avoid overspending and unnecessary expenses? These questions come to everyone's mind when purchasing.
To calculate the amount of resources, mark the site and measure the perimeter and calculate the area. Knowing these parameters will allow you to make calculations:
Calculation of paving slabs
- Number of tiles. Calculated from the total surface area. When purchasing, it is recommended to take the material with a 10% reserve. This will help in unforeseen situations and will not greatly affect the price.
- Number of components for the base. Directly depends on the thickness of the layer. It is calculated by multiplying the surface area by the layer thickness in meters. The result will be the number of cubic meters of building materials for purchase.
- Curbstone. The quantity is determined by the length of the perimeter minus the length of the surface areas adjacent to the foundation. In such places, the role of the curb will be played by the foundation.
- Concrete pillow. The amount of building materials depends on the strength classification of the final product. For example: for 1m3 of concrete grade B20 you will need 300 kg, crushed stone - 1100 kg, sand - 700 kg and water - 170 liters.
Step-by-step instructions will help you correctly lay paving slabs on a concrete base and achieve maximum results at minimal cost.
Advantages of using flagstone as a road surface
Modern paving materials are varied. To lay paths, rubber and ceramic tiles, wood, crushed stone of different shades, paving stones, etc. are used. But no artificial surface can compare with the decorative effect of natural stone.
Flagstone is the name for shale rock - sandstone or limestone, which independently splits into tiles of different thicknesses during mining. Flat stone elements require virtually no processing and are used for finishing walls and floors, as well as garden paths intended for pedestrians.
In addition to its decorative appearance and variety of shades, flagstone has many advantages that make it in demand among homeowners:
- smooth and non-slip surface of the slabs;
- environmental friendliness of the material;
- frost resistance;
- minimal moisture absorption;
- strength;
- color fastness;
- ease of processing and installation.
Flagstone is easy to purchase from construction companies, it is inexpensive and accessible to different segments of the population. In places where it naturally comes to the surface, you can extract the stone yourself by choosing tiles of the right size.
How to make flagstone paths at your dacha with your own hands - three reliable ways
In order to reduce errors and avoid translating a large amount of material, we will give some useful tips. They will help a beginner master the process of laying paths in the garden and make it much more enjoyable.
- Lay flagstone only on a fresh screed to save construction adhesive. If it dries out, you will have to put the stone on glue so that it does not “walk”, and this costs a lot of money.
- Use a level to measure every meter of road, especially when laying large layers of material. If you don’t measure, “waves” will appear and it will be simply impossible to eliminate them.
- Try to select sandstone from only one batch. Even if it looks the same, the color may differ after washing and varnishing. You have to take from one pack and not settle for leftovers.
- Take a shovel and clean out all the loose soil from the “pit” to minimize subsidence of the future screed. Under heavy weight, it can sink in places where the concrete does not touch a solid base.
- If you have very large pieces, it would be better to break them into small ones - they will be much more beautiful, and there will be significantly fewer hollow spaces.
If you follow these recommendations, your own sandstone path will be not only durable, but also beautiful!
Immediately stock up on all the necessary tools so that everything is at hand. Think about the direction of the future path. By the way, it doesn’t have to be straight; paths with turns and bends look better. Apply preliminary markings to the soil. It can be done by filling the borders with sand or simply stretching a thin rope or twine.
We recommend starting work with the selection of suitable material. The appearance of the track and its durability will depend on the stage.
Natural stone paths are most often made using the following materials:
- Gravel and crushed stone of small and medium fractions. This option will be the cheapest of all available. With proper and high-quality compaction of crushed stone, you will get a surface comparable to conventional gravel roads. This material can be used for pedestrian paths and paths along which your car will pass.
- River and sea pebbles. The use of such small and medium-sized stones is interesting because you can choose a material of different colors, and this allows you to realize unusual design ideas.
- Rubble wild stone is very thick. A path paved with wild stone will last much longer, even if it is constantly used for traffic.
- Sandstone is usually a flat stone up to 3–5 cm thick. It is convenient to work with and can be easily cut with a grinder with a stone or diamond disc. The advantage is that you can combine large areas and small debris. This makes it possible to compose a mosaic that is interesting in appearance. Another advantage is that due to the uneven structure of the surface, you will not slip along a path made of such stone.
- Slate flagstone is not destroyed by ultraviolet radiation and is not afraid of water and frost. Differs in a variety of shades and surface textures. Due to this, it will not be possible to obtain identical paths from stones in the garden; each result will be purely individual.
- Granite is the most expensive option, but it has an excellent appearance and durability. The path can be made from stones with a treated or untreated surface; they look different. Note that the second option will cost more.
There are also a number of stones that are widespread only in certain regions. Using such local material, you can lay out paths in your dacha cheaply and quickly, but they are not widely used throughout the country.
Before we talk about how to properly lay natural stone, let's look at preparing the foundation. The strength and durability of the path will depend on this stage of work.
So, you will have to do the following:
- Along the marked boundaries, dig a ditch one spade bayonet deep (20–25 cm).
- Remove remnants of vegetation and roots, lay a layer of geotextile on the bottom, the width of which is 2–2.5 times greater than the foundation pit. Of course, you can make paths from natural stone without this material, it will be cheaper. But we believe that in conditions of high water content of the site, it is better not to abandon geotextiles; it will prevent erosion of the base.
- Pour a base of fine and medium crushed stone about 15–17 cm thick. Compact it thoroughly. If this is not done, the laid stone will shrink significantly in the future.
- If a car is expected to pass along the path, then increase the depth of the pit by 10 cm, and pour the same layer of concrete on top of the crushed stone layer. Do you want to improve the reliability of your foundation? Then pre-lay a mesh of reinforcement with a diameter of 6–8 mm.
The next base layer will be sand, a cement-sand mixture or a solution of these materials, over which you will need to lay the flagstone on the paths.
This is the easiest and cheapest way to make a path from stones in the garden. Let us note one nuance - if the groundwater level in the area is high, then it is better to use not sand, but a cement-sand mixture, which will prevent erosion. It is prepared in a ratio of 5 parts sand to 1 part cement M300–400. For cement grade M500, the amount of sand is increased to 6-7 parts.
You can make a path with or without curbs. If you plan to make it higher than the level of the main ground on the site so as not to cause dirt, then the option with a curb is preferable. A more expensive option is to use a border for paving stones; it is cheaper when arranging the border from a board 30–40 mm thick. To make it last longer, treat the boards with an antiseptic.
Paving paths with natural stones should be done according to the following scheme:
- Align the edges and correct the shape using a grinder with a stone or diamond disc.
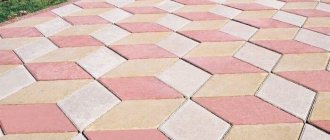
- You can lay them in a checkerboard pattern, in an arc, in straight lines, or in mosaics.
- Pour a layer of sand or mixture about 10 cm thick, it should be slightly below the level of the curb or the expected height of the path. Tamp down thoroughly.
- Place the stones with gaps of up to 5–10 mm, adjusting to the shape. Set each element down (compact) with careful but strong blows of a rubber hammer.
- When laying, check the flatness of the surface using a long level or rule. There should be no significant ledges between adjacent stones or significant distortions, otherwise walking along such a path will be inconvenient.
- Fill the gaps between the individual elements with sand or a cement-sand mixture. To do this, pour it onto the surface of the path and distribute it with a broom with hard rods. Repeat this treatment 3-4 times until the cracks are completely filled.
As you can see, everything is extremely simple, and you will be able to do it, even if you don’t have much construction experience.
In this case, you will get more durable paths from savage stone or any other. The technology is practically no different from laying on sand. You just replace it with a solution, which you make in a ratio of 1 part cement to 4-5 parts sand (depending on the brand of cement).
Place a layer of mortar on the prepared base and, until it hardens, place stones on the surface in accordance with the intended pattern. Then compact each stone, not forgetting to check the flatness of the surface. Fill the gaps with mortar as well. After the path has hardened, rinse it with water to remove excess from the stone.
We suggest you familiarize yourself with what paths in the garden can be made from.
A properly designed project determines the success of the work
The existing well-trodden paths along which the residents of the house habitually move around the site will help to lay out garden paths so that they are convenient. To make the garden more decorative, you can slightly change the configuration of the paths. The main directions must be preserved. To evaluate the design in advance, make a sketch drawing of individual corners of the garden.
To draw up a project, you will need a plan indicating the location of all outbuildings. It will help determine the total length of the paths and the amount of work when constructing recreation areas. It is advisable to take into account the location of temporary design elements: garden benches, flower beds, trees, etc.
The width of the paths should be sufficient to miss the oncoming person. It is irrational to make it larger than 1-1.2 m. The dimensions of the sites are determined arbitrarily.
Calculation of quantity and choice of flagstone
You can calculate the amount of material by calculating the area of the future coating. They do this by multiplying the width of the path by its length. By adding up the calculation results for each section of the path and rest areas, the total area is determined. Flagstone is sold by the square meter.
The strength of a stone can be determined by its shade: greenish and gray are the hardest, and yellow are the softest. The middle position is occupied by reddish and brown stones. The shade can be chosen taking into account the decoration of the house and other buildings. If a stone is purchased to decorate not only pedestrian areas, but also the base, then the choice of shade depends on the taste of the designer.
For laying on paths, it is advisable to select slabs with a thickness of at least 1.5 cm. It is better to pave the parking lot with thick elements (more than 4 cm). When purchasing, you need to select 15-20% of excess material: some of the slabs will have to be adjusted to each other, and waste will appear.
Tool for the job
Before starting work, you need to prepare tools that will help you do everything quickly and correctly:
- roulette;
- stakes and cord for marking;
- construction level;
- shovel;
- hammer and mallet with rubber head;
- metal brush;
- vibrating plate for compacting soil;
- Bulgarian;
- concrete mixer, plastering rule, trowel for bulk concrete work (when choosing a method of laying on concrete).
Do-it-yourself flagstone laying technology
Flat elements are easily split and cut with a grinder. You can install the stones on the surface of the path yourself. All you need to do is to carefully carry out the installation steps. You can make paving with your own hands in any way, although laying flagstone on a concrete base will require more effort and time.
Before starting work, for any installation method, mark the paths according to the previously completed project. When marking with a tape measure, determine the width of the base, taking into account the thickness of the slabs for the curb and the required width of the path. The laying line can be straight or winding. With the latter method, it is recommended to measure the width every 0.5-1 m, especially on radial sections of the route.
The edges of a path or platform are marked by driving in stakes and pulling a cord along the boundaries of the base. After this, the turf is removed between the cords and soil is selected to a depth of 35-50 cm. Geotextiles can be laid at the bottom of the pit if grass germination between the stones is undesirable.
Laying on a sand-cement base
Pour 10-15 cm of coarse sand or ASG onto the prepared bottom of the pit to form a drainage layer. Compact it while leveling the surface. Install curb elements along the edge of the pit and fix them with cement mortar.
Make a dry concrete mixture from 5-6 parts of fine sifted sand and 1 part of M400-500 cement. This layer is called the load-bearing layer. Its thickness is at least 10 cm. When laying, it is important to make a uniform slope in one direction. Its value is 5-10 mm for every 1 m of the width of a path or platform paved with flagstone. You can determine the slope using a building level.
When backfilling and compaction of the dry cement-sand base is completed, another 3-5 cm of sand cushion under the tile is applied to it. This layer will allow you to lay and level the stone without disturbing the supporting layer. The pillow does not need to be compacted; it is enough to slightly level it while maintaining the slope.
Flagstone can be laid closely, leaving only small gaps between the stones. They start with the selection of large masonry elements. Taking the part in your hands, place it with the flattest side up and press it to the base. The tiles should be leveled by tapping them with a rubber mallet. The next element is matched to the laid one so that it at least partially repeats the bends of the previous one. Leave a gap of 0.5-1 cm, level the plane of the stones and the slope. The next part is selected in the same way.
When large stones are laid out over an area of 1-2 m, fill the large gaps between them with small fragments. When selecting these slabs, they are guided by the outline of the bald spot and the size of the element, trying to maintain the selected seam width. If necessary, part of the stone can be chipped off by hitting the edge with the narrow side of a simple or geological hammer.
When choosing a masonry method with a large distance between the stone mosaic parts (4-10 cm), the work is performed in a similar way. The difference is that there is no need to adjust the edges of adjacent stones. Sand-cement base is suitable for stable, dense soil.
Laying on a sand and gravel bed
This type of dry installation method is practically no different in execution from the previous one. But due to the choice of a heavier load-bearing layer of crushed stone, it is suitable for constructing paths in areas with difficult soil (too loose and mobile or heaving).
Installation of the base begins with filling a 15-20 cm cushion of ASG and thoroughly compacting it. Then a curb is installed and a supporting layer with a thickness of at least 20-25 cm is backfilled. To form the base, use a mixture of crushed stone or gravel with a fraction of 2-3 cm with dry cement in a ratio of 6:1, respectively. When compacting, a slope is formed. Installation of the flagstone finish coating is carried out using the previously described technology.
Paving tiles on a concrete base
In areas with close groundwater, in low-lying flooded or wetlands, paths on an embankment base will not last long. The footing will not be able to withstand the loads arising from seasonal soil movement and people moving along the surface. The owners of such sites note that after several years of use, the stones sink into the ground and the path has to be paved again. To cope with this problem, you need to build paths on a concrete foundation.
The pit is dug according to the general rules, but its depth must be at least 50 cm, and the width must be 20 cm larger than the size of the path with the curb. A layer of sand about 20 cm thick is laid on the bottom to create drainage. After this, a concrete solution is poured from 1 part cement, 3 parts sand and 4 parts crushed stone. The first layer is 3-5 cm. Reinforcement mesh is placed on it and pouring continues to the soil level, forming a surface slope. The finished base is left to gain strength for 2-3 weeks.
Work continues with the installation of the curb and backfilling of the sand cushion under the covering. Installation of flagstone using this method is carried out according to general rules. Flagstone can be laid on a concrete base and glued to porcelain tiles or clinker. Choose brands intended for street work. The solution is applied to concrete and stone and the slab is pressed to the base, tapping with a mallet to level it.
Laying natural stone paths for screening
To correctly lay natural stone with your own hands using technology, follow the basic steps:
- Plan the surface of the site. This will save effort and money in the future.
- Remove the top layer of soil, level the surface and compact it. For wild stone, 15-20 cm is enough; when paving paving stones, you will need to remove 25-30 cm.
- Make a cushion of crushed stone 10-15 cm thick and be sure to compact it (you can use improvised means: handles are nailed to a log 1.2-1.3 m long for convenience, and with this tool the surface is consistently compacted with impact movements). Afterwards, thoroughly rinse everything with water.
- The wild stone is laid on the solution directly on a moistened bed of crushed stone (to save money, the solution is prepared from screenings with grade 500 cement in a ratio of 1:6-1:5). This type of laying of natural stone on paths is applicable both for a personal plot and in city parks.
- Granite paving stones require an additional preparatory layer: we fill it with screenings 5-10 cm thick, pull off the excess evenly and press the surface again, after which we pour a layer of a dry mixture of sand and cement (1:3) 2-4 cm thick and carry out direct installation using a special hammer. At the end of the work, the surface is cleaned with brushes and gently moistened to allow the mixture to set.
- The seams are covered with a sand-cement mixture (laying paving stones) or rubbed with a damp solution (wild stone).
When the budget allows, you can purchase a geofabric that improves the characteristics of our “cushion” and cover it with the very first layer on compacted soil. This technology for laying natural stone prevents uneven subsidence of our “cushion” under the influence of moisture and prevents the growth of weeds.
If the design includes a curb, we install it first, making sure to build a concrete lock at the joints to secure it.
As you can see, laying natural stone with your own hands only requires careful and precise implementation of the technology, then your paths will remain smooth and beautiful even after several years!
Let us note that, contrary to popular belief, stone paving stones are affordable and are serious competitors to the “paving stones” we are used to. The service life of the coating is over a hundred years (if installation technology is followed, up to 300 years), and the noble appearance is an order of magnitude different from the beautiful, but rustic wild stone.
ab7903138acbfa29d29ee8095712e5cb.jpe 1d986a1394086d67a787810ecd7bd529.jpe
Final works
Paths made from natural materials in an irregular garden are often laid without a border, using hidden edging. After paving is completed, the seams and especially wide gaps are filled with fertile soil and sown with low-growing varieties of lawn grass (bulbous bluegrass, creeping grass, knotweed, etc.). If there is a lawn around the paved surface, it will fit harmoniously into the overall landscape without a sharp transition from grass to stone.
In regular gardens of the classical type, paved surfaces are separated by borders, and after paving is completed, they are finished in another way:
- fine sand is poured onto the surface of the paved area;
- with a stiff brush or broom it is driven into the seams between the stones;
- water the path, compacting the sand;
- repeat the process until the gaps are filled.
When finishing a paved path on a concrete foundation, you can also fill the joints with a liquid solution of cement and sand. It is carefully rubbed with a spatula between the slabs, as when laying tiles. After drying, you will have to repeat the treatment of the slabs with a stiff brush to remove any remaining mortar. Finally, the surface of the paved area is washed with water from a hose.
Positive traits
If you decide to lay paving material on a concrete base, you need to know the most important positive aspects of this process:
Cushion for laying paving slabs
- Durability, resistance to heavy loads.
- Long service life.
All these qualities can be achieved by using a concrete pad, which will be laid under the paving surface. If you use a common composition of sand and crushed stone, then it will not be possible to maintain the originally laid shape of the coating for a long time; sooner or later such a cushion will shrink, and the coating may move in different directions. The concrete layer will act as a coupling and also impart immobility to the coating.