Restoration
Restoration is the longest and most boring stage, but at the same time the most important. You won’t do the splits without first warming up your muscles, will you? So the chest of drawers needs to be carefully prepared for the upcoming changes. Don't be alarmed - we have prepared step-by-step instructions for this process.
Stage 1. Internal examination of the chest of drawers. We remove and measure damaged boxes and parts in order to buy/make new ones.
Tip: take a close look at the handles and legs of the chest of drawers. If they vary slightly in shape or size, there's a good chance they were handmade. In this case, it is better to change all the fittings.
Step 2: Clean the surface with soapy water. For hard-to-reach areas, use an old toothbrush.
Stage 3. Remove the top layer of paint or varnish. To do this, apply acetone to the prepared surface and cover the chest of drawers with film or oilcloth for an hour to enhance the effect.
Stage 4. Remove any remaining paint or varnish with a spatula and carefully sand the surface with a sander. For small parts we use sandpaper or a sanding sponge.
Stage 5. Cover chips and scratches with wood putty.
Stage 6. Final. Cover the chest of drawers with paint or stain using a brush/roller. Then we coat it with varnish, and then apply one or two more layers of paint. The final coat of varnish remains until the bitter end. Then fanfare sounds and fireworks are heard.
Tip: when choosing a color, be guided by the style and color scheme of the interior. Muted shades and pastel colors are suitable for the bedroom.
Updating an old chest of drawers
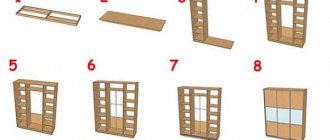
Whether it’s restoring a chest of drawers or decorating a bedside table with your own hands, everything is done in stages. The first thing you need before starting work is tools. Here is a list of what is needed:
- small grinder;
- sandpaper or sanding sponge;
- stencils;
- putty knife;
- unnecessary toothbrush;
- screwdriver;
- wood knife;
- several brushes, different in width and bristle composition (hard and soft), sponges;
- masking tape;
- acetone;
- industrial film;
- toothpicks.
Materials needed:
- volumetric paste or putty based on acrylic;
- glue for wooden surfaces;
- wood varnish, stain or primer with paint of a certain color (for decoupage - three-layer napkins).
You will also need gloves and a respirator.
If this is an artistic design, acrylic paint of the desired color will do. For those who want to modernize an old chest of drawers, a good option would be to replace the furniture fittings: you can add new handles or mirror panels.
Restoration
But for those who are not afraid of working with sandpaper, a spatula and acrylic paint, a step-by-step restoration of the chest of drawers has been prepared. The process consists of several steps: removing the old coating of paint or varnish, thorough sanding, checking for chips and other irregularities, local filling of defects, painting and final decoration of the chest of drawers.
But first you should look for defects in the inside of the chest of drawers. All broken bottoms, shelves and guides should be unscrewed with a screwdriver and measured. In accordance with the geometric parameters, you can buy new elements or make them yourself. If the second option is closer to you, be prepared to acquire an additional arsenal of tools and knowledge in the field of thorough furniture repair. Don't forget to do this check before decorating the chest of drawers with your own hands.
Also pay attention to the screws, handles and legs. If the fittings are not the same, with differences in shape and design, then most likely these elements were made by hand, and if some of them are damaged, an analogue part can no longer be obtained. In this case, it is better to replace all the fittings.
Cleaning and preparing the product
Cleaning the surface is done carefully so as not to damage important decorative elements of the product. First, clean the surface by wiping it with soapy water. Use a toothbrush to remove dirt and dust from hard-to-reach places.
To free the surface of furniture from paint or varnish, you will need industrial film and acetone. Cover the old chest of drawers with the latter, and to enhance the effect, cover the product with industrial film. In the absence of film, you can use oilcloth, cellophane and other available materials. Limit the air flow and leave the furniture like that for one hour. After this time, the layer of varnish and paint will come off the wood.
Decorating a chest of drawers with your own hands begins with working with a construction spatula. Remove the loose layer from the wood without damaging the surface. Remember to remove all paint.
This is followed by the sanding stage.
The surface free from small decorative elements is sanded with a machine. For the latter, it is important to choose the right nozzle. Using sandpaper or a sanding sponge, sand the area of protruding parts and small parts. Don't overdo the sanding to avoid damaging the chest of drawers.
Cracks, chips, scratches and other defects are carefully covered with wood putty. It is better to give preference to water-based putty. For restoration, putty is selected according to the color, not the name of the wood. It should only go into the recesses, so sand the surface again. If traces remain in the structure of the wood, when tinted with stain, stains will appear that cannot be removed. Replace drawer bottoms, runners and strengthen the frame.
Painting
The choice of paint, its brand and color depends on how you see the future decor of the old chest of drawers. This can be a layer of stain if the wood grain is sanded smooth and looks good without paint. Stain is suitable for changing color while maintaining the texture of wood. You can cover the entire surface with acrylic paint, and then the design of the old chest of drawers will become completely different.
Both stain and paint are applied evenly using brushes or a roller. The work time is the same: only the results upon drying are different.
Stages of work:
- Selecting varnish, paint of the desired color and other materials.
- Tinting, staining or painting with a brush or roller. You can use a rag.
- A layer of varnish over the entire surface of the furniture. After drying, add another layer or two. Can be replaced with transparent primer.
- Sanding to remove raised pile of wood.
- Finishing layers of varnish.
- Wait until completely dry.
Dresser decor for the bedroom
After restoration, you can safely begin decorating. For decoration, everything is used: from beads, coffee beans and old newspapers to nails, apartment numbers and plastic figures. The only limit is your imagination (well, you shouldn’t take away your children’s favorite toys). To know where to start, we’ll introduce you to a couple of ready-made techniques and inspiring ideas.
Decoupage
Necessary materials : pictures for decoupage, scissors, PVA glue, roller/brush for painting, varnish.
According to Wikipedia, decoupage is the decoration of objects using napkins, pictures, fabric or photographs. The technique is suitable for beginners. All you need is to cut out the illustration you like along the contour (you can use decoupage cards, ordinary three-layer napkins, postcards) and glue it to the selected area with PVA glue. Mix 2 parts glue with 3 parts water and cover the picture with the finished mixture. A final coat of varnish, and an ordinary chest of drawers turns into a work of art.
Stencils
Necessary materials : stencil (or lace napkin/old tulle), tape, acrylic paints, sponge/brush, varnish.
Another simple but effective technique. We fix the stencil on the surface with tape and carefully apply paint of the desired color. Afterwards, carefully remove the stencil and wash it. To make the result pleasing for as long as possible, cover the resulting pattern with matte varnish.
You can use old lace doilies or unnecessary tulle as a stencil. The principle of operation is the same, but it is better to replace acrylic paints with spray paint - the pattern will be clearer. The end result will be original furniture that will fit perfectly into a romantic girl’s bedroom.
Decoupage of a chest of drawers in Provence style: master class
This chest of drawers is decorated with a dream of summer, flowers and trees and with memories of all the delights of a carefree country life, away from the bustle of the big city. It will delight us all year round, whether in the bedroom, nursery or living room. And you have the opportunity to use simple recommendations and decorate any piece of furniture together with your children. After all, summer is a small life!
To decoupage a chest of drawers in Provence style, prepare these tools and materials:
- wooden chest of drawers;
- decoupage card;
- stencil;
- scissors;
- light green acrylic interior paint from Tikkurila (or any other manufacturer);
- acrylic art paints:
- white, green - chromium oxide, kraplak, ocher, gold;
- PVA glue;
- white craquelure composition in an aerosol can;
- acrylic art primer;
- acrylic felt-tip pen of bronze color;
- wax candle;
- a block of medium-grain sandpaper;
- brushes: synthetic flute brushes No. 12 and 24, synthetic round brush No. 2, bristle flute brush No. 14
To decoupage a chest of drawers with your own hands at home, follow the master class with a step-by-step description:
- Paint the primed surface of the chest of drawers with green acrylic paint in two layers. Drying time for each layer is 40-60 minutes.
- Draw an oval in the center of the front of the middle drawer and cover it with craquelure cracks using one-step spray craquelure. Let dry - about 40 minutes.
- Rub the entire surface of the chest of drawers with a wax candle - horizontal stripes along the wood grain.
- Paint the surface of the chest of drawers with light green paint in two layers. You cannot dry the surface with a hairdryer - the wax will melt. Drying time for each layer is 40 minutes.
- After the paint has dried, create the effect of a worn surface. Using an emery block, rub the painted wood against the grain until the green paint shows through.
- To decoupage a chest of drawers with your own hands, cut out houses, trees, flowers and other elements from a decoupage card strictly along the contours of the drawings.
- Cover the cut out fragments with PVA glue and wait 5-10 minutes, then stick them on the top and bottom drawers of the chest of drawers.
- Combine all decorative elements by drawing a stylized fence, for this use paint and an acrylic felt-tip pen.
- Cover all elements of decoupage decor with acrylic varnish.
- Write the words in the oval with paint and then with a felt-tip pen, and the flowers on the sides with a brush.
- Using a stencil, apply the image of a tree to the side walls of the chest of drawers using a round bristle brush.
- After mixing green and gold paints, use light tangential movements to walk across the surface of the chest of drawers, creating a patina.
- Using gold acrylic paint, lightly paint the surface of the dresser handles, creating scuff marks.
- Patina the corners of the chest of drawers with green gold paint using a dry bristle brush.
- The chest of drawers is ready. You can coat it with varnish.
Antique decor
Required materials : acrylic paint, roller or brush for painting, sandpaper, gold leaf, glue, varnish.
An antique decorated chest of drawers is suitable for a bedroom in country or Provence style. It's funny that even the marks of time have to look stylish, so you have to work a little. On the prepared surface (5th stage of our list) we apply two layers of acrylic paint in contrasting colors. After the paint has completely dried, we sand the corners and protruding areas with sandpaper.
If you want to give your chest of drawers a feeling of former luxury, additionally use thin foil called gold leaf. Apply glue to the selected areas, and then place the gold leaf on top. Give it at least two hours to dry and remove any excess. The final stage of work, as you probably already guessed, is varnishing.
Dresser decoupage idea (with photo)
This DIY chest of drawers decor is designed using the technique of monochromatic grisaille painting (from the French “grisaille” from “gris” - “gray”), which was widespread in the decorative painting of the Classical era of the second half of the 18th - early 19th centuries. Grisaille is made in different shades of the same color (most often gray, brown), which creates the impression of relief of the image.
To decorate the chest of drawers, we used tonal variations of brown - burnt umber, since the decoupage card pattern was made in these tones. Read on for more details on how to update an old chest of drawers with your own hands.
You will need:
- wooden chest of drawers;
- acrylic art primer;
- acrylic art paints: burnt umber, zinc white, light ocher;
- decoupage card;
- stencil;
- synthetic flute brush No. 16;
- round paint brush;
- fluted bristle paint brush;
- round synthetic brush No. 2;
- disposable plate;
- cotton rag;
- PVA glue;
- one step craquelure varnish
Anyone can update a chest of drawers with their own hands, the main thing is to follow the following instructions:
- Paint the chest of drawers, primed with acrylic primer, using a soft synthetic brush in two layers of vanilla-colored acrylic paint. To do this, mix 97% white primer, 2% light ocher and 1% burnt umber - you get the color of vanilla.29
- Having collected a small amount of burnt umber on a bristle flute brush, walk it over the surface of the chest of drawers, emphasizing the relief of the wood.
- Coat the cut out fragments of the decoupage card with PVA glue and wait 5 minutes before gluing them to the surface of the chest of drawers.
- Using a stencil, apply the design with a round brush with a small amount of burnt umber, complementing the decor from card fragments with stenciled images.
- Combine the stencil and decoupage designs using a #2 round brush. Use light brown paint.
- Using a soft synthetic flute brush, apply one-step craquelure to the sides of the chest of drawers. Wait 30-40 minutes and apply a layer of brown paint on top. As it dries, cracks will appear on the surface. All that remains is to coat the chest of drawers or its parts with water-based varnish and attach the handles, having previously painted them and decorated them with craquelure.
In conclusion, look at a selection of photos of chest of drawers decoupage, which presents the most original ideas for this decorative technique:
Volumetric decor
Materials needed : stencil, masking tape, acrylic putty or volumetric paste, spatula, acrylic paint, brush/sponge, sandpaper.
The stencil comes into play again. The first step is to attach the stencil to the surface. Next, apply putty and level it with a spatula. After we remove the stencil, we patiently wait for it to dry completely.
In the finale, there are two ways to develop the scenario: either we cover the chest of drawers with acrylic paint, or we create the already familiar scuffed effect. To do this, paint the surface with one color, then rub the three-dimensional pattern with a candle and cover everything with paint of a different shade. After drying, sand it with sandpaper. Done, you are amazing!
Master class: decorating and aging a chest of drawers for a workshop
Friends, today I want to show you how I decorated a chest of drawers for my workshop.
I purchased a chest of drawers with 9 drawers for various small things, of which I have already accumulated a lot 
Since I love antique things, I decided to decorate and age the chest of drawers myself.
For this I used the following materials and tools:
- chest of drawers;
- napkins with various patterns;
- wood impregnation "Tonerol" - oak color.
- glue for decoupage (you can use PVA glue with water 1:1);
- primer (or white acrylic paint);
- sandpaper;
- acrylic lacquer;
- shellac varnish (alcohol) + white spirit thinner (for rinsing the brush);
- water-based liquid bitumen - to give a patina and aging effect;
- stencil with ornament;
- relief paste - for decoration + palette knife.
First of all, I covered all parts of the chest of drawers (except those that I was going to decorate) with Tonerol wood impregnation to protect the wood. The color I chose was oak (photo below).
It is advisable to do this outdoors or in a well-ventilated area, since the impregnation has a strong odor.
After coating, I left it to dry and ventilate for a day.
Next, we cover the areas to be decorated with soil. For me this is the front surface of the drawers, the top and side surfaces of the chest of drawers. All other parts, including the inside of the chest of drawers and drawers, are coated with wood impregnation.
After the paint has dried, sand the surface.
We begin to glue napkins to all parts of our chest of drawers. To do this, separate the top layer of the napkin (there are three in total) and glue the napkin using decoupage glue or PVA glue diluted with water 1:1.
After complete drying, remove excess napkin with sandpaper. We also sand the entire surface to remove the folds of the napkin.
Here's what I got:
Let's start aging the chest of drawers.
We take liquid bitumen - apply it to a soft cloth or sponge and lightly cover the edges of our drawers, lightly shading the bitumen from the edges to the middle of the surface.
If you suddenly apply an excess amount of bitumen and greatly darken the surface, you can take a cloth soaked in water and remove the excess. Bitumen can be easily washed off with water because it is water based.
I similarly applied bitumen to all the drawers as well as the top and sides of the dresser.
To fix these actions, as well as to give it a more antique look, I applied shellac varnish. After application, brushes should be washed in white spirit.
Next we take the stencil. I purchased a stencil that sticks itself to the surface. If you have a regular stencil, then you can purchase a product that is applied to the stencil and, with its help, attached to the surface to be decorated.
So, we glue the stencil. Take the relief paste and apply the paste onto the stencil with a palette knife. The thicker the layer of paste you apply, the more voluminous the pattern will be on the surface of the chest of drawers. Carefully remove the stencil and wash it with warm water.
Waiting for the paste to dry completely:
After the paste has dried, take sandpaper and sand the surface of our decor to remove all unevenness.
Here's what happened:
To add antiquity to our 3D decor, I used restoration metal paste (dark gold color). I applied it with my finger, rubbing it into the surface of the decor:
Here are all the boxes. I put different designs on different colored boxes. I left the boxes with flowers without voluminous decoration:
I decorated the top surface of the chest of drawers in the same way, choosing a large pattern:
Next, I coated all surfaces with acrylic varnish.
My chest of drawers for the workshop is ready!
I hope you find my experience in decorating a chest of drawers useful.
I think a chest of drawers, decorated with my own hands, will delight me for a long time and decorate my workshop!
All the best to you and good luck!
Sincerely,
Natalya Osminko.
We paint the chest of drawers in an original way
Required materials : paints (acrylic, slate, marker board paints), masking tape, varnish.
Play with color: paint drawers or dresser legs in different tones, or use today's popular ombre effect (when the color fades to a lighter or darker shade). This can be achieved by mixing the selected tone with white paint. For each subsequent shade, increase the amount of white. Number of shades = number of boxes.
Do you prefer straight lines and clear shapes? Then cover the chest of drawers with stripes or geometric designs. To do this, you will have to make friends with masking tape: apply a base color, stick the tape with the desired pattern, and then cover the surface with a different color. Your new striped friend is ready!
Chalkboard or dry erase paint can transform an ordinary dresser into a space for love messages, tic-tac-toe games, and drawing. Write down dreams, inspirational quotes, or simply create a menu for the day here. Beautiful and functional – everything we love.
Geometric patterns
Geometric patterns are one of the hottest trends in the design world. Simplicity of shapes, clear lines and contrasting colors are all you need to completely transform any item. The idea of Stars for Streetlights combines classic colors and trendy triangular shapes, which together create the effect of an optical illusion.
This cheerful green and pink chest of drawers from The How-To Gal may seem frivolous, but it's perfect for a child's room. You can play with colors and give the design a more formal look by using navy and turquoise for a nautical theme, or gray and white for a modern theme.
Don't be afraid of bright colors! Brave enthusiasts and experimenters will love the DIY project from Fengshui Dana. If you want a more subdued option, you can reduce the number of colors or replace the triangles with squares.
An old chest of drawers can become attractive again with a new coat of paint and Moroccan-inspired patterns. Of course, the painting process may seem very complicated, but rest assured, the result will exceed all expectations. (DIY Network)
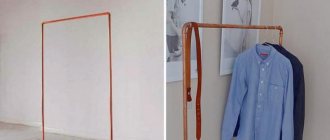
Place your hand on the dresser handles
Materials needed : replacement handles (toys, ropes, wine corks), drill, bolt, washer and nut, glue, marker.
If you're tired of the look of your dresser, you don't have to bother with spatulas, sanders and paints. Just replace old handles with children's toys, ropes, keys, branches, wine corks. Yes, yes, you heard right. This is one of the simplest and most original ways to upgrade. We have detailed instructions on how to do this.
Repair and replacement of guides in drawers
It happens that the guides quickly fail because the box is large and heavily loaded. Telescopic (ball) guides allow installation in two rows. In this case, the drawer will be endowed with greater load-bearing capacity and will last longer.
With such an “upgrade,” it is quite possible to replace the bottom made of flexible fiberboard with chipboard or plywood in order to store, say, tools in such a box.
It is better, of course, to replace the metal guides. They don't cost that much. However, if upon visual inspection the rollers are intact, have an even shape, and only the metal of the runners is bent, you can try to return it to its original shape. To do this, use a vice, pliers and other hand tools.
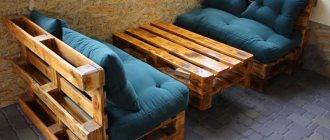
Turning a chest of drawers into an open storage system
Materials needed : replacement for boxes (wicker baskets, suitcases, wooden boxes).
Another way for those who don’t want to bother. To turn a chest of drawers into an open storage system, simply remove the drawers and replace them with something more original. For example, wicker baskets or old suitcases. Just. And how impressive!
You don't have to have an art education to give furniture a second life. It is enough to arm yourself with the necessary materials, discard ideas about right/wrong and simply allow your inner child to express itself.
If the number of options makes you dizzy, take our style preference test. At the same time, you will learn something new about your inner designer.
Repair of drawers: causes of breakdowns
Before you start repairing drawers with your own hands in a closet or chest of drawers, you should understand the cause of the breakdown. Understanding what caused the problem is the key to successful repairs. The main thing is not to confuse causes and effects. For example, warping the cabinet or cabinet body itself can cause incorrect movement of the guides and their failure. And if you do not “return” the body to the original correct geometry, replacing the guides simply will not solve the problem.
The box frame has fallen apart or the bottom is falling out
This kind of breakdown is especially common in wooden chests of drawers assembled on spikes. Over time, the boxes dry out and become unstuck. All that is required is to take them out, disassemble them into parts, level them, sand them and reassemble them with glue. For reliable tightening, use additional fasteners in the form of furniture corners and self-tapping screws.
The bottom of the fiberboard box may not be nailed securely at first. Fasteners on small nails are especially unreliable. If the drawer is made of chipboard, then it is better to attach the fiberboard bottom to it using 3x16 self-tapping screws. Use washers to expand the clutch area.
The drawer falls out or warps in the guides
Most likely the reason is the insufficient rigidity of the cabinet or chest of drawers itself. Due to the uneven load of the shelves, the body inevitably deforms: the sides bend, the distance between them increases, and the drawers begin to fall out. The cabinet may warp if the floors are uneven and the cabinet or chest of drawers itself is not level.
Correct, smooth movement of the guides is possible only with the correct geometry of all elements. That is, both the body and the boxes of the drawers must be aligned diagonally. Perhaps the assembly was incorrect from the beginning - if you screw the guides unevenly relative to each other by at least a millimeter, and over time, as the boxes are loaded and they sag, this inaccuracy will become critical.
Also, the cause of the box warping and falling out of the guides may be grinding and deformation of the rollers (ball bearings) of the rails themselves. It happens that the metal of the guides itself bends. The reason is simple - the fittings have exhausted their service life and require replacement.
The drawer doesn't slide out well, the guides stick
The reason may be either in the deformations described above or in the fittings themselves. Even if I installed Chinese analogues with thin metal on the guides, it is unlikely that the fittings were originally designed to fully load the box. Therefore, it cannot ensure the expected smoothness of closing and opening the drawer.