What makes our home truly cozy? Of course, nice and stylish little things! Floor vases can become an important element that complements the design of your apartment or house.
And here's good news for you: you don't have to spend a lot of money on expensive designer new items. Floor vases can be made with your own hands, and from fairly ordinary raw materials! Today you will learn how to make a beautiful floor vase from waste material with your own hands, easily and efficiently.
Ready to create? Then let's go!
DIY floor vase from a jar
Sometimes you can create the most unusual things from the simplest materials. Look at this vase, would you think that the basis for it was the familiar three-liter jars? That's the same!
Admit it, did you want one for yourself? Then take out your reserves of creative energy from your pockets and go ahead!
To create a floor vase from a three-liter jar you will need:
- Two 3 liter jars;
- One tea saucer;
- One plastic container from canned food;
- PVA glue;
- Cardboard egg trays;
- Silicone glue “liquid nails”;
- Acrylic paint;
- Decorative elements of your choice;
Stage No. 1
Let's create the base of our vase. To do this, take two jars, fasten the bottoms with silicone glue, and glue an upside-down saucer to the neck of one of the jars. It will serve as a stable leg for the future masterpiece.
Then we cut off a plastic container from canned food and attach it to the neck of the top can with glue. Let it dry overnight.
Stage No. 2
During this period, we can soak pre-shredded cardboard egg trays in water until completely limp. After this, the cardboard should be squeezed out thoroughly and mixed with PVA glue until a homogeneous mass is obtained. Apply the slurry to the base of our vase in an even layer. Leave for two days.
Stage No. 3
After the workpiece is completely dry, level the texture with alabaster.
Stage No. 4
In this form, the vase is completely ready for the final stage of finishing - decoration. Use your own imagination or the tips we will give below.
Decorative idea brought to life
When a strong and reliable blank for the future vase is ready, we move on to decoration. Decor can be done in various ways. In this matter, everything depends on your imagination and capabilities. To begin with, you can coat the base with varnish or paint. After that, if you can draw well, decorate the vase with drawings, patterns and shapes.
If you know how to knit, you can make an original knitted cover for a floor vase with your own hands; such a product will add special warmth and comfort to the interior.
There are a lot of design ideas; you can sew a fabric cover and decorate it with ribbons, beads, and appliques. A good decoration for a vase is to apply patterns using a stencil.
The decor will be:
• mosaic; • bright buttons; • coins; • cereals, seeds, acorns; • sequins, lace, ribbons; • coarse salt; • wood; • decoupage with napkins or clippings from magazines and newspapers.
Related article: How to make wedding cards yourself: gift and invitation cards
There is an option to tie a vase with a thick thread or rope. Decorating a vase is a pleasant moment, because at this moment your imagination and design abilities can fully manifest themselves. Create beautiful things with your own hands and fill your home with comfort and warmth.
DIY floor vase made from plastic bottles
Another chic option for waste-free use of garbage. Don't throw away plastic bottles, you can use them to create real masterpieces for your home!
A floor vase from plastic bottles can be made in different styles. For example, a regular five-liter bottle with a cut-off neck, wrapped in thin birch bark, can be an excellent option.
Idea: “Dress” a plastic bottle in a stylish “sweater”, crocheted or knitted. This know-how will pleasantly surprise guests and fill your home with comfort and warmth.
Made of glass with shiny decor
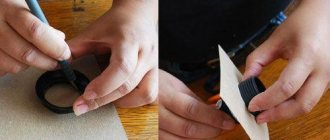
How to make a vase from a glass bottle or jar? To do this, thoroughly clean the selected container with mild detergents containing alcohol so that no traces of grease or dirt remain.
- Do-it-yourself dolls - the best ideas on how to make stylish, beautiful toys and step-by-step instructions on how to sew a doll (110 photos)
Choosing flooring for an apartment
- How to lay laminate flooring quickly and easily
Then abstract stripes (even or asymmetrical) are applied with construction tape (diameter 3-5 cm). Meanwhile, the modeling gel is mixed with glitter and spread over the surface with a sponge using light pats. After staining, remove the tape before the gel has dried, otherwise it will be difficult to separate it later.
Floor vase made of cardboard and papier-mâché
Yes, you read that right, you can also make a stylish floor vase from cardboard. It can’t be distinguished from an expensive designer one, just believe me. And if you don’t believe it, see for yourself.
To create a floor vase from cardboard with your own hands you will need:
- Cardboard tube (can be taken from under a linoleum roll);
- Thin cardboard;
- Hot melt adhesive;
- Newspapers and egg trays for papier-mâché;
- Polymer putty;
- Fine sandpaper;
- PVA glue;
- Acrylic lacquer;
Stage No. 1
We attach the pipe to the cardboard base and draw a shape for the future vase. We make 30 identical templates and cut them out.
Stage No. 2
We glue the cardboard blanks to the pipe, distributing them evenly around the perimeter. Leave for several hours until completely dry.
Stage No. 3
We glue the base of the vase with pieces of newspaper sheets in several layers.
Attention: the layer of paper must be thick enough so that the voids are not visible during subsequent finishing.
Stage No. 4
Soak the egg trays in water, squeeze them out and mix them with PVA glue. Apply an even layer to the base and let dry.
Stage No. 5
Coat the vase with putty in an even layer. When the mass dries, smooth out the texture using sandpaper.
Stage No. 6
We decorate the vase. This can be easily done using spray paint of any color. On top you can finish it in the style of decoupage, stucco, or apply the ornament manually using acrylic paints.
Stage No. 7
Cover the surface with acrylic varnish and leave to dry. That's all the tricks. DIY floor vase made from papier-mâché and cardboard is ready. Enjoy!
Let's protect our masterpiece
And now we have collected your work. The beautiful elements are secured and the glue has dried. The time has come to finalize the vase. It is necessary to protect the vase from dust and prepare it for successful use. In other words, you need to choose impregnation and coating.
A large selection of all kinds of varnishes, paints, stains and other impregnations here also leaves freedom of choice limited by technology.
Floor vase made of pipe
Everything is quite simple here. If after renovation you still have unnecessary plastic or cardboard pipes at home, do not rush to throw them away, it is better to make a wonderful vase out of them.
A stylish DIY floor vase made from a pipe is easy, practical and beautiful.
Simply wrap a cardboard or plastic pipe in newspapers, securing them with PVA glue, paint them white with acrylic paint and decorate.
Idea: to decorate a floor vase made from a pipe, use old nylon stockings. Soak them in PVA, squeeze them thoroughly, and then put them on the prepared pipe. Distribute over the entire area, creating curly folds. Let the workpiece dry, and then paint and decorate to your liking.
Decorating the base
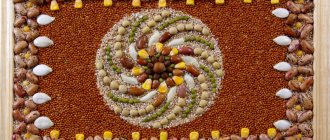
Any material that can be assembled into a finished image is suitable for decorating a vase.
- apricot pits;
- fragments of colored glass;
- pebbles and shells;
- pasta of interesting shapes;
- paper flowers;
- woolen threads of colored yarn;
- wine corks;
- “mukosolki” - dough baked in the oven from flour and salt of the desired shape;
- tree branches and cuts;
- everything else not mentioned.
The main requirement for the material, or rather not for the material for decoration, but for the glue that we will use, is the choice of the right glue that will reliably connect the material and the selected base. Here it is necessary to consult the seller when choosing an adhesive-sealant. When choosing glue, you need to remember what it will become after drying - color and consistency.
DIY floor vase made from newspaper tubes
The now fashionable technique of weaving from paper wicker allows you to create lovely crafts from waste material.
In order to make a chic wicker floor vase with your own hands you will need:
- Newspaper tubes (about 400 pieces);
- PVA glue;
- Scissors;
- Varnish;
Stages of work:
- We make a 4x4 cross braid, then secure it with one tube around it. This will be the basis of our future vase. Next, we perform seven rows of regular circular weaving around the base, gradually spreading one tube at a time.
- After this, we begin to remove the walls of the vase, bending and weaving in the previously separated tubes. Moving up, we gradually expand the space of the product up to 22 rows inclusive.
- Then we weave about ten rows evenly without spreading, and coat the product with varnish.
- Then weaving continues, narrowing the rows and tilting the tubes inside the product until about 72 rows.
- We expand the neck of the vase over 12 rows and complete the weaving by creating sides in 3 rows. We cut off the remaining pipes.
- Cover the product with a thin layer of PVA and wait until it dries completely. Then comes the final finishing stage - varnishing. This should be done several times in a row.
Unusual photo ideas for homemade vases
Read here Do-it-yourself bedspread: a detailed description of sewing and tips on how to decorate the bedspread. 125 photos of popular ideas
DIY floor vase decor
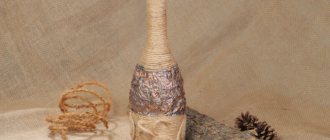
There can be a lot of options for decorating a floor vase, the most trendy of them are: wrapping with twine, decorating with glitter, silicone glue, as well as good old decoupage.
Of course, the vase should be decorated in accordance with the style of the room; the method of its external decoration will depend on this.
Well, since we already have a beautiful vase ready, we can think about what to fill it with.
Please note that not all types of homemade masterpieces are suitable for living bouquets, which means we will also make flowers for floor vases with our own hands.
When creating an artificial bouquet, use the most common tree branches. It looks very beautiful and natural. At the same time, for greater harmony with the bouquet, an eco-style vase does not even need to be painted. Attaching balls from leftover knitting threads to branches is an excellent and economical option for needlewomen.
In any case, DIY decorative branches for floor vases have not gone out of fashion for a long time. So feel free to use them to decorate your own home.
No matter how fashion changes, handicrafts are always in trend. Remember that you can create masterpieces of design art from the simplest and cheapest materials. The most important thing is imagination and a creative approach to business. A DIY floor vase is easy, beautiful and stylish. Get creative and get inspired.
Good luck!
Choosing a form
Once you have decided on the material you will use, consider the shape of the product. The shape is chosen at your discretion, imagination and combination with the chosen interior style.
Related article: New Year's gift: 8 ideas for DIY New Year's gifts
Designers consider the following to be the most popular forms:
• round, such a vase will succinctly fit into any interior; the easiest way to make it is using the papier-mâché technique, using an ordinary bottle as a basis; • square, it will suit a modern interior; the base will be a cardboard box; • triangular, the method using newspaper tubes is suitable here, this shape looks very original.
The vase can be elongated, convex, oval. Its form is the most bizarre and original. Finding a suitable base for a large floor product is not so easy. Don’t give up, you can make a temporary structure, for example, from cardboard, plasticine, plastic. And create a decoration for your interior from it, applying a lot of papier-mâché to the base. Subsequently, the dried workpiece is cut, the base is pulled out, and the halves of the workpiece are glued together, sanded and decorated.