According to the standard and SNIP, a hollow-core panel should rest on the walls by 8-10 cm, depending on the wall material.
For large blocks of strength grade M-100, such as the Besser sand-cement block, or monolithic concrete, the recommended overlap is 8-10 centimeters. For small-piece but durable products, for example, ordinary building bricks, the support should be about 10-12 centimeters. In the case of using materials of less strength, such as gas silicate or polystyrene concrete, it is better to make the overlap larger (up to 20 centimeters), since there is a danger of destruction of the wall block. For PC floor slabs, the issue of pressure from the overlying wall on the end sides of the panel is important. The more you overlap the slab on the wall, the greater the likelihood of crushing the end of the panel and its further destruction. In order to avoid such a situation, small vertical meshes about 1 meter long are designed in the slabs, which take on the vertical compressive loads. This is why it is not recommended to cut PC brand panels yourself if you have made a mistake with the length size.
In addition, the series provides for the use of concrete liners to fill voids on one side of the slab. If the liners were not made at the factory, it is better to fill them yourself using M-200 concrete. On the other hand, void formers have a special narrowing that reduces the diameter of the hole, and there is no need to fill this side.
For bench-molded PB floor slabs, this problem does not exist, since they were designed based on sufficient strength of the end sides under any reasonable pressure that the floor slab may experience during operation. This was achieved, first of all, by using high-strength concrete M-400 and higher (as opposed to M-200 for PC panels), as well as due to a larger gap between the voids.
Supporting the sides is not specifically regulated by the standard, but we do not recommend making it very large. We must not forget about the pressure on the side void, which may well crush the product. The best amount of overlap would be up to 100 mm, i.e. until the first emptiness. If you have already purchased panels that exceed the required dimensions in width, we can recommend filling the outer hole with concrete along the entire length, especially if a heavy wall of several floors will press on it from above.
Lightweight slabs are no different in support size from standard panels.
To get acquainted with the dimensions of all panels, the diameter of the holes, the gap between the voids, we recommend that you look at our article Basic dimensions of floor slabs.
Hollow-core floor slabs are used in the construction of buildings and structures to divide them into floors. They are made of reinforced concrete, with different design features. The strength of the house and its durability depend on the correct choice of structures. When designing and installing, it is important to know the minimum and maximum depth of support of floor slabs on walls made of your material.
For different types of buildings, certain types of interfloor ceilings are used. During the installation process, it is necessary to follow the installation technology, which is regulated by regulatory documents (SP 70.13330.2012) .
Supporting floor slabs on walls
Hollow-core floor slabs are used in the construction of buildings and structures to divide them into floors.
They are made of reinforced concrete, with different design features. The strength of the house and its durability depend on the correct choice of structures. When designing and installing, it is important to know the minimum and maximum depth of support of floor slabs on walls made of your material. For different types of buildings, certain types of interfloor ceilings are used. During the installation process, it is necessary to follow the installation technology, which is regulated by regulatory documents (SP 70.13330.2012) .
Design parameters
In order to avoid getting into unpleasant situations, especially in news releases, you need to pay great attention to calculating the basic parameters. The dimensions of the floor structures are selected specifically for all structures. In this case, the length of the spans located between the walls is taken into account. The spatial diagram of the building allows you to calculate the mass pressing on the supporting structures. Based on this mass, it is possible to determine the loads on an individual slab.
Important: when calculating the total load, the weight of the screed and partitions, insulating materials, furniture and other equipment is taken into account. Let the slab weigh 2900 kg and the load-bearing area be 9 square meters. meters. Accordingly, for 1 sq. meter accounts for 322.2 kg of weight. Next, the calculated figure must be subtracted from the standard figure.
From the resulting difference it is necessary to subtract the approximate load created by furniture, other structures and household appliances. After this there should be a solid margin of safety. Typically, the actual load per unit area is 2–3 times less than the value included in the project. This approach eliminates any surprises during operation.
The largest static load per point should be calculated with a reserve factor of 30%.
The dynamic load is calculated with a reserve factor of 50%. If you need to assess the suitability of old structures, you need to take into account:
- load capacity of walls;
- current state of building blocks;
- safety of fittings.
When placing heavy furniture or large cast-iron bathtubs in an old apartment, you must take into account the load limit.
The most accurate results can be obtained by involving specialists. A professionally performed calculation will allow you to avoid many unpleasant situations. As for the width and height of floor slabs, here it is even more necessary to take into account the recommendations of professionals. In some cases, it is possible to resolve the issues of strengthening floor slabs on site by re-supporting them on temporary supports.
Stripping of floors in accordance with established requirements can be done only after concrete has been strengthened to 70% of the design value.
In this case, a single tier of racks is installed.
Note: if you need 50% stripping, you need to install a couple of tiers of racks.
Span lengths up to 8 meters must be constructed with temporary support in the center. If the span is longer, then more supports are needed; but for slabs shorter than 3 meters, support is rarely needed.
Types by method of support
The slab used for interfloor separation is a reinforced reinforced concrete structure with voids. The holes in the slabs come in various shapes and sizes to lighten the weight of the structural element.
The choice of interfloor slab and the depth of its support depends on the design features of the building. The following parameters are taken into account :
- purpose of the building (residential, industrial, public);
- the material from which the structure is constructed;
- wall thickness;
- types of loads acting on both the slabs and the building;
- seismic characteristics of the development area.
Based on the type of support, interfloor slabs are divided into three categories . Their selection is carried out at the project planning stage, taking into account calculations of the loads acting on the load-bearing elements of the building.
On both sides
The support for such slabs is two opposite load-bearing walls. They are laid on capital elements, with narrow (transverse) sides. Most often, for this type, interfloor slabs with round voids are used, marked PK, 1PK, 2PK. They can withstand loads of up to 800 kg/m².
On three sides
They have reinforced end reinforcement and are laid on three load-bearing walls. They are mounted in the corners of the building, which have a U-shaped structure of load-bearing walls. They are marked PKT and can withstand loads of up to 1600 kg/m².
On four sides
Such slabs are reinforced with reinforcement at all ends, they are more rigid and have increased load-bearing capacity. They are used only in complex structures where maximum distribution of high loads is required, or in cases where the construction of additional superstructures is planned. They are marked PKK, indicating increased strength. They are practically not used in low-rise construction.
Product types
The installation of the ceiling must be approached responsibly. The strength of the structure depends on this.
Plates can be flat or ribbed (PKZH). The large-panel reinforced concrete slab has a U-shaped cross-section. They are used in the construction of industrial and technical facilities, under conditions of increased loads and long spans. Stiffening ribs increase load-bearing capacity. In residential construction, they are used to separate the first floor from the basement, since a section of this type does not allow obtaining a flat ceiling.
Flat slabs are produced with voids or with continuous fill (PT). The technical underground slab is used in public buildings to cover channels under the floor. During the construction of private houses, it can be used as an additional element for flooring over small spans of corridors and bathrooms. In residential construction, round hollow-core products are used. They are cheaper, weigh less and are easier to install. Air voids help retain heat better and increase sound insulation. Depending on the production method, they are divided into 2 types.
Round hollow formwork
PCs have been used in private construction for more than 20 years. In production, reusable sized molds (formwork) are used. To reduce the cost of products, formwork of standard parameters is used. The price of a product made in individual sizes will be much more expensive. The thickness of the slab is 220 mm. Depending on the width and length, there are options as shown in the table:
Continuous production
PB - manufactured using new technology on a continuous conveyor, then cut. They have a smoother surface, which greatly simplifies further finishing. Made from stronger concrete. At the customer's request, the length can be any, with an accuracy of 10 mm. It is possible to cut the end side of the product at an angle. The only drawback is the width, it is standard - 1.2 m.
Depth of the establishment on the walls
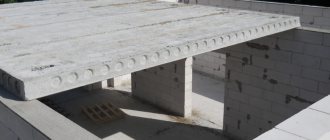
All floors, regardless of installation method, can be laid on a foundation or load-bearing walls made of brick, reinforced concrete panels, aerated concrete or foam blocks.
It is important to know how much you can support a hollow reinforced concrete product. This depth depends on the material from which the supporting structures are constructed :
- brick - from 9 to 12 cm;
- panel - from 5 to 9 cm;
- aerated concrete or foam block - from 12 to 25 cm.
Failure to comply with the recommended laying depth can lead to the destruction of walls due to improperly distributed loads. Insufficient depth leads to coloring of the inner layer of masonry and plaster, or to cracking of the panels. Excessive distance taken for support will lead to the destruction of the outer part of the wall.
Diagram of correct and incorrect support on a brick wall:
Excerpt from SNIP
JV “Large-panel structural systems. Design Rules"
4.3.17 The depth of support of prefabricated solid-section slabs on concrete and reinforced concrete walls, depending on the nature of their support, is taken to be no less than :
- 40 mm - when supported along the contour, as well as two long and one short sides;
- 50 mm - on two sides and a span of 4.2 m or less, as well as on two short and one long sides;
- 70 mm - on both sides and a span of more than 4.2 m.
The support of formless hollow-core slabs on wall panels is carried out on two sides, that is, according to a beam pattern with a support depth of at least 80 mm for slabs with a height of 220 mm or less, and at least 100 mm for slabs with a height of more than 220 mm.
In all cases, the maximum support depth for hollow-core slabs without formwork is taken to be no more than 150 mm.
Supporting hollow-core slabs without formwork on three or more sides (inserting the longitudinal side of the slabs into the walls) is not allowed .
How to select reinforced concrete lintels
So let's first enter some initial data. Let's say we need to calculate which lintel should be used to cover a span of 1350 mm wide in a self-supporting wall 240 mm thick with a wall height above the opening of 800 mm. Construction is being carried out in winter conditions.
A wall thickness of 240 mm means that we will need two lintels 120 mm wide. In winter, a load from the height of the wall equal to the design span is taken on the self-supporting lintel. The design span is calculated as follows:
1350 + 2*100/3 = 1420 mm
100 mm in this case is the minimum depth of support for the lintel. Since the height of the masonry turned out to be less than the design span, in future calculations we will use exactly this height - 800 mm.
0.24*0.8*1.8*1.1/2 = 0.19 t/m = 190 kg/m
In these calculations, 1.8 t/m3 is the weight of the brick, 1.1 is the coefficient. reliability, 2 – number of jumpers. So, we need to choose a jumper from those whose load index is at least 2.
As we said above, the minimum support depth for these jumpers is 10 cm, which means the smallest possible length of the jumper in our case is:
1350 + 100*2 = 1550 mm
From the list of standard sizes, a 2PB 16-2 jumper with a length of just 1550 mm and a design load of up to 200 kg/m could suit us. However, we still need to take into account the load from the beam’s own weight, which is 70/1.55 = 45 kg/m. That is, the total load will be 190 + 45 = 235 kg/m, which exceeds the maximum permissible for this jumper.
In our case, a 2PB 19-3 jumper is suitable. Its own load is 80/1.94 = 41 kg/m. Then the total will be equal to 190 + 41 = 231 kg/m, which does not exceed the permissible 300 kg/m for this beam. The length of the lintel is 1940 mm, and this is also suitable for our conditions.
Currently, in construction, prefabricated reinforced concrete floors are the most common. Flooring of reinforced concrete slabs is carried out on brick and monolithic walls. And also on walls made of foam concrete, pre-reinforced with a monolithic belt.
Armopoyas
Before installing the floors on the main structures, a monolithic reinforced belt is installed. It is carried out along the perimeter of the area of the main walls, along their entire width. Formwork is installed along the edge, then a reinforced frame of longitudinal, transverse and vertical reinforcing bars is mounted and filled with concrete.
When constructing an armored belt, the following requirements must be met :
- The height of the armored belt is from 20 to 40 cm (not less than the height of a standard aerated concrete block).
- The width must correspond to the width of the supporting element.
- The thickness of the reinforcement is at least 8 mm. The frame is tightly knitted with wire or fastened by welding.
- The concrete must match the brand of mortar used for masonry. The recommended grade of concrete used is at least class B15.
Support nodes
They are designed for reliable and correct fixation of floor slabs on permanent elements. Laying the slab and fixing it to the wall is done using mortar and rigid reinforcing compounds.
Nodal connections must meet the following requirements:
- the end sides of the slabs should not be closely adjacent to the masonry;
- thermal insulation is performed between the masonry and the ceiling;
- It is recommended to close the hollow holes with special liners to prevent heat loss;
- The connection between the ceiling and the reinforced belt is made by rigidly connecting the reinforcement belt reinforcement with the reinforcing rods of the slab by welding.
The nodes depend on the number and type of capital elements. For support on two sides, they are made on transverse load-bearing walls, and for support on three or four sides - on both transverse and longitudinal walls. The nodes are also performed when the load-bearing elements are columns, trusses and floor beams.
When laying floor slabs, it is necessary to take into account all the parameters necessary for correctly supporting them on the load-bearing elements. The selection of slabs, calculation of nodes, reinforced belt and support depth are made at the building design stage.
After installation, do not forget to seal the seams.
Features of slab laying
Installation of the ceiling is carried out using a crane. In addition to the crane operator, 3 workers are needed. One hooks the slings to the fastening loops of the slab, and two are used for installation on the wall. If there is no visibility between the installers and the crane operator, another person is needed. The PC needs to be laid rigidly, with bricks on top and bottom of the slab. When laying PB, hinged fastening is used.
It should be taken into account that it is forbidden to make technological holes in formwork slabs or shorten them. This reduces the strength of the existing structure, since they have increased reinforcement in the support areas. The possibility of supporting hollow products on a third side should be checked with the manufacturer. This may lead to cracking. You should not block two spans with one PC or PB.
Cracked
Sometimes, due to improper transportation or storage, the product cracks. If the cracks are 4-10 mm and there are many of them, it is better to cut off the damaged part and not use it. If the defect is small, the product can be put into use in compliance with the following installation rules:
- Use in a place where there will be the least load, for example, for an attic floor.
- Mount between two intact PCs or PBs, carefully fastening them.
Return to contents
Insufficient width
If existing standards were not taken into account when designing a building, it happens that the width of the floor does not coincide with the dimensions of the room. There are 4 ways to fill the missing space:
- Cut a strip of the required width from the PC or PB.
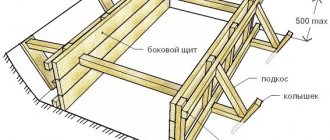
- Fill the gaps with sagging nets that rest on the top of the floors or floors and walls. Fill with concrete.
- Tie the formwork from below, lay reinforcement, and pour it.
- When the width is small, brick sealing is sometimes preferred to the monolithic method. “Holes” are left near the walls, the stones are placed with a poke in such a way that one edge of them lies on the masonry, and the other rests against the slab. For reinforcement, before screeding the floor, you can line this area with mesh or thin reinforcement (6 mm).
Return to contents
The amount of support of the floor slab on a brick wall: types, depth
The durability and reliability of the building are ensured by compliance with construction standards and regulations. SNiP completely regulate the process of building construction. Interfloor ceilings differ for different types of structures.
The depth of support of the floor slab on a brick wall is an important parameter that ensures the overall stability, strength and safety of the structure.
Overlap and depth according to SNiP
The requirements of SNiP Russia state that the overlap of the floor slab on the underlying wall is determined by:
- the purpose of using the building;
- width of the walls;
- thickness of overlapping structures;
- their mass;
- seismic hazard level;
- the size of the covered spans.
A larger overlap is simply not provided for in SNiP. Panels of PC and PB types in brick houses are placed on a couple of short sides. If the structure is up to 4 meters long, then the overlap should be 7 cm; for a longer length it should be 9 cm.
The depth to which prefabricated structures rest is:
- when supported along the contour - 4 cm;
- when supported on a pair of long and one short side - 4 cm;
- when supported on two sides and the span of slabs is up to 4.2 m, the depth should be 5 cm;
- when supported on 2 short and 1 long sides - 5 cm;
- when supported on 2 sides with a length exceeding 4.2 m, the depth of support cannot be less than 7 cm.
SNiP 2.03.01–84 prescribes a number of requirements for the anchoring of reinforcement structures placed on supports.
Of course, this moment also affects the final depth.
Important: the thickness of all parts of the ceiling located above technical underground rooms and passages (driveways) is calculated together with the insulating layer.
Separate requirements are imposed on the depth of embedding of structures into grooves. If the overlap is made with an incorrectly selected overlap, you can be afraid of the appearance of cracks and even complete destruction of the structure.
Types by method of support
The slab placed between floors is a reinforced concrete product with internal voids, which are needed to reduce the weight of the structure and its pressure on the brickwork.
The characteristics of the building influence the choice of reinforced concrete products for interfloor laying.
The following characteristics are taken into account:
- seismic properties of the construction region;
- loads acting on the building and slab;
- wall parameters - thickness, height, material of manufacture;
- The purpose of the building is industrial, public, residential.
The advantages of using ready-made products include:
- short installation time;
- low cost;
- reliability and durability in operation;
- ease of installation using workers and a truck crane;
- high noise insulation due to voids.
Factory floor slabs have their disadvantages:
- mandatory use of construction equipment;
- there remains a distance between them;
- the final rigidity of the structure is less compared to a monolith.
Concrete products resist tension worse than compression. The upper part of the ceiling is subjected to the latter, and the lower part is extended. To increase the resistance, reinforcement is placed along the slab. Therefore, the product can bend downward in the longitudinal direction.
On both sides
With this option for laying the floor slab, the support is carried out on 2 load-bearing walls located opposite each other. The product is placed on the walls with the transverse narrow side.
This method of load distribution is the most economical and easiest to install. It should be used when the deflection does not exceed the permissible values. Permitted load - up to 800 kg/m³. The method is suitable for reinforced concrete products marked 1PK, 2PK, PK with round voids.
On three sides
Supporting the floor slab on the walls is possible on 3 sides. In this case, 2 short and one of the long edges are pushed onto the wall load-bearing elements.
With this arrangement, only the free part of the product bends. The longitudinal frame comes into operation, taking tensile stress not along the entire length, but only at the hanging fragment.
On four sides
The most rigid slabs marked PKK are made with all reinforced ends. They are characterized by increased load-bearing capacity.
They are more expensive and are used in complex structures when there is a need to distribute fairly high loads. This option is suitable if you plan to install additional add-ons in the future.
The slab is laid on the walls on all 4 sides. It is unprofitable to use such products for the construction of low-rise buildings.
Features and purpose
It is appropriate to start the conversation about the use of floor panels with the fact that if the installation technology is violated, problems very quickly arise in them. Periodically it is reported that ceilings are collapsing in different places. Immediately after this, it becomes impossible to use the buildings normally.
Slabs or floor panels can rest either on a column or on an external wall. In any case, they are located horizontally.
The purpose of using slabs is to absorb the load exerted from above, with partial transfer of it to the vertical supporting structures of the house. In most cases these are standard products. The advantage of ready-made slabs is:
- reliability;
- ease of use;
- no special requirements for use;
- retention of vapors, gases and water;
- zero fire hazard.
In most cases, the covering panels are made of reinforced concrete. It is a composite material made from purely natural ingredients. Modern products of this kind, according to GOST, must withstand bad weather and severe frosts. An important feature of high-quality blocks is their high mechanical strength. As for the classification of slabs, it is mainly based on the internal structure and installation methods.
If the panel has longitudinal cavities, then it can be used in both residential and industrial construction. Based on the diameter of the voids across, the following types of products are distinguished:
- with cylindrical channels 159 mm;
- with circular chambers 140 mm (such slabs are made from heavy types of concrete);
- with voids 127 mm;
- with round cavities 114 mm.
Armopoyas
Monolithic reinforced belt is used as a base for laying before installation of floors on brick and foam or gas block load-bearing walls. Concrete is poured after a frame of vertical, transverse and longitudinal parts is installed along with the formwork.
Requirements for the installation of an armored belt:
- The grade of concrete used must match that used for masonry. A mixture of a class above 15V is best.
- The frame requires reinforcement no thinner than 8 mm, which is welded or tied with wire.
- The width of the belt is equal to the width of the wall.
- The height of the reinforcing base should be no less than the gas block - 20-40 cm.
A correctly executed belt is needed to evenly distribute the load between load-bearing walls and partitions. In addition, during the manufacture of the frame, the ends of the metal reinforcement are removed to securely fasten the slabs.
Plates with longitudinal stiffeners (PB)
They are used almost as often as the first type.
The production technology itself allows you to create products of absolutely any length.
The thickness, as in the previous case, is 220 mm, and the width completely coincides with the dimensions of the round-cavity panels.
To reduce high loads, slabs with transverse stiffeners are used. It is important that when stretched, concrete leaves the place of load and goes to the epicenter of compression, and the stiffener distributes it evenly over the entire plane. To reduce material consumption in the manufacture of slabs while maintaining all strength characteristics, stiffeners are also used.
Flat floors are used in private construction.
This type of floor is often used for the construction of civil housing, which is made in the form of a solid slab with longitudinal ribs that work in bending. According to the design scheme, they are divided into non-beam and beam groups.
In the first case, the floor rests on columns with extensions (capitals); in the second case, the beams together with the panels work together as a single unit.
According to their structural characteristics, beam floors are divided into prefabricated beams, monolithic with beams, ribbed monolithic, prefabricated monolithic beams, beamless prefabricated, beamless monolithic, beamless prefabricated monolithic.
Most often, prefabricated beam structures are used in the construction of houses.
Over time, the strength of this structure decreases.
The tent panel is a special type of slab, which is framed along the contour with ribs. They always point downwards. In terms of strength characteristics, such a panel is much inferior to a hollow-core product. The maximum load for this type of product is 200-250 kg/m.
Another huge disadvantage is that the strength of the product decreases over time. The panel structure is made of heavy concrete grade M-200, reinforced with spatial frames of longitudinal and transverse ribs and welded mesh.
There is multiple reinforcement in the corner part of the slab, so it is difficult to achieve strong adhesion of the reinforcement to the concrete. When molding a product, the reinforcement often shifts from the design state, so the finished product is of poor quality. Lightweight concrete tent slabs do not meet the required strength and deformation parameters, so they are not recommended for use in the construction of civil housing.
Support nodes
The unit for supporting the floor slab on a brick wall is a capital element of the building for its strong fixation.
When creating a node, the following conditions must be met:
- by welding, the reinforcing rods of the plates and armored belts are rigidly connected to each other;
- to reduce heat loss, use special liners that cover empty holes;
- thermal insulation is performed between the ceiling and the masonry;
- The ends of the slab should not be closely adjacent to the masonry.
To make a supporting element, when the bottom of the building’s ceiling is reached, masonry is made only from the outside to form a niche for the slab. Additionally, the following recommendations should be taken into account:
- If the product is mounted on half a brick (12 cm), then add 1 cm for the niche. This is done so that the overlapping element does not rest against the brick layer.
- A cement-sand mixture is laid on the brick, the quality of which is the same as the masonry mortar.
- The end voids are tightly closed with concrete liners so that the ceiling is not destroyed during further construction of the wall from above.
At a construction site, if there are no factory-made plug liners, M200 concrete is used to fill voids.
There are no strict standards for side supports. But in the case when the support occurs on the side (long) side, make sure that the load does not fall on the first void. This can cause cracks and destruction of the ceiling.
Minimum size for supporting a floor slab on a brick wall
What should be the minimum support for a floor slab on a brick wall to ensure the reliability and durability of the structure? This is a serious issue; the stability of the building to loads and the safety of the people in it depend on its solution. That is why the depth of laying flat reinforced concrete products on brickwork is regulated by construction regulations (SNiP).
The strength of the entire house structure depends on the quality of installation of floor slabs.
Installation recommendations
The slabs must be laid on the walls without gaps in width. You need to pay special attention to the top row of brickwork. It needs to be well leveled and the inside should be placed with the butt side on. Even before laying the PC or PB on the wall, it is necessary to seal the voids with liners or a piece of brick with mortar. The support unit for the slab is formed under the condition that there should be a distance of 1-2 cm between its end and the junction point in the stone. The same mortar should be used to secure the floor and masonry.
About hollow reinforced concrete products
It is difficult to understand the issue if you do not know what floor slabs are. These are structural elements of permanent buildings, made of reinforced concrete, for the installation of floors between floors. Inside along the entire slab there are voids of various shapes, most often round.
Products are manufactured according to standard designs - a series of drawings that indicate design features and dimensions. The length of the elements is 1.5-12 m. Modern production technologies make it possible to cut slabs of the required length in increments of 100 mm. The width of the product is made into 4 types: 1000, 1200, 1500 and 1800 mm.
What determines the minimum distance for support?
Regulatory documents establish the minimum length for supporting the end part of a hollow-core slab on a wall made of brick - 9 cm. Such a decision is made by design engineers with justification and calculations. Factors influencing the depth of overlap:
The parameters for supporting the slab depend on the type of future structure.
- overall size of the span and length of the reinforced concrete product;
- the magnitude of the distributed and point load on the concrete floor;
- types of loads - static, dynamic;
- thickness of load-bearing brick wall;
- type of building - residential, administrative or industrial.
All of these factors must be taken into account when calculating the reliability of the structure. In accordance with the standards, the end of the reinforced concrete hollow slab is placed on the wall so that the overlap size is 9-12 cm, the exact data is obtained by calculation.
If you study the series by which floor elements are produced, they indicate 2 types of sizes:
Table for calculating the cross-section of floor beams.
- Modular. This is the theoretical width of the span where the element should be placed.
- Constructive. This is the clear length of the ceiling tile from one end to the other.
For example, a concrete product with a modular length of 6 m has a real dimension of 5.98 m, which must be taken into account when designing. To get a clear room width of 5.7 m, you need to lay the slab on a brick wall to a depth of 120 mm; for finishing with plaster, 20 mm will remain on each side; there is also a brick ceiling.
The question arises - why is the size of the support so small, because the slab can be laid at 20-30 cm, as long as the width of the fence allows it. But this will not be support, but pinching of the reinforced concrete element, since its end also bears part of the load from the wall built above. In such a situation, both the slab and the load-bearing partition will not work properly, which will lead to the slow destruction and cracking of the brickwork.
Conversely, due to too little overlap, the heavy slab, along with the entire load, will begin to act on the edge of the masonry and eventually collapse it.
Therefore, the minimum support of 9 cm is rarely used in practice; usually 10-12 cm is accepted.
There is another reason why the edge of the ceiling should not be too deep inside the enclosing structure. The closer the end of the slab is to the outer surface, the more heat is lost in such a structural unit, because concrete conducts heat well. The result will be a bridge of cold, which will cause cold floors in the house.
Search for literature, drawings, models and other materials
Questions often arise about the depth of support (both minimum and maximum) of floor slabs (monolithic and prefabricated) on walls (concrete, brick, gas-ash concrete, etc.).
There is a proposal to collect in this topic all the information on this problem. I propose to refer to the source of information and provide the text directly in the message (preferably scans). If anyone has any series for prefabricated floor slabs, let us share information from them.
Message from: A manual on the design of residential buildings. Vol. 3 (to SNiP 2.08.01-85)
clause 6.16. The depth of support of prefabricated slabs on walls, depending on the nature of their support, is recommended to be no less than, mm: when supported along the contour, as well as two long and one short sides - 40; when supported on two sides and the span of slabs is 4.2 m or less, as well as on two short and one long sides - 50; when supported on two sides and the span of slabs is more than 4.2 m - 70. When assigning the depth of support for floor slabs, one should also take into account the requirements of SNiP 2.03.01-84 for anchoring reinforcement on supports.
SERIES
1.141-1 issue 63 - minimum support depth 90 mm.
PS: I will try to duplicate all the information in the topic header.
Message from topstas : The manual for the design of concrete and reinforced concrete structures without prestressing reinforcement to SNiP 2.03.01-84, paragraph 5.46 and drawing 105 do not clarify the minimum values? I don’t understand how this can be done when setting minimum values?
Not only this (5d/10d insertion of tensile reinforcement beyond the edge of the support). It also depends on the deviations that may occur during installation, on the distance between the supports (taking into account deflection) and on the stresses that the ends of the floor can “withstand” (for example, hollow core slabs according to series 141, the permissible stress when supported is 120 mm - 42 kgf/sq. cm, and with a support of 250 mm - 30 kgf/sq.cm). The collapse of the masonry (for example, some aerated concrete blocks without the use of a distribution belt) can impose a limitation on the minimum support.
Message from Yuliana : It’s clear with minimal support of the slabs. But are there standards for maximum support?
There are such restrictions in series for PB slabs. For example, for PB slabs from one of our local factories, the support depth is limited to 120.200 mm depending on the wall material (brick, reinforced concrete, etc.). Consider that there is no upper reinforcement; accordingly, there is a limitation on the support moment that may arise when inserting the ceiling into the wall. The magnitude of this moment is determined, as a rule, experimentally depending on the design of the slabs and walls, as well as depending on the magnitude of the support/pinching itself. I have not seen universal recommendations for floors of various designs.
Message from eilukha : The actual length of the slabs is 20 mm less than the standard length. Is the support depth determined from the standard or actual length? That is, when calculating the width of the support that is attached to the axes, should we take into account Lplates or Lplates-20 mm?
Something was too clever along the way. Forget about the axes in this case (I, as an idea, can tie the wall centrally along the axis, and support the slab over the entire thickness of the wall). The depth of support is always taken to be “actual” - how much the slab rests on the structure (how much is depicted/laid in the installation unit), that’s how much you take.
Message from: That is, when calculating the width of the support that is attached to the axes, take into account Lplates or Lplates-20 mm?
I didn't understand at all. What kind of calculation are you doing? To the local effect of load (crushing)?
Message from: 3.21. Floor slabs must be laid on a layer of mortar no more than 20 mm thick, aligning the surfaces of adjacent slabs along the seam on the ceiling side.
Message from: Floor slabs on trusses (beams) are laid dry
on the supporting surfaces of load-bearing structures.
Floor slabs must be laid on a layer of mortar
no more than 20 mm thick, aligning the surfaces of adjacent slabs along the seam on the ceiling side.
Here, more precisely, SP 70.13330.2012:
Message from: 6.4.3 Crossbars, intercolumn (tie) slabs, trusses (rafter beams), covering slabs on trusses (beams) are laid dry on the supporting surfaces of load-bearing structures. 6.4.4 Floor slabs must be laid on a layer of mortar no more than 20 mm thick, aligning the surfaces of adjacent slabs along the seam on the ceiling side.
Message from eilukha : floor slabs on trusses (beams) are laid dry on the supporting surfaces of load-bearing structures.
A lot depends on the quality of the slabs. This rather applies to slabs that are welded to trusses (beams) through embedded parts. If there are no mortgages, then through a solution (IMHO).
JV “Large-panel structural systems. design rules" (final edition)
4.3.17 The depth of support for prefabricated solid-section slabs on concrete and reinforced concrete walls, depending on the nature of their support, is taken to be no less than: • 40 mm - when supported along the contour, as well as on two long and one short sides; • 50 mm - when supported on two sides and a slab span of 4.2 m or less, as well as on two short and one long sides; • 70 mm - when supported on two sides and the span of slabs is more than 4.2 m.
The support of formless hollow-core slabs on wall panels is carried out on two sides, that is, according to a beam pattern with a support depth of at least 80 mm for slabs with a height of 220 mm or less, and at least 100 mm for slabs with a height of more than 220 mm.
Support unit design
When constructing a brick building with floors made of flat concrete elements, masonry in the full thickness of the fence is carried out to the design level of the bottom of the ceiling. Then the brick is placed only from the outer part so that a niche is formed where the slab will lie. The process is accompanied by the following:
- If the depth of support is 12 cm (exactly half a brick), then the niche is made at least 13 cm wide so that the end part of the slab does not rest against the brickwork.
- Before installing the ceiling, a layer of cement-sand mortar of the same grade that was used during the construction of the masonry is laid on the base.
- Since the edge zones of the slabs will absorb part of the load from the wall erected above, the voids at the end are tightly sealed with concrete liners so that the product does not collapse from compression.
As a rule, manufacturers of reinforced concrete products provide concrete liners at the factory. If this has not been done, the voids must be filled with M200 concrete mixture under construction site conditions.
In the end walls of the building, the floor slabs rest on the external fences not only with their ends, but also with one side part. Here the depth of support is not standardized, but for reliability, this unit should be designed in such a way that the load from the brickwork does not fall on the first void of the product. Otherwise, squeezing the hollow part may cause its destruction. The support arm should be minimal; its size depends on the design of the slab.
This site uses Akismet to reduce spam. Find out how your comment data is processed.
Installation of floors in brick buildings
A team of four people is required for installation work. The crane operator delivers it to the base (wall) - the slab. The rigger is busy strapping the slabs with a four-legged sling. Two installers, located on both sides of the supports of the mounted slab, accept it, unfold it and then coordinate its lowering into a given position using guiding actions. After using mounting crowbars, they perform a small straightening of the slab, even before removing the slings.
In brick buildings they are laid on walls and crossbars. The crossbars are laid on reinforced concrete pads using slings. They must be laid into brick walls during laying. Before placing the crossbars, you need to check the horizontality of the cushions. The difference between them, or rather, their surfaces, should not exceed 10 mm. Then the crossbars are brought to the desired position using mounting crowbars. The installers themselves are located on the scaffolding. The crossbar must be moved only perpendicular to the longitudinal axis, using the blade of a mounting crowbar. Otherwise, the stability of the walls that support the crossbar will be compromised. Afterwards, the verticality (plumb line) and horizontality (with a level) are verified, and only then the crossbar is fixed to the base. When this work is completed, the slings are removed.
The use of hollow core slabs is possible in buildings with either transverse or longitudinal load-bearing walls, because they are supported on two sides. Then follows the anchoring of the floor, which is the fastening of the laid floor slabs to the external walls and to each other. Anchors are usually placed at a distance of no more than 3 m from each other.
Before laying the floor slabs, the horizontalness of the working surfaces is again verified. The ridge of the wall masonry must be leveled.
Because a sufficiently large area of hollow core slabs will react sensitively even to small unevenness of the base. The plates will simply sway. Identified irregularities are laid with additional insulation strips.
And only after that they lower the slabs onto the supports, where the cement mortar has already been placed. In order to obtain a single rigid horizontal floor, the slabs are connected to each other and to the external walls with steel anchors, which are secured to mounting loops. The ends of the floor slabs are connected to the brick wall with L-shaped anchors. They are then sealed with a mortar mixture to protect against corrosion.
When the slabs are supported on internal walls, composite anchors are used, obtained by connecting them by welding. The gaps that appear between the slabs are filled with bricks used in the main masonry. The slabs are laid on the mortar mixture.
After laying the slabs, the ceiling is checked for horizontalness. If a discrepancy is detected between adjacent slabs, they are lifted using a crane and the mortar bed is trimmed, after which they are put back in place. When the alignment is completed, the slabs are secured with anchors, which are laid in the masonry. Adjacent slabs are connected to each other using mounting loops with anchors.
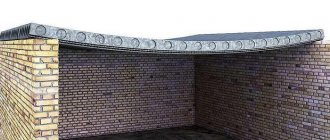
In hollow-core floorings, if the support is on an external base, the voids are filled with heavy concrete or concrete plugs to a depth of approximately 12 cm. This is done for the purpose of insulation. The same is done in hollow containers of slabs that rest on internal load-bearing walls. The voids are filled in order to prevent the destruction of the supporting parts of the slabs under the pressure of the structures located above, since it is their edges that are the most fragile.
The lintels that are load-bearing, that is, those that bear the main load from the floors, are installed by lifting them with slings using the mounting loops and laying them on the mortar mixture. Ordinary lintels are placed manually, taking into account the support area and horizontality.
When designing, and especially implementing a house, that is, construction, there are many nuances that generally affect the strength of the entire structure. Floor assemblies were no exception, because they are entirely responsible for what kind of load the laid structures will withstand.
A ventilated air gap must be created between the end of the wooden floor beam and the brick wall.
So, let's look at what the nodes of these systems are and how they are mounted.