Crafts from autumn leaves: bowl
- sponge or sponge brush
1.
Inflate the balloon.
2.
Mix water and PVA glue in a 1:1 ratio.
3.
Use a sponge to apply PVA glue to the ball.
4.
Carefully begin gluing the leaves to the ball one by one.
*If necessary, use scissors to trim leaves or twigs attached to them.
5.
Apply glue over the glued leaves to secure them in place.
6.
Continue gluing leaves until the entire bottom half of the balloon is covered.
*You may need to glue more leaves to the bottom of the ball to ensure the bottom of the future vase is strong.
7.
Leave to dry for 24 hours, after which you can pop the balloon and you're done!
Tree of Happiness
We present to your attention a master class “Topiary from autumn leaves”. In it you will learn how to make such a miracle for decoration with your own hands.
Before you start, you need to familiarize yourself with the materials that we will use in today's master class:
- scissors;
- newspapers, napkins or plain paper;
- glue (super glue, glue gun);
- a wooden stick or pencil (it all depends on the size of your tree);
- container for wood (yogurt cup, pot, bottom of a plastic bottle);
- wide tape;
- dry tree leaves (maple leaves make a good craft);
- gypsum;
- satin ribbons, beads, stones.
Once you have stocked up with everything you need, you can begin work.
Let's prepare the pot for use. After you choose the desired container (it could be a yogurt cup, a pot, the bottom of a plastic bottle), you have the right to decorate it. You can use paint, nail polish to paint the pot, or use ribbons and pebbles to cover the outer surface (you can choose the colors, sizes, shapes of the materials yourself).
Related article: How to sew a denim skirt: pattern and job description
When the appearance of our pot is much more attractive than before, we can move on.
Let's prepare the base. As for the base that will hold the tree trunk, here you can choose any mounting mixture (cement-sand mortar, putty, plaster or alabaster) or the same floral foam/foam.
If you prefer the first option, we recommend using alabaster. It is affordable, you can buy it at any building materials store, it is easy to install and does not crack.
Instructions for using alabaster:
To fill 1 container with alabaster you will need about 300-400 g of the mixture and about 1.5 glasses of water. Stir the solution for several minutes. As soon as the mixture thickens to the consistency of thick sour cream, pour it into a container, then install the barrel and hold it level for 2-3 minutes. Leave the mixture to dry for 12-24 hours.
If you use gypsum, then its consistency should resemble thick sour cream, and the drying time for such material is 30-35 minutes.
Next, you need to prepare the tree crown itself. You can use plain paper, newspaper and even napkins. You need to crumple the paper so that you get a smooth ball, and to prevent it from unfolding, we will secure it tightly with wide tape. When the crown is ready, you need to make a small hole for the future trunk of our tree.
Preparing dry leaves for decoration. In order to properly secure the leaves to the crown of the tree, we will use a glue gun (working with it requires extreme care).
The leaves can be stacked on top of each other, making all sorts of compositions that your imagination and soul desire. Here are photos that you can use when making wood. You can also add touches such as beads and stones.
The final stage is making the trunk of our tree. You can use any wood stick as a trunk: a strong branch (previously dried), a simple pencil, a knitting needle, sushi sticks or a wooden stick (the height of the trunk may be different, depending on the height of the pot, the diameter of the ball and your wishes about the height of the product). If you don’t like the original appearance of the trunk, then you can wrap it with ribbons, strands, or simply paint it with paint (nail polish).
Related article: DIY wedding envelope using scrapbooking technique with templates
When all the elements are ready, all that remains is to assemble them into one whole composition. We put the barrel on the ball, first fill it with glue, fix it and hold it for a few seconds. We place the finished tree in a pot with a mixture of gypsum or alabaster, we also fix it and check how firmly the trunk holds in the pot.
What you can get is shown in the photo:
Table decoration made from maple leaves
- multi-colored leaves (if you use artificial ones, the decoration will last a long time)
- strong thread or fishing line
- superglue or hot glue
- baking paper
1.
Using a centimeter, measure the distance between the chandelier and the table so that you know how long to cut the thread and baking paper.
2.
Cut the paper to the desired length.
3.
Cut the thread, the length of which should be 15-20 cm longer than the baking paper.
4.
Using masking tape, secure the thread at the top and bottom of the paper, leaving 15-20 cm hanging from one end of the paper. You will use this end of the thread to tie the craft to the chandelier above the table.
5.
Starting with the top piece of masking tape, begin laying out the leaves (face down and from largest to smallest), leaving a few centimeters (5-7 cm) between them. Continue adding leaves all the way to the bottom.
6.
Once you have everything laid out and are happy with how the piece looks, use glue to glue the leaves to the string.
7.
Make several of these strips with leaves and tie them to the chandelier above the table.
Tree made from dried leaves
Dry leaves are a much more fragile material than fresh leaves, so you need to work with them very carefully. But if you put in every effort, you will end up with the most beautiful tree. In this detailed lesson you will learn how to make topiary from dry leaves correctly.
You will need:
- wire 25-30 cm long (two pieces of thin wire and one thicker);
- corrugated paper in three colors;
- pot or decanter, plaster, potassium permanganate;
- tape, thread, newspapers, colored paper;
- dried flowers and foliage, which should be prepared in advance;
- heat gun, beads, decorative paper.
Making a barrel
Each wire is wrapped in corrugated paper. To keep the paper firmly in place, apply a little glue to the end of the wire. Secure all three wires together with tape, and then wrap the thin wires around the thicker one.
How to make a stand
To obtain a beautiful topiary from maple leaves, it is recommended to use not a pot, but a small decanter. It will add grace to the finished product. Gypsum mixed with potassium permanganate for brightness can be used as a filler. The gypsum mixture is poured into a container while it is still wet. Then a wire barrel is inserted inside the decanter.
Creating the base and crown
Form a ball from colorful paper and newspapers. To get the desired shape, wrap the base with tape and thread. Now let's start executing the crown. We will use roses and other dried flowers, as well as leaves. It is preferable to make topiary from autumn maple leaves.
Let's look at the process of making the crown and base step by step.
- Glue dried flowers and leaves to the base using a heat gun.
- Make small paper balls. Cover the base with them and fix a square made of decorative paper on it in the place where the barrel will be inserted into the ball.
- Make a small hole in the crown and apply glue inside it. Place the base on the trunk and apply light pressure.
- Decorate the crown of the topiary with miniature beads, and make a pattern of roses on the decanter.
That's all, the autumn tree is ready!
You may also be interested in the article in which we talk about how to make topiary from corrugated paper.
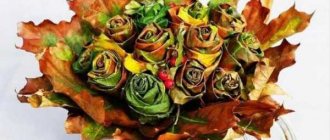
Roses from autumn leaves
— 10 leaves of different sizes (for one flower)
- adhesive tape or floral tape.
1.
Take a small leaf, place it face down and bend the ends. After this, start rolling the leaf on one side to create a bud.
2.
Take the second sheet, turn it face down and fold the top end towards the center.
3.
Place the first leaf in the center of the second leaf, fold the outer ends of the second leaf and wrap both ends around the first bud.
4.
Continue adding leaves, getting larger and larger leaves.
5.
Once you've added all the leaves (or not all of them, but you've got the flower to the desired size), hold the bottom of the flower and begin wrapping it with duct tape while securing the flower around the branch. Trim off any excess parts.
6.
Make several similar flowers for a bouquet.
Bouquet of roses from leaves (photo instructions)
Bouquet of roses from leaves (video)
Vase of leaves
In addition to children's crafts, you can make home interior items from leaves with your own hands. Let's try to make a vase that can be used as a storage place for candies and other sweets.
In order to build such a vase you will need: glue, Vaseline, scissors, maple leaves, a balloon.
Depending on the size of the vase you need, inflate the balloon; accordingly, the larger the balloon you inflate, the larger the vase you will get.
Next, you should lubricate the ball with Vaseline so that the balls lag behind the ball. For convenience, fix your ball in some container and start making a vase.We need to coat each leaf with glue; to do this, use a brush and stick it on the ball.
After you have completely covered the entire ball with leaves, you need to coat the ball with glue again. Wait two or three days and you can deflate the balloon completely. Now the vase is ready.
DIY Leaf Crafts for Kids: Turkey
- cardboard (for 5-6 circles)
- leaves (about 20 pieces)
- toy (plastic) eyes.
1.
Cut out 5-6 circles of different sizes from cardboard. You can use cups, saucers, plates and other small round objects as auxiliary tools.
2.
Remove stems from leaves. Leave two leaves with stems, because... these stems will act as turkey legs.
3.
Glue each piece of paper to its own cardboard circle.
4.
Stack the circles one on top of the other. They can be attached with glue or a stapler. If you use a stapler, it is better to attach each circle separately to the adjacent circle.
5.
Glue a large brown leaf to the back of the large circle.
Children's crafts from leaves (photo)
Here are some interesting examples of how you can make beautiful children’s crafts from simple leaves:
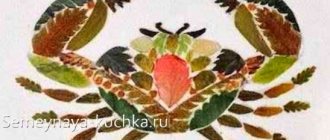
Applications from autumn leaves: animals
You can make different animals:
Leaf Crafts for Kids: Alphabet
You can make an alphabet from autumn leaves.
Crafts from dry leaves: paintings
Very beautiful paintings can be made from fallen leaves. These paintings can decorate any interior.
Autumn compositions from leaves
While in the forest, you can make beautiful patterns from leaves on the ground and photograph them as a souvenir.
Tips for decorating finished works
If desired, you can decorate the applications with moss, thuja branches, and rowan berries.
Any natural materials are useful for decoration: berries, cones, beautiful plants, nuts, seeds, acorns, fruits of various shrubs.
It is important to start creating, and then your imagination will tell you a lot. Crafts made from leaves will be a joy for children. In addition, the child will receive a lot of emotions while walking to collect leaves and other natural gifts. He will have a useful activity, which over time may develop into a hobby. Moreover, the modern problem of all parents is solved - the child has an alternative to a computer, smartphone and other gadgets.
Crafts from maple leaves: large autumn leaf
- plywood or thick cardboard
- sponge or sponge brush
1.
On a large piece of plywood or cardboard, draw a large maple leaf with a pencil.
2.
Find fallen leaves in a park or forest and dry them on baking paper.
3.
Lay out the leaves in a pattern on the plywood, take a brush and PVA glue, apply glue to all the leaves and leave to dry.
After the glue dries, all the leaves will harden. You can trim off excess parts if necessary.
4.
Glue the leaf blank to plywood or cardboard. For better adhesion, use superglue.
5.
Use a straight branch as the trunk of your large leaf. It can also be glued with superglue.
Making a topiary with your own hands: necessary materials and stylistic orientation
How to make topiary with your own hands? Such a sculpture, as well as the procedure for its creation, are not particularly complicated, but they contain some points that should be emphasized. The main feature of creating a craft is the fact that all its parts are completed separately and only at the final stage are assembled into one whole, allowing you to obtain unforgettable images and colorful shades of the finished product. In order to make a topiary from maple leaves, you will need the following tools and materials:
- a flower pot;
- gypsum, putty or cement;
- thread and needle;
- acrylic paint;
- a set of brushes;
- pencil, piece of branch or board;
- leaves;
- scissors;
- glue gun;
- colored paper;
- PVA glue.
A master class on creating topiary can become complete only when all the above components are assembled. At the same time, their list can be expanded or reduced - depending on the chosen style of decorating the elements. The creation of each object separately may require the availability of various materials and available tools that make it possible to obtain a certain shape of the object or give it a stylistic direction.
We also recommend reading
- Landscape design of a small summer cottage
- How to make a flower garden from continuous flowering perennials?
As a rule, crafts from maple leaves involve creating autumn motifs. And depending on the design style, such crafts can acquire unforgettable images - reminiscent of garden statues, permeated with sunlight, or become a kind of reflection of a garden flowerbed, covered with colorful and bright autumn foliage. Based on this, in the creation of similar objects, the main role is played by a flight of fantasy and the desire to translate it into reality, since it is they who allow us to obtain unusually bright and colorful images.
DIY crafts from autumn leaves: mask
- leaves of different sizes
- cardboard (can be from under a box of cereal, for example)
- hot glue or PVA glue.
1.
Draw a simple mask shape on cardboard and cut it out.
2.
Check where on the mask you need to make holes for the eyes.
3.
Make holes for the eyes and insert an elastic band into the sides of the mask so that the mask can be put on.
4.
Using PVA glue or hot glue, begin gluing the leaves to the cardboard mask, starting from the outside and working towards the center.
Crafts from autumn leaves: 40 ideas in pictures for the Autumn Festival!
My daughter Katya, wearing this wreath, became the “Queen of Autumn” in 2007!
In my deep conviction, our education, starting from Soviet times, has been built on the following principle:
“If you didn’t complete the teacher’s assignment as a child, you will still do it when you help your child” :-).
So, dear mothers, since we met on this page, it means your child has been given the task of bringing an autumn craft. Did you guess right?
I have no doubt that you will now breathe a sigh of relief! I've collected a bunch of ideas, and your fall leaf craft will definitely delight your teacher!
Source: https://snova-prazdnik.ru/podelki-iz-osennix-listev/
Bouquet of flowers from leaves
- autumn leaves of different colors (30-35 pieces)
- green adhesive tape (scotch tape) or floral tape
1.
Place your leaves on a flat surface in order, from small to large. Clean them from dust and dry them.
2.
Use scissors to cut off the leaf stems.
3.
Take the wire and cut it into small pieces, about 10 cm long. Each piece will be used for a separate sheet.
4.
Take floral tape or regular adhesive tape (scotch tape) and cut or tear off several 5 cm pieces.
5.
Take the second largest sheet and use wire to make a hole in it 0.5 cm from the edge. After this, bend the wire and twist it. This must be done carefully so as not to tear the sheet.
Back view:
6.
Use duct tape to wrap the wire. You need to attach the tape to the edge of the leaf and begin to carefully wrap the wire.
7.
To attach the wire to the smallest sheet, you need to twist it and only then insert the lower part of the wire into it.
Make a stem out of wire to form the core of the flower.
Wrap the wire with duct tape.
The core and petals are ready and can be connected.
8.
Wrap the second leaf around the core and add a second leaf, a third, etc.
* Petals should not lie tightly. They can be bent so that the flower is more magnificent.
9.
Keep your legs together. You can twist them a little to help them stick better.
When the leaves dry a little, you will get this, even more beautiful, rose:
Crafts from leaves ❥ 75+ photo ideas for crafts from autumn leaves
Fallen leaves are a beautiful and malleable material for creativity. A bright bouquet brought from a walk in the autumn park can, if desired, be turned into a real work of art: a panel, a wreath, an ikebana, a garland, a topiary.
All this is not a complete list of decorative products that are easy to make with your own hands. All you have to do is show a little imagination, and original crafts made from autumn leaves will decorate your home interior or take their rightful place at a school exhibition.
How to properly prepare foliage?
Before collecting autumn crafts from leaves, they need to be dried. You can do this in several ways:
- between the pages of books under pressure;
- between lightly pressed layers of paper towels;
- suspended in the air (away from sunlight);
- in a loose hydrophilic mixture: semolina, flour, salt, silicate gel;
- in glycerin: soak fresh leaves in a solution of 1 part glycerin and 2 parts water for 4-5 days, and for long-term storage - for a month; glycerin molecules will be absorbed, replacing water, and the sheet will retain its original appearance for a long time.
A hairdryer, microwave or iron will help remove excess moisture in a matter of minutes. Since the leaves themselves are almost weightless and fly away from the currents of warm air, it is more convenient to dry finished products with a hairdryer
The microwave can only be used for fleshy leaves, setting the time to a minimum and constantly watching to ensure that no fire breaks out.
Ironing is a quick way to get an even herbarium while maintaining the richness of the shades. In this case, the leaves need to be placed between two layers of paper (stationery, bakery), and a piece of cotton fabric should be placed on top.
What can you make from autumn leaves?
Crafts made from tree leaves are a great opportunity to add golden-crimson colors to your usual surroundings. This decor would be appropriate for any holiday from September to November.
Seasonal decorations also add attractiveness to some business projects: cozy family shops, mini-bakeries, restaurants. They look especially harmonious in interiors decorated in rustic or country style.
In kindergartens, schools, and clubs for young naturalists, crafts on the theme of autumn made from leaves are part of the educational program. In a playful form, such tasks teach children to create something new from natural materials, develop imagination, artistic taste and finger motor skills.
But you don’t have to wait for initiative from teachers. You can make crafts from leaves with your own hands together with your child and for no reason - a joint creative activity will bring a lot of positive emotions to all participants.
Leaf decorations: a selection of interesting ideas
To make a delightful decor from leaves, you will need plant materials collected from the nearest park, stationery and a few hours of free time.
The collection of photos presented below with a description of basic techniques will serve as a source of inspiration for the author's handmade.
Autumn bouquet of leaves
A simple bouquet of leaves is the easiest way to convey the atmosphere of autumn. It can be supplemented with tree branches, scarlet clusters of viburnum, rowan, and orange physalis lanterns.
A greenish-yellow background will highlight the beauty of dahlias, asters or chrysanthemums. Autumn bouquets of leaves also go well with ears of corn, steppe grasses, and dried flowers.
To bind elements, it is recommended to choose matte ribbons, straw, raffia, and linen twine. If you want to keep a bouquet of autumn leaves fresh for a long time, the base of the plants (cuttings, stems) should be immersed in a water-glycerin solution, adding liquid as it is absorbed.
2. “Floral” composition of autumn leaves
Sometimes bouquets of tree leaves can imitate roses.
To do this, take soft, wide foliage, bend the edges and twist it like a snail. The first element is located in the center, all subsequent ones are layered around. The base is fixed with a thread and, if necessary, attached to a stick with tape. Crafts made from maple leaves often resemble slightly blossomed buds.
Using birch or aspen “petals”, you can repeat the shape of an open flower.
Leaves panel
Creating pictures of autumn leaves with your own hands is a fun activity for children and adults.
It is better to choose a hard substrate for such art: thick matte cardboard, plywood, fiberboard, canvas.
Plants must be well dried, with a smooth surface, so it is advisable to prepare a herbarium in advance or use an iron.
From fragments of leaves, blades of grass and flowers, amazing abstractions, landscapes, portraits, graphic drawings, and mosaics are obtained.
To decorate a truly beautiful autumn panel with your own hands, you need talent and patience, since dry natural material is very fragile.
Applications from leaves on the theme of autumn
Many children enjoy cutting and pasting. For preschoolers who are not yet able to make complex products, the best craft option would be leaf applique.
Found on AliExpress / Art Supplies
Autumn paintings in the form of trees, hedgehogs, mushrooms, birds will be the first experience for a boy or girl to independently implement an idea.
Volumetric compositions of leaves
For competitions and exhibitions, students are often asked to bring crafts made from leaves and cones to school. Broken branches, pieces of bark, acorns, and chestnuts can be used with them. Such materials allow you to design three-dimensional plots: houses, animals, dolls, etc. Plasticine or hot melt adhesive is suitable as fasteners.
Garland of leaves
Aerial pendants of colorful foliage cannot be ignored, no matter where they are located.
An accent wall, window, showcase, doorway or space in the center of the hall - garlands look impressive everywhere.
They are easy to do, because you can, for example:
- string the foliage onto a thread / fishing line / twine, securing each element with knots on both sides;
- use clothespins;
- attach the leaves with tape near the diodes of the luminous tape;
- make a “curtain” by placing the threads parallel in a straight line - on a branch, cornice, clothesline;
- tie fragments with strung leaves, glass beads and metal bells to a ring, creating a “wind chime”.
Wreath of autumn leaves
Considering the weightlessness of the material, it is recommended to make a decorative wreath for the front door on a rigid base. It would be good if it was woven from willow or birch twigs.
A metal, wooden, plastic, or foam circle is also a good option. Leaves can be attached to the base material with thread, thin wire or instant glue. Rowan branches, sea buckthorn, nuts and acorns, and miniature pumpkins will aesthetically fit into the composition. You can complement the wreath with a bow made of thick matte fabric of matching colors.
Candlestick in autumn theme
An original idea for a DIY craft made from autumn leaves - a candlestick in an autumn theme.
To make it you will need a small glass jar or glass, glue (for decoupage, acrylic or PVA) and several bright leaves of suitable size.
The herbarium is glued to the outside of the container, coated with glue on top, and left until completely dry.
When the light is turned off, a candle burning inside reveals the natural texture of the leaves, highlights their veins, and colors the already bright pigments in a mystical orange-amber tone.
Another great fall decor idea for a candle:
Master class from autumn leaves: stained glass
1.
Cut the self-adhesive film to the required size.
2.
Peel off the back of the film, place it on a flat work surface, adhesive side up, and place the hoop on top.
3.
Place the leaves face down on top of the film.
4.
Cut another piece of film and place it on top of the leaves. Press, smooth and hoop.
5.
Insert the outer hoop and tighten the screws.
6.
Cut off any excess film.
7.
You can add twine so the applique can be hung on the wall.
You can tie a ribbon for decoration:
Wreath of leaves for the door
- a pair of willow branches
- thin wire or tape
- “helicopters” (if desired).
1.
Take willow branches and make a ring out of them, which you need to secure with wire or tape.
2.
Start twisting the leaves one by one in a circle into a ring and weaving the same way as a flower wreath.
How to weave a wreath of leaves (video)
3.
The leaf stems at the end of the wreath are tied to the base with wire.
Here's what it looks like from the reverse side:
If desired, you can glue maple pinwheels.
This wreath can be hung on a door or wall.
Owl made of leaves
Let's look at the step-by-step process of making crafts from leaves with your own hands. An unusual craft made from leaves will be an owl created on the basis of leaves. To create it, you need to take cardboard, the size of which is A3. Overlapping leaves must be glued along the entire perimeter.
The leaves are glued using PVA glue. There is no need to create an overly sized owl figure. Excess elements can be trimmed along the edge. You can use an acorn as a beak.
DIY autumn crafts from leaves for school
Of course, most often we have to imagine in this area in order to help our children take part in school and kindergarten exhibitions. So let’s begin a review of works for children who study in primary and secondary schools.
The easiest thing would probably be to collect a bouquet or make a cool wreath. Moreover, you can always supplement the composition with different berries and fruits.
You can create a very simple bouquet, or you can get a little confused and roll up not dry leaves to make roses.
Or you can assemble an unusual ekibana.
Or make a topiary.
Or make these funny and cute flowers.
You can also do handicrafts in the area of applique. If you know how to draw well, then complement the composition with a drawing.
Using glue and other materials, build a basket, vase or queen “Autumn”.
And I was very impressed by the bird - an owl, just gorgeous!
I think I gave you some great ideas, don’t you agree?
Leaf mask
If your child needs a costume for some autumn festival at school or in kindergarten, now we will teach you how to make a mask using tree leaves.
In order to make a mask you will need: maple leaves of various sizes, A4 cardboard, strong thread or rope, scissors and glue.
You should start by drawing a blank of your mask on cardboard, and then cutting it out.
On the cut-out cardboard, make holes on the sides in order to tie strings there with the help of which the mask would be held on your face.Well, all that remains is to glue the leaves. We glue large leaves along the edges, and small ones closer to the center.
New crafts made from leaves for kindergarten children
Now let’s look at job options for slightly younger children. Although all the ideas from this article can be applied to any age.
Again, the most suitable thing for kids is applique. You can glue different panels - butterflies, insects, fish, turtles, etc.
You can use this layout as a basis. Find the appropriate shape of leaves and make a cute cat.
What a gorgeous tree! It's simple and looks great.
But owls are a completely separate issue!
For example, my daughter and I made a craft from an ordinary bag. We filled it with leaves, gave it a shape, glued on the eyes and voila, everything is ready!
As additional materials, take colored paper, plasticine, cereals, seeds, etc.
The child will be delighted with this work. I know, in practice, children really love to sculpt).
You can also build a base for kids, for example a web like this. And then the child sticks on the leaves himself.
Or take the spotlight on children's hands. Also a very interesting idea.
I liked this picture here. Draw a background, and then with your child, stick on leaves to represent trees and bushes.
If you have more time, then work harder. You can make different masks, crowns and even angel wings!
In general, the scope for creativity is enormous. Choose - I don’t want it!
Crafts from leaves: new photo ideas, tips, instructions
Children are easily captivated by something new and interesting. If your child is already bored with drawing or modeling, you can invite him to make crafts from bright autumn leaves.
This process is extremely fascinating - amazing things are born from simple dried leaves with the help of glue, thread and other improvised devices.
By taking up appliqué or making vases and bouquets, the child will not only be able to develop his creative skills and imagination, but also get to know the environment better. Collecting a herbarium for crafts together is an excellent opportunity to teach your child to distinguish between different tree species. So, what can you make from leaves?
Preparing leaves for crafts
To make any craft from leaves, you only need well-dried material; fresh leaves are not suitable. Preparing the leaves takes a long time, so you will have to be patient. In addition, the material needs to be dried correctly, here are the basic rules:
- If the evenness of the leaves is not important for the craft, they can be placed in a spacious container (for example, a large wicker basket) and left in the fresh air. This will allow the leaves to dry quickly and allow air circulation to prevent mold from developing.
- To get perfectly smooth leaves, you need to place them between book pages or album sheets under a press. Carefully place the material between the sheets of books or albums. It will take at least 14 days for the material to completely dry and be ready for use.
- If you don't want to wait a long time, you can use a special herbarium press. To do this, fold a stack of leaves, alternating each layer with newsprint or scrap sheets. In a few days, the material for the crafts will be ready.
How to Skeleton Leaves
Leaf skeletons, due to their lightness and transparency, look very impressive as decoration. To achieve this effect, you need to resort to a special technique - skeletonization.
What you will need:
- any fresh leaves;
- soda;
- egg dye;
- small container - ladle or pan;
- Toothbrush;
- paper napkins.
How to make skeletonized leaves:
- Mix soda and water in proportions of 1 to 4 and place the leaves in the prepared solution so that they are completely hidden by water.
- Bring the mixture to a boil and leave to simmer for 30 minutes.
- Remove the pan from the stove and remove the leaves, carefully placing them on the table with the glossy side up.
- Remove excess moisture using napkins.
- Clean the pulp from the leaf with a brush (this must be done very carefully, the leaves are quite fragile).
- Rinse the skeleton under water and then paint it the desired color.
- Leave the painted skeletonized leaves to dry.
The resulting material is ready for use.
Bouquet of flowers from leaves
A bouquet is the simplest thing that can be made from leaves, and it’s worth starting with it if the child has not previously done such crafts.
To make a craft in the form of a home bouquet, it is not necessary to use real flowers, dry them, etc. The buds can be made from multi-colored leaves collected on a walk.
Involve children in every step of the process, creating a real creative workshop.
What you will need to make the craft:
- maple leaves (fresh) with stems;
- spool of strong thread.
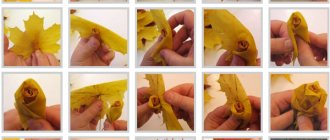
To make a bud from maple leaves, you will need to perform several steps:
- First take one sheet and fold it with the glossy side out.
- Roll the leaf into a tube.
- Fold the next sheet in half and wrap it around the tube.
- Continue wrapping the leaves around the bud until the flower is quite full.
- Wrap a thread around the base of the bud to prevent the flower from falling apart.
Using this method, you can make any number of flowers, which are then simply collected into a bouquet.
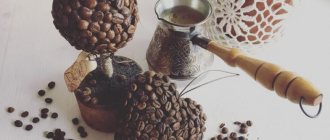
Topiary of autumn leaves
Topiaries can be made from a variety of materials. You can often find crafts made from coffee, banknotes, sweets, hearts, etc. This version of topiary involves the use of maple leaves.
So, what is needed for topiary:
- pot;
- wooden stick for the trunk;
- a foam or foam ball as a base;
- gypsum;
- dye;
- hot glue;
- elements for decoration.
The procedure for creating an autumn topiary looks like this:
- The stick must be inserted into the pot and secured tightly with gypsum mortar. As a result, the structure will be strong and stable.
- Paint the pot and stick a color you like, such as gold to match the leaves.
- We attach a foam ball to the top of the stick - this is the future crown of the tree.
- Stick the required number of leaves into the ball. For decoration, you can use berry bunches, ribbons, beads, as well as artificial twigs and flowers. To make the leaf stems more durable, they must first be soaked in a hot solution of glycerin (1 to 2) and left in this form for 10 days in a dark, cool place .
- Next, we decorate the trunk and soil of the tree using dry moss, bark, and beads.
How to make a decorative autumn wreath
You can weave a beautiful wreath from bright autumn leaves to decorate windows, doors, walls, etc. A wreath attached to the front door will delight not only you, but also your guests.
What you will need for the craft:
- flexible branches of any tree;
- dried leaves of different colors (contrasting combinations, for example, yellow and red, look best);
- bunches of red berries (rowan, viburnum, etc.);
- physalis;
- glue;
- spool of strong threads;
- decorative metallized threads;
- small bird figurines for bouquets.
How to weave a wreath:
- The branches will serve as a frame - make a round or oval wreath out of them.
- For strength, secure the structure with thread in several places.
- Wrap the frame tightly with gold thread, leaving small branches free.
- Glue the leaves to the branches.
- Attach the berry clusters using thread.
- Glue or wrap physalis with threads.
- Finally, attach the birds to the wreath.
A finished craft made from leaves in the form of a wreath can be hung anywhere in the house; it will delight you with its beauty for a long time and remind you of the most colorful time of the year.
Vase of leaves
Beautiful autumn leaves can be used not only for simple children’s crafts, but also for complete interior decoration. One such product is a fruit bowl.
To make such a vase you need:
- glue and brush;
- inflatable ball;
- petrolatum;
- scissors;
- maple leaves.
Step-by-step instructions:
- Inflate the balloon to the size you need.
- Lubricate the surface of the ball with Vaseline, this is necessary so that the leaves do not stick to it during the process and are easily separated from it.
- Fix the ball in a stationary state, this will make it more convenient for you to make your vase.
- Glue maple leaves to the ball, having first generously coated them with glue.
- To make the vase strong enough, you will need several layers of maple leaves.
- As soon as the last layer is completed, carefully coat the product with glue again and leave for 3 days.
- Burst or deflate the balloon and remove any remaining residue from the product.
The original interior decoration is ready.
Photo frame in autumn style
Children love decorating the walls of their room with their drawings and favorite photographs. A craft made from leaves in the form of a frame is perfect to complement the design of the room. Help your child decorate a frame with autumn leaves, where he will then place his favorite photo.
For the craft you need:
- thick cardboard;
- glue;
- leaves you like;
- pencil;
- scissors.
How to make a frame:
- Cut a square or rectangular frame of the desired size from cardboard. The center of the frame where the photo will be placed needs to be cut slightly smaller than the size of the photo.
- To wrap a frame with leaves, first soak them in hot water, this will soften them and prevent them from tearing or breaking in the process.
- Glue the leaves onto the frame.
- Wait for the product to dry.
When the frame is ready, insert the photo into it, securing it with glue or tape.
Applications from autumn leaves
Appliques are one of the simplest types of crafts made from dried leaves. Using leaves of different shapes and sizes, you can create real pictures, which will then become a decoration for your home.
You can make a whole series of panels united by a common theme. These could be animals, landscapes, etc.
Next, several small master classes will be presented on making applications in the form of an owl, Firebird, fish and lion.
Owl
To make an applique with an image of an owl, you will need:
- small leaves of brown tones (for this you can use oak, willow, birch);
- colored paper;
- a small twig of thuja;
- sheet of cardboard;
- a bunch of rowan berries;
- any tree branch;
- glue.
Before starting work, the leaves and berries must be dried. Once all the materials are ready, it’s time to move on to the most important thing:
- Cut out the outline of an owl from cardboard.
- Birch or oak leaves will represent the ears and paws of an owl; glue them in the right places.
- For feathers, use long, narrow willow leaves.
- Cut out eyes and beak from colored paper and glue them on.
- Glue your owl onto a tree branch, which will become a stand for the craft.
For additional decoration, you can use moss or thuja branches. You can also use rowan trees as owl paws. The product is ready.
Firebird
For the Firebird applique you will need:
- paper;
- leaves of linden, birch and rosehip;
- pumpkin seeds;
- thuja twigs.
And here's what the process itself looks like:
- A linden leaf is glued to the place where the bird's body will be.
- Birch leaf - head.
- Rosehip leaves are glued individually onto the tail.
- Whole sprigs of rose hips will serve as an additional decoration for the tail.
- Glue birch leaves to the body, these will be the wings.
- Eyes are made from pumpkin seeds, as well as decorations for the body and tail of the Firebird.
- The final stage is a tuft from a thuja twig or any other suitable plant.
The firebird is ready.
a lion
Children love different animals, so they will be especially interested in making one of their familiar animals.
What you will need for the lion cub:
- rounded yellow linden leaves;
- black felt-tip pen;
- ash seeds;
- horse chestnut (nuts);
- glue;
- small pine branch;
- scissors;
- a sheet of yellow paper;
- sheet of orange cardboard.
Having collected all the necessary materials, it’s time to start making crafts:
- Draw a lion's head on yellow paper or print the image on a printer and cut it out along the outline.
- For the mane, use linden leaves, gluing them around the head.
- Draw a nose for the lion and glue a chestnut in its place.
- Pine needles will be used for the mustache.
- The ash seed will represent a tongue.
As soon as the craft dries, it will be completely ready.
Fish
What child doesn't know about the goldfish that grants wishes? Making crafts with your own hands will be very entertaining for your child.
To make a fish craft you will need:
- dry leaves of quince and linden, brown and yellow in color, respectively;
- glue;
- marker;
- ash seeds;
- acorns;
- paper scissors;
- sheet of blue paper.
How to do:
- Draw the outline of the fish on blue paper and cut it out.
- Make scales from linden leaves and glue them to the body of the fish.
- Use brown quince leaves to decorate the tail.
- Using acorn caps, draw the outline of the fish’s head.
That's it, the real goldfish is ready.
Every autumn, colorful leaves delight the eye as they fall to the ground. This beauty quickly fades in the rain, turning the leaves into a solid brown mass. However, there is a way to preserve the beauty and brightness of autumn leaves - dry them or skeletonize them and use them to make various things from children's crafts to interior decorations. This activity will appeal to both children and adults.
75 photos of leaf craft ideas
Source: https://remontnichok.ru/rukodelie/podelki-iz-listev-novye-foto-idei-sovety-instrukcii
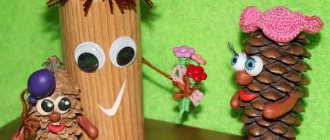
How to make autumn crafts from pine cones and leaves
Next, I will show you works using another favorite material - pine cones. If you're in the forest, be sure to stock up on them.
It’s very easy to make different animals using cardboard, plasticine and our natural materials. And most importantly it’s simple and fast.
Don't forget about the bouquet. He will always be popular.
But in the very first place are compositions with various forest animals and heroes. See for yourself how beautiful it turns out.
If you want something more complicated, then use more twigs and build real forest huts.
There is nothing complicated about the products, and everyone always has additional materials in their home.
Simple crafts from leaves and acorns
There are a lot of acorns and chestnuts in our city. So I couldn't lose sight of them. Let's see what souvenirs can be made with our autumn leaves.
Again, the easiest thing is different animals. And you can always connect the parts together using plasticine or glue.
Or make a decoration like this. I love.
And again, full-fledged compositions. Where would we be without them?