Home Information Blog Decorating a painting by numbers in a frame
How fun it is to paint pictures by numbers! You can feel like a real artist, even if you don’t know how to draw at all. Therefore, others will surely follow the first one. But paintings lying on a shelf, rolled into a tube, cannot become either a home decoration or an object of joy. You need to frame them and hang them on the wall.
How can you frame a painting?
In general, there are three types of design for paintings:
- simply attach it to a stretcher without any frame;
- can be arranged in a baguette;
- can be issued in a passe-partout.
A painting on a stretcher without a frame looks good only if it is hung in a modern interior. Frankly speaking, without a frame the picture turns out to be a little under-formed. But some people like it - we have to admit it.
Baguette is a classic design for a picture. These frames are made of wood or plastic and can sound both modern and vintage, depending on the type of frame.
A passe-partout is a wide frame made of cardboard, white or colored. It can give a painting one or another mood, depending on the color and width.
Often the frame combines both a baguette and a passe-partout . This looks very interesting:
Where to choose a frame so that it fits in size and at the same time elegantly complements the picture? The ideal option is a custom frame.
Features and nuances of self-design
The canvas is evenly distributed over the stretcher. You definitely need to look at which side it is placed on; almost all stretchers have bulges or the edges are slightly beveled inward - this is the back side of the structure. Bulges or bevels prevent the painting from fitting tightly to the stretcher.
You cannot fasten with both nails and staples at the same time; you need to choose one or the other. First, they nail it along the edges of the central part of the canvas and you need to monitor the tension so that the stretcher does not move. Afterwards, gradually and slightly stretching the canvas, it is evenly fixed on all sides. There should be no waves formed along the edge of the canvas, and if there are, everything needs to be redone.
There are rules for stretching paintings that apply regardless of the type of frame or skill level of the framer:
- The canvas should not be wet.
- If it is clean, then prime it only after stretching.
- The subframe is laid on a flat horizontal surface.
- For a large painting, you will need a cross made of slats.
- The threads of the canvas should be parallel to the slats.
- It is better to place small squares of fabric under the nails; this will prevent the threads from being pulled out if the fabric is attached.
- As a result, the picture should be stretched like a membrane on a drum.
And yet, it is easier and cheaper to arrange a picture in specialized workshops that work with baguettes. There, the craftsmen will suggest the preferred type of frame, help with the selection of stretchers, mats and glass, professionally working with canvases, paper, embroidered linens, etc.
We stretch the painting onto a stretcher
Suppose you decide to take the simple route and stretch the painting onto a stretcher, leaving it without a frame. How to do it?
Prepare materials:
- stretcher;
- spray;
- hammer;
- stapler for furniture;
- staples.
Lay the picture face down, let it lie down and straighten out. If it does not want to straighten, you can lightly moisten it with a spray bottle.
Once the canvas has straightened, place it on a stretcher. Align. Start fastening from the middle of either side.
Having secured one side, stretch the canvas and tack the opposite side. Carefully secure both sides, being careful not to distort the canvas.
Now secure the other two sides.
What's next? You still have some corners sticking out. Carefully roll them up, fold them, and secure them.
That's all.
We fasten the canvas with ribbons
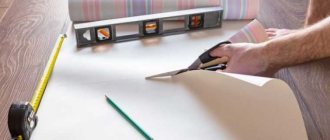
To do this, you will need thick cotton fabric, as well as some tools:
- ruler;
- pencil;
- sharp scissors;
- furniture stapler.
First you need to mark the fabric.
Important! It is very good if you have ready-made cotton tape, but any dense material is quite suitable. How to cut it - along the lobe or on the bias - does not matter in this case.
- Draw a template - a strip 7 cm long and 3 cm wide.
- Using the template, cut out the ribbons.
- Find the grooves - the places where the frame touches the picture.
- Nail the strips there with a furniture stapler (this is done in the plane of the frame).
- Place the picture in the frame - the ribbons should be visible between the stretcher and the frame itself.
- Fold the ribbons.
- Pull each one tight.
- Fix it on the subframe in the same way as in the previous case.
- Trim the excess end of the ribbon
Important! For a small picture, four ribbons are enough.
We frame the picture in a baguette
Maybe you like the classic version better - it fits most interiors of modern apartments and houses. How to frame a painting by numbers in this case?
You will need:
- frame;
- canvas staples.
- First, stretch the canvas onto a stretcher as you already know how to do.
- Turn the frame face down. Find out where the frame is top and bottom. Place the painting on a stretcher in it, also face down.
- Connect the frame and subframe using brackets.
If your baguette is not a classic one, but the simplest one (a frame imitating a baguette), the technology is a little different. How to arrange a painting by numbers in a frame with a backing and glass? Not difficult at all!
- Turn the frame over and remove the backing.
- Place the picture on the glass and align it. If necessary, trim the edges slightly.
- Cover with a backing and secure the fasteners.
That's all!
A few simple rules
Regardless of whether you insert the picture yourself or contact a framing workshop, you must follow these simple rules:
- Never wet the canvas before stretching it on a stretcher - such strange handling will deform the canvas and various other troubles may arise, such as the appearance of fungus or rot.
- The canvas threads are positioned parallel to the slats, and not at an angle, so that the material does not stretch arbitrarily.
- The primer is applied to the blank canvas when the future painting is already on the stretcher.
- The picture is inserted into the frame, placing the stretcher on a flat horizontal surface - most often on a table or on the floor, depending on the size.
- If the picture is large, a cross made of wooden planks is placed in the center.
- You can place pieces of thick fabric under the nails so that the threads of the canvas do not stretch or break.
We prepare the picture in a passe-partout
The design of a painting in a passe-partout is no different from the design in a baguette. Except one. If you have the desire and skill, you can make a passe-partout with your own hands!
How to make a picture frame by numbers? For this you will need:
- thick cardboard, thin plywood or a piece of hardboard;
- construction gun;
- scrapbooking paper or colored cardboard.
We will make a backing from cardboard, hardboard or plywood. The format of the backing should be larger than the painting in order to create a wide border.
We will fix the picture on it using a construction gun.
On top of the picture on the backing we place a wide frame made of scrapbooking paper or colored cardboard.
Now just wait until it dries and you will have a wonderfully decorated painting.
Something about sizes
The answer to the question of where it is better to buy a frame - in a framing workshop or in a specialized store for artists - depends on what format your painting has. The workshop will make any frame, and the store will offer standard ones:
- 20x25 cm;
- 30x35 cm;
- 40x50 cm;
- 45x60 cm;
- 50x60 cm;
- 60x75 cm;
- 75x100 cm.
The choice is large, but still limited. However, in the best stores you will also find sizes that differ from the standard.
Important! As for fasteners, they are sold in sets - for example, staples in a package of 4 pieces. For a small or medium format picture this is usually enough. Screws are not always installed - most often the picture is attached without them. But there are also screws of several sizes.
Protecting paintings by numbers
Paintings by numbers are painted with paints that can flow if water gets on them. To prevent your creation from deteriorating, it can be protected. But how can you protect painted paintings by numbers?
One of the methods we have already mentioned in passing is glass on a frame. The glass provides reliable protection during normal use, and even during cleaning. The only way to damage a painting under glass is to dip it in water.
If you do not rule out this option, there is another way to protect the painting - varnish. The painting is covered with varnish after it is all painted and has already dried.
It can be scary to apply varnish for the first time - what if everything gets smeared? We will tell you how to apply varnish to a painting by numbers correctly so as not to damage it. You will need:
- fluted brush (wide, like for painting);
- acrylic lacquer.
Thoroughly clean the painting from dust, if any.
Heat the varnish in a water bath to a temperature of 45 degrees - this way it will lie more evenly.
Apply the varnish using wide, parallel strokes. Try to put a little varnish on the brush so that drips do not form. The varnish is placed parallel to the lower border - that is, horizontally relative to the painting.
When the entire painting is covered with varnish, rinse the brush thoroughly and wipe dry. Using a dry brush, go over the varnish again, distributing it evenly. This must be done quickly, since acrylic varnish dries quickly. If the brush sticks, it's time to finish the job.
After 2-3 hours, when the varnish has dried, you can begin framing the painting.
How to paint pictures by numbers, read our article on the website.
We give blog visitors a 5% discount
When placing an order, enter the promo code
BLOG
What types of frames are there?
Before you fix the picture in a frame, you need to choose the frame itself. Depending on what exactly you are going to hang on the wall, you can choose one of the options:
- classic baguette;
- baguette frame with glass;
- wooden slats;
- metal frame with glass;
- Passepartout.
Let's look at the appropriate option:
- The first option is suitable for paintings made in oil on canvas.
- For works using pastel or watercolor techniques, you need glass, that is, a closed metal or wooden frame.
- Photos framed with a baguette do not look very good; narrow wooden slats or metal strips are more suitable for them, and it is better if there is glass, as for watercolors. The same option is good for panels made of straw and paintings using the floristry technique. Such design not only gives the work a finished look, but also protects it from dust, moisture and mechanical influences.
Important! An edging made of thin slats will also look good. Sometimes just a mat is enough, especially since this option can look very interesting.
If the frame is too big
It also happens that it is not possible to select a frame strictly according to the size of the watercolor or pastel. In this case, you will need an additional backdrop. You can make it from cardboard or paper:
- Trace the existing backdrop onto a sheet of thick paper.
- Cut it out.
- Position the picture and try on the frame - the sides of its opening should coincide with the sides of the picture or, at a minimum, be strictly parallel.
- Secure the painting to the additional backdrop using glue or double-sided tape.
- Place your work in the frame.
Simple wooden frame
The easiest and cheapest way to frame a painting. Such frames come with glass and a backdrop, or with a subframe, but the first option is more common. You can buy one in an artist supply store or in some photo stores:
- Place the frame with the back side facing up.
- Bend the metal plates.
- Remove the backdrop.
- Place the painting on the glass with the back side facing up.
- Align.
- Cover it with a backdrop.
- Bend the mounting plates.