Home page » Construction » Laying the foundation for a house
Among other types of foundation, strip foundation is the most common in private construction. Pouring it does not require significant financial costs and is not particularly difficult - even a novice builder can build it, you just need to understand the peculiarities of the work.
- Types of strip foundations
- Materials and tools for work
- Marking strip foundations and earthworks
- Installation of formwork and reinforcement
- Pouring a strip foundation with your own hands
- Further care of concrete
- Answers to frequently asked questions
Is it possible to make a basement with a strip foundation?
- How to properly make a floor with this type of base?
Advantages and disadvantages
Like any building structure, a strip foundation has its advantages and disadvantages; it performs well in some operating conditions and is completely inapplicable in others.
To avoid mistakes in the design and construction of buildings based on a strip foundation, it is important to know all its properties and features. So, the main advantages of the design include:
- low cost of raw materials and installation work due to its small size;
- simplicity and ease of installation, no need for complex technological equipment and special professional skills of workers;
- resistance to constant high loads, that is, suitability for private two- or three-story construction;
- compatibility with all modern wall construction technologies;
- high speed of pouring concrete, allowing to significantly reduce construction time.
However, this type of foundation has several disadvantages, the most serious of which are:
- the need for a detailed analysis of the soil and carrying out rather complex design calculations in order to determine the geometric parameters of the future foundation;
- a large mass of the structure, which, if there is an error in the calculations, will contribute to the “subsidence” of the building.
Having analyzed all the pros and cons of a strip foundation, we can come to the conclusion that the optimal area of its application is private construction on fairly strong, stable soils without a slope . In addition, this type of foundation can help out in conditions of a limited budget and with short deadlines for completing work.
Types of strip foundations
The main criterion for classifying strip foundations is their internal structure. Depending on it, designs are divided into three groups:
- Monolithic foundations. They consist of reinforcing rods, pre-installed in trenches and fastened together, which are filled with concrete. This technology ensures the greatest strength, reliability and durability of structures.
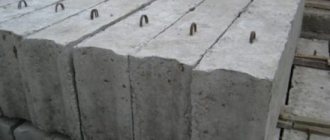
- Prefabricated. They consist of ready-made reinforced concrete blocks of industrial production, connected with cement mortar. Due to their heterogeneous structure, they are susceptible to deformation and destruction at the joints if the construction conditions are not met. The main advantage of a prefabricated foundation is speed and ease of installation.
- Other. As a rule, this group combines lightweight strip foundations for non-residential premises, for example, brick-and-stone, sand, soil-cement.
Pile-and-tape structures are kept apart. They are usually made using monolithic technology, but include, among other things, deep cast piles with a reinforcement cage to support the foundation on unstable soils.
Preparing the pit for filling
Let's start with the fact that you need to pour the foundation in a specially designated place. Such a place is a belt dug around the perimeter of the building. It is into this trench that we will pour the concrete solution. But, before doing this, you need to do a number of preparatory work, and do it efficiently. It all starts with marking the future foundation. Thanks to the diagram made on the ground, you will have a certain guideline for earthworks.
Based on the markings for the foundation, you can begin to dig a pit. Here you will have several development options: simple and complex. If we talk about the first option, then you only need to call a special service that will dig a foundation pit using special heavy equipment. Minimum effort and time expenditure, maximum benefit and waste of money. Another option is to do everything by hand using a shovel. This will be especially difficult, especially if the depth of the foundation is quite large. It is recommended to seek help from: relatives, friends, neighbors and family members. Such labor will be very useful; the process will be completed much faster.
It is important to ensure that everything corresponds to the dimensions of the foundation, and that the bottom and walls of the pit are level. Use a level, tape measure and plumb line. After everything has been dug out, the walls are vertical and the bottom is level, you can proceed to the next stage - constructing a sand cushion.
Why is it needed? It makes the foundation more stable when the soil moves. Thanks to this simple method, you can extend the life of the building. To implement this, you need to pour sand onto the bottom of the trench along the entire perimeter and compact it. The sand layer is from 10 to 20 cm, depending on the depth of the foundation. The sand can be moistened and compacted well. The same layer of crushed stone is placed on top and also compacted. All that remains is to cover the pillow with waterproofing material. It can be roofing felt or polyethylene.
Materials and tools for work
The role of the main building materials used in the construction of formwork, installation of rods and pouring of strip foundations is played by:
- boards, including lighthouse, longitudinal and necessary for the manufacture of formwork panels;
- reinforcement bars with a diameter of at least 10 mm are selected in accordance with the design loads and reinforcement pattern;
- wire, tension hooks and staples, which are used to fasten rods;
- concrete mortar, the components of which are cement, sand and crushed stone (the proportions of the components are given in the table below).
The set of tools varies depending on the planned scope of work. If the perimeter and width of the foundation are relatively small, hand tools predominate, such as:
- shovels, spades for excavation and pouring;
- metal containers for preparing concrete;
- hammers, saws and other carpentry tools;
- pliers and pliers for working with wire;
- metal cutting tools, for example, a hacksaw, a jigsaw, an angle grinder.
As the volume of work increases, the degree of mechanization of the process also increases. Excavators, concrete mixers, portable machines and powerful hand-held power tools are used.
Stages of work
Any owner of a garden plot or individual developer sooner or later faces the problem of pouring a foundation for a particular structure and must be prepared to cope with it on his own. Solving the question of how to pour a foundation for a house with your own hands is not as difficult as it might seem at first glance. The decisive factor in favor of choosing such a solution is, first of all, that when making the foundation yourself, you can do without the involvement of hired workers and special contractors. As a result, you will be able to significantly reduce the cost of building a house.
The construction of the foundation must necessarily include the following main stages:
- terrain breakdown;
- excavation;
- preparation of formwork;
- laying reinforcing mesh;
- pouring concrete mixture.
Marking strip foundations and earthworks
Unlike a pile-screw foundation, a strip foundation is perfect for the construction of buildings with basements, basements and underground floors. However, on heaving soil this option will be quite expensive - this type of foundation is best erected on dry soil, which heaves less than wet soil. It will also be unprofitable to pour the foundation to a great depth, but for small houses, bathhouses and garages it is best suited.
Since preparing the foundation for construction takes almost a third of the total construction cost, you should figure out in advance how to properly make a strip foundation. You also need to research the type of soil on the site and the depth of its freezing to understand whether this type of foundation is even suitable for you. It will be much more difficult to correct your mistakes later.
Before building a strip foundation, it is necessary to clear the area of excess debris and begin marking it. In accordance with the prepared project for a garage, bathhouse or house, it is necessary to mark the external and internal boundaries of the future foundation on the ground. This is done using available means: wooden pegs or reinforcement rods and rope (wire, strong fishing line).
It is necessary to mark the external and internal boundaries of the future foundation on the ground
How to mark a strip foundation perfectly evenly so that you don’t have to move pegs from place to place:
- start marking by determining the axis of the future building;
- using a plumb line, mark the first corner, and from it, pull a cord or fishing line perpendicularly to the second and third corners of the building;
- then the fourth angle is determined using the square;
- check all the angles by measuring the diagonals - if the angles match, you can drive in pegs and stretch the fishing line between them;
- make the internal markings in the same way, stepping back from the external one by 40 cm (the optimal width of the foundation).
Having finished marking, study the surface differences in the area and select the lowest point. From here you will need to start counting the depth of the trench in order to eliminate future differences in the height of the foundation. For a small house, a pit depth of about 0.4 m will be sufficient.
The pit can be dug with your own shovel or using an excavator. Just don’t dig by eye - be sure to check with a water level to ensure that the bottom of the trench is as level as possible, this precaution will help avoid many problems in the future. Do not forget that the walls of the trench must be strictly vertical.
The pit can be dug with your own shovel or using an excavator
How to pour a foundation without formwork in practice
Making a foundation by direct casting into the ground may seem simpler and cheaper than when you have to build a wooden formwork frame, knock down dozens of boards into panels, level and drive dozens of posts and spacers. In the absence of formwork, the role of the form that ensures that the concrete mass is given the required profile is played by the walls of the trench, well or pit.
Sequence of operations for pouring a foundation without formwork
The most difficult and time-consuming will be to build a strip foundation without formwork in conditions of weak and moving soils. Even in the absence of groundwater, the huge mass of uncured foundation concrete without formwork can cause settlement and distortion of the tape profile in the trench.
Thus, the strength of a foundation in the ground without formwork depends 90% on the quality of preparation of the trench or pit for pouring concrete. You will need to perform the following operations:
- Study the nature of the soil as accurately and in detail as possible, determine the groundwater level and the presence of springs, springs and other sources. If it is determined that there is a high water level, wet sand, or oily clay, then in parallel with the planning and digging of a trench for the foundation, it is necessary to drain the area;
- The width of the foundation strip, cast into the ground without formwork, is increased by 20-30% of the calculated value, thus, increasing the trench compensates for the deterioration in the load-bearing properties of the strip due to a possible violation of the geometry;
- If possible, the main part of the earth is removed from the trench with an excavator, the last 30-40 cm is torn off manually with an entrenching tool. This is the most difficult and time-consuming stage of work, since it is necessary to level the walls of the trench and trim the bottom horizontally using a building level and a hydraulic level gauge;
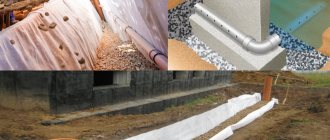
- After finishing and compacting the cushion, the walls of the trench are lined with plastic film, the bottom is lined with isospan or glass roofing material;
- At the final stage, the trench is filled with ready-mixed concrete to give the upper part of the foundation the shaped appearance of a strip; the edges of the trench are laid out with a decking board and a row of bricks. After the concrete has set, the bricks and boards are removed. A protruding part of the foundation 5-7 cm high is formed above the ground surface.
Preparing the soil and trench
Before starting work, experts recommend trimming the soil and fertile layer of soil along the edges of the future foundation. Any available material can be laid on the layer of earth freed from turf: pieces of plywood, boards, planks - anything that will help protect the edges of the trench from shedding of earth and collapse. Before you start backfilling the cushion, you need to carefully trim the walls of the trench, remove traces of the excavator bucket, protrusions, irregularities, stones, tree roots, and clean the trench as much as possible from crumbled earth.
The soil at the bottom of the trench is subject to maximum leveling and compaction. To do this, the surface is covered with a thin layer of crushed stone and wet sand and driven into the base of the foundation in four or five passes with maximum force. The last layer is filled with clean sand or screenings and is also compacted in several passes.
The most suitable tool for packing crushed stone into the ground of a trench would be an industrial motor vibrator, but often the limited construction budget does not allow the use of such equipment. In this case, the preparation of the pillow is carried out in two stages. First, large crushed stone is driven into the ground with a three-kilogram hand hammer, then the mixture of screenings and sand is compacted with a two-handed thirty-kilogram tamper.
Next, you need to waterproof the base and walls of the trench. Most often, the pillow and walls are laid out with thick plastic film, the edges of which are glued together at the joints with construction tape. Waterproofing can be laid on the bottom of the trench in one solid sheet and simply fold the edges 15-20 cm onto the walls, if the geometry of the trench allows. Otherwise, the canvas has to be cut into several parts and laid out on a pillow, folding the edges onto the walls. The joints between pieces of roofing felt must be glued with mastic or a mixture of resin and bitumen.
Pouring concrete
After completion of the preparatory work, reinforcement is carried out, laying reinforcement cages, pre-connected on the surface of the earth. Most often, the frame is made of three layers of reinforcing rod tied with soft wire. Since the most loaded part of the foundation is the bottom and surface part of the concrete casting, one layer of reinforcement is laid on brackets at a distance of 4 cm from the bottom waterproofing. The second and third rows are installed on top of the first on the same supports. The distance from the walls to the reinforcement should be no more than 4-5 cm.
Concreting a foundation without formwork can be done in two ways. The simplest option would be to purchase the required volume of concrete solution and carefully pour it into the trench, evenly dispersing it along the contour of the foundation with shovels. If the concrete is prepared using a homemade method at home, then you can pour the reinforced volume of the tape with your own hands in several layers, and the thickness of each layer should be at least 25 cm. After pouring, the surface of the concrete foundation tape is covered with film for at least 20 days. After the concrete has hardened, the turned-up edges of the waterproofing are wrapped and fused onto the foundation strip.
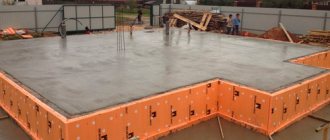
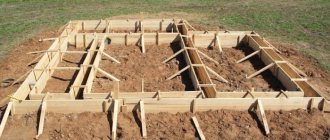
Installation of formwork and reinforcement
A sand cushion is placed at the bottom of the dug trench, which not only reduces the load on the foundation in the off-season, distributing it over the entire base area, but also saves building materials. Pour sand in a layer of at least 150 mm, level its surface using a water level and compact it, moistening it with water. You can pour a layer of crushed stone on top of the sand cushion and lay waterproofing in the form of roofing felt or plastic film to enhance the strength of the base.
Before pouring the strip foundation, you will definitely need to build formwork from available materials - plywood, wooden boards, pieces of metal tiles, etc. The formwork is screwed together with screws or nailed down, with the heads of the nails placed inside to make it easier to disassemble the structure later and the foundation walls to be smoother. The installed formwork should protrude at least 30 cm above the ground surface. Inside the formwork around the entire perimeter, pull the rope at the level to which you will pour the foundation. Immediately take care of the holes for sewer and water pipes, otherwise you will have to cut them later, violating the integrity of the concrete monolith.
The formwork is screwed together with screws or nailed down
The next step will be laying the reinforcement . Tie the reinforcing bars with a cross-section of 12 mm with a special knitting wire so that the sides of the square cells are 30 cm each. It is better not to use welding, since corrosion will appear at the welding points, and knitting with wire also ensures flexibility of the structure when the ground moves. When laying the reinforcement in the trench, make sure that there is a 5 cm gap on all sides, then the reinforcement will be inside the monolith.
Read on to find out more!
Basement and foundation waterproofing
What do you need to know before laying the foundation?
Driving piles
Where to buy reinforcement for the foundation
House foundation price
Columnar foundation
- 2.55
Rating: 2.6 out of 5 Votes: 123
- 9
Reply
5 years ago
Andrey
5 years ago
Quote
I would like to add that you should not neglect the choice of foundation for building a country house or a house in a gardening partnership. If comparable parameters (materials) are not met, problems may arise with documents when registering the house as a living space. Be careful when planning construction.
Alexei
5 years ago
Quote
I would like to add that the sand cushion under the foundations must be at least 100 mm thick in order for the built house to settle evenly and without distortions. Concrete can be laid at +5, +10 degrees and even lower, if severe frosts are not expected. If you need to finish laying concrete, and the temperature has dropped to zero Celsius, you can use anti-freeze additives. But the grade of concrete needs to be increased. When laying concrete using a mixer truck, do not rely on homemade trays at all. They will help you with a maximum of 1.5-2 meters. Concrete will not flow further, even with high fluidity. You won't have enough height difference. The concrete mixer truck comes with three trays, which are enough for you to lay concrete within a radius of three meters. The entrance must be equipped. If there is no possibility, then this is done in stages, in stages.
Igor
5 years ago
Quote
To ensure that the constructed house does not develop deformations and the walls do not crack, before starting construction it is necessary to carry out engineering and geological surveys, and then perform foundation calculations. The most common type of foundation will be strip. In order for the foundation to be strong, it must be concreted at a time, i.e., breaks in concreting should not be more than six hours. Then, working seams do not appear in the monolithic foundation, which weaken it. If continuous concreting cannot be carried out, then the location of the working joints must be agreed upon with the design organization so that the negative impact on the strength of the foundation is minimal.
Olesya
5 years ago
Quote
When we were building a house, my husband decided to do the following: he asked the owners of neighboring houses what kind of foundation they had and poured the same one, because the type of foundation depends on the soil, and it seemed expensive to us to pay for its research...
Valeria S
5 years ago
Quote
The topic is quite serious, so a lot depends on the foundation. I showed my husband the site and now he always watches news and articles. I like the simple presentation. One of these days we are thinking of hiring workers to build a bathhouse. So, just to be sure, read this article!
Pavel S
5 years ago
Quote
The article says. that there should be a seam and so on. As far as I know, concrete should be poured without interruption so that it is intact, then when it dries and in the future, cracks will not form on it. And I will answer Andrey that a sand cushion can be placed even 5 cm. And it is placed not so that the house will sink evenly, but to remove excess water and reduce groundwater pressure in winter.
Victor Vladimirov
5 years ago
Quote
And here’s the question: in order to make the basis for the foundation, what is needed - maybe use some kind of artificial heating with special devices, are there such? And what to do in this case with the solution - also heat it, and with what? What are generally acceptable sub-zero temperatures for such work and is it worth (is it even possible) to do this in winter, if it is really necessary?
Ruslan
5 years ago
Quote
Those who consider the foundation to be one of the most labor-intensive and expensive stages in the construction of a monastery argue fairly, and it is also one of the most important. After all, the foundation itself bears a lot of responsibility for how strong and durable the built house will be.
Pouring a strip foundation with your own hands
Now let's figure out how to properly fill a strip foundation. Calculate how much concrete you will need by multiplying the height, length and width of the foundation. You can prepare a concrete solution yourself by mixing 3 parts sand, 5 parts crushed stone and one part cement, diluting with water to the optimal consistency. But it is still better to use factory-made concrete, since you will not be able to pour concrete prepared by yourself at one time; as a result, “cold seams” and cold bridges are formed, through which water will subsequently seep, destroying the foundation. If you will be pouring the foundation using a machine, make sure that there is access for pouring from any corner of the formwork, and that the solution in the machine has not had time to harden - dilute it with water if necessary.
Video about pouring a strip foundation
Step-by-step filling instructions:
- concrete is poured little by little, in layers of 20 cm;
- each poured layer is carefully compacted with special wooden tampers to prevent the formation of voids in the monolith;
- for the same purpose it is necessary to tap the walls of the formwork;
- filling is carried out to the level of the fixed rope;
- At the end of the work, the surface of the poured foundation is leveled with a trowel, pierced in several places with reinforcement (so that air can escape), and the formwork is tapped from the outside with a wooden hammer.
Filling is carried out to the level of the fixed rope
So, we figured out how to make a strip foundation, now all that remains is to wait until it dries completely - this may take about a month. At this time, cover the foundation at night with waterproof materials so that rain does not wash away the cement from the surface, and during the day in sunny weather, water it with water to prevent cracking of the top layer. It is recommended to dismantle the formwork no earlier than two weeks after pouring the foundation, and preferably after a month.
Instructions for pouring the foundation
Columnar foundation.
Carrying out construction work on pouring the foundation necessarily includes the following steps.
- The initial stage of construction is preparation of the area. It is necessary to break out the area for the foundation. This must be done in accordance with the adopted construction project. At this stage, the contours of the structure are marked on the ground using a rope and special pegs. During the marking process, you need to make marks that apply not only to the entire house, but also relate directly to the required width of the foundation and the thickness of the walls.
- The next preparatory stage is excavation work, without which the construction of the foundation is indispensable. It is necessary to properly prepare a trench corresponding to the width of the foundation, according to the pre-applied markings. Strictly ensure that the resulting trench walls are smooth and strictly vertical. Please note that the depth must exceed the soil freezing mark. To achieve even shrinkage of the foundation, it is necessary to compact the bottom of the trench with a layer of sand, thereby constructing a sand cushion about 15-20 cm thick. The working surface is laid out using a waterproofing material: for example, you can use polyethylene film.
- Construction of formwork. To properly build a foundation, it is necessary to build formwork. Today, several types and types of formwork are common, which are prepared from various panels made of wood, characterized by simple manufacture, ease of use and reliability. When installed in a trench, wooden panels must be secured with special supports. This is done necessarily so that the concrete does not push the shield out. For the same purpose, jumpers are used to tighten the structure and add more stability to it. Particular attention should be paid to the rigidity of the corner nodal fastenings resulting from the construction of the formwork structure. When erecting formwork, it is worth considering that the ground part of the foundation must be higher than 30 cm.
- Installation of reinforcing mesh. Reinforcing mesh is necessary to give the foundation additional strength. The prepared reinforcement with ready-made formwork is installed in the trench and only then it is filled with concrete. To avoid displacement of the reinforcing mesh during pouring, it should be secured with soft wire directly to the panels.
- Pouring concrete mixture. At the final stage, the prepared space is filled with concrete mixture; during the pouring process it must be compacted.
Like many stages of work, pouring the foundation of a house can be carried out in several ways. The choice of one method or another depends on time costs and financial capabilities.
Further care of concrete
After pouring, it is important to provide conditions for its uniform hardening, first of all, the necessary temperature and humidity indicators. A set of actions aimed at this is called concrete care.
First of all, you need to cover the foundation, partially isolating it from the effects of solar radiation and other external factors. On cold cloudy days I do this 8-12 hours after pouring, on sunny and windy days - after 2-4 hours. The surface of the concrete is covered with sawdust or sand, covered with burlap or other similar materials. Now you need to ensure a regular supply of moisture, for which the foundation is watered with a hose through a sprayer every 1.5-3 hours, depending on the weather during the daytime and at least twice during the night.
Note! If the temperature drops below +5 degrees, humidification will have to be stopped. In this case, special varnishes and emulsions will help retain moisture.
The maintenance period depends on the brand of cement used. For fast-hardening varieties, 2-3 days are enough; standard cement is moistened within a week, and slow-hardening cement – up to two weeks. In addition, it is necessary to take into account the configuration of the foundation - deep and wide structures require more careful maintenance.
Preparation of mortar and pouring the foundation
After all this preparatory work, you can fill the strip foundation with your own hands. There is little left. At the same time, you also have a choice of what to do. To simplify the task, you can use the services of construction companies by ordering the required amount of ready-made concrete. After processing the order, you will receive high-quality concrete, which remains to be poured into the foundation. The raw materials are delivered in a special machine with a mixer. To feed into the foundation, either a system of gutters or a pump is used. Thanks to this method, you can pour the foundation in one go. And this is exactly what needs to be done so that joints do not form and the foundation has weak points.
The second option is to make concrete yourself. The process is labor-intensive but cheap. To work you will need:
- concrete mixer;
- buckets and shovels;
- wheelbarrow.
As for the concrete itself for the foundation, you will need its components for preparation:
- Cement grade M300 and higher.
- River washed sand.
- Crushed stone.
- Water.
- Plasticizers.
A detailed video on how to make a concrete solution for a strip foundation is below.
After preparation, the solution will need to be poured into the prepared foundation pit with formwork. We have already mentioned that it is better to do the work at one time, evenly distributing the concrete along the foundation strip. If you start uploading your feed in the evening, then stop and wait until tomorrow, the result will be disastrous. The first layer will dry out and it will be difficult to achieve solidity. So try to do everything in one go.
Unload the solution from the concrete mixer into a wheelbarrow, and then transport it to the foundation site. The whole process needs to be done with several partners who will speed up the process. After all, you won’t be able to unload it yourself, take it to the trench and at the same time mix a new batch. Fill the base until you reach the level marked on the formwork.
After pouring, it is mandatory to compact the concrete and remove air from it using a special vibrator. Finally, the base must be leveled with a rule or trowel. All that remains is to wait for the foundation to dry, which will take about 30 days. Cover the foundation during this period.
Answers to frequently asked questions
Is it possible to make a basement with a strip foundation?
A strip foundation can be considered the best option for implementing basement or cellar construction projects. It has sufficient depth into the ground to withstand additional loads, provided that the basement is dug at some distance from the load-bearing walls.
How to properly make a floor with this type of base?
The floor in buildings with such a foundation is created using the layer cake method. The soil is covered with sand, compacted and covered with crushed stone, a metal cellular screed is placed above it, and a layer of waterproofing is placed on it. Insulation and finishing layers of the floor are laid on top of the waterproofing.
Laying the reinforcement
The reinforcing mesh consists of rods that form a certain structure. The size of the grid cells needs to be known in advance, even at the planning stage. Usually it is 25x25 cm. As for the mesh connected by welding, it is better not to resort to this method. The fact is that rust may appear in welding areas. And the grid will poorly perceive changes in shape when pouring the foundation. The reinforcement must be installed at the bottom so that it does not come into contact with the ground. After you pour your foundation, the mesh will be inside, giving the tape rigidity and reliability. Moreover, it will not rust.
Advice! To lay the mesh at a certain level, use supports made of stones or bricks. But their height should not exceed 5 cm.
As for the walls of the trench, the reinforcing mesh should not touch them. It is important to maintain the same distance.