Build a good foundation - it will last a long time.
Holidays at the dacha should be comfortable and convenient, so often the arrangement of a garden plot begins with the construction of a sanitary room. In order not to regret later about the work done, it is necessary to immediately take into account all the important points: choosing a good place, how to properly build a foundation for a toilet for many years, what the sequence of work should be and what we will need for it.
Installing a foundation for a toilet in a country house is not a difficult task, and with the right approach you can easily handle it with your own hands.
How to find a suitable location
The convenience and durability of the structure depends on how correctly the installation site was chosen. Let’s turn to the experience of experienced summer residents and learn several important nuances.
Before starting work, draw a simple diagram, reflecting on it all the country houses, a well or a borehole.
An important point: the toilet must be located at least 25 meters from the well, 7 meters from a residential building and 1 meter from the border line.
Based on these indicators, mark on your diagram the most suitable areas for building a country toilet.
- If the height of the soil in your summer cottage varies significantly, then the best option for building a toilet with your own hands will be a lowland. Remember: to avoid flooding the cesspool with precipitation, it is necessary to thoroughly waterproof it. Don't forget to waterproof the foundation.
- The soil on which the base of the toilet will be placed should not have high humidity levels or be buoyant. In the case of clay soil, for better absorption of liquids, it is necessary to line the bottom of the pit with sand and crushed stone.
- One of the determining factors is the prevailing wind direction at the site. Therefore, it is necessary to build a toilet in such a way that unpleasant odors do not spread to the residential sector.
- If you are planning to install a sanitary facility for many years, and you are not going to change the location every time after the pit is completely filled, then you need to provide access to the toilet for a sewer truck.
- Before you make a country toilet with your own hands, consider the following: it is equally contraindicated for this room to be in the sun or in constant shade. The most acceptable option would be to place the building next to buildings or trees that cast shadows at certain times of the day.
For the construction of a new toilet, a place that has previously been used for garbage or the construction of a closet is not suitable.
Freezing depth
The most important factors when building a foundation are the depth of soil freezing and the composition of this same soil at the construction site. And that's why.
Clay soils have the unpleasant property of greatly increasing in volume as a result of freezing. The moisture in such soils freezes, and when water freezes, as is known, its volume increases. As a result, the soil begins to heave and all these movements are transferred directly to the building.
IMPORTANT! When heaving soil freezes, it can increase in volume by up to 10%!
Therefore, when building on such soils, the base of the foundation is buried below the freezing mark so that the foundation rests on a reliable foundation, which lies quite deep and does not freeze in winter. If this is not taken into account, the result of construction will be cracked walls, destruction of structures and the need for labor-intensive repairs of the entire structure.
The heaving of soils can be determined based on an independent study of soils on the site and the presence of moisture at different times of the year. So, for example, if the groundwater level rises only in the spring, this is not so scary, since it will not lead to freezing of the foundation. Typically, in such areas, puddles and mud appear only during the spring snowmelt. If throughout the year the soil on the site has fairly high humidity, then this is a bad sign.
In addition, you should pay attention to the composition of the soil, which can be visually determined by the twisting of a ring from a small piece of soil, from which they roll a “sausage” and then try to bend a ring out of it. Clay and loamy soils roll easily and bend into a ring almost without breaking up. It will not be possible to roll sandy soil - it will crumble into grains of sand.
Read also: What can be planted in the shade at the dacha
Having determined the composition of the soil, a decision is made on the depth of the foundation base.
Since the height of the barrel is 85 cm, lowering such a foundation below the freezing depth will only work in the southern regions, where in winter the soil practically does not freeze or freezes to a shallow depth. In other cases, it is better to place a house or bathhouse on screw piles or on a foundation using TISE technology.
But is everything really that bad and a foundation made of barrels is a fool’s errand? Of course, in some cases such a support will be a fairly reliable basis, and in which cases, read below.
Laying a strip foundation with your own hands
It is mounted like a foundation for a house, only the depth of the tape is from 40 cm.
It often happens that summer residents do not pay due attention to the base of the toilet, and place a hastily made wooden structure on any pipes, blocks or stones. However, later this threatens with big problems: the structure inevitably tilts to the side and its operation becomes truly dangerous.
So, in order to avoid such troubles, it is necessary to make a reliable and high-quality foundation. Its construction begins after the cesspool is completely strengthened. As a rule, a cheap and simple option is used: the walls of the pit are lined with rough bricks, often used.
Let's consider the materials, tools and technology for constructing a strip foundation.
Necessary materials for making a strip foundation
- Materials: gravel, cement class not lower than M300, sand, boards or plywood.
- Tools: twine or construction tape, marking cord, pegs, concrete mixer are also suitable.
Important: if you don’t have a concrete mixer, don’t despair; a shovel and a tin trough/sheet are quite suitable for mixing a small amount of concrete.
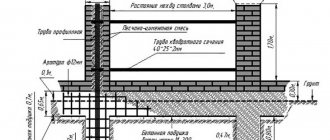
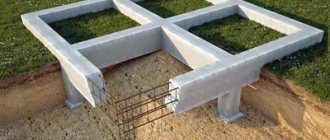
In order to make a toilet with your own hands, you will need to make a shallow base: its height should be 10 centimeters or more, and its width should be 20-25 centimeters. The distance from the pit to the foundation strip should be at least 30 centimeters.
Tape base manufacturing technology
To build this foundation with your own hands, follow these detailed instructions:
- The first step is to mark the location of the country toilet. Using pegs, construction twine is stretched in the corners.
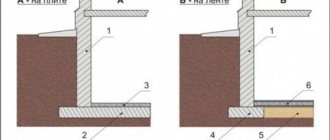
1 – mortar slab; 2 – waterproofing; 3 – blind area - Next, you need to make a projection of the lines and dig a ditch around the perimeter. It is important that the depth of the ditch must be at least 40 centimeters.
- After this, the pegs, along with the tensioned tape, are carefully removed and temporarily put aside. It is important to do this step carefully, as the pegs will still be useful when installing the formwork.
- The bottom of the resulting ditch is carefully leveled and compacted. It is advisable to make a clay castle.
- The ditch is filled with a layer of sand 5-7 centimeters thick. Then, using a simple device - a piece of log with handles - it is compacted and leveled.
- The next layer - gravel 10-15 centimeters thick - is also leveled and compacted.
- The pegs are reinstalled.
- Using the tensioned twine as a guide, the formwork is assembled. It should be located strictly in the middle of the foundation strip.
- The solution is mixed in a ratio of 1:3, where one part is cement, the rest is sand. For better strength, add gravel to the mixture.
- The mixture is poured all at once, or in layers. If poured in layers, each new layer is placed only when the previous one has hardened. You should not add gravel to the mixture for the last layer, as it will be leveling.
- In order to avoid displacement of such a lightweight structure, the base of the wooden structure is secured to the concrete using metal pins.
Construction of the blind area
Scheme of the blind area.
Simultaneously with the installation of the barrels, a blind area around the future structure is marked and constructed. Correctly this work is performed as follows:
— The internal and external contours of the blind area are outlined. The boundaries are marked with edged boards. They also perform the function of formwork. The internal contour should run along the line of the center of the barrels, the external - at a distance of about 90-100 cm from the internal contour.
- The soil is excavated to the depth of a spade bayonet.
- Sand is poured in a layer of about 10 cm. It is moistened with water and compacted. You can pour crushed stone on top in a layer of about 3 cm and compact it too.
- Welded reinforcing mesh is laid on the crushed stone.
- Along the perimeter of the blind area, temperature compensation gaps are installed every 2 meters in the form of wooden slats placed on edge.
- The formwork of the blind area is filled with a concrete screed about 5 cm thick. Its surface is carefully leveled and reinforced. A slope must be made so that the water flows away from the building.
At this point, the work of constructing a foundation from barrels filled with concrete can be considered completed. If construction rules are followed, such a foundation, erected without formwork, will last for many years.
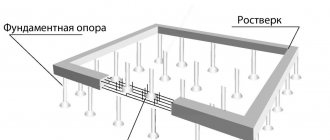
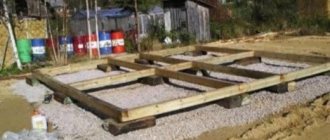
Installation of a columnar foundation for a toilet
This method involves the initial installation of pillars, and only then the construction of a cesspool. This sequence will allow you to adjust the digging of the hole, taking into account the location of the supports.
Stages of construction of a columnar foundation
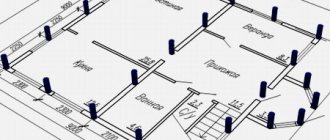
- The dacha plot where construction will take place is marked out. To do this, it will be enough to install only pillars in the corners; intermediate ones will not be needed due to the small size of the building.
- A ditch is dug along the marking line to the depth of soil freezing. Its width depends entirely on the diameter of the pillars.
- The bottom of the dug hole is strengthened and waterproofed using roofing felt.
- The hole is filled with a layer of sand of 5–7 centimeters and compacted.
- A 10-15 centimeter layer of gravel is poured on top and compacted thoroughly.
- The prepared formwork made of plywood or boards is installed in the middle of the ditch and fixed with stones or other spacers.
- If ready-made concrete structures are used, then the pit is filled with stones, gravel and other construction debris, and then concreted. The work is carried out layer by layer, while careful attention is paid to ensure that the installed support does not move.
- In the case of self-made pillars, the installed formwork is fixed and concreted in the same way as described in the previous paragraph.
Tip: bury a metal barrel in the ground and thus strengthen the walls of the pit. In addition, this move will increase the strength of the building and will not allow it to move due to external factors.
How to pour certain types of foundation?
Pile. Suitable for all soils, can be used even in peat areas, as well as areas with uneven terrain. The size of the piles depends on the weight of the entire building.
If it is large, screw piles will do. But they are expensive, and they are not easy to score. Wells need to be drilled. No formwork is required, which will reduce excavation costs.
Heaving of the soil does not affect the condition of the foundation. There is no need to equip a full basement. This is not required in baths.
Plates . The foundation is suitable for unstable and weak soil. There are two varieties. Each of them has different filling features:
Monolithic slabs. They are made of concrete. Depth – 30-70 cm. At the bottom of the dug hole you need to make drainage from pipes. The bottom is carefully leveled and compacted. It is necessary to arrange a sand cushion: it is made of sand from crushed stone.
The slabs can be ready-made: then they are laid on top of the finished cushion and secured with cement. If the slab is completely monolithic, formwork is made along the entire perimeter of the foundation.
Next, a reinforcing layer is placed in the formwork, and everything is filled with a mixture of concrete. In a month you can begin construction work.
Rubble . Depth – 50-70 cm. A sand cushion is also needed here: it is laid and carefully compacted. Then a layer of crushed stone is laid.
The layers alternate until the pit is 2 thirds full. Next, the foundation is laid out with a layer of rubble stone, secured with clay and cement.
Tape. Better than others for baths. In this situation, it is easier to use a finely sealed one. The depth depends on the weight of the building: it can be from 30 to 100 cm. A sand cushion is left at the bottom, which is then covered with a layer of crushed stone.
Next, you can begin installing the reinforcing layer - the frame. It is filled with a mixture of concrete. The frame cells are fastened together by at least 50%.
The formwork for this type of foundation is formed from the bottom of the trench if the soil is weak and subject to change. It is better to make it from strong boards or durable wood. Inside you need to place layers of a power frame.
Columnar. Another type of common foundation for a bathhouse. Withstands buildings made of both brick and wood. First, they dig holes - places for future supports.
Sand is placed at the bottom of such holes, then it is filled with water and compacted. You will get a dense layer.
Next, construct a brick pillar of the required length. It is held together with mortar. To make the structure stronger, a reinforcing layer is placed inside.
Layers of waterproofing are laid on top of the pillars. If the soil freezes heavily in winter, it is necessary to additionally put a layer of tightly compacted sand in the pits.
Budget method of making a foundation
Strip and column foundations for a country bathroom are placed if a major construction is planned. To install a light wooden structure, a foundation made of blocks or tires is suitable. How to make a foundation from tires is written below, but in the meantime, watch the video on how to make it firmly and inexpensively on blocks:
The cheapest way to make the base of a country house foundation with your own hands is to install the structure on car tires. This simple and inexpensive method was patented by M.S. Semykin and is also successfully used in the construction of baths and houses.
The principle of operation is simple: tires are placed in the right places, usually in the corners of the building, and filled with sand or gravel. The advantage of this method is that tires are a waste material that does not rot, does not crack, and has excellent shock-absorbing properties.
So, we examined in detail why it is necessary to build a foundation for a toilet, how to choose a suitable place, and also learned about three technologies for its manufacture.
Stages of work
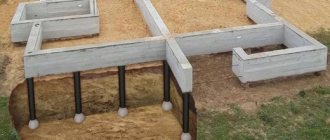
The top of the barrel must be removed. The removable lid is simply removed, and the circle is completely cut off from the closed container. You can leave the bottom of the barrel; there is no need to get rid of it. The prepared casings are installed on a prepared, leveled base at the corners of the building, at the junction of load-bearing walls, and, if necessary, in the spaces between already installed foundation supports.
First, markings are made by stretching cords around the perimeter of the structure. They will serve as a guide for correctly determining the location of the barrels in the plan. Separately, under each container, a small pit is dug to the depth of the underground structure, to the bottom of which, in stages:
- a leveling sand cushion 10-15 cm thick is added;
- roofing felt is laid in 1-2 layers as waterproofing;
- metal shells lubricated with waste oil are installed.
After backfilling the pits with a sand mixture with layer-by-layer wetting and compaction, they begin to fill the containers with concrete. The reinforcing mesh provided in the design is laid and fixed in metal shells in advance. Each barrel should be filled with the solution at a time, otherwise uneven setting can lead to delamination of the concrete monolith, which is unacceptable. Work on pouring the foundation is most often done manually, since concrete pumps are quite rare in private farms, and installing special gutters is not always a rational solution.
Experts recommend organizing the construction process in such a way that the “barrel” foundation does not remain unloaded during the winter period. Otherwise, after the soil thaws, there will be a possibility that the position of the filled containers will change.
Waterproofing is laid on top of the concrete barrels, protecting the walls from moisture penetration into the ground part of the building. For this, traditional roofing felt laid in two layers is most often used. The finished foundation is tied with a reinforced concrete grillage or a frame crown, if we are talking about building a bathhouse from a log house, for example.
Features of pouring a foundation from barrels
Concrete can only be poured into barrels whose lids have been removed. If you have to work with a welded barrel, then you can get rid of the lid by cutting. The shell must be mounted at the site of the building's support; in the future it will act as formwork. You will need approximately 4 or more similar support points.
Table of components for making concrete mixture.
After the concrete for pouring the foundation is ready, it can be poured into the shells. Reinforcement can be done with steel rods. Waterproofing must be laid in two layers on the surface of the barrels. It is preferable to use roofing material for this.
Ultimately, it will be possible to obtain point supports on which the lower crown of the walls will be mounted. It is permissible to bury the shells into the soil up to the freezing line. Whereas, if the installation is carried out without deepening, a compensation cushion should be installed under them; the thickness of the sand layer should be 10 cm or more.
Table for determining the grade of concrete based on its strength.
Work must begin with marking and leveling the soil on the site. Markings should be made using the method of pulling cords, after which the location of the barrels should be marked. They should be lubricated with used oil before installation.
The remaining space between the walls and the soil of the pits, in the last of which the barrels are installed, should be filled with sand and compacted. Filling the barrels with concrete is done in one step, this will eliminate the possibility of further delamination of the material. It will not be difficult to make such a foundation manually; the main requirement is the preparation of barrels, which can sometimes be problematic.