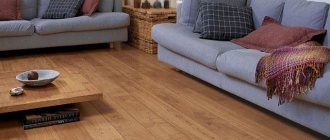
Why do you need sound insulation under the screed?
Many homeowners think about soundproofing their home. First of all, soundproofing the floor under the screed allows you to reduce the intensity of noise of various origins, including household noise and those transmitted by the structural elements of the building. At the same time, you should know that it will not be possible to completely get rid of extraneous sounds, but you can reduce their sharpness and volume and thereby ensure the greatest possible comfort for people in the room.
Among experts, floating screed is considered the most effective - sound insulation with this technology is the highest quality. Various materials are used for its arrangement. A floating screed is distinguished by the fact that it provides insulation of walls from interfloor ceilings (reinforced concrete slabs). In this case, the floor covering does not come into contact with the supporting structures.
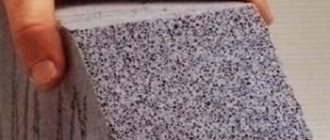
Sheet backing for laminate
To properly lay the coating, no special skills or tools are required. You will need a knife, a ruler, and tape (painting tape or stationery tape). Laying laminate flooring on a concrete floor with a cork backing requires additional insulation (a layer of polyethylene). Such a measure will protect the floor covering from moisture in the future.
A prerequisite for a high-quality floor is that the joints of the backing sheets and the seams between the slats do not coincide. To do this, the direction of the lamellas is determined, and the substrate sheets are placed maintaining an angle of 45°.
Start with a whole sheet from the corner and, moving to the opposite corner, carefully cover the entire surface of the room. Moreover, the sheets are placed with a slight offset (the “chessboard” pattern is not repeated). When the floor under the laminate is completely covered with intact elements, they begin to cover the empty spaces with trimmings.
The sheets are laid end to end and the joints are fixed with tape. This gives the coating integrity and will prevent the sheets from moving.
Along the perimeter of the room, at the borders with the walls, gaps of 10 mm are left to ensure the natural release of moisture.
What materials are used for sound insulation under the screed?
Most often, when soundproofing is performed under a floor screed, the following materials are used:
- Styrofoam;
- mineral wool;
- perlites (expanded clay);
- fiberglass
If you plan to soundproof the floor in an apartment under a screed, materials designed to absorb and dissipate sound waves are:
- roll;
- leafy;
- bulk.
Rolled soundproofing products have proven to be the simplest and most convenient to use.
Price for soundproofing a floor under screed per m2
Sound insulation under cement screed
- Stone slab ROCKWOOL Floor Butts
- Damper tape
- Vapor barrier layer
- Cutting basalt slab
- Sound absorber installation
- Outlining communications
- Laying out a soundproof side
- Stone slab ROCKWOOL Floor Butts
- Damper tape
- OSB board - 9 mm
- Superpol Knauf
- Cutting and laying sound-absorbing boards
- Outlining communications
- Laying out a soundproof side
- Screed installation
- Double layer stone slab ROCKWOOL Floor Butts
- Damper tape
- Reinforced OSB board - 12 mm
- Superpol Knauf
- Cutting and laying sound-absorbing boards
- Outlining communications
- Laying out a soundproof side
- Screed installation
The table shows the price per 1 m2, subject to ordering a turnkey service. That is, you do not need to pay extra for delivery and labor. Simply multiply the price of the selected option by the area of the room, and you will find out the total amount.
Please note the list of services that can be ordered separately. At the request of the customer, these materials can be replaced with any others. However, this will affect the thickness of the “sandwich”, the level of noise absorption, as well as the final price of floor soundproofing in a turnkey apartment.
Professional floor soundproofing
Free consultation by phone. After a surveyor visits the site, an individual solution is agreed upon with an engineer.
An acoustic engineer will arrive at a convenient time, perform all calculations and provide a consultation.
Free delivery of materials on the day of installation
All materials are delivered at one time on the day of installation. You don't have to wait for installers with a construction warehouse in your apartment.
Transparent prices and no hidden fees
All prices indicated on the website are valid. If additional work is necessary, it is discussed in advance and included in the contract.
Substrate for screed in Russia
For this reason, for use in sound insulation, you should choose rigid slabs, otherwise the screed on the foam will burst. By the way, neither foamed polyurethane nor extruded polystyrene, which have high density and excellent thermal insulation, are able to provide sound impermeability, so soundproofing the floor in an apartment under a screed cannot be done using them.
Natural substrates
Cork (cork tree bark in compressed form) is produced in sheets (610x915 mm), rolls (width 1 m, length 10/15 m). Main advantages: high density, low thermal conductivity, resistance to deformation, excellent sound insulation and vibration absorption. Disadvantages: cannot be laid in rooms with heated floors and high humidity. It is recommended to lay on a flat base/plywood or wooden floor.
Cork backing (kraft paper impregnated with natural bitumen and topped with cork chips). Produced in rolls. Advantages: excellent sound and heat insulation. Distinctive features: cork chips extend the service life of the base coating, and bitumen impregnation protects the laminate from moisture from the concrete coating. It is not recommended to lay it in rooms with heated floors.
Coniferous backing for laminate – wood fiber sheets/slabs. Advantages: free air circulation is maintained, excellent thermal insulation, “impact noise” is effectively dampened, roughness of the subfloor up to 4 mm is smoothed out. Antiseptic impregnation prevents the appearance of mold and fungi.
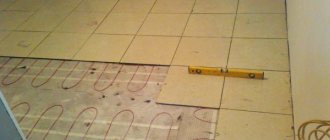
The procedure for arranging sound insulation under a screed
If the floor in an apartment is soundproofed under a screed using a material such as Schumanet, every home craftsman can do it on his own. Experience in construction or repair work is not required in this case.
At the initial stage, it is necessary to dismantle the old screed and prepare the floor surface, during which you can ensure that there are no defects (cracks and other errors) that contribute to a decrease in the level of sound insulation. If they do exist, they should be eliminated. After this, the surface of the reinforced concrete slabs is treated with a special primer. When sound insulation under the screed is done using Schumanet, there is no need to lay a polyethylene film to prevent moisture from entering the lower floors (about
Why is it necessary to use an underlay?
The lining is mandatory for floating floor technology. The quality of the coating will depend on this. In addition, there are several reasons to recommend using a substrate.
- Soundproofing. If you do not use a bedding material, then every step you take will impact the concrete floor. Using a soft and even layer will hide minor noise or friction. There is also a coating that has a built-in backing. In such situations, it is not necessary to lay additional material on a concrete floor under the laminate. We are talking about coverage of grades 32 and 33. However, its cost is quite high.
- Using a litter you can level the surface. This is an important quality that should not be forgotten. It plays a special role when laying laminate flooring. The durability of the locks will depend entirely on the levelness of the base. According to technology, differences should not exceed 2 mm per 1 meter. It should also be noted that if the substrate on the concrete floor under the laminate is too thick, then it is unlikely that it will be possible to hide the unevenness. At the joints when walking, it will begin to sag. If you do not want to change the coating after six months, then you need to carefully prepare the surface for installation.
- Moisture insulation. When creating a laminate, pressed paper is used. Therefore, even the most moisture-resistant models should not be tested. Otherwise, the panels will simply swell. The underlay on the floor under the laminate will help provide additional protection against moisture. Before you start laying the material, you need to wait about a month after the concrete screed has been made. The readiness of the base can be checked using polyethylene. Place it on the floor overnight. If there was no moisture on the concrete in the morning, then you can start laying.
- Thermal conductivity. The bedding material has good thermal insulation properties. If you place it under a heated floor, its performance will be reduced. There are special substrates that should be used in such a situation.
Conclusion.
If all the recommendations mentioned above are taken into account when laying the material, then the laminate will last a very long time. Naturally, the final choice in favor of a particular substrate must be made based on one’s own material capabilities. However, you must try to purchase only high-quality and natural products. Otherwise, new repairs may be required within six months.
Useful tips
- Soundproofing floor screed absorbs sounds better if softer materials are used. In this case, it is necessary to take into account the value of the compressibility modulus. Materials used in residential premises should not shrink under load by more than 0.5 centimeters, otherwise there is a high probability of destruction of the screed.
- When arranging sound insulation, it is necessary to take into account both the thickness of the interfloor slabs and all components of the “floating floor” structure. Since each of the elements of the multi-layer “pie” helps to reduce the sharpness and volume of extraneous sounds.
Chapter 11. Is it possible to commit a crime under hypnosis?
Vladimir Faivishevsky
As for hypnosis, at the end of the 19th-20th centuries, the problem of whether a person in hypnosis or a post-hypnotic state, under the influence of a hypnotic suggestion of a certain malefactor-hypnotist, could commit a crime was seriously discussed among criminologists. Corresponding experiments were also carried out. A hypnotized person was given a fake weapon - a revolver or a dagger (and he believed that they were real) and was encouraged to kill one of the experiment participants under hypnosis. In such cases, the hypnotized person spontaneously came out of hypnosis, often experiencing severe nervous shock.
I did not conduct such cruel experiments, but I wanted to check whether, under hypnosis, a person could commit an act that was contrary to his moral character. And one day I had the opportunity to test whether a moral person under hypnosis was capable of committing a crime.
A girl came to me complaining of almost constant headaches, which she attributed to lack of sleep and overwork. During the conversation, it became clear to me that she had reasons for her “headache.” She was 18 years old, but she already had a small child, with whom she lived in a dormitory and studied at an evening technical school. She knew no joys, no entertainment: only worries, studies, and even work. I wanted to give her a few pleasant minutes. I put her into hypnosis, relieved her headache and gave her such a scene. “You, Lucy, are at a ball in a medieval royal castle. The hall is lit with many candles and full of luxuriously dressed women, but you are wearing the most beautiful dress and you are the most beautiful (she really was very pretty). Music is playing (my patient, eyes closed, smiling, shakes her head to the beat of the music). Everyone is waiting for the prince to come out and open the ball. Upon entering, he immediately notices you and wants to invite you to the first dance. But then another woman enters the hall, also very beautiful, but with an unpleasant, unkind face. The prince is hesitating who he should invite to the dance (Lucy’s face shows slight anxiety). But,” I continue, taking from the table the first thing that came to hand—a half-open box of matches—“as soon as you, Lucy, close this box, that woman will disappear. And no one will notice her appearance or disappearance.” And Lucy, with a wide, majestic movement of her hand, throws away the open box so that the matches scatter on the floor, and proudly says: “Let this woman stay.
Soundproofing the floor in an apartment under a screed - materials and diagrams
The prince will still dance with me!” So I believe that a moral person cannot commit an immoral act even under hypnosis. In hypnosis, even deep, a person does not completely lose his sense of the situation and self-esteem, so the core of his personality is preserved.
There are also spontaneous, independent of a person’s will, falls into deep hypnotic states with hallucinations, sometimes “negative”, when a person “does not see” real objects in front of him - one example was given above.
Hypnosis does not result from any material influence on the brain. Even the most trained person can dive into it. Generally speaking, the hypnotizer, in fact, is only a pilot leading a person along a certain path, but the hypnotized person himself walks it with his own feet. And no one can be hypnotized against their will. A person himself transfers control of his mental processes to ANOTHER. Modern hypnologists believe that the ability to experience hypnotic states is a natural property of the human psyche. Hypnosis does not introduce anything new into the brain, but reveals, as through a magnifying glass, the properties that are inherent in it.
Many phenomena that are considered specific to hypnosis are also observed in everyday life: inexplicable lapses in memory (“where did I put this thing?”), selective perception of some fragments of the environment while not noticing others (for example, when we listen to interesting interlocutor) or unconscious perception and assessment of the situation (when, say, we are not mistaken on a familiar route).
Even such an amazing phenomenon as “negative hallucinations” has analogues in everyday life, when a person is looking for some “lost” object and suddenly notices that it has been in front of his eyes all the time. In the same way, in everyday life there are analogues of “post-hypnotic” suggestions (or self-hypnosis), when in the morning we “set ourselves the task” to call someone somewhere in the evening, we don’t think about it all day, but at the right time we do what what we had planned in the morning. The same is manifested in the so-called “iatrogenics” - diseases suggested (caused) by the careless word of a doctor, nurse or some kind of healer or “witch”.
The ability to immerse yourself in hypnosis is inherent only to humans. What is inherent in the human psyche manifests itself during hypnosis in a concentrated, seemingly unnatural form. (Perhaps this is an atavism adopted from animal ancestors). Hypnosis is not a dream, as previously thought, but a “sleep of consciousness”, which only a person has, it is like turning off the control of consciousness (what we call “I”).
In the deep stage of hypnosis, what the hypnotist says becomes subjectively real for a person; he lives in the world given to him. They tell him that he is under the hot sun and he is sweating, in the cold north - and his skin is covered with goosebumps.
A person can be transported to any age, forced to remember what he usually does not remember, right down to forgotten details of distant childhood (the so-called “hypermnesia” - he is not surprised by anything, because he does not notice the contradictions between what he sees and experiences in hypnosis, and the real situation). He is able to “recognize” a stranger as “his closest friend” and not recognize a close relative. Coming out of hypnosis, he either completely forgets what happened to him, or retains only vague (and sometimes vivid) memories of it.
Transference in hypnosis at different age periods, the so-called phases of physiological amnesia (up to 2-3 years), sometimes help a person remember some kind of mental trauma that he experienced at this age and is the cause of neuroses, phobias and depression in subsequent adult life. Sometimes memories of these traumatic events that emerge in hypnosis heal a person from their consequences. Here is an example from my practice.
I had a patient who, being a researcher and knowing my interest in meditative states, at my request, regularly practiced them with me and at home. She recorded all her meditations as scientific protocols, conscientiously and accurately. There were a lot of them, and I asked her to summarize them. These descriptions were so expressive that I decided to partially present them here. (I hope that this will not be regarded as plagiarism, but only as scientific protocol). I will call the author of these protocols Olya.
(To be continued)
© Copyright: Vladimir Faivishevsky, 2011 Certificate of publication No. 111051505639
List of readers / Print version / Post an announcement / Report violation
Other works by the author Vladimir Faivishevsky
Reviews
Write a review
What does science know about the nature of dreams now?
Alexander Belov 07/31/2011 03:01 • Report violation
+ add comments
Alexander! Little is known to science about the nature of dreams. But sometimes people have amazing dreams, sometimes “visionary”.
Vladimir Faivishevsky 07/31/2011 11:02 Report violation
I think this is the work of the subconscious.
Vladimir Faivishevsky 07/31/2011 11:03 Report violation
And when will science take care of this?
Alexander Belov 08/02/2011 12:21 Report violation
Alexander! She does this all the time, and I don’t know when she will resolve the issue.
Vladimir Faivishevsky 08/02/2011 21:04 Report violation
Will wait ! Sergey, I’m in the world, but here
Alexander Belov 02.08.2011 21:37 Report violation
I believe that you will wait, Sergey! All the best to you!
Vladimir Faivishevsky 02.08.2011 23:24 Report violation
+ add comments
2 reviews written for this work.
, the last one is displayed here, the rest are
in the full list
.
Write a review Write a personal message Other works by the author Vladimir Faivishevsky
Floating screed for thermal insulation
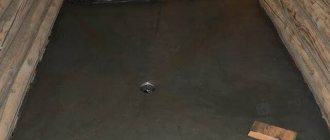
A screed made on a separating layer of insulation is called a “floating” screed. Insulated screeds must be installed under the floors of the first floors located above unheated and technical undergrounds and passages and as an element of heated floors.
Screeds with a soundproofing layer can be made in all rooms and on all floors of the house. The insulation embedded in the body of the screed is an excellent sound insulator; in addition, it reduces the thickness of the mortar screed, and therefore the weight of the screed as a whole, which relieves the load on floor slabs when installing high screeds.
The main design feature of “floating” screeds is that the screed does not come into contact with the walls and floor slabs anywhere, it rests on a layer of insulation and is enclosed by insulation. The result is a structure: solid body (screed) - spring (layer of heat and sound insulation) - solid body (floor slabs and walls). This screed design does not transmit sound waves (including shock waves) and heat to the ceiling and walls or significantly reduces their transmission.
The following is used as a slab heat and sound insulating layer: foamed polystyrene foam grades PSB-S-35 or PSB-S-50 (for higher loads than household loads); extruded polystyrene foam M35; mineral basalt wool intended for floors. The following are used as roll sound insulators: “Izolon PPE”, “Shumanet-100”, “Shumanet-100 Super” and other slab and roll insulating materials, the passports of which contain the entry: “for the installation of screeds”.
Insulation materials with open pores (all kinds of “cotton wool”), laid in screeds on the first floors of apartments above damp, warm basements, are placed on a layer of vapor barrier made of polyethylene film, laid dry, without gluing the joints. It is not necessary to install a vapor barrier under closed-cell insulation materials (foamed extruded polystyrenes, polyurethanes, polyethylenes). These materials themselves have zero or low vapor permeability. However, if it is slab insulation, then it is also better to place them on a layer of vapor barrier to prevent vapor transmission through the joints of the insulation slabs. For rolled thermal insulation with closed pores, a vapor barrier is not needed.
On the floors of the first floors located above cold basements, a vapor barrier is laid on top of cotton wool insulation. It is not necessary to lay it over foam vapor-tight insulation, but you need to tape the joints between the sheets of thermal insulation with tape.
The vapor barrier is always installed on the warmer air side. If, for example, there is a warm and humid room in the basement, then the vapor barrier of the floor of the first floor is the first layer - under the insulation. If the basement is a cold, unheated room, then a vapor barrier is placed above the insulation. Laying vapor barriers in screeds on all floors of the house is more of a fashion statement than an urgent need. If on the first floors they are necessary, since they cut off the movement of steam into a colder room - the basement. Then higher up on the floors there is no need for them, since when receiving heat from one boiler room, the difference in air temperatures in the apartments is insignificant and the movement of steam through the ceiling is negligible.
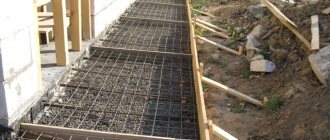
Installation of screeds with a layer of heat and sound insulation on slab insulation
The height of the screed for slab insulation is made at least 50 mm with mandatory reinforcement with steel reinforcing mesh welded from rods with a diameter of 1.5 mm and a cell size of 40×40 mm. Or the screed solution is reinforced with fiber fibre.
1. Geodetic marking of the screed.
For slab insulation on the walls, it is advisable to display not only the level of the top of the screed, but also the level of the top of the insulation (Fig. 34).
2. Preparing the base.
Floor slabs are cleared of debris. If there are holes in the slabs, they are sealed with tile adhesive. Under the thermal insulation device, cut off the mounting loops on the floor slabs, and if they do not interfere with the installation of insulation, bend them.
5. Installation of beacons.
Regardless of whether there is a vapor barrier under the insulation or not, we install pin beacons.
Substrate for floor screed, laminate, linoleum or tiles: choosing the best option
When installing a vapor barrier, it is impossible to install pin beacons (Fig. 35) without breaking through the insulation. Therefore, when installing screeds over a thick layer of thermal insulation, it is better to use insulation made from extruded polystyrene foam. They have low vapor permeability, you don’t need to do a vapor barrier, just tape the joints of the thermal insulation boards with tape. It is for this reason that rigid mineral wool slabs are practically not used in “floating” screeds. Either polystyrene foam board thermal insulation or rolled thin polyethylene foam is used.
3. Vapor barrier device.
Under the vapor-permeable thermal insulation on the first floors above the warm and damp basement we form a “trough” - we make a continuous vapor barrier carpet from polyethylene film. We overlap the film onto the wall above the intended screed. We do not yet install vapor barriers on the first floors above cold basements. In this case, on the first and all other floors, we install only a tape of polyethylene and a damper along the perimeter of the walls, with an overlap of polyethylene on the ceiling and on the walls above the intended screed, that is, we make a “trough” without a bottom.
When laying a continuous vapor barrier over pin beacons, you have to sacrifice the integrity of the film. The vapor barrier is placed on the beacons, but it is better to first spread the vapor barrier and then place the beacons. The holes are neater. However, we repeat once again that vapor barrier is needed for cotton insulation and non-extruded polystyrene foam; if extruded polystyrene foam or polyethylene foam is used, then a vapor barrier carpet need not be laid.
4. Laying insulation.
Level the top of unevenly laid floor slabs for laying slab thermal insulation with sand. There is no need to pour too much sand - do not overload the ceiling. You need just enough sand so that the slab insulation does not sway on it. Or achieve this in another way, for example, by trimming the bottom of the insulating boards or adding insulation chips under them.
Thermal insulation is pinned onto pin beacons. There is no need to walk and trample down the insulation. Therefore, walkways in the room are left free of insulation, or when laying thermal insulation, workers begin laying insulation from the far wall and stick out into the door. During the installation process, the joints of the slab polystyrene foam insulation are taped with tape.
6. Installation of screed on polystyrene foam boards.
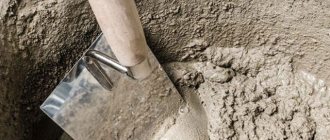
We work with a semi-dry cement-sand mixture. No lunch breaks or smoke breaks. We start working from the front door. We prepare the mixture and throw it through the doorway onto the insulation. We lay the screed at about half its height, focusing on the installed pin beacons - throwing them with solution above half (Fig. 40). Working from the front door, we move straight along the freshly poured solution deeper into the room. We make a screed and compact the mortar by trampling.
As soon as the entire room is filled to half the height of the screed, we bring the reinforcing mesh into the room, lay it on the screed and sink it into the screed solution with our feet. We lay two adjacent grids overlapping each other by about 3 cells. There is no need to connect the grids to each other - a waste of time.
Then you can work on several options. Fill and level the screed along the pin beacons or “put” PN plasterboard profiles on the beacons and level the screed according to these profiles. Some craftsmen work directly using pin beacons. Those who have never done this work will hardly be able to align the tie with the bolt heads. In this case, it is better to make guiding beacons along which you can work as a rule. This can be done most quickly by placing PN profiles on the pin beacons. Further work is carried out as usual. The rest of the solution is applied between the beacons and the screed is compacted with feet and smoothed with a rule. As necessary, the PN profiles are shifted along the heads of the pin beacons. It should be noted that a semi-dry cement-sand mixture without the use of a plasticizer is very difficult to level according to the rule. Therefore, most of the time you will have to work with a trowel, cutting off the tubercles and filling in the holes, and as a rule, the mixture is not so much stretched as its level is checked.
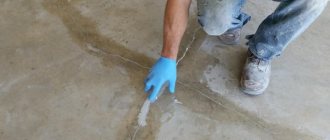
Having finished filling and leveling, the screed is rubbed with plaster floats, cutting off the bumps and filling the holes. If the solution does not grout well, it means there is not enough water in the screed; soak the grater in a bucket of water and grout. If there is a lot of water in the solution, then it is basically impossible to rub the screed; this is already a defect, which can lead to cracking of the screed. During the grouting process, we remove the beacons from the screed, and rub the areas “bruised” as a result of removing the beacons. If there is a layer of vapor barrier underneath the screed and it is pierced by a stationary pin beacon, then first, through the hole left by the removed bolt, we “treat” the vapor barrier by injecting silicone.
Professionals do not use pin beacons; they can make beacons simultaneously with the screed. This is exactly what they do at a construction site. However, it is necessary to take into account that the formation of a mortar beacon simultaneously with the manufacture of the screed requires experience; this is not a pin beacon, where by turning the bolt you can instantly raise or lower the mark. A second portion of mortar is thrown onto the screed “by eye” with a height almost equal to (maybe a little higher) the height of the screed. Using a trowel or grater, rub two “spots” on the screed, the top of which is leveled with a laser level to the mark of the top of the screed. Then, from the solution scattered over the screed, two beds are raked or raked and leveled (rubbed) along the “nickels”, as a rule, at the mark of the top of the screed. And then between two beacons rubbed with the rule, a solution is poured and stretched with the rule (Fig. 41).
At first glance, this technology seems simpler, but this is only at first glance. When you watch professionals work, it always seems that everything they do can be easily repeated by yourself. And indeed, there are no special secrets here, you just need experience. If you lack experience, you can fiddle with the mortar beacon for a very long time - pouring, smoothing, cutting and filling the bed again until you level it to the mark. But the screed does not wait at this time, it begins to set, as a result, you may not have time to lay the top layer of the screed before the bottom layer begins to set, and the screed will turn out to be laminated.
When using ready-made non-shrinkable dry mixtures for screeding, the work is greatly simplified. The first portion of the solution is also thrown to the height of half the screed, then the reinforcing mesh is brought in and laid. Then plaster profiles are put on the pin beacons and the work ends by aligning the screed with the beacons according to the rule. Ready-made dry mixtures provide a workable mixture that can be leveled well using the rule. There is no need to grate it with graters. As soon as the tie allows walking on itself, the beacons are removed and the screws of the pin beacons are unscrewed. The installation sites of the beacons are “treated” if necessary with silicone and rubbed with a new portion of the solution.
If we use a fiber-reinforced mortar as a screed material (Fig. 42), then installing steel reinforcement in the screed is not necessary. Fiber fiber reinforces the screed in all directions and prevents cracking. The screed manufacturing technology does not differ from that described above. To make fiber cement screed, you need to purchase a dry mixture with fiber filler. Or make the mixture yourself. Fiber fiber is sold at construction depots. You need 400–600 grams per cubic meter of solution. The fiber is added to the solution along with cement and sand. One of the many great features of this material is that when mixed, the fiber is evenly distributed throughout the solution and does not stick to the shovel or stirrer blades or clump together. When installing a screed, fiber hairs are initially noticeable on the screed, but after grouting and setting, the “hairiness” of the screed disappears.
7. Screed care.
Cover the screed with plastic wrap and protect it from drafts so that the water it contains goes to set the solution and does not evaporate in vain. For three days, make sure that the screed under the film does not dry out; if necessary, spray it with water from a spray bottle. Don’t pour a lot of water, you can wash away the top layer of the still weak screed, but don’t let it dry either. Watch the film, if there is condensation on the inside of the film, it means the water from the screed is evaporating, but it condenses and flows back. In principle, it is not so important how to retain moisture in the screed, by covering it with film, damp burlap or pouring raw sawdust onto the screed, the main thing is that it is not dried out by very high temperatures, sunlight or drafts. In general, when working with cement binders, understand one simple thing: for a normal chemical setting reaction, the solution needs 15–20% of water by weight of the cement put into the solution. If you stick to this water-cement ratio, the solution will turn out strong. However, keep in mind that sand, especially in a homemade solution, is rarely dry and initially it already contains some amount of water.
After three days you can walk on the screed, after about eight days you can do other work, for example, do something with walls, windows or doors, do electrical or plumbing work. However, there is no need to fully load the screed, for example, fill it with bags of building materials or perform impact work on it. She is not yet strong enough for this.
After 28 days, we check the screed using the “through-light” rule; if it does not meet the required parameters, we sand it and apply another layer of “self-leveling” - a self-leveling mixture.
Installation of screeds with a layer of heat and sound insulation made from rolled materials.
Rolled sound-heat-insulating materials have a thickness of 5 to 20 mm and, in addition to sound-proofing, many of them have waterproofing properties. For example, one side of the multilayer fiberglass “Shumanet-100” is covered with bitumen mastic, which is used to lay it under the screed. “Shumanet-100” with a thickness of only 3 mm reduces shock waves by 24 dB, which fully meets the requirements of SNiP, and “Shumanet-100 Super” with a thickness of 4 mm reduces it by 29 dB.
When using rolled materials, be sure to read the instructions included with them, since different manufacturers suggest different methods for laying their materials. If “Shumanet” can be installed on all floors except the first, without a vapor barrier between the material and the ceiling and without waterproofing between itself and the screed, then, for example, “Shumostop” already requires these separating layers, since it does not have a protective bitumen layer (Fig. 43).
Additionally, the instructions for these materials indicate that they must be used with a reinforced screed weighing at least 120 kg/m². With a volumetric weight of cement-sand screed of 1800 kg/m³, this means that the thickness of the screed, taking into account the weight of the reinforcement, must be at least 60 mm.
Otherwise, the technology for making a screed using rolled soundproofing materials is almost the same as the technology for laying a screed on a separating layer (for waterproofing), with the only difference - in this case, a separate damper seam is not needed. Rolled sound and heat insulation placed on the walls in the form of a “trough” is itself a damper separating the screed and the walls.
Do-it-yourself soundproofing of the floor in an apartment under a screed
Waterproofing with clay
Waterproofing with polyethylene film
The most effective way to reduce the cost of adhesive waterproofing is to use relatively thin polymer films, primarily polyethylene, the range of which is quite wide.
However, it was necessary to seriously study the issue of the durability of film waterproofing.
The durability of polymer films has been proven by direct experiments and confirmed by field observations, as well as experimental and theoretical predictions and justification of the estimated service life of film coatings in various conditions.
The durability of polymer films has become especially important due to their widespread use for impervious screening of reservoirs and other hydraulic structures. Field observations of polymer films under various conditions for 15-20 years have shown that films made of stabilized high-density polyethylene with a thickness of more than 200 microns age very slowly and their durability in ground and underwater conditions exceeds 150 years; unstabilized and polyvinyl chloride films have significantly lower durability, but increasing their thickness to 0.6-1.2 mm greatly increases it.
Construction moisture-proofing films made of polyethylene stand out among the traditionally accepted insulators in the form of roofing felt and mastic.
Film insulation is impermeable to water vapor and is a waterproofing layer to protect a building (foundation, walls, floor, etc.) from waterlogging.
The disadvantages of film materials include the possibility of their damage during construction, for which reason various measures are taken.
Thickness of polyethylene film for waterproofing
You should know that for waterproofing foundations you cannot use a polymer film thinner than 0.4 mm. Film with a thickness of 0.2 mm can only be used in floor structures on the ground.
Waterproofing film for floor
Polyethylene film is used:
- to provide a moisture-proofing layer under the floor (including at ground level), floor covering;
- for the installation of a protective layer against moisture, heat and sound insulation;
- to provide a sliding layer in various designs.
A wide range of possible sizes allows the film to be used without the need for mechanical connection of the film sheets.
- waterproof;
- elastic, easy to style;
- strong enough to break.
Specifications
Film laying
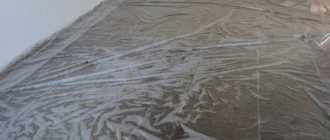
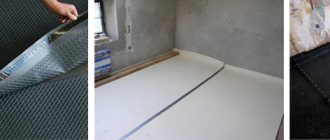
The waterproofing film should be laid on a clean and smooth surface. It is recommended to lay the film in the form of one continuous sheet over the entire room. If it is necessary to make connections between the panels, they should be glued together with an overlap of at least 20 cm using a special tape. At the walls, the polyethylene film should be folded to a height of about 10 cm above the floor surface. When used in combination with a layer of thermal and/or sound insulation, the film should be used according to the insulation manufacturer’s recommendations.
Waterproofing film for foundation
Polyethylene film is intended for horizontal waterproofing of foundation walls and building walls from capillary waterlogging along the perimeter (cutting off capillary moisture leakage).
- high resistance to moisture;
- has a textured (profiled) surface, which prevents possible slipping of the film during installation;
- high resistance to decomposition and decay processes;
- elastic, easy and comfortable to fit;
- tear-resistant.
Specifications
Thickness (with profile)
Film laying
Polyethylene film for horizontal waterproofing of walls is intended for installation in the upper part of the foundation.
- The surface of the foundation base is cleaned of sand and dust residues, and all protrusions that could damage the film during installation or during operation of the building are removed.
- A layer of mortar is placed on the foundation. Before applying the solution, it is recommended to moisten the foundation with water to prevent the rapid absorption of water from the solution.
- The waterproofing film is laid on the mortar layer, choosing the width so that there is at least 5 cm of protrusion on each side of the foundation.
- Polyethylene film sheets are connected along the length with an overlap of at least 35 cm. To ensure reliable connection, the joint is glued with specialized glue or sealed with tape.
- A layer of mortar is again applied to the laid film, which is the binding element for the blocks or bricks of the first row.
- Foundation
- Mortar layer
- Waterproofing film
- Mortar layer
- Blocks or bricks
How to install laminate flooring on a concrete floor
- First, prepare the concrete floor surface; if there are large unevennesses, they are corrected.
- It is important that the materials from which the installation will be carried out lie in the room for at least 2 days. Thus, the laminate will adapt to the temperature and humidity of the room.
- It is recommended to prime the floor before laying it.
- After this, a waterproofing film is laid on the floor with a margin of 20-30 cm. The joints are filled with tape.
- Then the lining is laid. It’s better not to do it all at once, but as you lay the laminate. The edges of the substrate should be 2-3 cm on the walls.
- Installation of laminated boards begins from a source of natural light, that is, from a window.
- When laying elements, pegs are placed between them and the wall. It is important to correctly connect all the elements of the laminate to each other. The slats are mounted one after another at a slight angle and without much effort.
- To ensure that the rows fit together well, you can tap a wooden block and hit it with a hammer. In this way, the entire floor space is filled.
- Almost always in the premises there are heating pipes, various communications, etc., which do not allow the normal installation of part of the laminate. Therefore, to cut out shaped elements you will have to use a jigsaw and a construction knife.
- The process of installing laminate boards ends with laying the baseboards.