In a modern home, a candlestick plays not so much a functional role as a decorative element in the design of a room. Thanks to candlesticks, you can create the right mood and give the atmosphere a romantic and festive feeling.
Candles in original candlesticks are appropriate not only for a holiday or a romantic evening, they will perfectly complement any dinner and add a touch of enthusiasm. Unusual and at the same time very beautiful candlesticks from different glasses can be made quite easily with your own hands. Such candlesticks will only emphasize the shape of the candle and create an exciting and mysterious atmosphere at any time.
DIY glass candlestick master class
We offer you a fairly easy master class with a photo of a candlestick made from a glass, which you can make with your own hands. To make it you need the following materials:
- Small thuja branches.
- A piece of paper or newspaper.
- Large tall glass.
- Scissors.
- Spray or regular glue.
Let's start the work by cutting the thuja branches to the required size and laying them out on paper. Then we will apply glue to them; if you do not have it in the form of a spray, you will need to use a brush to apply it.
We paste thuja branches around the glass in a circle; this must be done quickly so that the glue does not have time to dry.
After the glue has completely dried, you need to carefully trim off all excess with scissors. At this stage, all the big work is finished, all that remains is to choose a suitable candle and place it in the glass. As a result, we got a very original and beautiful candlestick that will become a worthy interior decoration.
Cup assembly process
The process of creating a floating mug is not at all complicated, but there are several important nuances that need to be taken into account when creating it.
The main secret in creating a flying bowl is to choose the right tea pair. The cup and saucer should not be too heavy. If you take this condition into account, it will be easier to create a flying bowl!
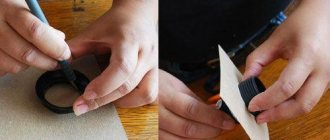
We construct the base of the floating cup; this is the element that connects the saucer to the cup. To do this, take a wire of the required length. It is important to note that the distance between the bowl and saucer should be approximately two cups. With these parameters, the flying cup will look most balanced.
Inside the bowl we form a loop from the wire, the diameter of which should be 2-4 cm. This will help to achieve better fixation of the wire in the cup. We twist the second end of the wire into a flat spiral in two or three turns. This way we will get a kind of stand, which we will fix in the saucer.
The tilt radius of the resulting structure should not exceed 45 degrees, otherwise the structure will be unstable!
Polymorphus is the best material when making a flying cup.
Take a piece of polymorphus and immerse it in hot water for 20 seconds. During this time, the material is converted into soft plastic.
We stick the resulting plastic, like plasticine, around the base, giving it the desired shape. If the plastic hardens before you finish the job, simply dip it back into hot water. The prepared base will completely harden within 15 minutes.
If you don’t have this material on hand, you can use modeling compound. An alternative to these two materials is masking tape, which is simply wrapped around the wire base. Or you can wrap the wire with felt or other fabric, after coating it with glue.
An important aspect is to constantly try on the base on a saucer with a cup in order to spot any flaws in time!
You should pay special attention to the edge of your cup in the place where the structure will be attached!
In this place it is necessary to make a kind of step in the form of a support. This way the structure will hold much more securely.
When the base is ready, you can begin fixing it on the cup. Lubricate with glue all surfaces of the base in contact with the saucer and cup. Press firmly and hold for 3-5 minutes. Don't forget to glue a step to support the cup!
We fix the flying cup on soft objects in the desired direction and leave it in this position for 5 hours. During this time, the glue will dry well and securely fix the resulting floating bowl.
When the floating cup is well glued, you need to check how stable it is.
If the saucer is not able to hold the cup, then it is necessary to reduce the radius of the structure until it becomes stable.
The last stage of making a flying bowl is the most interesting and creative. Decorating a spill cup! Apply adhesive gel to the decorative elements and glue them.
It is better to glue the large elements first, and glue the smaller ones last. This will hide small visible defects and gaps between elements.
After all the decorations are glued, you need to let the cup stand for 5 hours so that the glue dries.
The process of assembling a flying bowl is discussed in detail in the Hand-made master class from the Masterclassy website:
Varieties of candlesticks made from glasses
There are many options for how glasses can be used as candlesticks.
Candlestick made from an inverted glass
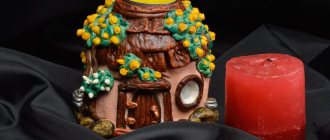
The simplest among them is to simply turn the glass upside down and place a suitable candle on the base of the stem. In this case, the glass can be decorated by wrapping a rope around it, a white lace border can be glued to the base, and textile flowers of the same shades can be glued above it. The candle itself, which will be placed on the stem of the glass, can also be tied several times with a tourniquet; overall, the result will be a very beautiful composition.
A very simple, but at the same time very elegant candlestick can be made if you create a decorative composition of cinnamon sticks and spruce branches, fresh flowers and leaves, berries, and Christmas tree balls in an inverted glass. To make such a candlestick more convenient, you can glue a CD to its base, thus removing the hole in the glass.
Painted with acrylic paint
You can create very beautiful candlesticks for the New Year holidays by painting them with acrylic paints. As a result, we can get excellent candlesticks from glasses in the shape of snowmen, Santa Clauses, penguins - everything will depend on your imagination!
30 ways to economically decorate your apartment for the New Year with your own hands! and Master classes for them - read in this article!
Candlestick with floating candles
A candlestick with a floating candle would be a very romantic option. In the middle you can place decorated balls, rose hips, flowers, twigs, Christmas tree needles, sea pebbles, fern leaves, then fill with water, and place a small candle-tablet on the surface.
With beads and stones
Incredibly delicate and beautiful candlesticks will be obtained if you place mother-of-pearl beads in a glass and install a candle. The glass can be filled with absolutely any decor that matches the theme of the evening; these can be sea pebbles and shells, dry maple leaves, twigs and acorns. It will also look very original if you make several small layers of different grains.
What else can you make candlesticks from:
Follow all the links to find detailed Master Class!
Candlestick with lampshade
A very original candlestick from a glass, you can make it yourself in the form of a table lamp. To do this, you need to cut out a lampshade from thick colored paper, glue it and put it on a glass with candles. Thanks to the conical shape, the lampshade doesn’t even need to be fixed. Such an unusual lamp can be additionally decorated with any decor, such as braid, rhinestones, flowers, appliqués.
With lace
A candlestick will look incredibly elegant if you cover a small glass with beautiful lace or an openwork napkin.
As we see, there are many options for how to make a candlestick from a glass with your own hands, everything here depends only on your imagination, because you can use a variety of objects for decoration.
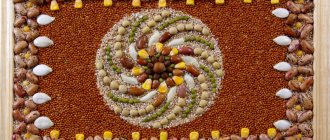
Option 7
Just think, thanks to your imagination, a simple glass can easily be turned into a candle stand. Moreover, there are a lot of execution techniques. Let's consider a New Year's example.
We will need:
- wineglass;
- twine;
- for decoration peas, red beans, corn;
- candle.
Sequencing:
- In a clean, dry glass, first pour a layer of peas, then beans, and corn.
- We put a candle in the middle.
- We tie a rope on the glass with a bow.
DIY candlesticks made from glasses
Today, there are many techniques that allow you to turn an ordinary glass (not necessarily crystal) glass into a luxurious candlestick. The main thing is the desire to create and some free time. The easiest option is to place a candle on the flat base of its stem or pour mother-of-pearl beads into a bowl and place a long candle. With a little imagination, you can make a more mobile candlestick, decorated with various details: beads, seed beads, ikebana, balls, pine cones, small Christmas tree decorations or spruce branches, as in the photo.
Very elegant interior accessories emerge from inverted glasses, where the bowl contains the main decorative elements of the composition.
To create a New Year's themed candlestick from an inverted glass, you will need the following materials:
- glass goblet;
- decor (beads, pine cone, cotton wool, sparkles, any New Year's toy characters);
- glue;
- a piece of foam rubber;
- cardboard;
- candles.
- Using cardboard scissors, cut a circle whose diameter is equal to the circumference of the glass bowl.
- Using foam rubber, apply glue to the edges and glue to it a small piece of cotton wool, beads, glitter and other things that you have prepared for work.
- “Place” the pine cone on the glue in the center of the cut out circle.
- Glue a small layer of cotton wool and toy characters on the sides. Apply glue to the edges.
- Place the bowl of the glass on the composition. Place a candle at the base of the leg.
Such a candlestick can be made not only with a New Year theme. To decorate a marine-style interior, New Year's accessories are replaced with a variety of shells or small pebbles. For the Provence style, a candlestick decorated with dry herbs and ribbon is suitable.
A candlestick made from a glass, shaped like a lamp, the lampshade of which is decorated with perforations, rhinestones, braid, appliqués or flowers, will help to add a touch of romance to an ordinary dinner. Nicely tie a ribbon on the leg.
Making a lampshade is quite easy: make a cone out of paper, fasten the edges with glue and cut off the top. After completing all the decorative work, place the lampshade on a glass, inside of which there is a small candle-tablet, and place it on the table.
Attention! Don't forget about your own safety. Paper is a highly flammable material.
Option 1
We will need:
- stemmed glass;
- brush;
- PVA glue;
- salt;
- decor (buttons, rhinestones, stones).
Sequencing:
- Wash the glasses thoroughly and wipe dry.
- Dip a brush into glue and draw simple patterns (curls, inscriptions, funny figures).
- Pour salt into a deep container. Cover the glass with it, removing excess.
- We are waiting for it to dry completely.
- If desired, the inside of the glass can be decorated with rhinestones or beads, placed on glue.
- Drizzle a little wax onto the bottom of the glass. We attach a candle to them.
The candlestick is ready. All that remains is to decorate the festive table with it, creating a fabulous mood for yourself and your guests.
Interesting: DIY New Year's gift bags 2021: master class with photos
DIY wooden candlesticks
Wood is a noble material. Thanks to this, all products made from it, including candlesticks, look aesthetically pleasing in any interior and beyond, for example, in the garden. In addition, it is not necessary to “spoil” some expensive wood. In your work you can use saw cuts, logs, various branches or snags. The more crooked and knotty the wooden blank is, the more interesting the result will be.
Even a person far from wood carving can make a candlestick. For a product made from branches you will need:
- a drill with a furniture pen attachment (the diameter of the attachment should be at least 5 mm wider than the candle);
- dry branches are slightly wider in diameter than a candle;
- glue;
- decor at your discretion (for a product in a natural style, purely natural decor is suitable: pine cones, brown ribbon, ikebana, etc.)
- Cut dry branches into pieces of the required length (usually 10-15 cm).
- Use a drill and a pen to make a notch.
- Squeeze a little glue into the center and place the candle on it.
- Attach the decor prepared for work to the branch using glue.
- Place it on a table, windowsill or shelf and light a candle.
In the same way, you can cut several small indentations in a piece of driftwood or sawn wood, and place a tablet candle in the center.
For a bachelorette party or a wedding ceremony in nature, a white birch candlestick is suitable. An excellent decorative element for such a wooden candlestick can be “windows” in the shape of hearts.
Candlesticks made from glass jars
It's very easy to make a candle holder from jars. Decor is placed inside the glass container and a candle is installed. Baby food jars, mayonnaise and half-liter jars are perfect for this product. And if the container is also decorated with some kind of perforation, then all that remains is to complement it with a harmonious decoration and the candlestick is ready to fulfill its purpose.
As decorative finishing you can use: lace, ribbons, ropes, all kinds of beads. Decoupage or enamel coating in the form of a fancy pattern applied to the inner surface of the jar looks beautiful. They can be placed on a shelf, table or hung on a wire from a tree in the garden.
To make a romantic-style candlestick with a heart-shaped window, you will need the following materials:
- any small jars (up to one and a half liters);
- masking adhesive tape;
- ribbons for decoration;
- sharp knife;
- matte paint in light or red tones;
- corrector pencil;
- small candle.
- Apply mounting tape to the jar. Draw a heart on it and cut it out with a knife. Remove excess pieces of tape from the surface of the jar so that the heart remains in place.
- Paint the outside surface. Let dry.
- Peel off the heart. Using a corrector, draw strokes or a beautiful pattern on the surface of the paint. Tie a ribbon around the neck.
- Place a candle inside the jar and light it.
The original effect of the candlestick is given by ordinary coarse table salt. To make the product you will need:
- glass jars;
- varnish in the form of a spray in a can;
- silicate glue (transparent);
- sea (bath) or table salt;
- brush;
- alcohol;
- candle tablet.
- The first thing to do is degrease the jar. Apply alcohol to a cloth and wipe the glass surface.
- Using a brush, cover the outside, bottom and edges of the neck of the jar with a thick layer of glue.
- Sprinkle or roll in salt and let dry for at least 3 hours. To give the candlestick some shade, mix salt with suitable food coloring.
- Cover everything with a layer of varnish and dry at room temperature for 2-3 hours. After this time, apply a second layer and dry again, but for 2-3 days. If desired, a third layer can be applied.
- Drop a little wax into the center of the jar and glue the candle.
Candlesticks made of plaster or polymer clay
You can sculpt the shape of candlesticks from plaster or polymer clay yourself. Made in an abstract manner, this decor will fit perfectly into an interior designed in high-tech, art deco or minimalist style.
For work, take the following materials:
- gypsum (mix it with water in advance in the required proportion);
- knife;
- sandpaper;
- candles.
- Roll the prepared plaster into a ball.
- Use a candle to make a hole in it (should be slightly wider than the candle itself).
- Use a knife to shape the candlestick into the desired shape.
- Wet your hands with water and smooth the surface of the product.
- Let it dry for a day. If you use polymer clay, dry it in the oven.
- Sand the surface of the finished candlestick with sandpaper. If desired, paint the product in the color you like.
Flying mug with birds
The bird is a symbol of lightness and freedom; it is very often found in interior solutions in various styles and variations. This motif is also reflected in the decoration of the floating mug.
A floating mug can become a wonderful house for a nest of birds. The nest resembles a home and an idyll in it.
A cup with daisies and a bird with a nest looks like a real symbol of family, love and fidelity.
A bird with delicate roses, fluttering butterflies and other decorative elements will help create a summer soaring composition.
You can decorate the flying cup with simple pasta. It’s better to take bow-shaped pasta, paint it with acrylic paint, and decorate the middle with pearls. We decorate the mug with them and the waterfall of bows is ready!
This mug looks elegant both in pastel colors and in classic colors - black and white.
Candlesticks made from bottles
With a little imagination and effort, simple wine or beer bottles will turn into original home decor. Before you start decorating the bottle, you need to carefully cut off or knock off its neck.
Attention! If a bottle is accidentally chipped, treat it with sandpaper or fill it with silicone to avoid injuries and cuts during work.
A candlestick made from a bottle, decorated with mosaics, looks original. To do this, cover the inner surface with glue and place small pieces of glass, for example, from another bottle, in random order. The easiest way is to use special tools to cut off the bottom of the bottle and cover the candle with the top.
A candlestick made from a plastic bottle looks simple, but at the same time original and beautiful. To work you should prepare:
- plastic bottle 1.5-2 l;
- scissors;
- knife;
- glue moment.
- Cut off the neck and bottom of the bottle.
- Using a hot knife, make a hole the size of the neck in the bottom.
- Apply glue to the neck and connect the two parts. Let it dry.
- Paint the surface of the finished candlestick, place it on top and light the candle.
Whatever technique you choose to make a candlestick, homemade decor always looks new, original, and individual.
Unusual flying cups
Instead of a flying cup, you can make a flying teapot. This composition will look very original on your kitchen table. When performing such a craft, it is better to choose a teapot of small size and weight so as not to overload the structure. It is better to make a “stream” from a teapot from thin, strong wire (for example, knitting needles) and superplastic.
Hanging flying cups with flowers can become an original decoration! The main thing is to securely fasten them.
Categories,
Candlesticks and candles today are, first of all, an element of modern decor that helps bring a festive, calm or romantic atmosphere to the interior of your home. Individuality is especially valued in this matter. You can make candlesticks with your own hands from any available materials: plastic, glass bottles and jars, wood and thick branches, plaster or crystal glasses. Our detailed master classes, which come with step-by-step instructions, high-quality photos and video materials, will help you make unique and beautiful products.
Master class: making a candlestick from a glass
- wineglass;
- satin ribbon;
- artificial rose bud;
- candle;
- self-adhesive half beads;
- marker;
- sponge;
- cotton buds;
- nail polish remover;
- glue;
- white acrylic paint.
- Turn the glass upside down and place a rosebud in it.
- Using a marker, draw a semicircular window for the flower. Using a sponge, paint the surface of the glass, leaving a gap in the intended place.
- Use a cotton swab dipped in nail polish remover to correct painting errors.
- Glue half beads along the window line.
- Tie a bow from a satin ribbon and glue it to the stem of the glass.
- Place a rose inside the wine glass and place a candle on top.
Video: how to make a beautiful candlestick from a glass
Decor ideas in the photo
You can make original candlesticks with your own hands not only for a festive feast. Candles can add romance to dinner at any time of the year.
Every home will probably have items and materials that can be used to decorate a wine glass for a candlestick.
Glasses in this role are used in different ways. When turned upside down, decor corresponding to the theme of the dinner is placed under the dome.
A wine glass will make a simple and elegant piece of furniture if you place a composition of sand, shells, pebbles, beads or other elements in its bowl.
Glasses for candlesticks can be painted with acrylic paints or filled with small decor, leaving them transparent, and can also be used in their usual or upside-down form.
Looking for inspiration
Not only a professional, but anyone can create handmade candlesticks. The only things that matter are imagination and the desire to create. Very often, candles are decorated in a duet with glasses and wine glasses. You can get an idea from artists and paint the glass surface with paints.
Decoupage masters share the secrets of their technique and teach even children how to work with napkins. A sophisticated candlestick will be made from a wine glass decorated with beads, rhinestones and delicate lace. Exclusive independent work will always attract attention and will not leave anyone indifferent.
Candlestick made from glass
In almost everyone's home you can find many things that have not been used for their intended purpose for a long time, but which you cannot throw away. Among such rarities, the most common are ordinary faceted glasses. But even from such a seemingly banal and outdated thing, you can make wonderful, beautiful candlesticks.
To make a candlestick from a glass we will use the following materials: 1. thin sewing threads 2. white paint - spray 3. colorless varnish - spray 4. universal glue 5. beads 6. beads 7. sequins 8. soft brush 9. double-sided tape
1. Wash and rub the glass well to avoid streaks.
2. Wrap the glass with thin sewing threads. The more threads there are, the less transparent our candlestick will be. The end of the thread can be secured with double-sided tape.
3. Open the surface of the glass with white spray paint. When the paint has dried well, carefully remove the threads from the glass.
4. Using universal glue, draw curls and random lines on the walls of the glass. Sprinkle them with glitter. When the glue has dried well, lightly tap the glass to shake off any unadhered glitter. You can also remove excess glitter with a soft brush. But under no circumstances begin this step until the glue is completely dry, otherwise the drawing will be blurred.
5. Using glue, draw several small designs on the walls of the glass. These could be stars, snowflakes, hearts, or just some kind of abstraction. Sprinkle the design with beads, wait for the glue to dry, remove excess beads using the previously applied method, and glue several large beads. We open our candlestick with a colorless spray varnish. Let the surface of the glass dry.
6. Now all that remains is to place a small candle inside the glass and enjoy the results of our work.
Materials
1) tea or coffee pair (cup and saucer)
2) glue
to connect the “spouting” structure with a bowl and saucer. It is better to use the universal Moment gel adhesive for ceramics, plastic or glass. An alternative can be any other adhesive designed to work with smooth surfaces. A glue gun is also used, but it is intended mainly for working with rough surfaces. There is a possibility that the cup will come off in the near future after gluing.
3) thick
wire
or triple wires. You can use other flexible items, such as old aluminum forks or spoons, or a metal hanger.
superplastic
) is a self-hardening thermoplastic. When heated, it becomes plastic and convenient for giving it the desired shape. When cooled, it becomes hard, elastic and durable.
5) masking tape
– they can replace superplastic
6), can also replace polymorphus. It resembles plasticine, but unlike it, it hardens well in air. Contains natural ingredients (dough made from cereal flour), so it is absolutely safe for children.
7) decoration items
cups: coins, flowers, cones, feathers, candies, beads, buttons, ribbons and much, much more.