Concrete is considered one of the most durable and strong foundations for structures, be it a fence or a floor. However, the cement mixture has one significant drawback - it lacks an attractive external component.
That is why specialists and craftsmen decorate and hide concrete from prying eyes with paints, which also perform a number of other equally important tasks:
- protect the surface from dust;
- serve as a reliable barrier against mechanical damage and rapid wear of the plane;
- save from exposure to chemical components;
- If concrete is laid outdoors, modern coloring agents are able to protect the cement from destruction due to special weather conditions.
How to choose the best paint
To properly hide concrete under paint, it is important to choose the right paint composition. If during the Soviet era, paints differed only in color, today buyers are presented with a huge variety of paint bases, each of which is suitable for a specific case.
So, if you are wondering how to paint concrete, give an answer for each of the following criteria:
- evaluate the conditions in which the concrete will be painted (this could be street conditions, residential square meters or an industrial premises);
- the result you want to achieve (draw yourself a real picture of what the surface will look like after painting);
- the cost of the material, which will not be an invoice for you.
For example, if you plan to paint the blind area, you should consider the following parameters:
- resistance of coloring components to changes in temperature;
- water-repellent properties;
- presence of antibacterial inclusions in the composition.
If aesthetic appeal is important, it is advisable to choose polymer coatings.
A natural stone
A colorful and noble material that will fit well into any landscape style. But in our gardens it is not found very often. Which
stone
Can it be used to create a garden path? The most different. From expensive breeds -
basalt, granite, porphyry and marble
. More affordable -
sandstone and limestone
. They all differ in color (gray, dark red, greenish-gray, black), surface, and processing.
You can use raw stone collected in mountainous areas. Or you can take a sawn stone, which in itself is practically a tile. Stone slabs are much easier to lay, but they are more expensive.
We suggest you familiarize yourself with How to properly transplant a pine tree from the forest
Other rocks used include diabase, gabbro, all types of pebbles, tuff, slates and dolomite.
Path made of natural stone
Advantages of natural stone:
- durability: will literally last for centuries;
- environmental friendliness;
- beauty.
Durability, environmental friendliness, beauty
Disadvantages of natural stone:
- heavy weight (physically difficult to do such a track);
- high cost, even if you take simple limestone.
- icing. Alas, an ice crust forms on most rocks in the cold season, and therefore it is unsafe to walk along such a path. There is salvation, but not everyone will decide on it. This is the installation of a heating system directly under the path)). I'm serious, they do that too.
What you need to know:
- Porous stones, such as limestone and tuff, absorb moisture, and therefore it is advisable to treat them with a water-repellent solution every 3 years.
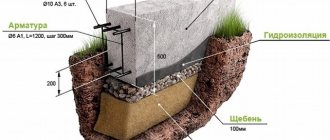
- When laying natural stone, remember that at least one side must be level. The trench must be made deep enough so that the stone fits well and the path is smooth. In this case, it is advisable to fill half the height of the trench with crushed stone. And pour sand onto the compacted crushed stone and lay stones. And don’t forget to buy a rubber mallet for laying the stone. However, if the stone is hard, you can get by with a hammer.
Porous stones must be treated with a water-repellent solution
Wood in a variety of types
The material is also colorful, but, unfortunately, not as durable as stone.
If you don’t want to change your garden path every 3-4 seasons, consider immediately treating the path with antiseptic and water-repellent compounds
. I think the one that is used for processing is quite suitable
baths
.
Our market will help you choose the right product for treating paths. Look at the selection of wood antiseptics and compare offers from different online stores.
ALPINA Antiseptic for wood ALPINA 2.5 l1 229 RUR OBI
NEOMID Fire-bioprotective antiseptic NEOMID 10 kg RUR 1,399 OBI
ALPINA Antiseptic for wood ALPINA 0.75 l429 RUR OBI
NEOMID Antiseptic – preservative NEOMID non-washable 5 kg2 799 RUR OBI
Wooden garden paths come in a variety of varieties:
- from boards (like walkways - the simplest and most common option);
- from special wooden tiles;
- from wooden cuts. A very interesting idea, by the way. It looks amazing, especially if you use saw cuts of different sizes and arrange them beautifully.
Path made of wooden saw cuts
What types of wood are best for a garden path? Of course, oak. True, it won't be cheap. Oak trees are generally valued on the farm. I know old houses that still stand on oak pillars. Larch also does not rot for a long time. Well, if there are none, take any wood you find). You can even cut down garden trees.
Advantages of wood:
- environmental friendliness;
- beauty;
- variability of solutions. You can come up with anything, as long as you have your imagination;
- quick drying. Wood is a very warm material, so it quickly thaws in the spring and becomes a favorite place for cats to sunbathe =))
Disadvantages of a wooden garden path:
- short service life (if it is not oak, larch and similar species).
What you need to know:
- Before laying the same cuts, they can be treated with drying oil brought to a boil. After drying, this treatment should be repeated again.
- Some people recommend putting plastic film on the sand cushion. The wood will not be in contact with the ground and, as a result, will rot less. On the other hand, there is a high probability that moisture will accumulate there. To avoid this, the ground under the future path must be formed in the form of a gentle arch. Then the water will definitely not accumulate.
- The voids between the cuts can be filled with wood chips, sand, crushed stone or gravel. To your taste. If you fill it with sand, over time grass will grow there and it will be very beautiful.
- When nailing the walkways, leave a small gap between the boards. Firstly, the wood will “spread” from moisture, and secondly, water will leak into the cracks.
When nailing the walkways, leave a small gap between the boards
Classification of paints for painting concrete
What kind of paint is offered in construction stores today?
- Silicate - hardens quickly, does not change color and consistency under the influence of high or low temperatures, direct sunlight.
- Oily - perfectly tolerates the effects of liquid and sun, so it often covers the pool. Requires a long drying period and has low vapor transmission rates.
- Acrylic - protects concrete from mechanical damage better than other coloring compounds. It is safe for human health, does not create a bathhouse effect, and allows the cement screed to “breathe.” You can easily paint the base, flowerpots or floor with it.
- Latex - costs less, but also lasts less.
- Water-based emulsion is economical to use, inexpensive, and a huge range of color shades allows you to choose paint to suit any design. Disadvantages include low resistance to moisture, high temperatures, chemical compositions and mechanical damage.
- Rubber – amazing with elasticity characteristics, does not crack, but, on the contrary, stretches like rubber in accordance with temperature changes.
Advantages and disadvantages
Of course, in certain construction works, wood is virtually irreplaceable, in some cases it has unique properties, in others the ratio of advantages and disadvantages wins. However, regarding the construction of wooden paths, you need to understand certain advantages and disadvantages of wood. First, let's clarify the advantages:
- Environmental friendliness, it’s stupid to argue, but wood is one of the cleanest materials (excluding, of course, wood from contaminated areas, the same Chernobyl as an example).
- The thermal insulation properties of wood allow you to even run barefoot along such a path without fear of getting sick. But try to do the same with a stone or concrete path, the result will be the opposite.
- The material itself is cheap, especially since such a covering can be made literally from scraps of board left over from the construction of the same house.
However, there is another side to the “coin”, namely disadvantages:
- The main disadvantage is the lack of durability of such a coating. Of course, you can argue about this for a long time, but you need to understand that the service life can only be extended with the help of special protective materials and the like. When with brick, granite or the same stone, such problems do not arise at all.
- Problem with maintaining aesthetic appearance. It is sometimes difficult to keep track of a tree on a house, let alone on some garden path.
Therefore, determine for yourself what is more important and closer to you, and from there think about what material will look most preferable on your site.
Preparatory stage before painting concrete
Painting concrete begins with preparing the concrete base. If the quality of the concrete screed is lumpy, uneven, turning into holes and depressions, even a specialist will not be able to paint the surface beautifully with his own hands.
How to improve a concrete surface before applying a coloring compound?
- If there is dirt, debris, or untidy stains from various materials, use regular detergents.
- Dry the surface thoroughly; no liquid is allowed.
- If there are concrete chips, collect them and treat the resulting unevenness with special leveling compounds or putty.
- To ensure the surface is perfectly smooth, use a sander. This will not only increase the aesthetic appeal of concrete, but also increase the adhesion of one material to another.
- After sanding, the resulting crumbs are carefully removed using a vacuum cleaner or damp mop.
- The smallest specks of dust become a thing of the past with the use of a dust removal procedure, which involves applying polymer compositions to the concrete.
- It is advisable to strengthen the surface with a hardening agent.
- Apply Beolux Aqua or Grid primer, their advantages are quick drying and resistance to many factors and substances.
Types and types of wooden paths
Such a path will look organic in any garden, because wood is a natural material.
And to make it last longer, it is worth pre-treating it with special protective impregnations. They can be laid directly on the ground, dug in completely or halfway. The path will look more original if the parts are placed a little unevenly or at a short distance from each other. The gaps can be filled with earth or gravel.
Such paths may become overgrown with grass. If this is not to your taste, it is better to do some preparatory work. This will also allow the path to maintain its appearance longer.
Dig a trench along the length and width of the future path. Place geotextiles on the bottom, then compact sand, crushed stone and another layer of sand tightly. Place wooden pieces on top. You can also fill the gaps between them with sand or gravel.
The boards can be attached to a prepared base of concrete blocks and beams. In this case, the path will be raised above the ground, which will provide the tree with additional ventilation and extend its service life. And such a path will look very solid.
Stone paths will also fit perfectly into the interior of any garden plot. They will last for many years and will not deform.
Flat stones are laid either on cement mortar or on a bed of earth. The second method is suitable if you plan to make large gaps between the stones. In both cases, you need to first dig a trench.
Paths lined with gravel, pebbles or other small stones look original. To do this, you need to dig a trench, install a border, for example, made of stone, wood or metal plates, compact the bottom of the trench with sand and cover it with geotextiles. Place gravel on it in a dense layer.
This seemingly ordinary building material will make very beautiful paths. After all, it allows you to lay out all kinds of patterns.
To lay out the pattern, you need to dig a trench, install boards along it and compact crushed stone and then sand along the bottom. Bricks or paving stones are pressed into the sand layer, and the space between them is filled with sand and gravel.
How to make a garden path yourself →
The concrete path will delight your eye for a long time. You can make an ordinary straight path: dig a trench, install formwork, compact crushed stone and fill it all with concrete.
Or you can approach the process more creatively and create something unique and unusual. For example, make original concrete tiles with your own hands.
You can use special forms into which cement is poured. Thanks to them, the path will acquire an unusual pattern.
You can also buy special plastic tiles in stores. With its help, you can lay out an entire area in the garden, or you can design a neat path. This is done quickly and simply: you just need to connect the tiles together and lay them on a dense surface, such as concrete, crushed stone or compacted earth.
This design can be easily disassembled and, if desired, moved to another location. In addition, the variety of colors, shapes and patterns of such tiles allows you to create unusual, beautiful paths.
If you don’t want to thoroughly create garden paths, but want to add variety, then you can simply beautifully design already trodden paths.
To do this, you need to dig small trenches along them and dig or press boards, pegs, stones or bricks into them. Another option is to create a living border of low-growing plants.
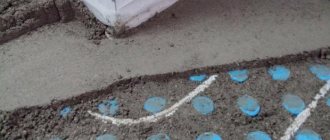
But the most unusual and practical way to visually design a path is to install small solar-powered lamps along it. During the day they will be charged from the sun, and at night they will illuminate your path and decorate your garden.
This option is perfect for decorating finished paths.
When choosing a material, consider the site. Well, if there is no place for designer “tricks” in your garden, go first of all, which I will talk about below.
Safety precautions
Even though painting concrete structures seems like a simple task, the risk of injury is quite high. First of all, you need to prepare the material and tools:
- All devices must be in working order. This is especially true for reused tools.
- You can only use paint that has not expired.
- For work at the top, you should use a ladder or stepladder.
- Painting should be carried out wearing protective clothing, gloves and a respirator.
- Paint and primer should be transported and stored only in closed containers.
Clothes must be removed upon completion of work. Wash off any paint that gets on the skin with a special solvent, then treat the area with warm water and laundry soap.
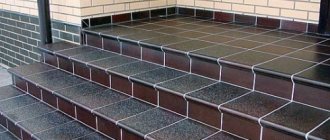
Painting concrete paths
Instead of the costly and labor-intensive process of constructing a garden path from natural stone, clinker bricks or granite pavers, rational and forward-thinking developers prefer paths made from concrete. The process of paving them does not require high qualifications in the field of construction and allows you to do all the work from scratch with your own hands. And if the garden owner paints the paved paths in stylish colors, then the path will fit perfectly into the surrounding landscape and give the landscape of the site a complete look.
Requirements for dyes
Concrete paint for street work should be selected taking into account the specific operating conditions. These are the ones you need to pay attention to when purchasing.
- Moisture resistance. The coating must prevent the penetration of moisture.
- Light fastness. Characterized by paint resistance when exposed to ultraviolet radiation.
- Fire resistance. The composition of the raw material should not ignite in a fire, much less contribute to the spread of fire.
- Vapor permeability. This property provides oxygen access to the surface and eliminates the accumulation of condensation on it.
- Adhesion. The intermolecular effect of the coating on concrete reflects how well the paint will adhere to the surface.
- Wear resistance. Due to the large mechanical and dynamic load, the endurance indicator must be high.
- Drying. The paint should dry for a minimum amount of time.
- Covering power. This indicator indicates the consumption of raw materials to cover 1 m² of surface.
- Temperature changes. The ability of the coating to withstand changes in air temperature.
- Manufacturability. Possibility of painting in a variety of ways.
- Resistance to pollution. The denser the paint, the less it will be exposed to contamination.
We invite you to familiarize yourself with Mortise locks for gates at low prices in Moscow
Expert answer
Concrete, although it is one of the most durable and hard building materials, is, unfortunately, very susceptible to the negative influences of the external environment. That is why, when manufacturing concrete products and structures using the industrial method, they are subjected to various methods of strengthening and protection.
All you had to do after arranging the concrete surface on the street was to saturate its surface with a water repellent. The fact is that the lion's share of destruction during the operation of concrete sidewalks, blind areas and garden paths occurs due to moisture penetrating into the micropores of the material. In winter, the liquid freezes and expands, creating many small cracks in the concrete structure.
This is what causes peeling, failure, swelling and other defects. The water repellent layer has a water-repellent effect, so the concrete coating lasts much longer with it. It is also important whether the foundation was properly laid out before laying the concrete. The presence of a good drainage cushion under the screed also contributes to its successful and long-term operation in the future. But, as they say, what’s done is done, and therefore all that remains for you is to repair the old paths and take into account your mistakes in the future.
We will not recommend laying paving slabs on the old surface, because for some reason you did not do this in the first place (most likely due to higher financial costs). And, nevertheless, such a reconstruction would be optimal in terms of appearance and durability.
We invite you to familiarize yourself with Sandwiches with red caviar - 7 simple and delicious recipes
In your case, you can make a repair screed at least 5 cm thick on top of the old concrete coating. This method is often used by home craftsmen, although it is not without its drawbacks. The most important of them is the presence of a so-called cold seam. With this concept, experts designate the plane of contact between dry concrete and fresh mortar. Due to the reduced coefficient of adhesion between the new and old coating, the frost resistance, moisture resistance and strength of concrete decreases.
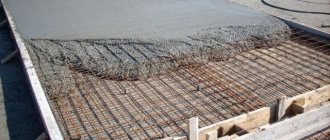
2.5 – for PC-400). The amount of water should be such that the solution is not liquid, and moisture appears on the poured surface only after careful compaction. It will be very good if you can find polypropylene or polyvinyl chloride fiber - adding it will create a reinforcement frame in the concrete structure and make it even stronger. Such concrete is guaranteed not to crack during operation.
A screed made from granite screenings (this must be a material obtained by sifting gray rather than white stone) and cement also has good characteristics. This composition is recommended by people with extensive practical experience in concrete work. The materials are mixed in a ratio of 1:3, without adding sand. As in the first case, you should ensure that the solution is not liquid, since excess moisture reduces the strength of concrete when it sets.
Filling the screed correctly is only half the battle. She will be able to meet your expectations only after proper care. To do this, cover the concrete with plastic film and spill its surface with water from a garden watering can 3-4 times a day. Such procedures should be done within the first 6-7 days. Complete setting of concrete occurs after 4 weeks.
As you can see, the work ahead is serious. And, nevertheless, if you do everything correctly, you will return the old concrete surface to its original attractiveness, and most importantly, make it strong and durable.
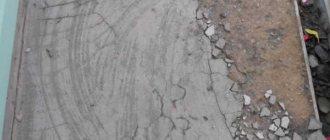
Strength and durability: how to protect concrete pavement from destruction
Concrete is negatively affected by excessive water saturation, cold temperatures, salts and acids.
The environment can greatly damage the surface of concrete, so it is extremely important to eliminate or minimize the influence of these factors. To do this, the material will need to be treated with special impregnation or other solutions. The destruction process may intensify if the considered criteria simultaneously affect the street area. Thus, regular exposure to moisture and low temperatures will lead to greater damage than if these factors acted separately. Protection of concrete from moisture must be timely, otherwise cracks may appear, which will be quite problematic to repair in the future.
Three years ago, the yard was concreted, 100-150 mm thick, without covering anything on top. Now the destruction of concrete has begun. Tell me what can be done, how to save the concrete from destruction, if you are making a screed, what should you add to the solution and what should you cover it with?
Paint manufacturers
When choosing a coating, you should focus on such characteristics as:
- color fastness;
- environmental friendliness;
- frost resistance;
- moisture resistance.
Finnish is one of the most famous on the Russian market, in great demand. The products of this company can satisfy the requirements of any consumer. Acceptable quality and competitive price are characteristic of the domestic enterprise VGT. The paint has good adhesion and can be used at low temperatures down to -10 ºС. The range of application of the coating is extensive.
The paint of the Slovenian company Belinka has minimal susceptibility to any contamination. The coating repels water and dirt and prevents condensation. It can be tinted in rich and pastel colors. Due to the most economical consumption of raw materials, Dulux brand products are popular. Latex emulsion and special additives prevent fungal colonies and salt stains from appearing on the surface. The paint is harmless and easy to apply.
How to paint a concrete floor outside to avoid dust: photo
Concrete surfaces, despite their strength, are susceptible to destruction from time to time. One of the ways to delay this process is by painting the material. We will try to find out how and with what to paint a concrete floor outdoors, as well as indoors, in this article.
Do-it-yourself concrete floor painting
Materials
Epoxy paint
For concrete floors, epoxy is used, the price of which most often depends on the manufacturer, since it:
- serves reliably for a long time;
- extends service life;
- gives the surface an impressive appearance.
- withstands heavy loads and is resistant to chemical influences.
Epoxy coatings adhere well to surfaces, so they are used for painting floors even in:
- auto repair shops;
- production workshops;
- parking lots and stairs.
It withstands adverse weather conditions well, so it can be used to cover open areas. The material adheres well even to fresh, not completely dry surfaces, which improves the quality of the floor.
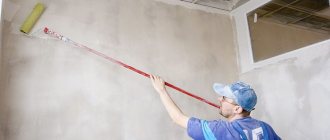
Painting the floor with a roller yourself
| Positive sides | · adheres well to the coating; · does not change color over time; · withstands various chemicals well, resistant to solutions of salts, alkalis, acids, as well as fuels and lubricants; · environmentally friendly; · has good waterproofing properties. |
| Flaws | · when repainting, it will be difficult to change the color; · the paint must be mixed before use, since it is two-component. |
Tip: It is best to paint surfaces twice.
Paint hardening time is 12-24 hours.
In the photo - epoxy paint
Characteristics of acrylic dye
Acrylic dye is a water-based structure based on acrylic resin, to which various polymers are added.
It forms:
- protective film on the floor surface;
- protects the floor from various mechanical and chemical influences;
- prevents destruction of the floor.
It can be used to paint floors on balconies, stairs, basements and garages.
Pros of acrylic paint:
- resistant to atmospheric changes;
- environmentally friendly;
- protects surfaces well;
- dries quickly;
- waterproof and moisture resistant.
Surfaces can be painted with a sprayer, roller, or brush. One coat of paint will be enough. Dries in about 12-24 hours.
Matte acrylic paint
Tip: to dismantle concrete structures, as well as to cut grooves in the floor, cutting reinforced concrete with diamond wheels of the required density is used.
Polyurethane enamel
This two-component material is intended for treating surfaces inside and outside buildings.
Benefits of enamel:
- the product is harmless to others;
- tolerates atmospheric changes well;
- economical to operate, you can paint a large area;
- has durable painted surfaces;
- has a low price;
- Suitable for metal and wooden surfaces; asphalt can be painted.
Enamel has one drawback - it takes a long time to dry.
Polyurethane enamel
The instructions recommend painting surfaces with enamel at temperatures up to +5˚С. When starting painting work, you need to stir one component of the paint, then add another and mix again. After this, you can paint the surfaces.
It is recommended to paint the floor twice - the first time with a thin layer and repeat the painting a day later. It dries in the range of 2-14 days. After 2 days you can walk on the floor, the paint does not stick. After a week the layer becomes mechanically resistant, after 2 weeks it becomes chemically resistant and suitable for use.
Advice: making channels for communications in a finished reinforced concrete floor is very problematic, but diamond drilling of holes in concrete with crowns of the required diameter will help you with this.
Primer
If it is not possible to paint the floor, it can only be treated with a primer. It is used as a pre-treatment before painting, and as simply protection without subsequent painting.
Concrete primer to prevent dust
The following primers are available for concrete coatings:
- epoxy;
- polyurethane.
Polyurethane primer:
- densely fills small pores;
- has good connecting abilities;
- Resistant to chemicals, oil, gasoline, fats, detergents, and precipitation.
Advantages of the material:
- improves the adhesion of the finishing layer;
- applied with a brush or roller;
- saves finishing coat consumption.
The primer is used before painting surfaces with polyurethane enamel, since the composition of the primer and paint is identical.
Tip: Before you paint your concrete floor, you need to sweep it.
Treat surfaces using a paint brush or short-haired roller. The primer must be applied evenly over the entire surface.
If it is unevenly absorbed, you can paint the floor again. You can apply paint to the primer after 12 hours, as the latter must dry.
Tip: Do not apply paint to wet surfaces.
Two-component primer
Epoxy primer is applied to concrete surfaces before painting them with epoxy paint. You can simply treat concrete with it without subsequent painting. It reliably clogs all pores and cracks, strengthening the floor.
Among the positive qualities are the following:
- waterproof;
- water resistance;
- strengthens surfaces;
- improves adhesion to paint;
- resistant to water, mechanical wear and chemicals.
Apply the epoxy primer to a clean, sanded and dry surface using a short-nap roller or rubber spatula. Since it loses its qualities after 20-30 minutes, you need to work with it quickly.
Conclusion
From the article it became clear that to protect concrete it is worth using paint and primer. You learned when, how and what to do it with, as well as what materials to use. The use of paints makes it possible to increase the service life of the coating, which will save on its repair.
The video in this article will help you find additional information on this topic.
masterabetona.ru
Step by step painting instructions
The old concrete base must be dry and durable, it must be processed according to the following scheme:
- Remove all detachments, clean off mold and mildew.
- Blow off the surface with compressed air.
- Fill cracks and potholes with cement-sand mortar or repair mixtures.
- If the condition is unsatisfactory, remove old oil paint using a hair dryer or grinder.
To apply paint, you can use cotton or foam swabs. Brushes with natural bristles are suitable for acid stains and polyurethane varnishes. Synthetic brushes can be used to apply all types of water-based paints.
To treat large areas, use fabric rollers or a spray gun.
Brush painting technique
When using new or old brushes, be aware that bristles may fall out during painting and remain on the finished surface.
To prevent such situations, before work, brushes must be stretched with your fingers and blown with air, then dipped in paint and checked for quality on a piece of cardboard.
To paint horizontal substrates, medium-sized flat (flat) or round brushes are most often used. The length of the bristles and the width of the tool are selected depending on the surface area, the chemical composition of the emulsion and the thickness of the paint and varnish material.
Adjustments must be made until the tip of the tool becomes wedge-shaped - it allows for more precise painting and does not go beyond the boundaries of the surface being treated.
After preparing the tool, dip the brush into the paint up to the middle of the bristles, then wring it out and begin painting work. The emulsion should be applied to the concrete surface slowly and evenly, blending thoroughly. The final pass is made parallel to the long edge of the structure.
Subtleties of working with a paint sprayer
Before starting painting, you need to adjust the nozzle to the most efficient operating mode, fill the tank with emulsion, turn on the spray gun and check the quality of the applied layer on any flat surface (sheet of plywood, cardboard, etc.).
Painting a concrete path should begin from the nearest area. The movement of the spray gun when spraying should occur in several directions - forward (away from you) and from left to right at a distance of 15-20 cm from the surface to be treated. Each subsequent layer should overlap the previous one by 3-5 cm.
The composition must be applied in sections 60-90 cm in length. It is not recommended to paint the entire base area in one pass - this may lead to uneven distribution of paint over the surface of the path.
When working with a spray gun with a bottom liquid supply, you need to ensure that the emulsion does not block the air pipe when tilting the tool.
The sprayer should not describe an arc of too large a radius during movement or be strongly inclined towards the base. Failure to comply with these rules will lead to the appearance of dark stripes and spots of different shades on the treated surface.
Application of a roller
For flat horizontal surfaces, the most effective painting method is with a roller. To make work easier, the roller can be extended using a telescopic rod, which is inserted into the hollow part of the tool handle.
Before starting work, the fabric surface of the roller must be impregnated with a colored composition. To do this, the tool is lowered into a bucket of emulsion and squeezed on a plastic grid that is attached to the paint container. Then take a piece of plywood and run a roller over it several times until the cover is saturated with paint.
After completing the preparatory procedures, they proceed to processing the concrete surface. The application of the composition begins from the far left end of the path and gradually approaches its edge in a back-and-forth motion.
Each subsequent layer of paint should cover the previous one by a quarter of the roller length.