Features of the material
Ceramic tiles are the most common material for use in water-related areas. Ceramics have been known since ancient times and are actively used in baths, saunas, hammams, showers and bathrooms.
The tile perfectly isolates the rough surface or other base from the influence of humidity. At the same time, the tiles combine well with any material - there are known cases when they are laid even on wooden floors.
Characteristics of ceramic slabs
- Easily retains and transfers heat, due to which it is used in conjunction with heated floors;
- Does not allow water to pass through;
- Easy to clean with water or special products;
- Large selection of colors and patterns;
- There are both inexpensive models and skillfully finished specimens;
To select tiles and preview, use the bathroom tile layout catalog. You can find a suitable design and evaluate the natural look from the photo of the tile layout in the bathroom.
Taking into account the size of the bathroom
When choosing material and layout, adhere to the following rules:
- In a small room, medium-sized tiles, for example, 15x15 or 20x20 cm, are appropriate. Large ones here will emphasize the lack of space, and mosaics will have the same effect - due to the abundance of seams.
- In a spacious bathroom, both small and large tiles look harmonious.
- For a compact room, glossy tiles are preferable - they visually make it more spacious. In a large bathroom, you can install matte cladding: unlike gloss, it does not show drops, stains after wet cleaning, or finger marks.
- When decorating small rooms, avoid dark colors. Light ones are needed here - they create the illusion of space. The same effect is achieved through a smooth transition from dark shades below to light shades above.
- In a larger bathroom, colors are used more freely. Sharp transitions and bright, rich colors are appropriate here.
- In the decoration of small rooms, the presence of a large number of decorative elements is undesirable: all the objects here are located close to each other, so the interior will be overloaded.
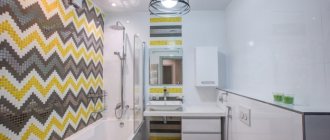
- laying tiles in cool colors: gray-turquoise, silver, blue;
- formation of a horizontal pattern on the walls;
- diagonal laying of floor tiles;
- border in contrasting color, friezes near the floor and ceiling.
The following techniques visually add height to the ceiling:
- vertical laying or pattern;
- vertical friezes;
- highlighting corners with color;
- placing decorative elements at eye level or higher.
Options for laying out tiles in the bathroom
The most difficult thing is not to choose the tiles and buy all the necessary materials, but to correctly calculate the tiles for the bathroom with the layout.
Good tile installation allows you to avoid unsightly trims, unnecessary use of material and external corners.
If an experienced craftsman takes on the job, he will be able to lay even inexpensive tiles so that they look as if the bathtub was created for it.
Color features of tile layout
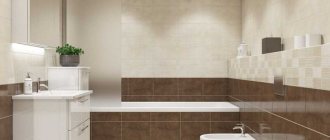
A classic and fairly common solution is to decorate the top part in a light color, and the bottom in a darker color, using a clear border line. However, this layout option should not be used in a small bathroom. In such rooms, plain tiles in beige, olive, light brown, gray or white tones will look better.
When decorating a small bathroom with two-color cladding, it is advisable that the selected elements do not contrast too much with each other.
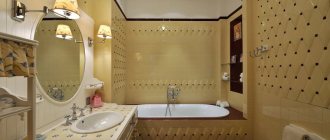
The photo shows a beige hog tile with patchwork style inserts on the walls in the bathroom interior.
Types of installation
Laying methods can be roughly divided into three separate components:
Incorrect placement from the corner. In this case, one whole tile is installed in a corner, where it is connected to another wall. The entire row and wall are laid out from it, and the last tile in the row is cut to fit the remaining space. This results in unsightly thin trimmings on one edge of the wall in many rooms.
Laying from the center. The first slab is positioned so that its center corresponds to the center of the wall. Next, the row is laid out until there are equal empty spaces left at both ends of the wall. The same trimmings are inserted into them, which looks much more harmonious.
Correct layout. The row is again laid from the center, as in the second option. But one slab in a filled row is removed without cuttings, and the entire line is aligned in the center of the wall. The remaining identical sections are filled with cut slabs.
Which method to choose and why
In the first option of “wrong” installation, uneven sections will appear at one end of the wall. However, since the cutouts are located only in one corner, the wall will look strange and geometrically incorrect.
This method is used only by inexperienced craftsmen who do not want to cut the slabs again. The customer is left to admire the annoying shape of the wall for ten years until he makes repairs.
The third option is the most preferable, since it is the one that will leave large and beautiful pieces of tile on the sides of the wall.
Source
Classic bathroom tile layout
Classic methods of arranging tiles on the walls and floor of a bathroom include symmetrical laying without displacement. Such options are simpler and do not require serious calculations, especially if large elements are used. Although small products with a side size of 10-50 mm can be used to create a design, this makes even the classic layout original, but also increases the time it takes to complete the work.
Vertical and horizontal layout
The option with vertical stripes increases the height of the room, but also visually makes the bathroom, shower or toilet more cramped. The method is not recommended for small and narrow rooms. Although combining a vertical arrangement with horizontal laying can partially compensate for the effect of narrowing.
By arranging the stripes vertically, you get different styles:
- along the entire height of the bathroom;
- stripes starting at a certain distance from the floor;
- lines that break before reaching the ceiling;
- several stripes starting and ending at different heights.
You can create horizontal lines from several rows of tiles. Place the strips at the bottom or top of the walls, in the center or along the entire height. There can be several of them, and each can have its own color. If there is only one line, then the higher its location, the more voluminous the room appears. Modern bathrooms are often decorated with one wide dark stripe in the center of the walls and light background tiles.
Border
When choosing this method, 1-2 rows of floor tiles extend onto the wall. It turns out that there is a small strip in the lower part of the room. The technique visually increases the width of the room, but reduces the height. The stripes do not have to be placed along the entire perimeter, especially since in this case they will be partially covered by plumbing. It is enough to make a border on only 1-2 walls, choosing tiles in contrasting colors.
When decorating a modern bathroom, the technique is used less frequently. After all, her additional task, in addition to expanding the area, was to save on cutting tiles. Now, to obtain a height that is a multiple of the size of the tile, it is enough to use a suspended, suspended plasterboard or plastic ceiling, installing it at a suitable level.
Darker bottom
This classic installation method assumes that the tiles in the lower third of the wall will be darker, the remaining part will be made lighter. Now this option is considered not very fashionable. Although it can be made more modern if you lay out the lower part with tiles that match or are similar in color to the floor tiles. For example, a jade bottom would go well with a green floor.
Another way to make your design more original is to add horizontal or vertical stripes. With their help, the layout is not so monotonous and no longer resembles a border. To obtain horizontal lines, you can use elements of different heights or several rows of tiles.
Accent wall
If you don’t want to divide the room by height, you can choose another interesting option. It involves decorating three walls with plain tiles, and the fourth with tiles similar in color, but differing by several shades. For example, on one side the bathroom will be lilac, and the rest of the wall decoration will be purple. The method is well suited for narrow and elongated bathrooms, as it makes the shape visually closer to square.
To create an accent wall, it is not necessary to place elements of the same size. Three walls decorated with large square tiles and one wall decorated with small tiles look good in the interior of the room. Mosaics, which can be combined with any formats and sizes, are also suitable for this method.
Types of tile layouts
There is a huge selection of types of tile layouts, each of them has its own advantages. How to make the right decision that's right for you? Let's look at the main types.
Vertical and horizontal
These are two classic ways to lay tiles. The advantage is that when choosing these methods, you can visually change the appearance of your room; when using vertical installation, the room will appear taller, and horizontal - wider. It is worth noting that to achieve these effects, you should use light tiles with contrasting grout.
Diagonally
One of the complex and unusual options is the diagonal layout. In this method, the tile rows are not laid parallel to the walls, but at a certain angle, the standard is 45 degrees. An effective and beautiful way, but you will have to cut a lot of tiles. It is worth noting that this choice is not suitable for every bathroom. For a large room, with the right choice of tile color, you can hide almost any imperfections in the layout, but when used for a small room, on the contrary, it can highlight all the imperfections and even visually reduce it.
With offset
This layout option resembles brickwork. When laying, it is important to ensure that the middle of the tile coincides with the vertical seam of the previous row and that the thickness of the seams is the same. This original method will avoid monotony and hide minor flaws. For this installation, it is best to use rectangular tiles.
Herringbone
An ideal choice if you decide to lay tiles that imitate parquet. This method uses small rectangular tiles, which are laid by joining the narrow side to the wide side, forming an angle of 90 degrees. At the same time, ceramics laid out in this way can look completely different depending on the variations. Herringbone styling can be:
Another difficult but original way. When it comes to choosing tiles, it is important that all sides are multiples of each other. There are no restrictions on the selection of colors, the main thing is that they combine well. It is also important to use grout that contrasts well with the tile itself. It is laid out chaotically, but the drawing should still show a certain rhythm of alternating fragments of different formats.
However, with all the advantages of this installation, it is worth noting that the wrong size of the seams can negate all the work. And this will become noticeable after laying a decent amount of tiles.
Another problem that you may encounter is the number of tiles. Since tiles of different sizes are used, it may happen that there will be more of one format, but on the contrary there will not be enough of another, it is worth considering with the seller about a possible return or exchange of one or another format for another.
Ways to combine tiles
Fashion for bathroom design is constantly changing, and classic tile layouts and combinations are used less frequently. Modern methods include other styles - honeycombs, ornaments and kaleidoscope (patchwork). Original techniques such as mosaics are also popular, with which you can create drawings in the style of abstractionism or surrealism. This emphasizes the design features of the room, making its decoration unique.
Lines
The method of placing the tiles resembles a border, but the wall is divided into parts not at floor level, but at any height. The colors of the lines can be the same, differ by several tones, or be completely opposite. To create stripes, whole tiles and their trimmings are used.
It is allowed to lay out the tiles so that the lines are vertical, separating the door or sink from the main background. But in appearance, such a scheme seems unusual and not very logical. Laying lines staggered is also not recommended. It will attract attention, causing a slight feeling of discomfort.
Carpet
The installation fits well into a large bathroom. For a small room, it should be chosen only if the walls or floor are not cluttered with furniture and plumbing. The meaning of this layout is to highlight one or more zones with rectangles made of tiles of a different color. Inserts can consist of 1 tile, 2, 4 or any other number, depending on the size of the fragments and the room.
Using this method allows you to get a unique interior. However, in order for the bathroom to look beautiful, the work is carried out in accordance with a pre-drawn diagram. It is recommended to use at least 3 shades, tiles with ornaments and ornate patterns, and decor of various widths.
Basic layout options
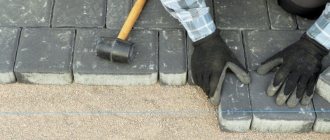
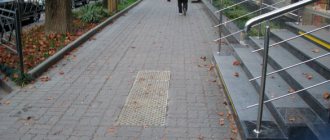
The above installation methods are relevant not only for floor or wall tiles, but also for paving tiles. Before purchasing facing building materials, you should understand the layout methods. This will allow you to make accurate calculations on the amount of raw materials needed for work. It is also worth considering the fact that some of the products will break, and there may be defects in the batch, so experts recommend keeping a small supply.
Base
The classic masonry method is the easiest to implement. It can be used for finishing floors and walls. For work, square and rectangular tiles are used. The lined surface visually looks like a standard checkered sheet, and the seams resemble lines. The essence of this method is to lay out all the elements in even rows, joint to joint, while the edges of the material used must be parallel to the corners of the room.
During work, the layer must constantly monitor the evenness of both horizontal and vertical seams. Also, installation difficulties may arise if there is a pattern on the surface of the product. High-quality masonry looks quite attractive and is found in many interiors. This technique is the most economical in terms of consumption of building materials; a minimal amount of pruning is used here.
In the dressing
The offset method is also standard. Externally, the masonry resembles brick. The material is laid in even horizontal stripes, but unlike the previously discussed option, the seams of each next row are shifted by half of the tile compared to the previous one. Visually, you can see that each individual block on top lies on two lower ones, and if you extend the seam upward, it will divide the upper element into two identical halves.
When working, preference is given to rectangular products. The main rule of masonry is that the middle of each element must coincide with the vertical seam of the previous or next row. This method allows you to install tiles of lower quality, and the requirements for precise dimensions are reduced. Small deviations are almost invisible. However, it is not recommended to use material that is different in color or texture.
Diagonally
This technique is based on the classical method. The only difference is the arrangement of the elements at an angle of 45 degrees relative to all angular lines of the plane on which the installation is performed. Square tiles are used for work. The color can be monochromatic; plates with a pattern are also used. In the second case, it is more difficult to connect all the components.
This is one of the most difficult layout methods, which requires a certain amount of experience from the master. Installation of finishing material begins from the corner. The first row is a tile cut diagonally. After laying two isosceles triangles, move on to the next line. The seams should intersect at an angle of 90 degrees. You can check their evenness using a laser level.
The diagonal method allows you to visually expand the space and gives the room an unusual, unique look. The main disadvantage of masonry is the large amount of trimming. After installation work there will be a lot of waste. It is recommended to purchase raw materials with a 15% reserve. Particular attention should be paid to the quality of the finishing material; the sizes of individual blocks should be the same.
Checkerboard
The tiles are laid using the basic or diagonal method. In fact, this technique is a variation of them. The only difference is that the work uses plates of two different colors, which alternate with each other like squares on a chessboard. You don't have to choose a black and white layout. You can combine any shades, use material with different patterns.
Modular
One of the most interesting masonry methods. To implement this, you will need blocks of different sizes. At a minimum, three standard sizes are used. The ratio of elements to each other should be 1:2, 1:4. Layout is a creative process that results in a geometric pattern. Installation can only be carried out by an experienced specialist; the work requires extreme care and accuracy.
When purchasing material, it is best to give preference to tiles with special markings, which are intended specifically for modular installation. In ready-made kits, the individual components correspond exactly to each other. The texture of the plates must be uniform, the colors may be different. By combining several types of elements, you can get a unique design that will decorate your bath or kitchen.
"Herringbone"
For work, rectangular tiles are used. Use plain products that imitate parquet or natural stone. When arranging a kitchen apron, bathroom, or bathtub, you can use special hog tiles. It is laid out in two ways, in a dressing or in a herringbone pattern. Modern material has an elongated rectangular shape with beveled chamfers (facets), which give it a unique convex appearance.
Elements should be laid out in a certain way. All tiled blocks are joined together with a narrow and wide side at an angle of 90 degrees. In this case, all plates in relation to the walls are turned at an angle of 45 degrees, located diagonally. There are English, French, and Hungarian installation schemes. Tiles are placed on the walls only in a horizontal position; a vertical layout can ruin the appearance of the room.
Deck
The styling is very easy. The deck method of laying out is a variation of the dressing method. The only difference is that the modules in adjacent rows are shifted not by half their length, but by only one fifth or sixth. Mainly used for floor cladding. The most commonly used building materials are those that imitate natural wood. This is a good decor option for the hallway of a room. Allows you to hide the shortcomings of low-quality tiles of different lengths.
Linear
The tile laying pattern is similar to the basic version. For work, tiles of the same size are used, but of different colors. Building material of one color is located in one row, another in the next. The lines can be straight (horizontal, vertical), placed diagonally, solid or broken, crossed and interrupted. The main condition is the combination of the selected shades with each other.
Labyrinth
This technique is also called braiding. For work you will need square and rectangular tiles. The design is created by weaving straight stripes around a light or dark square. It is very difficult to choose the correct sizes of all elements. Experts recommend laying out a ready-made sample from the purchased materials at the purchase stage. Square blocks should be exactly half the size of rectangular ones.
Ornament
Using tiles of different colors, you can create a whole carpet of tiles. In the center there can be a flower, a complex ornament, large and small, simple drawings. To create a beautiful coating, blocks of three or more shades are used. Before laying, a sketch of the planned image is made, on the basis of which the tiled cladding is formed. This design is suitable for the hallway and bath.