Let's imagine a completely ordinary situation. You need to make horizontal markings on the wall and you are certainly wondering, what is the best way to do this? After all, it is necessary to avoid even small deviations and obtain a flat surface as a result.
A water level, also called a hydro level, can help in solving this problem. This article will tell you how to make a hydraulic level yourself and how to use it at home.
First, let's define the appearance of this instrument, which is often also called a “spirit level.” Its design does not have any difficulties. It consists of a transparent and long hose, with a diameter of 0.6 to 1.5 cm, at the ends of which there are two measuring flasks with divisions marked on them.
DIY water level
It won’t be difficult to make a hydraulic level yourself. To begin with, we purchase a hose at least 10 meters long. We measure the same distance from the ends of the hose and put marks. Pour water into the hose. Have you ever had to suck gasoline out of your tank? Here it is, the same principle. Of course, a “spirit level” is sold in hardware stores and costs about 150 rubles. But, if you want to make it yourself, then go ahead.
When working with a hydraulic level, perfectly accurate horizontal markings are obtained due to the fact that this tool uses water.
Attention!
There is one important point. The hydraulic level may incorrectly show the points you need if it is not properly prepared. Therefore, after filling it with water, it is necessary to release all air bubbles from it. To do this, you need to find the approximate middle of the hose, press it down with your foot and lift the two ends up. Air bubbles, of course, also rise up. And so on, by analogy. Place the place where the air has accumulated, lower it to the floor, step on it, lift it up... until all the bubbles reach the end.
How to use a hydraulic level?
Well, your tool is ready for work and now how to use the hydraulic level?
The operation of the device is based on the principle of communicating vessels, in other words, the levels in the two flasks at the ends of the hose must coincide with each other. In this case, the line will be straight. Let's look at the operation of the device using an example. We make markings for the future floor on the joists. On the wall, measuring a meter from the floor, we make a mark. Now, we apply the “spirit level” to this mark with one end, and place the other end in the other corner of the room. This procedure must be carried out by two people, or you can use masking tape to secure the first end of the hose.
How is the level determined directly? The bulb near the first mark remains motionless, and the position of the second bulb needs to be adjusted. And so, when the water level in the first test tube coincides with the mark on the wall, you need to make a mark at the water level in the test tube at the other end of the hose, that is, on the other wall. Using this principle, you need to determine the remaining points. And when a sufficient number of marks have been applied, you need to connect them into a line. Now, you just need to measure down from each mark, for example, 95 cm and apply marks along the entire perimeter, and then connect them again with one line. That's all. Marking with a water level for the floor on the joists is complete!
Water level. How to use?
Theodolite - a detailed description of the device and its types. For example, when you use a hydraulic level during construction or repair, the law of communicating vessels, formulated by the French scientist Pascal, works. Anyone who has had to deal with construction or serious repairs at least once knows exactly what a construction hydraulic level is and how to use it.
For those who have never encountered such a device before or prefer modern analogues: an optical level or a laser level, we note that man has not yet come up with a simpler and more reliable tool.
It is necessary to determine the horizontality of certain structures and lines, that is, precisely for what responsible builders often do to ensure that surfaces do not deviate from the standards.
Refilling the water level. Video
During the construction or repair process, one of the main criteria for assessing the quality and reliability of the work performed is the evenness of the planes and lines relative to each other. Strict adherence to horizontal and vertical is the basic rule for a builder, therefore, to achieve this, a construction tool such as a level is widely used.
In modern construction, high-precision laser levels are used, but along with them, many professional builders still prefer the old, proven and easy-to-use hydraulic level.
Despite its simplicity, a beginner, for example, will need to understand its structure, operating principle and the nuances of its use at various construction stages.
Types of measuring instruments based on liquid level
Several measuring instruments that are used in construction work using the principle of the fluid equation, namely:
- hydrostatic device of the simplest design.
- bubble level
- model used for pipes.
The first type is widely used in construction both by beginners, when carrying out home renovations, for example, and by experienced and professional representatives of the construction professions. It is not difficult for a beginner to understand how to use a hydraulic level.
It is interesting that such a device weighs about one kilogram after filling the flasks with water, and the empty device weighs about three hundred grams.
When filling the device with water, you need to take into account the fact that this must be done carefully and efficiently, since this affects the accuracy, you need to make sure that there are no air bubbles left in the device.
As for the bubble level, it works on the basis of air bubbles in flasks that are filled with a special liquid. On the ruler, the air bubble should be in the center, which will indicate a flat vertical or horizontal surface.
But the pipe models mentioned above, equipped with a magnet, are used mainly when laying utility networks: water, gas, sewer pipes and profiles. They are easy to attach to a support or pipeline due to their shape and magnet.
What is a water level
We all remember from school physics lessons the law of communicating vessels, the famous scientist of his time Pascal. So, according to this law, in interconnected containers the levels of liquid, which is homogeneous, are equal. Based on this law, let's try to figure out how the hydraulic level works.
In order to measure the horizontal between two points that are distant from one another in relation to the surface of the earth, a simple device is used - a water level.
Its structure includes a transparent flexible hose, at the ends of which there are two flasks with a special scale. It is noteworthy that the length of such a hose can range from 3-4 to 30 meters.
Flasks or hose ends are control vessels, and by the position of the water in them, you can determine the level of the plane relative to the horizon.
How a water level works - let's figure it out!
To understand how the hydraulic level works, you will have to remember the school physics curriculum. No, not all of them, of course, only the law of communicating vessels, Pascal’s law. Do you remember? In communicating vessels, the water level will always be the same. Look into the kettle - the water in both the spout and the main container is at the same height. If you tilt it, the water will react, but the levels will still remain the same. And one more thing: pour water into a transparent glass with a horizontal pattern so that the liquid reaches one of the lines. If you place the glass on a flat surface, the water will confirm this by touching the lines, and if you place it on something inclined, the liquid will instantly react and show the level of inclination.
In general, you can trust the water, it will not deceive! And, once in the hydraulic level system, it will allow you to quickly make horizontal marks.
To answer the question frequently asked in search engines: “hydraulic level, how to use”, we will need to carry out some simple preparation. Some transparent hoses, which, as you know, are the basis of spirit levels, may contain slight residues of oily liquid inside, which will interfere with the accuracy of measurements. To remove this deposit, it will be enough to pass a warm soapy solution through the system.
It is not recommended to fill the water level from the tap, as it will be rich in air bubbles, and you will have to spend time releasing them from the system. Many craftsmen first pour water into a bucket, and from there, immersing one end of the hose, draw water through the other end with their mouth until it flows freely. After this, the system is carefully checked for air, since bubbles will not allow you to take correct readings, so they need to be removed.
Most craftsmen prefer to work with a spirit level together; this is indeed convenient and speeds up the process. However, if you are working alone at your construction site or in an apartment being renovated, this does not mean that you are in a hopeless situation and work will have to be postponed. You just need to attach a fastener, for example, a wire hook with tape, to one of the ends of the hydraulic level system, let’s call it number 1, and then hook it, say, to a stepladder - today it is your partner and assistant. At this moment you close the second end of the spirit level, we call it number 2, with a lid, and if it is a simple hose, then simply plug it with your finger so that the water does not spill out.
We transfer the mark near the water level under No. 1 using a pencil or marker to a wall or other surface. With the second end of the system, move to the opposite corner or wall and transfer level #2 to the surface. Repeat this operation as many times as needed. When you connect the existing marks into a single line using a construction ruler, you will get the ideal horizontal level in your room or structure. Already from this you can build a line for arranging, for example, a floor or ceiling that is perfectly level from a horizontal point of view.
Features of the water level
It is worth noting right away that if you hit a horizontal line together, this will save a lot of time and effort, although this process can be mastered alone.
Using this tool, it is only possible to check the evenness of the horizontal surface, but it will not be possible to check the vertical.
Since the main substance in the hydraulic level is water, work can be carried out at above-zero air temperatures. The final accuracy of the indicators depends on the quality of filling this device with water.
The water level, also known as a spirit level, is often used by masons when doing masonry, in this case it is quite informative. They can work outside, mark horizon lines at different angles, be used for their intended purpose in difficult places, and align points that are far from one another.
The spirit level is very simple both to use and to manufacture, so the question arises of which hydraulic level to choose: factory or homemade.
If you decide to make your own spirit level, this is quite normal, because you can save money by doing this, especially if you already have the necessary materials. To do this, you need to use a transparent hose with a dense wall to ensure free movement of water and protect against kinks.
The optimal length of the level is approximately 10-20 meters; it is better to calculate it based on the size of the application area. If you have a hose of the required length on your hands, you are already close to a ready-made simple spirit level!
You just need to add water and, by bringing the ends of the hose close to each other, make sure that the liquid levels match.
Another option, namely buying a ready-made factory product in a store or on the market - a hydraulic level - will practically not be difficult, since you only have to decide on the size of the product, based on the size of your space. Before going to the store, we recommend viewing photos of the hydraulic level, for example, in our gallery.
Photo of hydraulic level
During construction work, the need often arises for the simplest device, with the help of which it would be possible to quite simply and accurately make horizontal markings of a particular structure. It turns out that you can get fairly even markings (with a minimum deviation from the horizontal) using the simplest tool - a water level, sometimes also called a hydraulic level. In this article we will consider the question of what this measuring tool is made of with our own hands and how it should be used in everyday work.
In appearance, this simple instrument, also called a “spirit level,” is a hollow transparent hose of a certain length and a diameter of about 1-1.5 cm, on both ends of which control marks are sometimes applied.
First of all, we note that such a spirit level is sold today in any construction tools store and is quite inexpensive (about 150-200 rubles). But if time is running out and you have everything you need at hand, it’s faster and more convenient to make it yourself. To make a level, you only need a piece of hollow transparent hose of appropriate length and a suitable coloring material (marker, felt-tip pen, etc.), with which you can apply control marks or lines on the hose itself and on the objects to be marked.
As you fill the hose with water, be sure to get rid of the bubbles that form during the filling process (using a syringe, for example), after which you can begin marking the levels you need.
The operation of the device you have made is based on the well-known principle of interaction between two communicating vessels. In accordance with it, when the water levels in two interconnected parts of the vessel coincide, the marks measured on the scales have the same distance in height from the point taken as the initial level. Due to this coincidence, it is possible to obtain points on the marked surface that are equally spaced in height from the conventional geographical mark, taken as zero.
After making a water level, you will be able to obtain the same height marks approximately as follows (as an example, we will consider the case of setting the location of the floor joists):
- First of all, on one side of the working wall we mark the starting marking point at a height of approximately 1 meter. At this level you will need to draw a clear horizontal line.
- Then we apply one of the ends of our tool to the previously made mark and secure it there with tape (or we resort to the help of another person).
- We transfer the second end of the spirit level to the other side of this wall and apply the final section of the tube to a place approximately corresponding to a height of 1 meter. We adjust the height of this end of the hose so that the water level at the opposite end coincides with the previously drawn horizontal line.
- The resulting water level mark at this end of the device will give us the desired height. In the same way, you can set all intermediate marking points, which are then connected by one solid line.
Upon completion of these operations, all you have to do is measure down the required number of centimeters from the resulting marking line and mark the location of the floor joists along the entire perimeter of the room.
Construction hydraulic level
When constructing stoves, and indeed during any construction work, at some point it is necessary to determine the horizontal location of a particular surface, line or structure. An ordinary bubble building level (see here) is quite suitable for these purposes, but its disadvantage is that the greater the distance between the points of determining horizontality, the greater the resulting error. In such cases, professionals use a special device - a level; you can also use a laser level. However, the level requires certain preparation and is not convenient for working with small volumes and areas. A household laser level can also operate with significant errors. This is where we move on to the main topic of this article - a tool called a construction hydraulic level .
Another name is spirit level. This is the oldest simple and accurate instrument for measuring horizontality, based on the principle of communicating vessels filled with water. Strictly speaking, horizontality is a rather vague concept for the common man. The level of the world's oceans is always horizontal, the state of water in any vessel and any puddle is horizontal, and water under any circumstances tends to this state, to the level of the horizon. The figure shows two transparent flasks connected to each other by a transparent hose and this entire structure is filled with colored water. Based on the above, the water in this device always tends to be horizontal, therefore, if you draw a line through the water levels in two flasks, this will be the horizon line.
For example, you need to draw a horizontal line on the wall. Two people are needed. The first one puts a mark on the edge of the wall and places one flask on it, the second one, on the other edge of the wall, places the second flask at approximately the same level and does not move it anymore. The first person begins to align the water level line in his flask with the mark on the wall by gently moving the flask up and down. When the mark and the water level line are aligned and the movement of water in the flasks stops, you can put a second mark according to the water level in the second flask. The flasks are usually marked with a measuring scale, but I advise you not to pay attention to it, as this can only confuse, and the described method has been tested in practice more than a dozen times, it is simpler and more reliable. A line is drawn between the marks using a construction cord (tinted with some kind of coloring powder, crushed chalk, for example). This is the horizon line. Now you can take various measurements from it using a tape measure. For example, by measuring the distance to the floor along the edges, you can determine its horizontality - if the distances are the same, then everything is fine, if some of the distances are greater, then the horizon of the floor “falls” in that direction. In the same way, you can determine the horizontality of the ceiling. It’s worth practicing in this matter at least once or twice and everything will become clear, because it’s simple to the point of primitivism, but at the same time as effective as possible.
But it should be noted that the construction hydraulic level is effective with a hose length of up to 20 meters, which is quite enough when building, for example, your own house, cottage and for interior work. For larger distances, you need to use other measuring tools.
Before using the hydraulic level, you need to check its condition - there may be air bubbles in the hose, they need to be expelled. The liquid should move freely through the vessels and there should be no debris in it. From time to time the fluid needs to be changed to avoid the hose becoming “clogged”. The hose should not be kinked or pinched; this must be monitored during work. The best way to check the accuracy of the hydraulic level readings is to bring open flasks together, the levels in them must match.
A construction hydraulic level can be found in almost any store that sells construction tools; it is very cheap compared to the benefits it can bring.
Video
This video shows how to work with a hydraulic level.
No rack is complete without a construction tool, especially on a large scale. the hydraulic level will find its application.
. The device, which was invented on the basis of Pascal's law, can be called the simplest but most effective device. To make it, two flasks with marks and a long hose are used.
The dimensions of the intestine can vary from 200 cm to 3000, the radius from 0.5 cm to 20. In order for the device to work, it is enough to pour in any liquid. And based on the law of communicating vessels, obtain accurate data on a horizontal surface.
The device is quite ancient, but has not lost its relevance to this day. Whatever construction equipment we take, be it a laser level or a bubble level. None of them can cope when it comes to large, and especially invisible objects.
The hydraulic level has found its application:
— blocks;
— installation of foundation corners;
- ceilings.
A simple tool is available to every beginning builder. You can easily make it yourself. To do this, take a silicone hose with a diameter of 0.8 cm and connect it to 20 cc syringes. A DIY device is useful when you need a short length. And knowing how the hydraulic level works
there will always be a use for it.
Video text
An excellent alternative to a hydraulic level is a laser level - https://goo.gl/RkmMuN How to use a hydraulic level! In our age, when during construction we use the latest technical devices, such as a laser level, the old proven tools go into complete shadow! Fewer and fewer ordinary people know how, and even want to know, how a construction plumb line, hydraulic level and square work. This is not possible - it’s not right! And the “Guys from Stone” channel does not want to forget the achievements of our predecessors in construction. Bright video No. 97 – “How to use a hydraulic level”! The hydraulic level looks like a simple flexible hose and nothing more, unless, of course, you are familiar with the works of Pascal. That's right, the law of communicating vessels in action! With such knowledge, the hose (hydraulic level) easily turns into an in-person tool for finding the horizon! When building a foundation in an open space, a laser level is useless; if the batteries are dead, you won’t be able to work with a laser. But our work should not stand still! Watch video No. 97 “How to use a hydraulic level”, do not forget the instructions of the Masons!
Read also: The best built-in electric ovens
Instagram is a young portal, but photos about working with a hydraulic level will work there - https://www.instagram.com/guys_stone_/ Yo, for you and only you, a video on how to properly use a hydraulic level when pouring a foundation - https:// www.youtube.com/c/Guysstone And Vkontakte is now all over the ears! Video No. 97 about the exciting hydraulic level device - https://vk.com/guysstone
The collection of our channel is simply amazing! In addition to the video about the hydraulic level, we offer three more episodes that you need at your construction site: No. 1 Working with the hydraulic level will help you decide where to start repairs wherever you want -
No. 16 Where there is a hydraulic level, there is an old plumb line, and a video on how to use it correctly -
No. 55 And a video about the direct rival of the hydro level! How to use a laser level! Go for it! –
Oh, hydraulic level! We remember how to work with you!
How to use the hydro level! In our age, when in the construction we use the latest technical devices, such as laser level, the old proven tools go into total shadow! Fewer ordinary people can, and wants to know how the dispensation plummet, hydro level and square. So you can’t – it’s not true! And the channel “Men of Stone” does not want to forget the achievements of our predecessors in the construction of . Bright Video No. 97 – “How to use the hydro level”! Gidrouroven seemingly simple hose and no more than that, if you are, of course, are not familiar with the works of Pascal. That's right, the law soobschayaschihsya vessels in action! #Hydraulic level #Brickwork #Tools
Builder 4th category
A hydraulic level is a construction tool that is used to determine the level of a surface located at a certain distance. Externally, the device resembles a flexible tube with a scale. Before using a water level, it is recommended to familiarize yourself with the principle of its operation. It is based on Pascal's law of communicating vessels. The level is determined relative to the position of the horizon.
Read also: Connecting a diode strip to a power supply
Description and characteristics of the tool
The water device consists of a hose and two reservoirs. It is used when installing suspended ceilings and pouring screeds. It helps to align objects located in different rooms.
To simplify the work with the hydraulic level, it is recommended to use tubes with a larger diameter. They provide easy passage of water. The optimal length of the tube is 3-30 m. The water tool weighs up to 1 kilogram. Not only specialists, but also novice builders will be able to work with a water level.
To check the accuracy of the device, the liquid in two containers is measured. To mark a given height on an object, one tank is held at a certain point, and the second is moved in space.
In this video you will learn how to work with a hydraulic level:
On large construction projects, a laser level with a beam 100 meters long is used. To determine deviations in any plane, use a bubble level. It is presented in the form of a straight body of 15-200 cm with flasks and liquid. Taking into account the position of the bubble, the angle of inclination of the device relative to the surface is determined.
A similar operating principle is typical for a pipe level. It is easy to use as it has a special mount. An electronic hydraulic level is used to convert tilt and angular velocity into an electrical signal.
Advantages and disadvantages of a construction hydraulic level
Among the advantages of the construction hydraulic level are:
- affordable price;
- the work can be done by a non-professional;
- ease of operation;
— the sleeve is flexible and long, which makes it possible to make marks in different places, in a non-visible area;
— captures large sections;
— the instrument is not picky in storage; it is enough to wrap it on a drum and keep it in any climatic conditions;
— continues to show accurate data after it could have been stepped on.
— it’s difficult to work in small rooms due to the enormous length;
- cannot tolerate overheating;
— the presence of bubbles delays the start of work;
— not applicable in all planes, only in horizontal ones;
- you need to work on invisible objects only with an assistant;
- at temperatures below 0 degrees C, not used with water - freezes;
— a 30 m intestine presents difficulties when refueling;
— with each new job, the procedure with pumping liquid will be repeated;
— it is not possible to work close to heating or hot appliances.
How to use a hydraulic level correctly
As soon as you have purchased an auxiliary tool in the form of a hydraulic level from a construction center, you should carry out some procedures. Heat the water and dilute a small amount of soap solution in it.
Fill the hoses with the contents and rinse again under the tap with clean water. Before filling, the flasks must be removed. This is done to ensure that all particles that could have entered during manufacturing are removed from the walls and will certainly interfere with the work in terms of measurement accuracy.
Prepare additional tools that you cannot do without when working:
- a small bucket or jar. It all depends on the length of the hoses;
- any dye. It visually helps when working;
- marker;
- construction tape;
- wooden plank.
Unwind the hose and pull it along its entire length until it becomes elastic. Remove the flasks and fill the device with water. To reduce filling time, it is better to use distilled, boiled water.
They have less oxygen content. If work is carried out outdoors in winter, professional builders advise filling the intestine with used brake fluid.
When using distilled or boiled water or brake fluid, one end is lowered into the container where they are poured and raised to a height. There must be an assistant in the work who will keep the second part of the intestine at a much lower level at a distance.
Moreover, you should make several suction movements, as in the case of filling gasoline from a tank into a bucket. The liquid consistency will immediately flow along the entire intestine. As soon as it reaches the finish line, drain it a little more and only then lift and close the plug.
Some novice builders think that they will gain time and try to pour the liquid mixture from the tap. Yes, filling will be faster, but it will take a very long time to remove bubbles. After all, the length of the hoses can be up to 30 meters. You can fill the hose using a watering can. This technique can be used for large diameters.
After filling the intestine, it is carefully examined. If air spaces are visible, you need to press down the sleeve at the bottom and, with a gradual rise, drive them upward. Once the clean filling has been ensured, the plugs are put in place.
Algorithm of work on how to use a hydraulic level:
— let’s say you need to set the level in all rooms to fill the floor;
- choose a convenient height on the wall and install the flask with marks, let it be 2;
— it can be fixed or held motionless by one builder;
— mark the first mark with a marker;
- the assistant goes to the end of the first wall and applies the flask;
— the mark is made only when both have the same rizka 2;
- a cord is pulled between two points and a strip is struck. You can use a wooden plank;
- so the first room will be marked step by step;
- now you should go to the next room;
- the builder remains with the stationary flask in the previous room, and the assistant goes to the next one;
- the vessels are again aligned to mark 2 and a mark is made;
— at each interval, make additional measurements with a bubble level, since communicating vessels give an error of several mm;
— when the level is set in all rooms, the tape measure comes into play;
- the lowest point to the floor is selected and marks are made;
- a strip is beaten off with a cord and you can start pouring the floor.
If you need to level with a hydraulic level
ceiling, work is carried out in the reverse order. Use a tape measure to find the lowest point from the ceiling and use it to mark the level.
If masonry is being done, you can always check the height of one level. In this case, the builder moves one flask on one side of the masonry, and the assistant adjusts the next side with the other end of the sleeve. Here you can visually see how horizontal the brickwork is.
Work with communicating vessels can be done by one person. Then you should use the mount for the first flask, and adjust the height with the second. There is one drawback here. It will not be possible to set the level in another room. It is important to do this in small rooms, for example, in the bathroom, kitchen, etc.
What is a hydraulic level and why is it needed?
When creating any building or carrying out interior finishing work, it is necessary that the foundation, floor, walls, ceilings, door and window openings are located in the same horizontal and vertical planes.
For this purpose, levels are used - devices that are capable of showing deviations from the horizontal and vertical.
Today, there are 3 types of levels that are widely used in organizing construction work, these are:
- drip level;
- hydraulic level;
- laser level.
Each of the devices has its own scope and features.
The laser level is a modern measuring device that is conveniently used by builders in any room or outdoors.
This device is an electronic product, powered by a rechargeable battery, and has a fairly high price. Not every home owner and even builder can afford to purchase it.
A regular drip level is an indispensable device for construction work, but it loses its effectiveness when it is necessary to take measurements on structures located at a distance of more than 2 m from each other.
A water level is a fairly simple tool that has a low price and is capable of producing fairly accurate values. Many professionals rightly believe that this device is indispensable when performing private construction work.
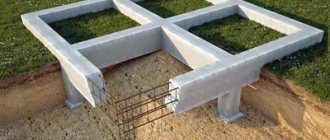
The scope of application of the water type level is quite diverse. Using a hydraulic level, it is possible to set up pile and strip foundations and determine the height difference. The device is widely used in repair work and organizing flooring (rough and finishing).
You should know that when organizing construction work on a sloping site, using a hydraulic level you can easily and accurately determine the height difference from one end of the site to the other.
This will be of great importance when organizing sewerage and water supply systems, as well as wastewater treatment.
Hydro level - what is it?
The principle of operation of a water level is quite simple, it is based on the physical law of “communicating vessels”, which states that if 2 vessels are connected to each other with a hose or other connecting material through which liquid can move, and filled with water or other flowing material, the level liquid will always be comparable. This means that, being on the same plane, 2 vessels will show 1 water level, but if 1 vessel is raised, then the level of the fluid in it will decrease, and accordingly in 2 tanks it will increase.
Basically, 2 vessels are 2 hydraulic level flasks into which liquid is poured, and they are also connected to each other by a transparent plastic tube. A graduated scale is applied to each of the flasks, which allows you to determine how many millimeters the two objects being compared have differences in the horizontal plane.
The length of the device hose can be chosen by each owner independently upon purchase, since it depends on the scope of the device (at what distances objects will be measured).
If a hydraulic level will be used when performing interior work, then a tube length of up to 8 m is sufficient; even if the length of the floor or ceiling beams exceeds this distance, additional benchmarks (beacons) are always set, which are an auxiliary element for high-quality marking.
For external construction work related to the construction of buildings, it is advisable to choose long hoses 10-20 m long, so that it is possible to take measurements along the diagonals of the foundation or the house as a whole.
You can see a clear example of using a self-made hydraulic level in the diagram.
It should be remembered that when selecting a water level tube from the measuring point, it should descend vertically down and in the same way move to another point. Moreover, the hose along its entire length should not have tension or extra loops when taking measurements.
Water tool technology
The procedure for working with the measuring tool depends on the selected type of water level and the task at hand.
Filling the building level with water
When using a simple model based on the equilibrium of liquid in conjugate vessels, the first step is to fill the tube with water. There are two ways to do this:
Method 1. Fill a bucket with water and place the container above the level of one tube. Place the second end of the hose into the liquid and suck out the water from the first. Under pressure, the liquid will begin to flow from the bucket into the tube. The liquid should not reach the edge of each hose by 10-15 cm.
Method 2. Clamp one end of the hose or plug it with a plug. Place the other end under a thin stream of running water.
Important! Before using the hydraulic level, be sure to remove excess air from the tube. If this step is neglected, then the probability of measurement error is high.
Filling the device tube with water
Procedure:
- Fold the tube in half with the ends up, straighten them and press them together.
- Remove the stoppers from the flasks.
- Lightly tap the hoses with your fingers - air bubbles will gradually rise and come out naturally.
Removing air from liquid
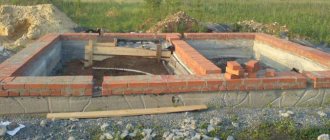
Leveling the foundation along the horizon
The evenness of the poured foundation will be checked with a hydraulic level - how to use the tool is described below.
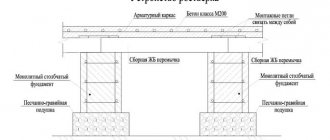
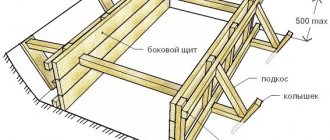
Stage 1. Creating a base for mounting the measuring device:
- Place two wooden boards horizontally on the foundation.
- Attach to them perpendicularly along the rail.
- Check the angle of connection of the elements - it should be 90°.
- If necessary, level the structure.
Attaching the hydraulic level to a wooden frame
Stage 2. Fixing the hydrostatic device:
- It is better to use one tube for measurements - the flasks can simply be removed.
- Fill the hose with water.
- Secure the ends to the boards with wire.
- Allow the water to level out and apply the base mark, the so-called “zero”.
- Squeeze the ends so that the water does not splash.
Applying a base mark to the tube
Stage 3. Checking the deviation between the corners of the foundation:
- Move one board with a tube to the angle being tested.
- Untighten the edges of the hose.
- After the water is leveled with a ruler, take readings, comparing the resulting level with “zero”.
Calculation of foundation angle deviation
Stage 4. Calculation of the difference. Subtract the deviation in the corner being checked from the deviation at the base point. If the water column has dropped relative to “zero”, then the value with the “-” sign is taken and vice versa.
After checking all angles, it is necessary to compare the obtained values with the standard ones. Maximum deviations are indicated in the table.
Permissible deviations according to SNiP
Marking the foundation and brickwork
The strength and durability of the entire building depends on the level of the foundation. To move the boundaries and axes of the building onto the terrain you will need:
- wooden racks;
- cord;
- roulette;
- hydraulic level
The main task is to arrange all the vertical crossbars-racks of the cast-off at the same height. Sequencing:
- Install the first rail of the required height.
- Fix one end of the “water” meter hose on it.
- Before attaching the second cast-off element, check that its placement is vertical. A bubble device is suitable for this.
- Secure the second end of the hose to the installed crossbar.
- Take the top of the first support as the base zero level and, according to it, set the remaining slats. It is important that the hose does not bend during measurement - this will lead to distortion of the indicators.
Using a hydraulic level when building a house
Using a similar technology, the formwork is set up and the foundation concrete solution is poured.
Brick laying begins with determining the highest reference angle. It is necessary to check the horizontal position - how to work correctly with the level is described in the previous paragraph. After calculating the position of all angles, you can choose a starting point.
Important! Starting from a high angle will allow you to reach a single horizon line. To level the edge in low areas, a thick layer of mortar is laid.
Marking under the floor and ceiling
Often, to level the ceiling and install suspended structures, it is necessary to mark the horizon line. The marking is done with an assistant, the procedure is as follows:
- On one of the walls display the estimated ceiling height.
- Connect the two ends of the filled level hose, lift them to the marking location and mark the water position strip with a marker.
- Hold one end on the wall with the markings applied, and an assistant must transfer the second end of the tube with the flask to the opposite side.
- Raise the second flask up until the water reaches the “marker” mark.
- Stretch a thread between the marked points - a guideline for installing the frame.
Determining the height of the suspended ceiling
Using this principle, the horizon line is laid when leveling the floor or installing a joist system.
Checking the evenness of a plastered wall
The verticality of plastered walls can be checked with a “bubble” device. An algorithm for how to work with a building level is given below:
- Take a tool with two or three ampoules filled with water. The bulb in the middle indicates the horizontal, and the other two indicate the vertical and the inclination of the angle.
- Lean the tool against the wall with its edge, holding it in a vertical position.
- Evaluate the result. If the surface is flat, then the air bubble in the upper capsule is in the center - strictly between the marks.
Checking the vertical position of a plastered wall
In this way it is necessary to check the wall in several places. Particular attention should be paid to corners, door and window openings.
Video: How to use a hydraulic level
Pros and cons of the device
Flexible hose makes it easy to work in hard-to-reach places. The hydraulic level can be used from various corners of the building where there is no direct visibility of the object. It is difficult for one person to use a water level. Experts include other disadvantages of the device:
- long hoses are difficult to fill with water;
- systematic change of water;
- 2 people must work with the tool, with the exception of the laser type of device;
- the level requires insulation of 2 meters from hot and heating devices;
- work is carried out only in the horizontal plane.
To use a hydraulic level, you will need a container, a marker, a tape measure, tape, and water dye. The instrument is first washed with soapy water. In this case, dirt will not affect the accuracy of its operation. Experts identify 2 ways to properly use a water level.
To color the liquid you will need:
- Place the containers next to each other.
- An equal level of fluid in the vessels is ensured.
- The found value is indicated by a clamp, which is called the zero level.
- When the apparatus is filled with water, the flasks are fixed and the taps on them are turned off.
Read also: Which direction does the disc on the grinder spin?
Instructions for making a building level yourself
There are several options for how to make a level at home. The manufacturing principle is the same, the difference is in the choice of available means. To create a simple model you will need:
- a transparent hose with a diameter of 1.2-1.5 mm - it is not advisable to use a smaller tube, since it is more difficult to release air from it;
- disposable syringe with a volume of 20 ml;
- sealant;
- plugs for the diameter of the syringe;
- water container;
- stationery knife.
An example of a homemade hydraulic level
Assembling the water meter:
- Measure the required hose length.
- Clean the tube with soapy water to remove any remaining dirt and dust.
- At the ends of the hose, string the cannulas of the syringes - the side flasks of the spirit level.
- Mark zero points and fill the device with water.
Video: The simplest hydraulic level from syringes
Self-production
To make a device from scrap materials, you will need a tube with a diameter of 8-10 mm. Additionally, syringes will be required. The length of the hose depends on the area of the premises. Step-by-step assembly of the hydraulic level :
- passing a soap solution through the hose, which allows you to get rid of residual industrial oil;
- cutting syringe pistons with a knife;
- expanding the syringe holes to the diameter of the hose;
- inserting the needle into the appropriate tubes.
Another way to assemble the tool is to use a transparent hose and dispense with the flasks. Centimeter markings are made with a marker at the ends of the hose. For the device to work correctly, release the air from the hose. The system is filled with water. The ends of the hose are lifted up. The tube is pressed with your foot in the place where the bubbles have risen.
The marks are connected with thread. It is first rubbed with chalk or stylus. It is pulled back in the center by 1 centimeter and then released. The thread should leave an even and straight mark. Experts advise pouring clean water into the hydraulic level, which contains a small amount of bubbles. If the system is used at sub-zero temperatures, an anti-freeze agent is used. Upon completion of the work, the liquid is drained.
To preserve it in its original state, alcohol and vodka are added to the liquid. To check the accuracy of the tool, connect the ends of the hose. The liquid level in the vessels must be the same. In other cases, experts believe that the hose is kinked and contains air.
To make marks accurately, use a well-sharpened pencil. When performing work, you must avoid bending. It is recommended to carry the device in an open state to prevent tearing. The hose is stored away from the sun.
Nuances of using and storing a level
- It is better to “fill” a hydrostatic device with settled or boiled water - it contains less oxygen.
- When working in subzero temperatures, use non-freezing liquid. Some people recommend filling the tube with car detergent, water diluted with alcohol or salt.
- At the end of the measurement, the water must be drained. If this is not done, over time the walls of the hose will become covered with sediment.
- The rubber tube should be stored in a place protected from direct sunlight. It is advisable to wind the hose onto a reel - this will protect it from bends and cracks.
- An old hose with kinks has a certain error. In this case, it is advisable to buy a new tool or make a level yourself.
The use of a hydraulic level greatly simplifies the construction process, making it of higher quality. Making a homemade water spirit level is not difficult, and working with it does not require special knowledge and skills.