In the interior
Butterflies in the interior are presented in the form of a panel, which is made from a variety of sheet materials, and then attached in an elegant applique to one wall or several at once. There are many options for materials for creating butterflies, as well as many variations in how to hang them; it is the combination of these factors that affects exactly how the presented decorative element will look in the interior.
Butterflies can be mounted on the wall, either in any form or create a single three-dimensional picture.
Attention! If you make this decorative element with your own hands, it is recommended to select a lighter material, then when the wind blows, the butterflies will rustle their wings, creating the effect of being ready to fly up.
Butterfly wall applications
Making butterflies is one thing.
But the most important point in decorating a room is creating a specific pattern. It is he who plays the main role and brings zest to the room. Sometimes you can simply randomly place butterflies on the wall, as the interior requires it. But, still, most often this option is not suitable. What kind of compositions of butterflies on the wall can be brought to life? There are a variety of methods for this. Here, as they say, a flight of fancy is needed. Let's look at a few examples. The first option is to create a romantic atmosphere. There are many options for this purpose. First, it should be mentioned that the color of the butterflies in this case can be done in red and with its tones. In the photo below you can see one composition that contributes to a romantic atmosphere.
An easier option would be to create a heart on the wall from butterflies. It looks quite original and romantic. Dining by candlelight with this decoration will be doubly pleasant.
The second option, which is also very often used to create original decoration, is a flying flock of butterflies that are trying to break free from the room.
Such applications give the room some volume. Moreover, flocks of butterflies can be located in any direction and in any form.
Some make a spiral out of them, while others combine this solution with a pattern, as can be seen in this photo.
There is also the option of creating the likeness of butterflies taking off from certain objects. This will require the use of improvised means. Butterflies are attached to a chest of drawers, a plate on a table or another element, after which a specific pattern is formed. Here's how to put it into practice.
You can also benefit from other pieces of furniture or accessories in the room. For example, if there is a staircase in the house, it can be transformed with butterflies by placing it parallel to the direction of the staircase. And in the photo below you can see an interesting combination of butterflies and wall clocks.
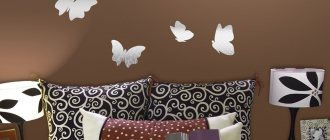
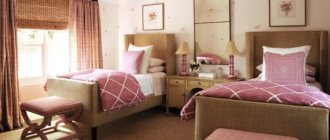
In the bedroom, moths can be placed at the head of the bed. Moreover, the design of them can be very different. It all depends on the wishes of the owners.
The options that we have listed above are not all that can be implemented using a variety of butterflies. If you have imagination, then success is guaranteed. Look at the photo to see some more unusual options for decorating walls with butterflies.
And below you will see a video of exactly how you can create butterflies for decoration with your own hands.
What style are they suitable for?
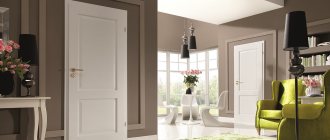
The presented decorative element is suitable for decorating almost any style, but they look especially bright if you have the following room design styles:
- Provence;
- high tech;
- modern;
- minimalism;
- classic.
The main thing is to ensure that the color of the butterflies is combined with the overall color scheme of the interior design, because otherwise the decoration will turn out to be ridiculous and tasteless. But it is desirable that the butterflies differ in color by at least 1-2 tones, since otherwise they will simply merge with the walls.
The following combination will be organic:
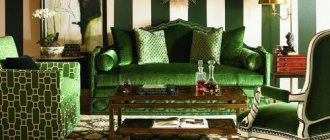
- red and green on a beige wall;
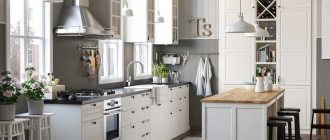
- Yellow, brown and black on a gray or white wall;
- rich blues or reds on a pink wall.
Preparing for work
To create a picture of paper moths, you need to carefully consider the future composition, and then begin preparing stencils. If your own imagination does not suggest any ideas, then you can find photographs of compositions with wall butterflies on the Internet. The image of a whirlwind or simply a scattering of moths in suitable places is popular.
Having decided on the future composition, you need to select the material from which the decorative elements will be made and create a stencil. If you do not have the necessary materials at home, you will have to visit any stationery store or arts and crafts store.
Moths are created on plain paper or vinyl film using stencils. It is advisable to purchase several stencils, then when mounted on the wall, the butterflies will differ not only in size, but also in appearance, which will look more original.
What material should I use?
You can cut moths from almost all materials:
- paper;
- cardboard;
- vinyl film;
- textile.
All presented materials are characterized by a number of advantages and disadvantages.
Paper
The presented material is suitable for people who are encountering interior decoration with butterflies for the first time, since paper is the easiest way to create beautiful butterflies. Due to the low cost of the material, you don’t have to worry about how much paper it will take to cut out butterflies. You can opt for colored paper, which can be purchased at any stationery store.
If a person prefers variety, then you don’t have to stop at just one color and cut out moths from glossy magazines you’ve read a long time ago. As a result, the home owners will become the owners of a decoration consisting of butterflies of different colors.
You can attach butterflies from this material in any way. The big advantage is that when the moths are fully glued, they will not stand out much above the surface of the wall, but if you glue only the central part of each individual butterfly, you can make them sway in the wind.
Cardboard
Moths made from cardboard will be several times stronger and more reliable than paper ones. When cutting out such butterflies, you will have to put in a little more effort, but you have the opportunity to shape them the way you want, since the cardboard easily takes the shape and retains it forever.
You can bend the wings of insects or make them rounded. To carry out these actions, you need to slightly wet the cardboard and, using a weight, bend it in the desired way. Once completely dry, the cardboard will forever remain in the desired form.
Difficulties may arise when attaching cardboard decorative elements, since they will have to be secured more securely.
Vinyl film
Vinyl film, which is a self-adhesive material, is simply ideal for creating decorative moths. The film is glossy and colorful, as a result of which the moths are not only characterized by quite bright colors, but also shimmer in the light.
Cutting butterflies from such material is quite easy, and attaching the resulting butterfly to the wall is even easier, since you only need to remove the protective layer from the film and then stick it in the desired place. If the apartment owners want the moth to move its wings, then the protective layer must be removed only in the center, in the form of a thin vertical strip.
Textile
Fabric is an ideal material for creating butterflies if the walls are decorated with liquid plain wallpaper, drapery or any fabric that is soft to the touch. Moths cut from the specified material will only complement the interior, adding coziness to the room.
It is recommended to use glue to secure the fabric to the wall.
Decor with butterflies: 7 exclusive ideas for handmade
Butterflies made of paper and cardboard are, of course, beautiful, but if the soul asks for originality, then completely different ideas will come to the rescue. We have collected 7 extraordinary ways to decorate your painting with butterflies using the most unexpected materials and design solutions.
1. From vinyl records Do not rush to throw away old vinyl discs, because they are an indispensable material for decorating a room with your own hands. The plates are also used to create decorations in the form of butterflies.
Butterflies in the interior of the room.
Design of a room with butterflies The process itself includes several stages.
- We apply the design to the plate according to the template.
- Heat it in the oven or microwave for about 1 minute until the edges begin to curl slightly.
- Cut out the shape.
- Sand the edges with sandpaper.
- We attach it to the wall using glue.
2. Multi-layered and voluminous Made from several layers of different colors and sizes, they look very lively and truly voluminous. Usually only the bodies of butterflies are glued together, while the wings remain free and bend at different angles.
An unusual effect is achieved by combining ordinary butterflies with openwork ones. To do this, two butterflies are cut out according to a template of the same size, but different in color, with the wings of one butterfly being solid, and the other with patterns. To avoid cutting out the same shape several times, fold the paper so that you get several butterflies at once.
Photo wallpaper with butterflies.
Butterflies in the heart3. From corrugated paper, butterflies from such paper are even easier than from regular paper. They are very easy to make even without the help of glue.
- Cut out a rectangle of paper of the desired color, slightly larger than the planned butterfly.
- We sew the rectangle with a thread in the middle, tighten it, resulting in a bow.
- Fold it in half and smooth out the wings.
- From one edge we cut off a small strip for antennae. Using scissors, cut out a pattern along the edge of the wings.
- We roll the cut strip into a tube, forming antennae.
- We turn the wings inside out and carefully smooth them, giving them the desired shape.
4. From tin cans Decorative butterflies can be made even from such inconspicuous items as ordinary tin cans
When cutting out the moth silhouettes, extreme care must be taken to avoid cutting your hands. This design can be secured using thin wire.
Freely moving butterflies will create a light chime at the slightest breath of wind5. Accordion The secret to the success of such a product is in a small accordion. You need to cut out 2 squares of paper, fold them like an accordion, then attach them to each other and wrap them with thread. We will make the antennae from flexible wire of the same color. Let's straighten the wings and give the butterfly the desired shape. The moth is ready!
Popular articles Compositions from artificial flowers. 100 photos and ideas. do it yourself for the interior
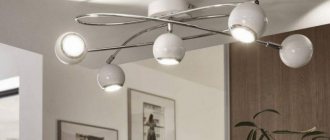
6. Mobile An elegant hanging arrangement of butterflies will look great both in a child’s room and in a bedroom. Building such beauty at home is as easy as shelling pears.
To implement this idea, we will need a hoop, fishing line, ribbons, and the butterflies themselves, numerous manufacturing options for which we have already considered. We secure the hoop under the ceiling using satin or chiffon ribbons, and evenly attach the fishing line to the hoop over the entire area. Place butterflies made of paper or cardboard on the fishing line.
They can be made either plain or colored. Such a voluminous decorative composition looks very impressive in a woman’s bedroom and emphasizes the romance and femininity of the hostess.
Room design with butterflies7. PaintingsThe essence of the idea is that now the butterflies are not placed directly on the wall, but become part of a single application, enclosed in a limited frame.
We cut out butterflies from old magazines using a ready-made template and place them on a plain sheet, which will be the basis of the picture. We attach them using double-sided tape so that they rise above the level of the picture. If this is not available, then you can insert a piece of foam rubber between the tape.
We combine colors in such a way that they smoothly flow from one to another. We insert the finished picture into a frame.
How to attach?
In order for the created moths to stay firmly on the wall and not fall off the next day, it is important to be especially careful when selecting a fastening method; there are several of them.
Glue
Using glue to attach butterflies to the wall, the apartment owner can be sure that the described decorative elements will hold tightly. You can use any glue, either in the form of a pencil or PVA. The main thing is to make sure that you do not use a very large amount of glue, since it will protrude beyond the edges of the moths and ruin their appearance, leaving marks on the wallpaper.
Glue is considered a simple way to attach the presented decorative elements to the wall.
Pins
To attach the butterflies you created yourself, you can use pins of different sizes and shapes. At the same time, to add butterflies to a picture of butterflies held together with pins, the pins should be selected with some kind of beautiful head or decorated with different pearls. Pins are suitable in cases where the walls are decorated with plastic panels, regular or cork wood, and plasterboard.
If wallpaper was used as wall decoration, then you can perform a slightly different action. Using pliers or pliers, bend the end of the pin 1-2 centimeters at an angle of 90 degrees. Having completed these steps, the bent end of the pin is placed under the wallpaper, thus securing the moth.
Attention! To connect a pin and a butterfly, use Moment glue.
Styrofoam
Take a small piece of polystyrene foam and, using glue, connect it to the butterfly on one side and to the wall on the other. This mounting option is quite unreliable, since foam plastic is not a strong enough material and if it breaks, it will be very difficult to separate the remaining part from the wall.
Threads
Using thin threads or fishing line, the moths are suspended from the ceiling or chandelier by a cornice. This method of fastening makes it possible to create a three-dimensional picture.
What are they made from?
Butterflies on walls are made from different materials, sometimes even exotic. The spring appearance of the resulting decor depends on this choice. While you have no experience and you don’t really imagine the end result, you can make several different decorative butterflies for testing. They can be attached to the location of the planned decor. This will make it easier to evaluate the effect and choose the most suitable option.
You can transform your room with very little money.
Paper
Butterflies for decoration from paper are the easiest and cheapest to make. There are several different techniques. If the product is flat and is glued entirely to the wall/panel, only the front surface is important. If a three-dimensional composition is intended, the paper should be double-sided - both sides should be colored, because the white “wrong side” often spoils the impression.
From ordinary double-sided colored paper
Instead of regular colored paper, you can use corrugated paper. The effect will be different - it is lighter, airier, translucent, with its help it is easy to make the decor with butterflies three-dimensional.
Butterflies for decoration made from corrugated paper are airy and light
You can make butterflies from an old magazine, newspaper, postcards, colored napkins, wallpaper of a suitable color, or any other printed material.
Even from an old magazine it turns out very well
As you can see, there are a lot of options just from paper. If you consider that they can still be slightly tinted, combined, made multi-layered, it is clear that there is huge scope for imagination...
Cardboard
Cardboard is not very dense. It's more like a very thick paper. It is also colored and double-sided. It is often used to create voluminous decor - you can easily bend the wings relative to the body. This material even holds its shape better. Just remember that you can’t make corrugated wings - the material is too hard to make a small fold.
Patterns look clearer on cardboard
It is also easier to make openwork butterflies from cardboard. Having a sufficiently sharp knife, cut out the “extra” leaving only the partitions. Such decorations require perseverance, great patience and accuracy.
Make a template, according to which you can then make winged insects of the same size
Cardboard is also used to make templates for “mass” production of identical butterflies. With the help of such stencils you can make insects of the same type and size and spend a minimum of time on it.
Textile
Having a template, you can make butterflies for wall decoration or a fabric chandelier lampshade. The fabric will need to be given additional rigidity, but the rest of the process is not much different: the outline is applied, cut out, decorated if necessary, and mounted on the wall.
The simplest version of fabric butterflies
It is more difficult to work with fabric, although very interesting decorative crafts are obtained. This is an option for more advanced decorators and needle or sewing machine skills. With their help you can recreate the veins on the wings.
Exotic materials
Old vinyl records will also be an excellent raw material for making butterfly decor. Since vinyl is hard, you will have to heat it in the oven to cut a butterfly out of it. And in order not to spoil the baking sheet, you need to cover it with foil.
Butterflies for decor from vinyl records
An outline is applied to the vinyl using chalk, the record is placed in a preheated oven, as soon as it begins to soften, it is taken out and quickly cut along the outline with scissors. Often the “workpiece” has to be heated several times. After cutting, heat it one last time and give it the desired shape.
Beer cans or any other relatively soft sheet metal also make excellent flying beauties. First you need to cut off the bottom and lid and level the piece of tin. Then, using an awl, transfer the contours from the template to the sheet metal, connect them with a marker and cut along the resulting contour.
Popular articles Beautiful congratulations on May Day
Even beer cans can be used for “butterfly” wall decor.
You can decorate the back - the shiny part. To do this, you will need markers or felt-tip pens; you can try decorating with nail polish. The painted beauties are given the desired shape
One caveat: the edges are very sharp, you need to work carefully, otherwise cuts cannot be avoided
Wall decoration with glowing butterflies
To create this type of design, the butterfly should be attached to a white wall, and a table lamp should be located nearby.
For this decoration option you will need the following components:
- stencils;
- phosphor paint (preferably several colors at once);
- pencil;
- several sponges;
- palette and brushes;
- glue (recommended in spray form).
After preparing all the described things, you need to perform the following steps:
- Initially, you need to make several stencils, which are attached to the wall with glue.
- The sponges are cut into several parts, each of which is attached to the handle of the brush.
- If it was decided to use paint of several colors, then each color is separately prepared on the palette, and then applied one by one to the stencils already attached to the wall.
- Once the paint is completely dry, you need to remove the stencils, turn off the light, and then enjoy the unusual appearance of glowing butterflies.
Attention! To analyze whether the paint is applied correctly, it is recommended to carry out the described actions in dim light.
Master class step by step
Those people who have decided to make their own butterflies for wall decoration should familiarize themselves with several master classes on how to create them.
Moths made of colored paper
To create butterflies from colored paper you will need the following materials:
- thick colored paper;
- Printer;
- sheets of white paper (from which templates will be created);
- cardboard (the density is chosen so that it can be bent);
- a simple pencil;
- scissors;
- glue.
Having prepared the presented components, you can proceed to creating:
- You need to print several templates and then cut them out of paper. If you use pictures of different sizes, the final result will be more interesting.
- The cut out templates are applied to cardboard, outlined with a simple pencil, and then cut out. If possible, the templates can be immediately printed on cardboard.
- The templates are traced on the back of colored paper and then cut out. It is recommended to create more instances. Each specimen is bent in half, this is necessary to provide the moths with the effect of fluttering wings.
- A small amount of glue is applied to the fold of each butterfly, and then the blanks are attached to the wall. The central part of the moth needs to be lightly pressed against the wall with your finger, this is required so that the moths do not lag behind.
Attention! To make the butterflies more realistic, they should be placed on the wall in such a way that they appear to be flying in one direction.
Origami
A rather original solution would be to decorate a wall using moths made using the origami technique.
To make such a moth you will need the following components:
- paper (sheet from a book or newspaper);
- paint - used to darken the edges of the wings;
- thin wire;
- pliers;
- a simple pencil, ruler and scissors.
Having prepared all these things, you can move on to creating butterflies:
- A square measuring 4*4 is cut out of a book or newspaper sheet (it is allowed to use a square measuring 5*5).
- The paper is folded in half twice.
- After this, the square is folded diagonally in two directions.
- The paper is folded inward, resulting in a triangle.
- The two tips of the top layer of the triangle are bent towards the apex.
- The triangle is turned over to the side, while the bottom corner needs to be bent up so that it extends beyond the moth.
- The formed triangle is bent to the other side and glued to the base.
- The edges of the wings are darkened.
- A bird with bent wings is created from wire.
- The butterfly unfolds with a small triangle upward, its wings are bent and given a realistic shape.
- The wire is dipped in glue and attached in the form of tendrils.
The made butterfly can be attached to the wall in any of the following ways.
From vinyl records
Making butterflies from vinyl records is not difficult if you follow the plan. You need to prepare a number of components:
- unwanted vinyl records;
- black and white chalk (can be replaced with colored pencils - you will need any two colors);
- moth patterns;
- scissors.
Having prepared the auxiliary elements, you can proceed directly to making butterflies:
- The middle of the template is marked on the vinyl record. The outline is outlined on the vinyl record with white chalk, and on the sticker located in the center of the record with black chalk.
- You need to take a baking sheet, place foil on it, and then place a vinyl record on the foil. The oven is preheated to 400 degrees and a baking sheet is placed at the top of the oven. The plate must be removed as soon as it begins to deform - after approximately 45 seconds.
- Using sharp scissors you need to cut out the butterfly. If during this action the plate begins to harden again, it must be placed back in the oven to soften. Vinyl cools quickly, so you need to cut out the moth not only carefully, but also at a fast pace. It is possible that you will have to warm up the record several times.
- Once you are able to cut out the butterfly, you need to carefully bend its wings.
After completing these steps, the butterfly can be attached to the wall.
From clay
Making moths from polymer clay is popular.
You will need the following components:
- butterfly baking dish;
- polymer clay (2.5 butterflies require 60 grams of material);
- white thread - the moth will hang from it.
Having selected all the components, you need to follow this plan for creating a butterfly:
- Using a baking mold, blanks are cut out of polymer clay, using a needle to make 4 holes in the center of the blank. The moths' wings are folded back at different angles and placed in a glass baking dish. The clay is baked in the oven for 15 minutes, the temperature is selected as indicated on the clay packaging.
- If after baking the moths you need to enlarge the holes in the center, you can take a sharp knife and carefully enlarge the holes. You can also use sandpaper and carefully sand the edges of the product. If desired, the finished figures can be opened.
- The thread is threaded crosswise through the holes and tied at the back with a knot. You need to pierce a pushpin through the created knot and attach the butterfly to the wall.
Such butterflies, looking quite unusual, give the interior a certain elegance.
Corrugated paper
Beautiful three-dimensional butterflies are made from special corrugated paper. To create a decorative craft, you will need the corrugated paper itself, a needle and thread. Materials can be taken in different colors. It also comes in different densities and ductility.
Instructions for decorating walls with corrugated paper butterflies:
- Cut a strip of paper measuring 7 cm wide and 10 cm long.
- Using a needle and thread, make an accordion in the center of the paper and pull it together, as shown in the photo.
- Fold the resulting wings, connect them and slightly stretch them to the sides, giving them shape. Get rid of wrinkles.
- Using scissors, make wavy shapes for the wings. Also leave room for the antennae.
- At the end of the work, unfold the butterfly, straighten it and twist the antennae with your fingers.
Popular articles New Year's stocking
You do not need to use special templates to create corrugated butterflies. The wings are cut out in free form.
Ready-made corrugated paper butterflies
Openwork butterflies
Creating openwork butterflies is a titanic task. They can be cut from different materials, but paper is most often used. You will need a sharp stationery knife and template blanks with drawn lines of the design.
It is along these lines that excess paper is cut out. To make it easier to cut and not damage the table, place a block or plastic under the workpiece.
It is recommended to cut and remove small pieces first, and then only cut out the outline from a piece of paper. By following this rule, thin bridges will not tear when cutting.
Blanks for openwork butterflies:
A visual example of openwork cutting out insects from paper for wall decor:
- Fold the prepared paper in half and apply a sketch using a stencil prepared in advance.
- Use a sharp thin knife to cut out small parts.
- Carefully cut out the insect along the outline.
- Glue the resulting blanks to the wall in the intended place.
It is recommended to cut out openwork crafts not on the table. Place something solid, such as a piece of plywood or a plastic container. Also keep in mind that there will be some nicks and abrasions on the surface of the hard stand when finished. It will no longer be possible to reuse it.
Butterflies for decoration on the walls can be placed randomly or used to create beautiful landscapes. When fixing the workpieces only by their middle, the wings will remain free. It is also best to glue butterflies first onto pieces of foam rubber, and only then to the wall. Thanks to this, the crafts will look voluminous and beautiful.