Floor base
Classification of floors is made by type of coating:
- planks;
- parquet;
- linoleum;
- slab.
And by type of structure:
- layered;
- single-layer;
- separate hollow;
- separate empty.
Required tool:
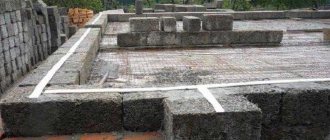
Scheme of the ceiling over the ventilated underground.
- grinder;
- plane;
- hammer;
- trowel;
- cord;
- rule;
- saw;
- fasteners;
- screwdriver;
- roulette.
Flooring solutions
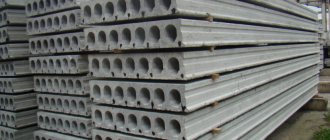
1 - floor covering made of block parquet; 2 - prefabricated screed from finished floor elements; 3 — polystyrene foam boards PSB-S; 4 — polyethylene film; 5 - hollow-core floor panel
| Indicators for 1 sq. m | Weight | Standard consumption of basic materials | ||||
| Piece parquet | GVL5 floor element | Polystyrene foam boards | Polyethylene film | Cold mastic | ||
| units change | kg | m2 | m2 | m2 | m2 | kg |
| quantity | 37,7 | 1,02 | 1,02 | 1,02 | 1,15 | 0,5 |
1 - covering made of parquet boards; 2 - prefabricated screed from finished floor elements; 3 — polystyrene foam boards; 4 — polyethylene film; 5 - hollow-core reinforced concrete floor panel
| Indicators for 1 sq. m | Weight | Standard consumption of basic materials | |||
| Parquet boards | GVLV floor element | Polystyrene foam boards | Polyethylene film | ||
| units change | kg | m2 | m | m2 | m2 |
| quantity | 40,2 | 1,02 | 1,02 | 1,02 | 1,15 |
1 - covering of PVC linoleum on a fabric basis with non-cold waterproof mastic; 2 - prefabricated screed from finished floor elements; 3 — polystyrene foam boards; 4 — polyethylene film; 5 - hollow-core floor panel
| Indicators for 1 sq. m | Weight | Standard consumption of basic materials | ||||
| Linoleum | GVLV floor element | Polystyrene foam boards | Polyethylene film | Mastic | ||
| units change | kg | m2 | m2 | m2 | m2 | kg |
| quantity | 29,5 | 1,02 | 1,02 | 1,02 | 1,15 | 0,5 |
Instead of fabric-based PVC linoleum, baseless PVC tiles and 1.8 mm thick foam-based linoleum can be used. It is recommended to use it in conjunction with block parquet or parquet boards in other areas of the apartment.
1 - floor covering made of parquet boards; 2 - prefabricated screed; 3 — self-leveling log; 4 — polystyrene foam boards; 5 – bituminous rolled material; 6 - hollow-core floor slab
| Indicators for 1 sq. m | Weight | Standard consumption of basic materials | ||||
| Piece parquet | GVLV floor element | Polystyrene foam boards | Polyethylene film | Lumber | ||
| units change | kg | m2 | m2 | m2 | m2 | m3 |
| quantity | 45,3 | 1,02 | 1,02 | 1,02 | 1,15 | 0,084 |
1 - ceramic tile coating on cement-sand mortar; 2 - waterproofing made of bituminous materials; 3 - prefabricated screed; 4 — polystyrene foam boards; 5 - polyethylene film; 6 - hollow-core reinforced concrete floor slab
| Indicators for 1 sq. m | Weight | Standard consumption of basic materials | ||||
| Ceramic tiles | GVLV floor element | Polystyrene foam boards | Polyethylene film | Gidrostekloizol | ||
| units change | kg | m2 | m2 | m2 | m2 | m2 |
| quantity | 90,8 | 1,02 | 1,02 | 1,02 | 1,15 | 1,15 |
1 - floor covering; 2 - prefabricated screed from finished floor elements; 3 — polyethylene film; 4 - leveling screed made of cement-sand mortar; 5 - hollow-core reinforced concrete floor slab
1. This type of floor is intended for cottage construction and public buildings
2. Linoleum on a heat and sound insulating basis, textile carpet, piece parquet, parquet boards, etc. can be used as floor covering.
| Indicators for 1 sq. m | Weight | Standard consumption of basic materials | |||
| Parquet boards | GVLV floor element | Solution | Polyethylene film | ||
| units change | kg | m2 | m2 | M3 | m2 |
| quantity | 66,7 | 1,02 | 1,02 | 0,015 | 1,15 |
1 - floor covering; 2 - prefabricated screed from finished floor elements; 3 - large-format gypsum fiber sheet; 4 - backfill made of expanded clay sand; 5 - polyethylene film; 6 - hollow-core reinforced concrete floor slab; 7 and 8 - glue and screw for gypsum plasterboard
1. The floor covering can be made of linoleum of all types of PVC tiles, textile carpet, block and panel parquet, parquet boards, etc.
2. This type of floor is intended for installation on floors made of hollow-core reinforced concrete slabs with a thickness of 140 - 160 mm
| Indicators for 1 sq. m | Weight | Standard consumption of basic materials | ||||
| Linoleum | GVLV floor element | Expanded clay gravel | Polyethylene film | GVL sheet | ||
| units change | kg | m2 | m2 | m3 | m2 | m2 |
| quantity | 1,02 | 1,02 | 0,115 | 1,15 | 1,02 | |
1 — block parquet covering with cold waterproof mastic; 2 - prefabricated screed from finished floor elements; 3 - underlying layer of expanded clay sand; 4 - polyethylene film; 5 - hollow-core reinforced concrete floor slab
| Indicators for 1 sq. m | Weight | Standard consumption of basic materials | ||||
| Piece parquet | GVLV floor element | Expanded clay sand | Polyethylene film | Mastic | ||
| units change | kg | m2 | m2 | m3 | m2 | kg |
| quantity | 93,2 | 1,02 | 1,02 | 0,07 | 1,15 | 0,5 |
1 - floor covering made of parquet boards; 2 - prefabricated screed; 3 - backfill made of expanded clay sand; 4 — polyethylene film; 5 - hollow-core floor slab.
| Indicators for 1 sq. m | Weight | Standard consumption of basic materials | |||
| Parquet boards | GVLV floor element | Expanded clay sand | Polyethylene film | ||
| units change | kg | m2 | m2 | m3 | m2 |
| quantity | 95,7 | 1,05 | 1,02 | 0,07 | 1,15 |
1 - PVC TZIL linoleum coating on Bustilat glue; 2 - prefabricated screed from finished floor elements; 3 - backfill made of expanded clay sand; 4 — polyethylene film; 5 - hollow-core reinforced concrete floor slab
| Indicators for 1 sq. m | Weight | Standard consumption of basic materials | |||||
| Linoleum | GVLV floor element | Lumber | Expanded clay sand | Glue | Polyethylene film | ||
| units change | kg | m2 | m2 | M3 | m3 | kg | m2 |
| quantity | 86,2 | 1,02 | 1,02 | — | 0,07 | 0,5 | 1,15 |
1 - covering of ceramic tiles 150×150×13 on cement-sand mortar M150; 2 - waterproofing layer; 3 - prefabricated screed from finished floor elements; 4 - bedding made of expanded clay sand; 5 — polyethylene film; 6 - hollow-core reinforced concrete floor slab
| Indicators for 1 sq. m | Weight | Standard consumption of basic materials | |||||
| Ceramic tiles | Solution M150 | Waterproofing material | Mastic | Butt element from GVLV | Sand | ||
| units change | kg | m2 | m3 | m2 | kg | m2 | m3 |
| quantity | 147,7 | 1,02 | 0,022 | 1,15 | 2,4 | 1,02 | 0,06 |
1 - linoleum covering on a fabric base with cold waterproof mastic; 2 - prefabricated screed from finished floor elements; 3 - continuous plank flooring made of edged boards 80×25 mm; 4 — logs 80×40 mm; 5 - expanded clay sand; 6 - hollow-core floor panel; 7 - polyethylene film
| Indicators for 1 sq. m | Weight | Standard consumption of basic materials | |||
| Linoleum | GVLV floor element | Lumber | Sand | ||
| units change | kg | m2 | m2 | m3 | m3 |
| quantity | 90,6 | 1,02 | 1,02 | 0,035 | 0,052 |
1 - linoleum floor covering without base; 2 - prefabricated screed from finished floor elements; 3 - underlying layer of expanded clay sand; 4 - polyethylene film; 5 - hollow-core reinforced concrete floor slab
1 This type of floor is recommended for installation in utility rooms on reinforced concrete floor slabs with a thickness of 220 mm.
2. Instead of laying linoleum without a base, a paint layer can be applied over a prefabricated screed.
3 The joints between the floor elements and the places where the screws are installed must be puttied and cleaned.
| Indicators for 1 sq. m | Weight | Standard consumption of basic materials | ||||
| Linoleum | GVLV floor element | Expanded clay gravel | Polyethylene film | Glue | ||
| units change | kg | m2 | m2 | m3 | m2 | kg |
| quantity | 63 | 1,02 | 1,02 | 0,044 | 1,15 | 0,5 |
1 - floor covering; 2 - prefabricated screed from finished floor elements; 3 — polystyrene foam boards; 4 — self-leveling logs; 5 - underlying layer of M150 concrete with a rubbed surface; 6 — two layers of hydroglass insulation; 7 - concrete M150; 8 - crushed stone (gravel) 40 - 60 mm in size, compacted into the base soil.
| Indicators for 1 sq. m | Weight | Standard consumption of basic materials | ||||||
| Floor covering | GVLV floor element | Expanded polystyrene boards | Gidrostekloizol | Concrete | Crushed stone | Lumber | ||
| units change | kg | m2 | m2 | m2 | m2 | m3 | m3 | m3 |
| quantity | — | 1,02 | 1,02 | 1,02 | 2,3 | 0,17 | 0,042 | 0,08 |
Depending on the functional purpose of the premises, the floor covering can be made of parquet boards, linoleum, textile carpets, ceramic tiles, etc.
1 - floor covering; 2 - prefabricated screed from finished floor elements; 3 - backfill made of expanded clay gravel; 4 — self-leveling logs; 5 - underlying layer of M150 concrete with a rubbed surface; 6 — two layers of hydroglass insulation; 7 - concrete M150; 8 - crushed stone (gravel) 40 - 60 mm in size, compacted into the base soil.
| Indicators for 1 sq. m | Weight | Standard consumption of basic materials | ||||||
| Floor covering | GVLV floor element | Expanded clay sand | Gidrostekloizol | Concrete | Crushed stone | Lumber | ||
| units change | kg | m2 | m2 | m2 | m2 | m3 | m3 | m3 |
| quantity | 1,02 | 1,02 | 0,05 | 2,3 | 0,17 | 0,042 | 0,08 | |
Depending on the functional purpose of the premises, the floor covering can be made of parquet boards, linoleum, textile carpets, ceramic tiles, etc.
1 - floor covering; 2 - prefabricated screed from finished floor elements; 3 — polystyrene foam boards; 4 — two layers of hydroglass insulation; 5 - underlying layer of M150 concrete with a rubbed surface; 6 - crushed stone (gravel) 40 - 60 mm in size, compacted into the base soil.
| Indicators for 1 sq. m | Weight | Standard consumption of basic materials | |||||
| Floor covering | GVLV floor element | Expanded polystyrene boards | Gidrostekloizol | Concrete | Crushed stone | ||
| units change | kg | m2 | m2 | m2 | m2 | m3 | m3 |
| quantity | — | 1,02 | 1,02 | 1,02 | 2,3 | 0,084 | 0,042 |
1 - floor covering; 2 - prefabricated screed from finished floor elements; 3 - backfill made of expanded clay sand; 4 — two layers of hydroglass insulation; 5 - underlying layer of M150 concrete with a rubbed surface; 6 - crushed stone (gravel) 40 - 60 mm in size, compacted into the base soil.
| Indicators for 1 sq. m | Weight | Standard consumption of basic materials | |||||
| Floor covering | GVLV floor element | Expanded clay sand | Gidrostekloizol | Concrete | Crushed stone | ||
| units change | kg | m2 | m2 | m2 | m2 | m3 | m3 |
| quantity | — | 1,02 | 1,02 | — | 2,3 | 0,084 | 0,042 |
Depending on the functional purpose of the premises, the floor covering can be made of parquet boards, linoleum, textile carpets, ceramic tiles, etc.
1 — log 80×40 mm; 2 — layer of hydroglass insulation; 3 — nail K4×100; 4 - screw for gypsum plasterboard; 5 - floor covering; 6 - floor element; 7 - concrete (brick) column 250×250×150 every 800 mm; 8 - crushed stone (gravel) with a fraction of 40 - 60 mm is compacted into the base soil.
| Indicators for 1 sq. m | Weight | Standard consumption of basic materials | |||||
| Parquet boards | GVLV floor element | Gidrostekloizol | Crushed stone | Concrete | Lumber | ||
| units change | kg | m2 | m2 | m2 | m3 | m3 | m3 |
| quantity | 48,5 | 1,02 | 1,02 | 0,70 | 0,042 | 0,082 | 0,015 |
1. This floor design is used on soils with an undisturbed structure, natural density, with the mark of the base floor surface above the level of the building blind area and above the level of dangerous capillary rise of groundwater.
Layered floor construction
Mainly used in interfloor ceilings. They are made from several layers over colder rooms (basements, garages). A soundproofing layer is laid on the floor slabs, and a hard floor covering is placed on it - piece parquet or parquet panels. For sound insulation, fiberboard slabs of grades 4, 12, 20 are used.
It is recommended to make basement floors above groundwater with the installation of a continuous layer of waterproofing.
Single layer construction
This floor is made directly on the floor slabs. If unevenness is detected, it is necessary to make a leveling layer. The material for the construction of a single-layer floor can be linoleum on a bioresistant basis, which is not subject to rotting processes. In rooms with high humidity (toilet, bath), a single-layer floor can be made of ceramic tiles or rubber-based linoleum.
Installation of separate hollow core covering
Diagram of a soundproofing floor.
First, a soundproofing layer is laid over the floor slabs, then the logs are strengthened, and the finished floor material is laid on them: parquet boards, tongue-and-groove boards or wooden panels. If the room has a continuous flooring made of unplaned boards, then fiberboard slabs are laid on top, the thickness of which must be at least 20 mm. Logs for the construction of a separate hollow-core floor on floor slabs must be planed and treated with an antiseptic. The dimensions of the bars (lag) are 80*40 mm. Depending on the thickness of the floor covering, the distance between the joists is determined. The thinner the material, the more often the bars are laid.
Installation of a separate hollow-core floor
Scheme for installing floorboards yourself.
It is built on the basis of a monolithic screed made on floor slabs. The screed is made from a mixture of concrete and porous aggregate of class B12.5, density grade D1200, the thickness of the screed should be no more than 40 mm. It cannot be leveled with cement mortar; uneven areas must simply be sanded. A gap of 20-30 mm is made between the monolithic screed and the walls of the room along the perimeter, which is filled with soundproofing material and subsequently covered with a plinth.
The external covering of such a floor can be linoleum, PVC tiles, parquet, laminate parquet, fiberboard or other materials. A layer of waterproofing material is placed on top of the screed. It is laid overlapping or the joints are coated with bitumen mortar. Then lay a layer of sound insulation made of mineral wool grade 125-150 up to 60 mm thick, fiberboard slabs up to 50 mm thick, sand or expanded clay.
Classification
Floors consisting of screed, insulation and floor covering are called separate
A complete analysis of the element allows us to identify several categories of floors, divided by purpose. These are industrial buildings, residential buildings, public institutions and livestock buildings.
Related article: Ways to tie curtains beautifully
There are several more distinguishing features, first of all, division by type: monolithic, roll and piece. Analysis of the installation site is divided depending on the location: above a heated room, floor construction on the ground, along the interfloor ceiling.
Regarding sanitary standards, there are 3 types of floor installation:
- single-layer, made of material that complies with GOST for heat loss and sound transmission;
- separate structure, made of a separate layer of sound insulation, screed and finishing coating;
- hollow, made along logs (cuts) with heat and sound insulation laid between them.
You can understand how to make a good floor while meeting numerous requirements only after fully familiarizing yourself with the standards.
Parquet flooring
Floor arrangement diagram.
Beautiful appearance, low thermal insulation and soundproofing make parquet (parquet boards, parquet panels, piece parquet) a popular material for the construction of floors. The installation of such a floor is possible on a solid plank base, fiberboard slabs, cement-sand screeds. Block parquet floors made in a herringbone pattern with or without friezes look good.
First, you need to mark the rows of coverage to reduce waste. A layer of glassine is laid on the prepared base, and the lighthouse “Christmas tree” is laid on it. Based on it, the floor covering is installed with careful connection and fastening of each parquet strip with forty nails, two driven into the side groove and one into the end groove. The caps are pressed deeper into the material using a hammer.
The installation of block parquet floors on screeds is made using a hot or cold bitumen solution in a “Christmas tree” pattern without friezes. When laying parquet, if necessary, level it using a special parquet planing machine or a hand plane; After sharpening, baseboards are installed, scraping and sanding of the floor are done. The floor is slightly moistened before scraping. The laid parquet is rubbed with mastic or varnish.
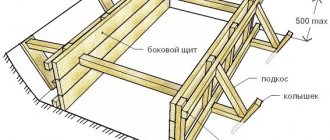
Installation of wooden floors on joists
To install a wooden floor on joists, the thickness of the board must be at least 40 mm, otherwise it may sag and the floor will turn out wavy.
A wooden floor on joists is not sensitive to unevenness of the base. The joists can be laid directly on the concrete base, and large unevenness can be leveled with the height of the joists.
Additional insulation can be done using mineral wool or other similar materials. This is especially true when installing a wooden floor on the ground. Many communications and wires can be easily mounted directly under the flooring, which is very convenient, especially for country houses, where the number of different wires and pipes is huge.
If you decide to lay a wooden floor with your own hands , then the first thing you need to do is check the quality of the base. If it is a monolithic base or a concrete floor, then in principle there is nothing to check. The only thing that can be done is a cement screed, but you can do without it. If the screed is already present, then it is necessary to examine it by tapping and visual inspection. There should be no cracks on it. If there are any, then you need to clean this area from the screed and fill in a new one.
The next stage is laying waterproofing. To do this, lay a regular polyethylene film on the cleaned surface with an overlap of 20 cm, which is secured with tape, or you can purchase polyethylene film equal to the size of the room.
The logs are wooden blocks. They must be dried and coated with special compounds that prevent the process of rotting. There should be no bark on them. If there is bark on the block, it must be removed, and the area must be cleaned and treated with an antiseptic.
After that, logs measuring 50x100 mm are laid in increments of 50-60 cm, leveled and attached to the base. Now there are adjustable logs that are very convenient to install, but they are more expensive. Additionally, the space between the bars can be filled with any heat-insulating material, which is covered with a vapor barrier on top.
Next, you can proceed directly to installing the wooden floor. It spreads perpendicular to the joists, usually in the direction of the light falling from the window. The first row should be 1 cm away from the wall. This gap is necessary so that the wood can freely expand to the sides when the temperature and humidity in the room changes, otherwise it may bend the floor somewhere in the middle.
After which, using self-tapping screws, the floor boards are attached to the joists. For a more aesthetic appearance, screws are screwed into the end of the board at an angle of 450. Then the next board is attached and the whole process is repeated. Laying occurs in a checkerboard pattern.
The next step is sanding. If the difference between the flooring boards is large, then these places are leveled using an electric planer. Then they take a sanding machine, which is cheaper to rent, and bring the surface to perfection by reducing the grain size of the sanding belt from coarse to fine. When sanding indoors, a lot of fine wood dust is generated, so it is necessary to curtain doorways and wear a special protective respirator.
Often after the grinding stage you can find small chips, cracks, and depressions on the surface. They need to be sealed using wood putty, allowed to dry and sanded again with fine sandpaper.
The final stage will be wet cleaning of the entire room, varnishing or painting the wooden floor and installing skirting boards.
Linoleum floors
Floor insulation diagram for the first floor.
Linoleum is a material used for finishing floors. It has such qualities as strength, durability, resistance to chemicals, elasticity; it is easy to clean and wash. For all these qualities, the material is very popular among developers. Disadvantages include susceptibility to deformation - expansion, shrinkage, warping and swelling. To prevent their appearance, the linoleum is first kept in a rolled-out state for several days to straighten and take the shape of the floor.
The quality of the base for the flooring significantly affects the quality of the linoleum floor. Possessing elasticity, linoleum is able to absorb even the slightest irregularities. Therefore, the bases must be level, clean, dry and strong. The horizontalness of the base must be checked with a special rod. The bases for linoleum can be screeds made of cement-sand mortar, fiberboard slabs, chipboard slabs, slag concrete, expanded clay concrete and plank floors.
To install a new screed on the floor slabs, a sand-cement mortar of 3:1 composition is made, which is laid on a hard and durable preparation in a layer of up to 3 cm and leveled with a rule or a trowel along pre-installed guide rails. The surface of previously made screeds must be clean and smooth. If necessary, the screed can be leveled by laying a new layer of cement-sand mixture with a composition of 1:2. Permissible base humidity is no more than 10%.
The most labor-intensive process is considered to be the process of preparing the bases for gluing linoleum on plank floors made on floor slabs.
Floor sound insulation diagram.
They should be quite tough. The base boards should not sag. Before gluing linoleum, the base of the floor must be well treated: the lumber must be dry, planed, treated with an antiseptic or drying oil. All cracks must be filled, cleaned and primed.
When constructing a base made of fiberboard or chipboard, it is also necessary to ensure the rigidity of the base under the slabs with mandatory grouting of the joints between them. The slabs are screwed to the wooden base of the floor with screws, their caps are well sunk into the material, and the slabs are glued to the concrete or cement-sand screed with hot bitumen. The surface of the fixed slabs is leveled by smoothing out the bulges, sealing the seams with mastic, priming and filling with oil putty. Then lay linoleum.
Wooden floor on concrete floor
If you decide to install a wooden floor on a concrete base, then you may prefer a technology that involves the use of logs. Such structures are most often used in wooden houses or apartments. The advantages are undoubted; they are expressed in giving the floor noise and heat insulating properties. With the help of logs, you can level any foundation, whereas utility lines are usually located under the floor in this case.
If you decide to resort to this particular flooring technology, then it is important to know whether it is worth attaching the logs to the concrete floor. Opponents of this approach emphasize that such a procedure destroys the screed, and the junction of the base and the joists form sound transmission bridges. Proponents of rigid fixation note that the deformation of wooden beams negates all repair efforts.
In fact, soundproofing is a controversial issue. Rigid structures transmit sound, but to eliminate this effect, insulation with sound-proofing properties is placed between the joists. If you nevertheless decide to resort to the technology of installing a wooden floor over a concrete floor, then at the first stage all debris is removed from the room, cracks are rubbed out, and protrusions are knocked down.
Next, waterproofing is applied, because the wood needs to be protected from moisture. To do this you should use:
- penetrating compounds;
- hydrophobic mastics;
- rolled materials;
- thick film.
When installing a floor on a concrete slab in an apartment, you need to stock up on fasteners and substrates to raise the joists. When choosing a substrate, you must be guided by the recommendation that the material should be rigid. Over time, it should not sag in order to prevent play from occurring at the support points. You can use pieces of plywood and thin boards for this. But by visiting a hardware store, you can purchase special plastic backings.
The lags are laid perpendicular to the sunlight falling from the window. The distance between the beams should depend on the thickness of the rough coating. The stronger and thicker the sheets, the farther apart the logs can be located. Usually this parameter varies from 40 to 50 cm. The outermost bars should be 3 cm away from the wall, everything else will depend on the width of the room.
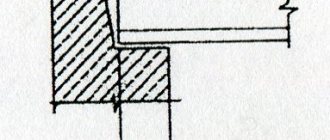
Ceramic tile floors
To install a floor on floor slabs from ceramic tiles, a base is first made - a monolithic screed made of cement with the addition of sand (approximate composition 3:1; 4:1), the installation of which is carried out over a waterproofing layer. When installing a floor on a wooden base, it is necessary to stick waterproofing on the flooring with hot bitumen mastic, then put a reinforced mesh and put the mortar over it. To install the screed, you should use beacon wooden slats installed level along the walls of the room. Place the prepared solution between the slats. The horizontality of the screed is checked by the rule, the ends of which must rest on the lighthouse slats. After the solution has hardened, the slats are removed. The remaining grooves are filled with solution.
Scheme of floor covering and insulation.
Before laying the tiles, they must be sorted by size and color. Lay out the floor according to the selected pattern of the future covering, after which you should check the rectangularity of the room with a cord, stretching it diagonally from corner to corner, and then determine the width of the frieze and lay two mutually perpendicular rows according to the pattern dry. The distance between the tiles when laying them should be no more than 2 mm.
If the tiles do not fit completely, they can be cut and laid in a row located closer to the wall. Lighthouse tiles are laid according to the marks made on the clean floor. Then corner, intermediate and frieze beacons are installed along the cord and ruler. The prepared mortar is used to seal and lay the first row of tiles. After laying the frieze rows, they begin laying the tiles of the main floor covering pattern. In order not to step on already laid tiles, they begin to be laid from the far wall.
The solution used should be of a plastic consistency, and it is advisable to lay it in an even strip on several rows of tiles at once . Having laid the tile on the mortar, you should slightly settle it with light blows of a trowel or hammer on the block placed on top. Checking the horizontality of laid tiles is carried out as a rule. The seams between them must be free of mortar. Two days after laying the tiles, they are filled with a creamy solution of cement in water, having previously cleaned the surface. The infusion is carried out 2-3 times, as the solution shrinks. Remains of the solution are removed from the surface immediately after completion of work by wiping the tiles with moistened sawdust. Cover the laid tiles with moistened sawdust in a layer of 15-20 cm, and, periodically moistening them, achieve good hardening of the solution.
Laying linoleum on a concrete floor
The installation of a floor on a concrete foundation slab may involve the use of linoleum. At the first stage, the base is prepared, the quality of which will determine the service life of the finishing coating. It is important to eliminate depressions and protrusions that can cause wear and tear on the linoleum. If the height differences exceed 2 mm per square meter, then the depressions are puttied, and the protrusions are eliminated by knocking down. After this, a new floor screed is performed; for this, cement or concrete mortar, as well as self-leveling mixtures are usually used.
Before laying linoleum on a concrete floor, it is important to lay the film, and then the insulation material. When laying the finishing layer, the temperature in the room must be maintained at least +18 °C, and the humidity must not exceed 68%.
When cutting linoleum, there should be 10 cm left on each side. If there are seams, they should be positioned in the direction of light from the windows, so they will be less noticeable. Linoleum can be laid without gluing, using glue or mastic, or using tape. The most effective and labor-intensive technology will be using glue or mastic. For large areas this technique is the only correct one.
Installation of laminated parquet floors
A modern building material for covering floors on floor slabs is laminated parquet. This is an environmentally friendly coating, reminiscent of wooden parquet, which consists of several layers and is very convenient to use. It is made of dense, waterproof fiberboard boards, covered with a layer that imitates wood. Dimensions of the planks: length – 1.2-1.7 m, width – up to 18 cm, thickness – from 6 to 14 mm. The laminate planks are coated on top with acrylate or melamine resin to protect them from mechanical damage.
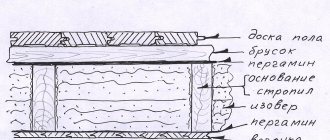
Do-it-yourself wooden floors above the first floor
Wood, unlike other bases (reinforced concrete slabs, monolith) used for floors, is an environmentally friendly material. In addition, a wooden ceiling or floor gives the room a unique look and retains heat well. Previously, wood was used for these purposes quite often. Nowadays, interfloor wooden floors, as a rule, are made only in wooden houses, although there are exceptions.
Wooden floor installation
Wooden floor installation
Installation of wooden floors between floors begins with the installation of support beams. The cross-section of beams depends on several reasons, in particular on the length of the span and the load on the floor of the floor above. The type of wood used for them also plays a big role in choosing the cross-section of beams. Pine is most often used, but sometimes oak is used.
The determining factor is the price of wood; naturally, oak is more expensive. In this case, the thickness of the beams can be reduced and the design slightly changed.
Construction and installation of wooden floors
The process of constructing wooden floors involves placing beams into pre-prepared recesses in the wall. The cross-section of the beams is made equal to both height and width. It happens that the height is chosen slightly higher. In any case, the beams are laid on waterproofing, with a gap in both planes of the order of 1-2 cm. This is done in order to eliminate the expansion of the walls when such a floor gets wet or dries out.
Further, to the beams at the level of their lower plane, slats are packed along the entire length, which are used to attach thermal insulation and ceiling lining. An additional layer of waterproofing is laid on top of the thermal insulation, and finally a subfloor is laid.
In the case of oak, in order for the ceiling of the lower floor to look “antique,” the beams are planed before installation. Further overlap is carried out on top of the beams. In any case, the span length for a wooden floor should not exceed 5 m. A span length of 4 m is considered optimal.
Do-it-yourself wooden floors above the first floor