Now that a good half of the ground floor apartments along the central streets of our cities have firmly linked their fate with small and medium-sized businesses, the article on laying tiles on the street becomes very relevant. It is not a fact that everyone who reads it will immediately personally begin laying tiles on the porch of their office, workshop or shop, but it is a fact that it will help to understand the basic requirements for this process and competently control the quality of the work performed.
A porch lined with ceramic tiles looks great and, if you selected all the materials correctly and followed simple but extremely important rules when laying it, it will not only please the eye for a long time, but also fulfill its main function: to serve as a comfortable and safe entrance to your room.
Choosing tiles for the porch
Tiles for outdoor steps must have a number of characteristics that ensure their long-term operation in quite difficult conditions:
- Wear resistance - resistance to abrasion. Of the existing 5 wear resistance groups (PEI I - V), the last two are suitable for installation on the street, but if a large number of people are expected to pass through, then it is preferable to choose the PEI V group.
- Water absorption is the ratio of the mass of water absorbed by the tile at full saturation to the mass of dry matter (in percent). According to this indicator, ceramic tiles are divided into 8 groups: 1 group absorbs up to 3%, 2 group no more than 6%, third up to 10%, the remaining groups are not interesting to us in the context of this article.
Video on the topic
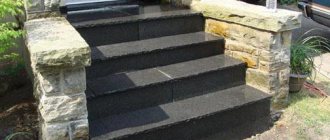
Installation of clinker
steps
- Frost resistance is the ability of a tile to maintain its appearance and technical characteristics during repeated freezing and thawing. Frost-resistant tiles must withstand 25 such cycles. This is a single fired tile with minimal water absorption. it is usually indicated by a snowflake.
- Chemical resistance – resistance to chemicals. Without going into details, let us take into account that class AA or a slightly weaker class A is suitable for us.
- Hardness – the ability to resist scratches. Of the 9 hardness indicators for ceramic tiles (on the Mohs scale), 8th and 9th are suitable for us - they can withstand the effects of the main street abrasive - sand. It is indicated by a foot on a shaded background.
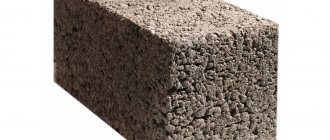
A few separate words need to be said about this type of tile, such as porcelain stoneware. Porcelain tiles are made from the same material as regular ceramic tiles, but differ in that the material is dyed in the body and molded under higher pressure. Porcelain granite is fired only once and most types are suitable for outdoor installation. Its floor types are characterized by increased roughness.
Also used for outdoor flooring are clinker tiles, which are produced from heterogeneous types of clay with the addition of fireclay, dyes and fluxes using the extrusion method.
What is porcelain tile and its types
Let's start with the fact that it actually has nothing in common with natural stone. The artificial cladding does not contain any granite chips. It only contains:
- Quartz sand
- White-burning clay
- Chamotte
- And feldspar
All this is ground into powder, pressed under pressure of 400-500 kg/cm2 and sent to the oven, where it is fired at a temperature of 1300 °C. For comparison, copper melts at a temperature of 1083°C, and at 1539°C the steel itself turns into liquid.
It is not surprising that as a result of such heat treatment a product is obtained that, in its physical and technical characteristics, resembles stone, and in some respects even surpasses it.
However, judge for yourself.
- Water absorption of porcelain stoneware is less than 0.05% of the volume, while for real granite this figure is 5%.
- The bending strength is around 49 MPa, while the norm for floor finishing material is 27 MPa.
- In addition, artificial stone has high impact strength.
- UV resistant.
- Resistant to alkalis and acids.
- Immunity to temperature shock.
- Enviable wear resistance.
Most cobblestones used in construction can only envy such “impenetrability”. However, we must not forget one very important point. Porcelain tiles are different from porcelain tiles.
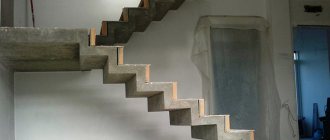
Preparing the porch base
As always, there are two options: the porch already exists and you need to lay tiles on it, or you need to make a porch for laying tiles. The second option is preferable because you can accurately calculate its dimensions to match the dimensions of the selected tile and immediately eliminate or minimize factors that negatively affect the future structure.
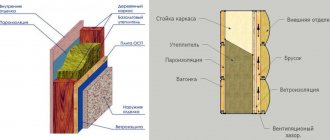
If a new porch is being built, it is important not to miss two important points: the depth of the foundation laid under the porch must correspond to the depth of the foundation of the house, or be no less than the depth of soil freezing for a given region. For central Russia this is 1.2 m. And the structure of the base could be like this:
In this case, vertical and horizontal waterproofing is mandatory. This is important, since any moisture that appears in the area where the tile is glued will lead to its inevitable separation from the base.
The base can be not only concrete, but also brick. The brick must be new and durable.
Not many craftsmen follow the technology for preparing the base of the porch for laying tiles in full, but it is worth striving for the ideal, and we will now consider which of the components of the under-tile pie can be omitted and why.
Preparing the base for laying ceramic tiles
Using a hammer drill with an attachment, I quickly removed the old tiles and the remains of the mortar that held them in place. The surface of the cleaned porch had to be leveled using mortar. It was mixed in a standard proportion - one part M400 cement to three parts sand. I added a little PVA glue to the finished solution. It gives the frozen solution extraordinary strength. I was convinced of this when I once laid tiles in a summer shower. It still stands and not a single one has fallen off. After leveling, I let the solution dry for a day.
Expansion joint device
They are made if the surface area exceeds 8 - 9 sq.m. and filled with sealant for exterior use to match the color of the tiles. It is unlikely that your porch will be this size. It’s worth leaving the expansion joint at the junction of the tiles with the house. It is worth doing a waterproofing layer in the case when you did not have the opportunity to properly waterproof the entire porch. Also, a slope layer is necessary if it was not specified when constructing the porch or you are covering an existing porch without a slope. Reinforcing mesh is usually installed if the base of the porch is made of brick or in case of reconstruction. The discharge layer makes sense when constructing expansion joints.
But if the base of the porch is seriously damaged, as a rule, due to the lack of waterproofing, it is not worth repairing. Moisture will reach the tile and, after several freeze-thaw cycles, will definitely tear it off from the base.
Cut and glue
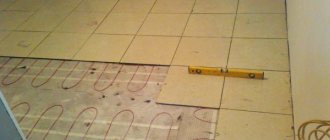
Then I first laid out the tiles on the porch and steps, taking into account the seams. I marked out the places where I needed to lay a whole tile and where I needed to cut it down. To ensure that the seams were equally even, I bit some wire and made brackets, which I inserted between the tiles instead of standard plastic crosses. I cut the tiles with a grinder and a diamond blade. Cuts like butter. I prepared all the tiles except the last row - there are four tiles where you need to make cuts for the railing posts.
I prepared the glue according to the instructions in small portions. I poured a little dry mixture into a bucket of water and mixed it with a drill with an attachment. I started laying the tiles from the wall of the house, as the smoothest side. The glue was applied to the floor with a notched trowel with a slot spacing of 8 mm. After laying, each tile was checked with a level and corrected with a rubber hammer. I inserted prepared bent wires into the seams. I cleaned the seams of glue if it got there.
When the last row remained, I tried on the tiles again, made the appropriate cutouts for the railing posts and laid them in place.
Features of laying tiles on steps
If you have already selected a non-slip tile for your porch, calculated and built a base for it, all that remains is to choose an adhesive composition that will provide it with many years of life. And, of course, try to avoid mistakes when installing it. After all, it is absolutely not a fact that even the most durable and frost-resistant tiles will be able to take on all the sins of unscrupulous builders or the excessive savings of too thrifty customers.
Video on the topic
Step cladding
Master Class
Do not believe tile adhesive manufacturers who claim that their product is universal and works both indoors and outdoors. You need at least an elastic adhesive such as Ceresit CM 17/117 or their analogues from other manufacturers, and even better, special cement-based waterproofing mixtures. When using the latter, you don’t have to worry about grouting the joints, but simply lay the tiles with minimal gaps, or better yet, without, and wipe them dry and promptly after laying. The elastic and water-repellent properties of these mixtures are such that they will forever prevent moisture from entering under the tiles from the outside. If you use tile adhesives and lay tiles with gaps, then be sure to use epoxy resin-based compounds for grouting.
We begin laying by marking the site, not forgetting about the overhang of the edge of the tile to the thickness of the riser and the adhesive composition on which it will be glued. In the case of installing tiles with a corner or a safe edge, an additional gap of 3–4 mm is required.
If the tiles do not have a corner, then we begin laying from the top platform on the far left. Don't forget to leave a gap for expansion joints where it joins the house. Apply the adhesive evenly onto the tiles with a notched trowel without leaving any gaps. Remember that the presence of voids under the tiles is unacceptable. We grout the joints after 20 - 30 minutes. If you're late, you may not be able to wipe it off.
Next, the tiles are laid on the steps while maintaining the slope. And after that, a riser is mounted with a gap as in Fig. higher. To apply the adhesive solution, you can use a simple device with a cutout for the protruding edge of the horizontal tile.
When laying tiles with a safe edge, they are installed from the bottom step.
In both cases, it is important to remember that the riser should overlap and not touch the bottom step tile and should also not reach the top tile of the step or landing. These gaps are being erased.
There remain two nuances that are important to know about for everyone who wants to decorate their porch with tiles.
First: in addition to tiles, you can also successfully use slabs of natural stone cut to size.
Artificial stone slabs - polymer concrete or already familiar paving slabs - are becoming increasingly popular.
The installation rules are the same. The only thing that can be allowed is a small protrusion of the top tile above the riser, commensurate with its thickness.
And second: ensuring the safety of your coating in the winter. There are three most common ways here:
- Gluing self-adhesive anti-slip tape, rubberized corners and strips.
- The use of anti-slip compounds, available in a wide range on our market and allowing, with a single application, to transform slippery tiles into an absolutely safe coating for up to 3 years.
- Built-in electric heating device.
We recommend other articles on the topic
How to lay paving slabs with your own hands - choosing tiles, preparing the base, laying process
Choosing non-slip tiles for the porch | Overview of step cladding options
To be or not to be porcelain tiles
And yet, any owner who wants to decorate a porch with artificial stone must understand that non-slip porcelain tiles for steps are a myth. A minimal amount of snow or melt water, and your stairs will turn into a skating rink. Therefore, the finishing will necessarily require additional anti-slip devices.
- Abrasive belts;
- Rubber inserts;
- Aluminum linings;
This is truly an inevitable minus, which, meanwhile, is compensated by the beauty of the structures and their durability. The latter easily overcomes the 50-year mark. Only natural stone or clinker steps can boast such durability.
But judge for yourself the aesthetic qualities of porcelain stoneware finishing.
Comments4 comments
- Alexei:
06/17/2016 at 19:13I recently opened a store in the center of Sochi and decided to change the steps. For a long time I couldn’t find normal ones. All were either bad or expensive. But a month later I came across a website for C3 steps and decided to order because... They didn't look bad and weren't very expensive. They arrived in 4 days and installed them promptly. Very pleased, I recommend it.
- Alexander:
02/14/2017 at 13:11
Good afternoon. The porch (based on wooden logs) and the staircase (based on a metal profile on stilts) are covered with a composite decking board. Is it possible to cover the top with tiles and, accordingly, steps made of tiled material using the technology presented in the article? Thank you.
- Nikolaevich:
02/14/2017 at 17:57
Since you indicated that it was a composite decking board that was used that does not experience temperature fluctuations or changes in size due to wetting and drying, we can answer unequivocally: yes. Possible dimensional fluctuations of wooden logs will not be transmitted to the tile through the composite board, the main thing is that the entire structure does not have excessive mobility. The only thing we can recommend, and what we would definitely do in this situation, is to use a polyurethane adhesive composition for gluing ceramics, selecting it for the specific material of the tiles and steps.
- Alexander:
02/15/2017 at 12:11
Thank you for the explanation of the properties of the composite and the recommendation for the adhesive composition. There should be no mobility of the structure, since the porch and stairs are on stilts, below the freezing depth. Sincerely, Alexander
Grouting the seams of the tiles
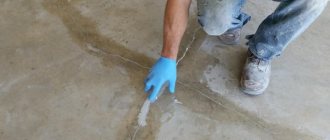
Two days later, when the glue had hardened and the tiles could be walked on, I began to grout the seams. To do this, I mixed a solution of cement and sand with the addition of PVA glue. I rubbed the seams with a rubber spatula and then wiped them with a sponge, at the same time removing dirt and excess mortar with a damp cloth. After grouting, I allowed the entire structure to harden. A day later I swept away the dust from the grouting. Now you can freely walk along the porch and rejoice at how well and beautiful everything turned out.
| Material | Quantity | Cost, rub. |
| Tiles (porcelain tiles) 30 x 30 cm | 40 pcs. | 1080 |
| Tile adhesive | 1 bag | 250 |
| Cement M400 | 1 bag | 240 |
| PVA glue | can 2 kg | 125 |
| River sand | 2 buckets | |
| TOTAL 1695 rub. |