How to properly sand a floor: description of the process with photos and videos
Floor grinding is one of the types of processing of concrete, self-leveling and wooden surfaces, which allows you to remove old or damaged protective coating and level the floor before further finishing. In addition, using this process you can remove various types of dirt and defects, such as cracks and chips. Grinding also makes the concrete surface less hygroscopic, and therefore more frost-resistant.
Grinding Methods
There are two main ways to carry out this operation:
- Wet. In this case, to sand the floor with your own hands, special abrasive components are used, which are well suited for mosaic or marble coverings.
- Dry. This method is used to treat all classic surfaces, including concrete, wood and self-leveling surfaces. The inconvenience is that during operation a huge amount of dust is generated, so you have to constantly pause so that it has time to settle.
When sanding dry, it is advisable to use machines equipped with a vacuum cleaner.
Grinding equipment
This technique is divided into two groups:
- Professional. It is a machine equipped with large discs with abrasive material. The movement of the working elements occurs in different directions, so subsequently a perfectly polished surface is obtained. In addition, the devices are equipped with dust collectors and a control system for the speed of rotation of working parts and the intensity of processing. The main disadvantage is the cost. Even if you rent equipment, the budget can be very large.
- Small household grinders. The most popular is the grinder. To work with this tool you will need an abrasive disc. If polishing is required, it is recommended to buy a special machine. It is inexpensive and very easy to work with.
Floor grinding technology
Concrete base
This procedure can be carried out immediately after laying the material, if the semi-dry screed method was used, or some time after the start of operation.
Preparatory work
- It is necessary to remove all furniture and other interior items from the room; the surface must be completely empty. Skirting boards should also be removed. After this, you need to dismantle the old decorative covering: laminate, parquet, boards, paint, tiles, etc. For these purposes, you can use any tools, including a hammer drill.
Old concrete screed often requires additional repairs
- Assess the condition of the screed. If there are too many defects or they are large, then sanding will not help and you will have to replace the coating. Small cracks can be sealed with epoxy sealant, and if reinforcement or mesh fragments stick out from the concrete, you need to cut them off with a grinder and a trimming wheel. Otherwise, these elements may damage the grinding equipment.
- Check that the coating is horizontal. Significant differences cannot be corrected by sanding the floor screed; in this case, it is better to use self-leveling mixtures. The need for grinding or repair of the screed can only be shown by checking the level of curvature of the floor
Immediately before starting, it is recommended to check the voltage in the network; for proper operation of the machines, it must be stable.Performing sanding
- First of all, the top layer of the floor covering is removed, after which the filler grains are exposed, and about 5–7 mm of thickness is removed. For these purposes, it is necessary to use abrasive materials with a grain size of 30–40 units. During the grinding process, peeled areas may be discovered; they need to be removed and then sealed with cement-sand mortar.
After this, the coating is impregnated with a special strengthening compound, which will increase the mechanical strength of the floor. To do this, you need to pour the composition in wide strips over the surface and spread it with a roller. It is important to stretch the solution evenly so that there are no dry areas left. It is recommended to apply 2-3 layers of impregnation and let it dry.
- At the last stage, you need to use the machine again to grind the concrete floor, but in this case the abrasiveness of the material should be 100–400 units. The result is a smooth coating with a characteristic shine, and this completes the sanding of the concrete floor with your own hands.
- Place a cutting wheel on the grinder and cut 4 lines around the perimeter of the pothole with a slight indentation. Hollow out the resulting rectangle with a hammer drill.
- Place an abrasive wheel on the grinder and grind the groove. Remove any formed stones and dust.
- Apply 2-3 layers of deep penetration primer.
- Seal the cavity with cement-sand mortar if it is deep.
- Grind down the corners with an abrasive wheel if there are no strict requirements for the surface.
When using special strengthening impregnations, the quality of concrete processing increases significantly
If you do not plan to further finish the screed, you can polish it. For these purposes, materials with a grain size of up to 3000 units are used. The result is a completely waterproof coating. After all of the above procedures, it is necessary to treat the surface with a layer of polyurethane varnish, which can be applied immediately after completion of the work. To do this, use brushes or rollers.
Floor repair by sanding
As a result of prolonged use of floors or improper installation technology, cracks or potholes may appear on the surface. In this case, you can use a grinder to eliminate defects. If the coating has many shallow cracks, then the entire area just needs to be sanded using an abrasive disc. If there are large potholes, you need to do the following:
Serious potholes are completely cut out, after which the niche is reinforced and filled with new mortar.
In the case of a crack, the sequence of actions is slightly different:
- Step back from the crack 5 cm in each direction and apply appropriate markings.
- Place a stone cutting disc on the grinder and cut out the damaged area according to the markings. Remove concrete fragments and dust.
- Prime and cover with a repair compound containing quartz sand.
- After polymerization of the material, grind it with an abrasive wheel.
To repair cracks in concrete screeds, it is better to use special polymer-based compounds
Self-leveling floor
In this situation, you cannot use equipment for grinding concrete screeds; it is better to use wood machines.
So, processing the floor with a grinder looks like this:
- Markings are applied to indicate the boundaries of the areas requiring treatment.
- Bubbles and other small defects are removed using an abrasive wheel.
- Large potholes are repaired in the same way as large defects in the concrete screed. Then the cavities need to be filled with polymer putty, and after it dries, sanding is carried out.
Attention! During sanding, do not allow water to get on the surface, as the machine will clog. It is also important to sand out defects completely, and not try to save money and remove only the top layer.
Defect 2. Cracks
There are many reasons for dismantling the self-leveling floor.
Standard prerequisites include poor quality work, non-compliance with technology, and unauthorized changes in the composition of the mixture being poured. The list of more impressive reasons is headed by the owners’ desire to install a “warm floor” system in rooms with low ceiling heights and similar compelling excuses for radical alterations.
The choice of method for removing self-leveling floors is influenced by:
- Composition of the solution used in filling. It is important that a polymer leveling solution or mixture based on cement or gypsum was used.
- The purpose of the fill. Mixtures with a cement or gypsum base solve the problems of leveling and forming a base for further laying of finishing materials. Polymer compositions serve as finishing coatings or substrates for the finishing decorative layer.
- Final thickness. Compositions with a cement or gypsum base are poured in a layer with a thickness of 1 cm to 8 cm. The optimal thickness of polymer floors is 2.5 mm. Maximum limit 5 mm. The minimum thickness may be 0.3 mm polyurethane coating and 1.0 mm methyl tetacrylate finish shell.
- Option for screed device. More precisely, the screed is connected to the base or there is an insulating layer between it and the base. Insulation prevents the diffusion of self-leveling floor and reinforced concrete base. If it is not there, then the molecules of the poured solution partially penetrate into the ceiling, which makes it much more difficult to remove.
- Technical condition. It is necessary to find out the location of the damage and decide on the feasibility of expensive dismantling.
The technical condition of the floor does not matter if major alterations or redevelopment are carried out in the room. The situation is completely different when defects spread over 10–20% of the total area.
It is not necessary to remove the screed or decorative finishing shell completely if it is possible to eliminate only the swollen or cracked areas.
The methods used today for dismantling self-leveling floors require impressive labor efforts and do not spare customers’ wallets or floor materials. The costs can add up to a very significant amount. Therefore, if it is possible not to resort to major transformations, it is better to carry out partial removal of the self-leveling floor or local repairs.
The work of completely removing the screed is often carried out much easier and faster than cutting out fragments or almost precision removal of surface convexities. However, it should be remembered that it is worth taking on them after carefully weighing the costs and the expected result.
An operation to completely remove the screed is performed in the following cases:
- Increasing the height of ceilings in rooms with multi-layer powerful screed.
- Preparing the base for installing a “warm floor” system, if the ceiling height does not allow reducing it by another 7–10 cm.
- Low adhesion of the screed to the base, if strong adhesion over the entire area was assumed.
- Deterioration of the old leveling layer, requiring major replacement.
- Cracking and dusting of the base floor, precluding further arrangement of the premises and living in it.
Dismantling is carried out by simply destroying the screed with a hammer drill. To make it easier to solve destructive problems, it is recommended to first cut the floor into segments with a grinder.
You need to use a diamond blade. You should cut carefully, being careful not to catch the ceiling or the bottom leveling layer. It is better not to go deep into the entire thickness, but to leave about a centimeter of the uncut layer. Otherwise, serious repairs will be required.
After the grinder divides the floor into sections, the hammer drill enters the fight to destroy the screed. To work with it you will need two attachments:
- Scarpel chisel. With its help, the bulk of the screed is crushed.
- Pike. With its help, work is carried out to separate the layer with high adhesion.
If the screed was designed according to the “floating” principle, there is no need to use a peak. The leveling layer is simply crushed into small pieces, collected in craft bags and transported to a disposal site.
If the floor was poured onto a concrete base so that the adhesion was maximum, then you must first act with a scarpel, then clean it with a lance. The width of the scarpel can be different: from 3 to 10 cm or more. If it is necessary to remove a figuratively poured floor, it is worth using several similar devices. Usually the largest scarpels are found in the most powerful hammer drills.
It was not in vain that we touched upon the issue of careful dismantling work. If the underlying screed is significantly damaged during the dismantling of the top layer, it will also have to be removed. It is possible to refuse complete dismantling only if there are no more than 20% defects in the subfloor, and it is also possible to restore the technical characteristics of the base through repairs.
Screeds made on a small area can be cleaned without a hammer drill. But more effort and time will be spent than renting a drilling machine.
Thin screeds created by pouring mortar with a gypsum or cement base are much more difficult to remove than thicker leveling layers. They are rarely arranged according to a “floating” scheme.
Basically, it is poured to eliminate the relief of the concrete subfloor, with which the leveling screed should adhere as much as possible.
There are much fewer reasons for dismantling thin layers of leveling, these are:
- Partial detachment from the concrete base. Manifests itself in the form of “swelling” of individual sections. This happens due to the subfloor not being sufficiently dried before pouring, poor preparation for pouring, or the presence of oil stains on it.
- The appearance of cracks over a large area of the floor. Occurs due to violation of the proportions of the solution or instructions from the concrete mix manufacturer.
- The presence of bubbles and voids in the body of the fill and on the surface. The traditional result of non-compliance with technology is associated with a large number of air bubbles in the mixture being poured.
The removal of thin screeds must be treated with special attention. There are many actions to be performed “automatically”, but one must not lose vigilance. A careless movement can very easily damage the rough base, to repair which you will need to re-fill the floor.
The priority is manual labor; the tools used are a narrow and wide spatula. It is better not to cut the screed into segments if you are not fluent with an angle grinder. If a hammer drill is used, it is installed at an angle of 10 - 20º to the surface of the screed. Among the permitted attachments is only a lance, which, when crushing the floor, many craftsmen lightly hold with their free hand.
It is generally better to remove leveling layers up to 1.0 cm thick using a mobile unit designed for grinding concrete. For one-time work, it is more profitable to rent it.
Industrial options are connected to a vacuum cleaner, which during operation collects and removes harmful dust. A thin layer of up to 0.5 cm can be cut with a grinder, using it not as a cutter, but for its intended purpose as a manual grinder.
Dismantling of screed sections is carried out according to one of the above-described schemes, depending on the thickness of the layer and the technology of its filling.
Work on cleaning the self-leveling floor area is carried out as follows:
- Marking the area with defects. It is carried out so that there is at least 10 cm between the edge of the cracking zone and the line of future dismantling.
- Cutting out a section of the floor with a grinder. Performed strictly along the intended lines.
- Grinding the screed inside the cut area. Produced with a hammer drill with a lance or chisel and spatula. Without fanaticism with the desire not to damage the rough base.
- Preparing the base of the site for pouring a new mixture, which should be identical in composition to the previous one.
- Pouring the solution into the floor segment freed from the screed, taking into account future shrinkage during the hardening period.
READ MORE: How to properly make a floor screed with your own hands
The amount of shrinkage is usually indicated by the manufacturer of the mixture. If the thickness of the screed is insignificant, it can be neglected. If the leveling layer was 7–8 cm, the shrinkage should be calculated. Before pouring along the perimeter of the removed segment, you need to make a kind of formwork from thin sheet plywood and fill the mixture with a layer that takes into account the amount of shrinkage.
After waiting for the floor to completely harden within the repaired segment, the formwork must be removed. Place twine in the seams, then seal them with a solution of similar composition.
Manufacturers of acrylic and epoxy-based leveling mixtures eagerly claim that their products are practically non-removable. It is truly impossible to remove a polymer floor if the thickness of the fill exceeds 5 mm and the floor was built without a decorative layer.
Advice not to install a polymer floor without thinking about the consequences is worth heeding. Another question is that it is removed in extremely rare cases, because... it is thin and even enough to serve as a strong rough base for laying the next coating.
Suppose there is an urgent need to cut and remove the polymer floor installed on top of the decorative print. For example, the rough base was prepared poorly, as a result of which bumps and dents appeared on the surface, or the owners got tired of the drawing.
Although the thickness of the fill allows you to simply level the floor or apply a new film with photo printing on it, there are ways to remove the polymer shell. To remove manually, use spatulas or thin cutters. Depending on the composition of the polymer floor, it can be partially dissolved or heated to facilitate dismantling efforts.
Most self-leveling floors created with a 3D effect are installed on top of a thin layer of cement or gypsum leveling. In such situations, it would be wiser to sacrifice the rough screed and remove the polymer floor along with the subfloor.
Dismantling methods are equivalent to methods for removing screeds; they depend on the thickness of the layer and the design of its structure. True, the destruction of such a floor will require much more time and effort.
To clean polyurethane, acrylic and epoxy coatings, you can use rented mechanization equipment - grinding machines with a disk working body. If the floor area is small, a regular grinder will do.
The upper part of the polymer coating is simply cut off, after which the lower part, which resembles softened linoleum in structure and plasticity, is scraped off with a spatula.
And yes, after dismantling the old screed, you will most likely have to make a new one. And in order not to make a mistake with the materials, we recommend that you read a review of the best self-leveling mixtures.
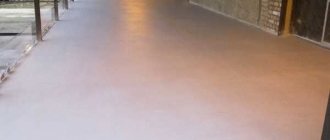
How to polish a self-leveling floor?
Photo of a sanded self-leveling floor. How to sand a self-leveling floor?
Self-leveling flooring has been very popular for a long period of time. This coating has the unique property of self-leveling, so installing it is quite simple. In order to obtain good quality coating, all instructions must be followed. While using this coating, you may encounter the problem of carrying out repair work. As a rule, this is due to non-compliance with installation rules, so all its obvious advantages were not identified.
Features of grinding concrete floors
Grinding of a concrete floor can be carried out both on the rough and on the final coating of the screed, using equipment called “helicopter”.
This technology for grinding self-leveling floor screed provides high-quality adhesive properties to the materials being laid.
Here it is worth noting the fact that grinding does not correct the horizontal plane of the self-leveling floor, and the absence of wave-like changes should be provided for even when pouring it.
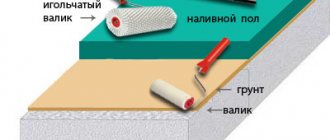
In the process of grinding a concrete base with your own hands, it is recommended to use the dry grinding method, which is performed in three stages:
The surface of the screed is leveled with a grinding tool. Deformation shrinkage joints, potholes and cracks are eliminated; To remove existing unevenness, epoxy mastic is used; when applying it, the plane is controlled, along which the grinding “helicopter” should subsequently pass without any problems; At the final stage, polish the screed with your own hands.
The details of grinding a self-leveling concrete floor look like this:
- Using a “helicopter” trowelling and grinding machine, first treat the working surface with circles with abrasive 40;
- Then, to strengthen the concrete screed, a special composition is used, due to which an astringent film is formed on the surface, closing the pores in the concrete;
- Afterwards, the concrete floor is polished with discs with a grain size of 400 and higher, which makes it possible to make the base resistant to high mechanical stress;
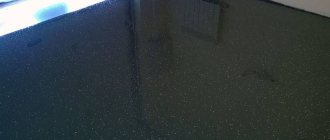
- At the final stage, the floor is polished with circles of abrasive from 1500 to 3000, as a result of which the surface of the screed gets a glossy appearance.
Video:
The main problem is the occurrence of uneven floor surfaces
You may encounter this inconvenience if the surface is not properly cleaned before installation. Remember that it is very important to thoroughly remove dust from the entire floor, as well as eliminate greasy stains and differences in height of more than one millimeter.
Some people are confident that with the help of a self-leveling floor they can hide small swellings of the surface. But that's not true. After pouring the mixture, on the contrary, this flaw will be even more noticeable. Therefore, it is worth sanding the self-leveling floor and, if necessary, repairing all the holes and chips.
The occurrence of floor swelling
An unpleasant situation with swelling can occur when the solution was prepared poorly.
When installing a self-leveling floor, the mixture is poured and leveled using a rubber spatula. Note that it is very important when working with such a composition to use a spatula with needles. With their help, excess air will be removed from the composition, and you will get a surface that will be highly durable and can last for a long period of time.
Swelling can also occur when the mixture was poured onto a wet base, after which, due to condensation, the polymers separated inside the concrete.
If you plan to carry out renovation work in a room with a large area, you should hire at least three people as assistants. In order for the work to proceed smoothly, assign roles and tasks for each of them in advance.
The self-leveling mixture may cause waves. This defect occurs due to the solution being too liquid. Therefore, before preparing it, carefully read all the manufacturer’s recommendations. There should be no draft in the room where these repairs are taking place.
Remember that it makes sense to sand the floor only if minor errors have been made, otherwise you will have to dismantle the entire coating.
Defect 1. Bulging, peeling of the filling surface
Coping with this defect will not be difficult. If small holes appear, you can simply fill them with putty. After drying, wet the trowel and smooth the area where the repair was made.
If the unevenness is large, then the surface will have to be leveled by pouring another layer of cement-based leveling coating. Before using the mixture, do not forget about.
Professionals recommend using tile adhesive as a repair composition, which is durable and has good adhesion to the surface.
Lumps and sagging
In this case, it is enough to simply sand the surface of the self-leveling floor using a special tool. If you don’t have a grinding machine, then you can rent one, since there is no need to buy a tool to eliminate defects in the self-leveling floor in an apartment - it costs a lot of money.
Craters
This defect can occur when the self-leveling coating is installed on a wet base. If no voids are found during the inspection, then you can simply seal them with a repair compound. If delamination occurs, you will have to carry out minor dismantling work.
The cause of swelling and peeling is insufficient adhesion (adhesion) of the self-leveling layer and the base. The coating, which is not properly glued to the base, begins to move away from it.
Errors in technology leading to swelling and peeling:
- Insufficient cleaning of the concrete base from dust, grease stains and other contaminants.
- Using a low-quality primer.
- Laying the self-leveling layer on a wet base. In this case, excess water and condensate are rejected by the filling layer, bubbles and peeling form.
- Low grade strength of the concrete base.
- Failure to observe the time interval between applying layers of self-leveling floor.
- The coating components were not mixed thoroughly enough before pouring. Mixing must be done only mechanically, using special attachments.
- Failure to remove air bubbles from the coating using a needle roller. Bubbles remaining in the thickness of the coating move to the surface during the drying process and leave behind swollen bubbles or burst “craters”.
- Violation of temperature and humidity indicators in the room. According to the technology, when carrying out work, the room temperature should be above 5°C and humidity below 60%.
Elimination of blisters and detachments:
- All swelling must be removed. You can remove bubbles and formed “craters” with a grinding machine or manually using a spatula.
- Clean the floor from small particles of construction debris and dust. To do this, the surface is vacuumed and wet cleaned. Before proceeding to the next step, the base is thoroughly dried.
- Prime the defect areas, twice if necessary.
- Fill the defects with the self-leveling mixture used. As an alternative, you can use polymer or cement putty. Cement putty is intended for self-leveling cement floors, while polymer putties are universal, many of them can be used not only for polymer, but also for cement (or concrete) coatings.
If the self-leveling floor is not facial, then at this step the repair can be completed. The self-leveling floor, used as a front covering, needs complete visual masking of the “patches”. Therefore, the entire floor is filled with a finishing self-leveling layer, fully adhering to the manufacturer’s instructions for the self-leveling mixture.
Do-it-yourself self-leveling floor polishing
Unfortunately, even the most experienced builders can make mistakes during installation, so in this case, sanding the self-leveling floor can help you. After this, it will be necessary to level the base of the polymer floor.
At the first stage, it is necessary to clearly identify the places where the bulges or holes are located. If you are removing defects from the wrong side, then this mixture can be done by covering the pits. After the composition has completely dried, the bumps should be removed using a grinding machine.
Remember that sanding is only permissible to a distance of up to two millimeters. Otherwise, you will remove the protective layer that gives strength to the entire surface.
In the case where there are differences in height from three to four millimeters, it is best to turn to professionals to carry out the work. In order to eliminate such a defect, they will need to pour another layer, but without any mistakes.
Floor sanding can only be done when there are no metal objects on it. Otherwise, this procedure cannot be performed.
To ensure that there is not too much dust during the sanding process, it is necessary to periodically moisten the floor with water.
The grinding procedure is accompanied by the release of a large amount of dust, so you can work with the device only in special protective equipment. Be sure to wear goggles and a respirator. To remove debris, you can use a construction vacuum cleaner, since a regular household device will not be able to remove the entire volume of dirt, but will only become clogged.
To perform this procedure, you should use devices that are used for sanding wood and polymers. Please note that after this procedure, scratches will remain. To eliminate them, it will be necessary to re-fill the surface with the composition, the layer of which should not exceed two millimeters.
Surface grinding
If, as a result of the work carried out on installing the self-leveling floor, you still made mistakes, this is possible even with experienced specialists, then grinding the self-leveling floor will help you in this situation. And the next stage is leveling the polymer floor.
To begin, mark the locations of the bulges and holes. If the self-leveling floor is not the front surface, then dilute the same mixture and cover the holes. After the surface has dried, you can begin to work: arm yourself with a sanding machine, remove the bumps on the floor surface.
If after pouring you still have differences in height of more than three to four millimeters, then it’s better to invite professionals, they will pour another layer of floor, but this time evenly, without mistakes.
Before sanding the floor, make sure that there are no metal products or fittings anywhere in it. If they are present, grinding will be impossible.
When carrying out work, do not wet the floor to reduce the amount of dust. Water will only increase the sliding process, and wet material will clog the rubbing elements of the machine.
The grinding process involves a large amount of dust, and accordingly, work must be carried out using personal protective equipment, such as goggles and a respirator. It is permissible to use an industrial vacuum cleaner: with large volumes of work, a household vacuum cleaner will quickly become clogged and may even eventually fail.
It is worth noting that concrete grinders cannot be used for grinding self-leveling floors, as they can destroy the surface of the polymer coating.
It is necessary to use machines designed for sanding wooden surfaces and polymers. After any grinding work, small scratches remain, which is why, after grinding work, the surface is once again treated with a layer of fill up to two millimeters.
If bubbles occur on a flat surface, such places are cleaned and refilled with the same solution, provided that this is not the front surface.
When applying “pothole” repairs to the front surface, this will be very noticeable. In such cases, it is recommended to treat the entire surface with a thin layer of up to two millimeters to create a presentable appearance of the entire surface.
Let us remind you once again that some defects acquired during operation cannot be corrected with a grinder. For example, during street use, car tracks or chips due to mechanical shocks.
The most correct solution in such situations is to repair the defects with putty based on polymeric materials, with the obligatory preliminary priming of the surface. And after that, pour a fresh layer of flooring.
Thus, sanding a self-leveling floor with your own hands does not seem to be a difficult or impossible task. The main thing is to decide on the need for this process.
Don’t try to save money and sand to a thin layer. It can easily happen that a thin floor will crack, and such repairs will cost more.
You can see an example of sanding such a coating in the video below. Good luck with your repair.
How to level an incorrectly filled self-leveling floor
Pouring a liquid self-leveling floor is a troublesome and time-consuming task and, despite its apparent simplicity, requires considerable knowledge and skill. And if the technology for laying it is not followed, holes and tubercles, cracks and potholes will be your constant companions under your feet. How to fix? There are options - some can be done on your own, others will require the experience of a master and special equipment.
Option one - we can handle it ourselves
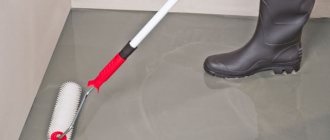
For this purpose, self-leveling, finishing compounds for the floor are suitable for final leveling - this is liquid linoleum. With its help, you can level the floor, where the difference in unevenness varies from 1 to 20 mm. At the very beginning, its surface is cleaned and polished with a special machine - the roughness will allow the mixture to adhere securely.
Important! After sanding, a lot of dust is generated - collect it with a vacuum cleaner, but do not carry out wet cleaning.
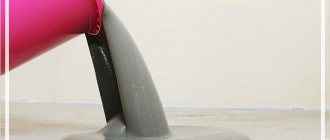
Next, the floor is poured - the mixture should be leveled with a roller. The main condition is to do all the work quickly, since the mixture sets and you have 30-40 minutes to do everything. And remember - plaster beacons will help you simplify your work; they will be used to mark the required level.
Requirements for concrete screed
The coating is considered high quality if:
- There are no potholes, cracks, bulges, depressions, or swelling on the surface. The number of foreign inclusions is minimal.
- The color of floors that have decorative value does not differ from the declared color.
During repairs, observe the following requirements:
- After removing the damaged floor, ensure that the compressive strength of the exposed substrate is at least 25 mPa and its thickness is greater than 60 mm.
- The construction of the concrete screed must comply with construction SNiPs.
- The concrete surface must be thoroughly cleaned before pouring the polymer.
- The slope of the base does not exceed 2 mm over a length of 2 m.
- The moisture content of concrete at a depth of 20 mm does not exceed 6%.
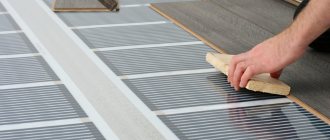
The process of polishing self-leveling floors
It is carried out using a grinder or a renovator - the work is carried out the next day after all the filling has been completed. The experts give their advice in this case - the grinder perfectly levels the surface, but you should work with it carefully. And if you are new to this issue, use a renovator, which works slowly, but this will allow you to control the entire leveling process.
- Mark the floor with a bright marker - this will allow you to visually control the area of the floor that needs to be leveled.
- Next, place the renovator attachment on the surface to be leveled, and holding the machine body on top, grind. The main thing is that the working tool itself should always be positioned horizontally, and all work should be carried out wearing a respirator and safety glasses.
- Walk the machine once over the intended area, without pressing hard on the body of the unit - it is better to make 2-3 “light” passes rather than ruin the floor surface at once.
- Finally, remove the dust - use a vacuum cleaner without a wet cleaning function, or go through it with a broom, then check the level with a laser.
Main! DO NOT rush - carry out all work carefully and evenly.
How to level the floor under a sander
If it is possible to use an industrial grinder to level the surface, use it. And it doesn’t matter what brand and model it is - almost all of them cope with the task perfectly.
- At the beginning of work, install a coarse sandpaper on the system - it is optimal to choose exactly 40, due to which you can not only “remove” the excess, but also level out all the unevenness;
- connect it to the vacuum cleaner system. If the diameter of the hose and the inlet coupling do not match (and this may happen), there is nowhere to look for an adapter - you can twist the metal tip from a regular vacuum cleaner and screw the hose into the hole of the grinder itself;
- release the collet on the handle and set the length, tighten the nuts back - the main thing at this stage is to choose a comfortable handle length for yourself so that the machine can be controlled without much physical effort;
- plug in the machine and start leveling the floor - do not work in a chaotic manner, slowly, removing unevenness and bumps layer by layer.
After work, thoroughly vacuum the surface or walk with a dry broom. Next, you can lay linoleum or finish filling the floor with a self-leveling mixture.
Do-it-yourself self-leveling floor polishing
Self-leveling flooring is a very common solution for renovation work in recent years. Polymer-based self-leveling floors are considered self-leveling, that is, there is no need to finish them after pouring. However, a completely ideal surface can only be obtained if all the rules and guidelines of the manufacturer are followed. If you deviate from these rules, which often happens when installing floors yourself, the quality of the floor deteriorates and its service life is greatly reduced. In this option, the floor requires repair.
Polymer-based self-leveling floors do not need to be trimmed. Because this is done of course.
An important advantage of a self-leveling floor is its durability, however, if installation and operation rules are not followed, the integral structure of the floor can be damaged in a very short time. Certain coating deficiencies occur more frequently than others.
Tips for sanding resin floors
Very often, roughness and unevenness appear on the self-leveling floor. Their most popular cause is poor quality floor cleaning before pouring. The floor also often swells. A similar effect appears if the solution poured onto the floor has not been processed very well.
Sanding a polymer floor will make it possible to correct deficiencies made during the construction of the floor.
If you made mistakes during the manufacture of the floor or damaged the coating throughout the work, you can correct the defects by grinding the surface. After sanding, the polymer floor covering is leveled.
First of all, note the unevenness of the plane. Next, prepare a solution from the same mixture from which the floor is made. Cover the recesses in the plane with the solution and, after drying, remove the bulges using a sanding machine. It would be nice not to be inclined to sand the floor yourself if the height differences on its plane create more than 2 mm. In this option, it is better to call professional craftsmen who will pour another layer of polymer composition on top using precise technology, so that the result is a better coating than the previous one.
Types of unevenness on the screed floor
Cracks
Irregularities can be divided into several categories; they all have their own cause of occurrence and individual methods for eliminating defects.
| The reason for the appearance of irregularities | Type of irregularities |
| Wrong proportion of water and dry ingredient | Water is required to ensure optimal chemical reactions during curing. Insufficient moisture results in incomplete hardening of the floor. As a result, some areas quickly wear out, and depressions appear on the surface of the dried floor. Excess moisture causes partial or complete detachment of the self-leveling floor from the base. |
| Violation of mixing technology | Too high mixer speeds create many air bubbles of various diameters. All further measures (settling, use of a needle roller, etc.) remove only large ones; small ones remain in the mass. During hardening, air bubbles rise up and the floor surface becomes lumpy. |
| The base is not primed before pouring | Due to the lack of primer, areas with different moisture absorption appear on the base. In one place the mixture loses moisture too quickly, and in another it holds it for too long. Another consequence is the peeling of the self-leveling floor. This is a very unpleasant phenomenon; ordinary leveling cannot be done to eliminate it. |
| Insufficient labor productivity | When determining the volume of the finished mixture, actual capabilities were not taken into account. The solution has its own maximum time frame for use; in the future, the course of chemical reactions significantly reduces fluidity. As a result, it is difficult to level, and tool marks are noticeable on the floor. |
| Poor leveling of the surface with a rule and squeegee | Poor leveling of the surface with a rule and squeegee |
| Drafts indoors | Drafts cause uneven drying of the mixture. Some areas lose moisture too quickly, while in others it stagnates. The floor becomes not only unstable, but also uneven. |
| Failure to comply with recommended indoor microclimate indicators | Too high a temperature or low humidity disrupts the optimal hardening regime. The self-leveling floor deviates from horizontality. |
| Large unevenness on the base | Any material containing water shrinks. Depending on the components, it may fluctuate within different limits, but it will definitely happen. If there are large depressions on the surface of the base, then an increased thickness of the liquid mass will be required to level them. During hardening, it is in these places that depressions appear. |
| Absence of damper tape around the perimeter | The tape compensates for linear expansion of the self-leveling floor. Its absence causes separation from the base and swelling of the material. |
| Weak concrete screed | If the strength of the screed is much lower than the physical characteristics of the self-leveling floor, then peeling is inevitable. A dirty base can lead to the same negative result. |
| Non-simultaneous filling | With large areas of premises, it is almost impossible to fill at the same time. And any interruption of work inevitably leads to differences between the old and new solution. |
After we have figured out the reasons for the appearance of irregularities, we can begin to talk about various methods and technologies for eliminating them.
All existing defects of the finished surface of the self-leveling floor are divided into 2 large groups:
- Local (for example, differences in height, cracks, sagging, pits, craters, peeling);
- Serious (excessive drying of the top layer, the presence of deep cracks, complete delamination, voids and porosity that affect the entire depth of the hardened layer).
And if in the first case you can save the situation with the help of a grinder and simple methods of leveling the surface (primer, putty, plastering), then in the second case you will have to completely dismantle it, clean the floor down to the foundation and fill it all over again.
READ MORE: How to calculate a self-leveling floor in an industrial building, material consumption and formula
When it is quite possible to correct errors, you need to do the following:
- Level the surface;
- If necessary, expand slightly;
- Clean from dust and small debris;
- Pour the quick-drying putty or plaster mixture;
- Level with a spatula or rule;
- Dry;
- Prime;
- Reapply the finishing layer.
When the defects are irreparable, the self-leveling floor will have to be completely dismantled. These disadvantages include:
- Cracks, small and deep, that affect the entire coating area;
- The floor peels off completely;
- The presence of many voids under the frozen surface;
- Porosity that extends throughout the entire depth of the screed.
Specific Job Properties
Do not wet the surface to reduce the appearance of dust during work.
If the surface is wet, the sanding machine will only slide harder, and wet dust will clog it. Do not forget that before work you need to wear a respirator and goggles that will protect you from dust. You can remove dust with an industrial vacuum cleaner, but it is not recommended to use a simple household appliance. Countless amounts of dust can damage it.
The machine for grinding work must be specially designed for self-leveling floors.
It is necessary to abandon the use of a cement mortar grinder, which can destroy polymer-based floors. Equipment for sanding polymer materials and wood is suitable for you. After sanding the floor, small scratches will inevitably remain on it. To remove them, it is necessary to additionally pour a layer of polymer composition 2 mm thick.
If bubbles appear on the surface, the places where they appeared must be cleaned and refilled with a similar solution. However, this can only be done, for example, if the self-leveling floor is not an external surface. If, for example, you apply a similar repair option on the front plane, the result will not be very beautiful. The completed areas will be very different. When making the front plane, it is proposed to pour a new one with a thickness of approximately 2 mm on top of the previous layer. In this option, the entire appearance of the floor needs to be neat and beautiful.
With specific care, anyone can sand and level the floor with their own hands if they have a suitable sanding machine. It is worth noting that sanding the floor may not remove all imperfections. Major damage cannot be repaired in the same way. If the ceiling height does not allow you to pour an additional layer of 2 mm, then an excellent option is to dismantle the covering that is already outdated and fill the floor again.
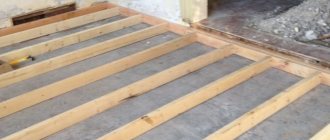
Features of sanding wooden floors
Having decided to overhaul a wooden floor instead of replacing it with a new material, you can turn to sanding technology and subsequent polishing of the surface.
In the case of installing a new floor made of pine tongue and groove boards, you also cannot do without a sanding machine.
Before grinding, it is necessary to carry out a number of preparatory work.
First of all, stock up on the necessary tools, you will need:
- grinding machine;
- sanding paper;
- beam for grinding;
- hand scraper;
- hammer.
Since during the operation of the wooden flooring, the heads of the nails that fixed the boards can pop out of it, it is recommended to inspect the entire floor and tap the protruding heads with a hammer.
The need is caused by the use of a special machine equipped with a sanding belt, which can be damaged by nails during operation.
It is recommended to take this fact into account when laying a new wooden floor made of tongue and groove boards.
The material is fixed with self-tapping screws, but not through the front part of the part, as this will not only spoil the appearance of the floor, but will also negatively affect the operation of the blade.
If, nevertheless, the screws were screwed into the front part of the tongue-and-groove board, it is necessary to ensure that the head of each fastener is well recessed.
In addition, when preparing wood flooring for sanding, it is recommended to rid the surface of cracks with your own hands.
Large gaps are sealed by using planks with appropriate dimensions, which are installed in the gap.
The plank is treated with wood glue, placed in the slot and tapped with a mallet.
Then remove excess glue. When the adhesive has completely dried, the surface is leveled with a plane.
Small gaps in the wooden surface are eliminated using specially prepared crack filler.
To do this, mix 1x1 gypsum and sawdust, add water until a thick, wet mass is obtained.
If the composition is supplemented with a minimum amount of citric acid (1/3 tsp per 0.5 water), sawdust will become more pliable for use.
Using a spatula, smooth out the cracks in the boardwalk, and sand the dried surface with sandpaper.
Video:
Sanding self-leveling floor
Despite the fact that self-leveling floors are self-leveling mixtures, in some cases they need to be sanded. If the technology and proportions are observed when making the solution, the coating turns out to be even and smooth, without such defects as bumps and swellings, pits, waves, etc. Grinding of the self-leveling floor is carried out to eliminate small irregularities in the polymer layer of medium and large thickness. This correction is performed using grinding machines designed for processing different types of materials, including polymers.
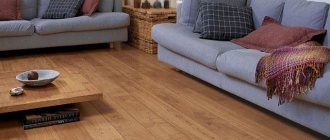
Areas of use of self-leveling floors
Self-leveling floors. Consumption of self-leveling floors. Types of self-leveling floor
Self-leveling floors are often used in construction. This is due to the large number of advantages of this coating:
- They are safe and do not emit toxic substances;
- Create a smooth monolithic coating without seams;
- Used for a long time;
- Resistant to external influences;
- Withstands large temperature changes;
- Plastic, fireproof, aesthetic, antistatic.
Liquid floors are used in the following industries:
- In the construction of residential, commercial and industrial buildings.
- Since the coating is resistant to moisture and is easy to care for, self-leveling floors are used for installing floors in bathrooms, kitchens, and bathrooms.
- Decorative self-leveling floors are used in living rooms.
- Liquid floors are considered an excellent option for flooring in industrial premises, catering establishments, medical and educational institutions, and in the field of cultural and domestic purposes.
However, the benefits can only be enjoyed when the solution is poured in full compliance with the manufacturer's requirements. Otherwise, after the coating has hardened, defects will have to be eliminated.
Causes of defects in polymer self-leveling floors
The main reasons why defects in the surface of a polymer coating occur are non-compliance with the technology for installing polymer floors.
For what reasons can blisters appear on a polyurethane or epoxy surface:
- Incorrect base coat preparation. The polymer is poured onto a cement screed or other base, which must first be leveled and cleaned of dust and dirt. Dirt and dust particles, oil stains and other technical contaminants, if not eliminated, will impair the adhesion of the polymer to the base, as a result of which the surface may swell after drying. Another important point is to eliminate large unevenness of the base surface. If this condition is not met, then the self-leveling solution after curing in different areas will acquire different degrees of wear resistance and strength (which depend on the thickness of the polymer). Thus, it may turn out that the customer expects a high quality of the entire surface of the polyurethane or epoxy floor, but where the layer is thinner, mechanical stress may cause potholes or cracks from heavy equipment or vehicles.
- Incorrect preparation of the polymer solution. Grinding the self-leveling floor may be required in case of the formation of so-called waves, which can appear when the solution is too liquid, when drafts enter the room.
- High humidity of concrete or other base. With high humidity of the base, the polymer may also poorly “stick” to the base, which will lead to the formation of swelling and “swelling” of the floor. To check humidity indicators, moisture meters are used, or this can be done in a simple “old-fashioned” way. To do this, cut out a piece of polyethylene (1000*1000 mm or other size) and glue it with tape along the entire perimeter to the concrete base. If after a couple of days condensation forms on the film from moisture, it means that the surface of the screed has not yet dried out enough.
In order to prevent the formation of such defects, it is necessary to contact the professionals of a specialized company who will carry out all work in compliance with the technology and taking into account the operational requirements for the future coating.
Problems with self-leveling floors
The appearance of irregularities and roughness
Unevenness and unplanned roughness primarily arise due to poor cleaning of the surface before pouring the floor.
Before laying such material, it is necessary to remove dust from the base, remove all oil stains and unevenness of more than one millimeter.
Many people believe that by pouring the floor, small pimples will disappear, but this is a big misconception. The self-leveling floor will only highlight all the minor imperfections on the base, and they will become more noticeable. That is why the base is pre-ground and all holes and chips are sealed with putty.
Floor swelling
The occurrence of blisters on the floor surface is associated with poor-quality processing of the poured solution.
Quite often, when installing self-leveling floors, the solution is poured and leveled with a simple wide spatula, considering that a self-leveling self-leveling floor does not require unnecessary actions.
Again, this is a misconception: all the instructions say that it is necessary to treat the self-leveling floor with a needle roller. The needles will eliminate air bubbles in the solution, resulting in a denser and more wear-resistant surface.
It is likely that swelling is caused by laying the polymer solution on a damp base; condensation causes the polymer floor to separate from the concrete base.
If the room area is large, you cannot carry out the filling work alone; the optimal number of people is three or four. Each person is pre-determined the scope of work so that the pouring process goes on continuously and before it begins to set, it has time to be evenly distributed.
Also quite common is “waves” on a self-leveling floor. The reason for their occurrence is simple: when preparing the solution, it turned out to be too liquid than what was recommended by the manufacturer, and when hardening, the freshly poured floor was affected by a draft in the room.
If there is a slight deviation, such a floor can be sanded to an even state, otherwise, only laying a new layer.
How to polish a self-leveling floor
Grinding a polymer coating requires the use of special equipment and appropriate qualifications. You cannot grind hardened polymer with a regular concrete grinder; such a device can destroy the polymer layer, forming chips and cracks. To grind polymer, you need to use a tool with a more gentle action, designed for processing softer surfaces - wood, polymer, soft metals, etc.
After processing with a grinding machine, in any case, small scratches and other traces of mechanical impact remain on the polymer coating, so after eliminating the defects, the floor must be covered with a finishing polymer solution of a similar composition, which will hide all the imperfections that appeared during the correction process.
If serious surface defects form, such as deep cracks, potholes and other damage, grinding the self-leveling floor will not help. Such defects are eliminated through restoration - cracks are cleared and filled with mortar, just like potholes, then a polymer solution is poured over the entire area, which will hide the traces of repair of the polymer floor.
How to fix mistakes when pouring a self-leveling floor
You can remove visible scratches and restore the original gloss of the epoxy coating by polishing. The operation is carried out using a rotary polishing machine using felt wheels onto which a special emulsion is applied.
Restoration of polyurethane floors is carried out by applying a protective varnish.
Any surface treatment is preceded by thorough cleaning, dust removal and degreasing.
In some cases, it is enough to remove only the top layer of polymer by grinding with diamond wheels. This is done when a coating with sagging, bubbles, or surface discoloration is subject to renovation. A new finishing layer is poured onto the sanded surface. If the area of defects to be corrected is small, you can do without an industrial rotary installation. For local grinding, a conventional hand-held angle grinder is used.
Repairing cracks and peeling involves complete removal of the polymer coating. In the case where the quality of the concrete base is not satisfactory, but the old fill is going to be removed from the entire area of the room, the sequence of actions looks like this:
- Where the coating has weak adhesion, scraper-type attachments for a hammer drill are used for removal.
- In areas where adhesion is preserved, attachments such as chisels and grinders are used.
- The exposed surface of the concrete screed is ground.
- A sequence of actions is performed that corresponds to the polymer floor installation technology: dust removal, degreasing, priming, applying the first layer, etc.
If the coating is removed in a limited area, then first the perimeter of the repair work is determined (it is made in the shape of a rectangle). The covering is then cut through to the concrete along this perimeter. Further work is carried out as if the floor was completely removed. The only difference is that the joints with the old coating are sanded and treated with a special mastic.
READ MORE: Proportions of cement and sand in concrete for floor screed calculator
What are the selection criteria: completely remove the coating or carry out local repairs?
If decorative properties are important (for example, in offices and shopping centers), then local repairs are appropriate even if the general condition of the surface is satisfactory. The decision to completely replace the polymer floor (regardless of the type of object) is made, as a rule, if more than 30% of the area of the self-leveling coating is damaged.
When replacing the coating locally, materials of the same type that have already been applied should be used. An exception is cosmetic repairs using methyl methacrylate mixtures. They work well in contact with other materials. The advantages of methyl methacrylates are the speed of work, the disadvantages are their low abrasive resistance.
If peeling of the polymer layers occurs due to the poor quality of the concrete substrate and the unsatisfactory condition of the waterproofing, then it is impossible to do without reworking the screed.
If cracks in the screed are detected when the quality of the concrete is satisfactory, the substrate should be restored. Traditional restoration technology consists of opening cracks to the required depth, followed by dust removal, priming and filling with a polymer repair compound.
Recently, an alternative technology called injection has begun to develop. First, the polymer layer is removed to completely expose the crack. Then, at an angle of 45°, holes are drilled in the concrete towards the crack along its entire length in increments of 30 - 40 cm. Special fittings - packers - are hermetically inserted into the holes. An injection pump is connected to the packers and a waterproofing compound is injected until it exits the fracture.
All repair actions after sealing cracks are similar to those described in the previous subsection.
The disadvantages of the finished self-leveling layer can be divided into:
- local, which can be eliminated without significant labor and material costs;
- serious - in these cases it is better to completely remove the coating and fill in a new one.
Cracks
This type of defect can be eliminated using a quick-drying repair mixture. Surface tears in the self-leveling floor need to be opened up a little, thoroughly removed from dust and sealed with putty or a quick-drying repair compound, having previously been treated with a primer.
Cracks in the self-leveling floor.
For deep cracks, special metal construction staples are used that look like corrugated paper. The crack needs to be further expanded with a grinder. Perpendicular to the main seam, depending on its length, cut one or more small, compensation cuts. Thoroughly clean the entire area to be repaired with a vacuum cleaner.
An experienced flooring installer knows that floors with bulging, buckling areas should not be installed. The base will quickly crack and collapse, the locks of the laminate or parquet board will begin to creak and crumble. Therefore, this type of defect must be eliminated without fail (!).
Delamination of self-leveling floor.
Damaged areas must be removed with a crowbar or knocked down with a hammer drill. Thoroughly remove dust, prime and fill with self-leveling floor diluted in the required proportion.
Potholes, drops
It is not difficult to combat this phenomenon. Small depressions must be filled with any repair compound (putty, self-leveling solution or cement-sand mixture) and carefully smoothed with a trowel or wide spatula.
Filling the holes with a quick-drying compound.
Deep holes of large size and differences need to be “brought to zero”. That is, level to the highest point using a non-shrinking self-leveling floor on a gypsum or gypsum-cement base. Pre-prime the floor, fill it with mortar and smooth it with the rule. Be sure to remove the excess.
Some craftsmen recommend using thin-layer tile adhesive to smooth out defects. It has good adhesion to mineral substrates and can act as a reinforcing (strengthening) component.
Sanding the floor with a grinder.
It is not difficult to fix this defect. The best way to eliminate tubercles and thickenings is to grind the self-leveling floor. A surface grinder, belt or any other suitable machine, grinder with an abrasive wheel is used. The grain size must be selected individually. For cement compositions, a concrete grinder is used.
Advice! When working with a grinding unit, a huge amount of dust is generated, which “clogs” the tool and impairs visibility. Therefore, be sure to use a pipe to connect a construction vacuum cleaner.
Craters
Formed due to insufficient deaeration or increased residual moisture of the base. If the filling layer is not porous, there are no voids underneath, then the recesses just need to be filled with putty or a solution of self-leveling mixture poured in. There is no need to do deep jointing, just lightly clear it.
Due to drafts and working radiators, the surface of the self-leveling floor may lose moisture too quickly and not gain the required strength. Therefore, this layer must be removed with a grinder and leveled with a thin-layer non-shrinking compound.
Leveling the floor with a thin-layer self-leveling floor
Let's list those shortcomings with which nothing can be done. There is only one solution - complete dismantling. This:
- A network of cracks over the entire area;
- Complete detachment;
- Multiple voids under the self-leveling floor;
- Porosity to the entire depth of the layer, spalling of sand and dust.
Dismantling the self-leveling floor.
There is no need to spare time and effort to correct shortcomings. Laying flooring on an uneven or damaged base means throwing significant amounts of money down the drain. After 1-2 years, the finishing material will become unusable and everything will need to start over. In this video, the floor is being repaired using a liquid self-leveling floor solution; we recommend using special compounds, for example, as in the video below (there are many domestic analogues, for example: Art-Eco).
Even when the surface is perfectly prepared, defects can appear if the manufacturer’s instructions are not followed, as well as by careless adherence to technology. In particular these are:
- There is not enough water for the solution to achieve its final hardness and strength when drying;
- Excessive amount of water, which leads to partial or complete separation of the bulk mixture;
- The mixer is too powerful, which excessively saturates the solution with air, which leads to porosity of the surface;
- The foundation was not primed, which leads to poor adhesion and uneven spreadability of the finished mixture;
- The production of the solution proceeds at a slow pace, the next portion is added too late, when the first has already partially hardened and is no longer able to adhere to the new one.
- After pouring, the floor was not treated with a squeegee or rule, which led to bumps and holes;
- Air was not removed from the solution using a needle roller;
- The heating system was turned on early;
- There were drafts;
- High or low humidity levels;
- Temperature changes.
How to order polishing of a polymer floor or elimination of other defects
If you notice that the polyurethane or epoxy floor has become movable in some places, cracks or chips have appeared on it, or gouges from heavy objects or equipment, you need to contact a specialized company. A technician will visit the site to assess the current condition of the coating and the extent of its damage, determine the optimal repair plan and calculate the cost of the work.
If there are minor defects, we will offer surface restoration, which is carried out promptly and at a reasonable price. If the damage is too serious or the coating is made with an inappropriate level of quality, the option of completely replacing the polymer floor will be offered. If deformations or damage to the polyurethane floor appear, you should not delay repairs - after all, cracks and potholes will only increase, which will lead to higher costs for restoration work.
Grinding tool and work procedure
Naturally, grinding the concrete surface must be carried out with appropriately designed equipment. Grinding machines can be both professional and household.
A professional floor grinder differs from a regular one not only in its high quality, but also in the use of a special planetary mechanism, that is, a large disk with satellites attached to it.
Sander
Diamond attachments are fixed to the satellites and rotate in the direction opposite to the movement of the circle. The evenness and smoothness of the concrete floor is precisely ensured by such complex movements of the tool. In addition, equipment of this level is equipped with regulation of speed, water supply, and also has the ability to collect sludge formed during grinding from the floor surface.
Naturally, when using professional machines, the price for grinding a floor on a concrete base will be quite high, but the quality of the surface will be much better. “Budget” options differ from professional ones in their compactness and the presence of only one diamond blade.
Different grinding attachments
Of course, grinding a concrete floor must be carried out in several stages. First of all, all uneven surfaces on the new concrete surface are removed. If we are talking about an old coating, then all coating materials are removed from it. At this stage, it is recommended to use 25-30 grit discs. With the help of these discs you can remove the “milk” or expose the filler.
At the second stage, various defects are eliminated - expansion-shrinkage seams, cracks and potholes. As a rule, epoxy mastic is used to eliminate them.
The actual grinding of concrete is the third stage, divided into several operations. These include rough grinding with 40mm diamond discs, as well as treating the floor with hardening compounds.
It is then treated with 400 grit or higher discs to create an incredibly durable layer of concrete that can withstand significant foot traffic and traffic. For perfect smoothness, the final stage is polishing.