Tools and materials needed for laying curb stones yourself
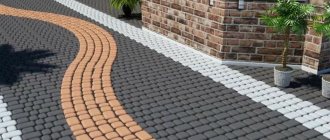
A border is used to mark the boundaries of sidewalks, flower beds and other design elements. A curbstone curb holds sand from the base and edges of garden paths and preserves the integrity of the canvas.
Structural elements are made of wood and plastic. The category of stone materials includes concrete and ceramic products, natural stone, and clinker bricks. Depending on the purpose, highway, road and garden curbs are distinguished.
To improve the garden area, a concrete curb is made in the form of individual elements of a given size and a monolithic structure. The choice of option depends on the track configuration and design requirements. The quality of a self-made border is inferior to industrially produced products.
For work you need to prepare:
- bayonet and shovel shovels for excavation work;
- trowel for leveling concrete;
- concrete mixer for preparing sand-cement mixture;
- cord and pegs for marking;
- rubber and metal hammers;
- level;
- an angle grinder with a diamond wheel attachment.
When laying, you will need a border, the choice of which depends on the purpose of the canvas. To prepare the base you need sand and crushed stone, and to prepare concrete - cement grades M400, M500.
What you need to prepare before starting work
To lay a high-quality stone border with your own hands, you will need a set of tools and equipment. The preparatory stage of work includes leveling the territory where installation work is carried out.
To do this, remove the turf ball of soil and move it to another place. The layer thickness is 50-100 mm. The plant layer must be removed carefully so as not to damage the underlying soil.
Marking is carried out using a cord, which is secured to pegs. The width of the grooves is selected according to the thickness of the product being installed. The base for the curb is leveled and compacted separately from the main soil.
Foundation for stone installation
A curbstone curb is installed on a crushed stone base, a sand-cement mixture, and a concrete pad. The choice of technology for installing curb stones depends on the requirements for the design and durability of the coating.
The technology for laying the base and installing the cushion provide for phased work, which includes:
- marking the line for laying the boundary stone and determining the depth of laying;
- excavation work associated with leveling the surface layer of soil and constructing trenches;
- arrangement of the foundation;
- installation of stone;
- securing the border and sealing the seams between the masonry elements.
The line for installing structural elements is marked using a cord stretched between pegs. At this stage of work, you can check the quality of surface leveling.
The depth of the trench depends on the installation method of the structural elements, their dimensions and the required height above the level of the canvas. When laying the paving cloth, the installation height of the curb is 15-20 cm, taking into account the dimensions of the material.
At driveways and entrances, curb stones are laid to a greater depth, which eliminates the creation of obstacles. On roads, the structural element is installed at the height of the stone. The width of the trench should be 5-7 cm greater than the base of the curb.
When arranging a crushed stone base, a layer of sand is poured onto the bottom of the prepared trench, water is spilled to compact it, stones are compacted and installed. This method is recommended for fencing garden plantings and sidewalks.
Laying structural elements on a concrete pad is highly costly and durable. During the construction process, a layer of sand and fine crushed stone is poured onto the bottom of the trench. The curb is installed on the concrete mixture.
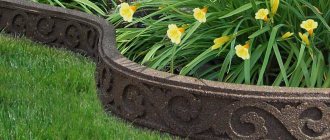
Decorative borders and moldings made of concrete
It is possible to make curbs of almost any profile from concrete. You just need to select the appropriate forming element. Plastic skirting boards and moldings are well suited for the latter.
Before work, decide on the desired number of elements to be produced. For personal use and if you have enough time, several forms are quite suitable; to speed up the process and expand production, it is better to prepare several dozen containers.
It is better to use the previously mentioned wood materials as a material. Give preference to those that have a durable glossy finish - this will facilitate the process of removing finished products.
Saw the required number of parts using templates.
Then assemble the molds to the desired size using screws.
Attach pieces of floor plinth of the desired profile to the bottom of wooden containers. For this, it is better to use small nails, since self-tapping screws or staples can irreparably damage the profiling elements.
If necessary, carefully treat the inner surface of the mold with liquid wax or silicone.
When preparing a concrete mixture for such products, it is necessary to purchase natural stone screenings with small fraction sizes. This will give the mixture a more uniform structure and improve the quality of the outer layer. Filled forms also need to be compacted and removed from excess air. In mass production, an indispensable device for this is a simple vibrating table. For small volumes, a percussion instrument or lightly tapping the bottom of the mold on a table or solid base is suitable.
Any spatula will help remove irregularities formed when air escapes.
We remove the frozen product by partially disassembling the mold - disconnecting the end and side walls.
If necessary, the surface of the finished product can be puttied and coated with dye on any basis.
We recommend other articles on the topic
Making a hanging swing for a summer house - step-by-step instructions
Which swing to choose for your dacha - overview of options
Fighting moles on the site, do-it-yourself mole trap
Porch made of polycarbonate and metal in a private house: photos, examples
Installing stones on a prepared base
The curbstone curb is installed along a cord, which is pulled onto pegs along the top and bottom lines. The first building element is placed on the edge of the trench. Correct installation is controlled using a building level. Planting and leveling of elements is carried out using a mallet.
To avoid damaging the surface of the stone when using a metal hammer, place a wooden board at the point of impact. Trimming of finished structures is carried out using an angle machine. During installation, it is prohibited to use vibrating or pneumatic tools, which could damage the surface of the curb.
After installing the curb, a concrete mixture containing sand and fine crushed stone is poured on both sides to secure it. During the installation process, it is recommended to pay attention to the fact that the structures have a front side.
The fence for the path is laid with the front side facing the inside of the canvas. The finished enclosing structure should rise above the soil level to prevent the coating from spreading.
If an element protrudes above the level of the others, then it must be planted using a wooden mallet. It is better to install structures that are heavy, using lifting equipment. The borders around the flower bed can be lined with pebbles. The masonry elements are fastened with cement mortar or placed without using it.
Garden border 400
Garden border 400
- Building blocks(21) Concrete blocks(6) Block 90×200×400 M150 double-slot
- Block 120×200×400 M150 double-slit
- Block 200×200×400 M100 double-slit
- Block 200×200×400 M150 four-slot
- Block 200×200×400 M200 solid
- Block 300×200×400 M150 seven-slot
- Block 90×200×400 M100 double-slit
- Block 390×120×188 M200 Red
- Vibration-pressed brick(6) Brick 250×120×88 M200 Red
- Paving stones(12) Paving stones Gray 200×100×70 M250
- Old City gray M250 120×120×70 120×90×70 120×60×70
- Square gray paving stones 390×390×70 M250
- Garden border 400(6) Garden border 400×50×188 M250 Gray
- Cement in bags(4) Cement 50 kg Holcim ExtraCEM 500
- Gravel screenings in 50 kg bags
- Euro pallet 1200×800 light - up to 2500 kg
- Concrete rings for wells(1) Well ring KS-10-10 with lock
- Laying paving slabs(4) Straight-line laying of tiles on a finished base
You watched
Gravel screenings in 50 kg bags
150 rub. / PC.
Old City gray M250 120×120×70 120×90×70 120×60×70
500 rub. / sq.m
Block 390×120×188 M200 Graphite
43 rub.
/ PC. from 600 rub. / sq. m
Laying paving slabs
Order now
Limited time discounts
Vibropressed products
Order now
Garden border 400…
Garden border (curb) 400×50×188…
47 rub. / PC.
Favorites Add to cart
In stock
Garden border 400…
Garden border 400×50×188 M250 Yellow…
60 rub. / PC.
Favorites Add to cart
10% discount
Garden border 400…
Garden border 400×50×188 M250 Red lead...
44 rub. / PC.
Favorites Add to cart
In stock
Garden border 400…
Garden border 400×50×188 M250 Graphic…
45 rub. / PC.
Favorites Add to cart
4% discount
Garden border 400…
Garden border 400×50×188 M250 Red…
44 rub. / PC.
Favorites Add to cart
In stock
Garden border 400…
Garden border 400×50×188 M250 Gray…
41 rub. / PC.
Favorites Add to cart
Products in this section
13% discount
Garden border 400…
Garden border 400×50×188 M250 Graphic…
45 rub. / PC.
Favorites Add to cart
13% discount
Garden border 400…
Garden border 400×50×188 M250 Yellow…
60 rub. / PC.
Favorites Add to cart
4% discount
Garden border 400…
Garden border 400×50×188 M250 Red…
44 rub. / PC.
Favorites Add to cart
7% discount
Garden border 400…
Garden border 400×50×188 M250 Gray…
41 rub. / PC.
Favorites Add to cart
10% discount
Garden border 400…
Garden border 400×50×188 M250 Red lead...
44 rub. / PC.
Favorites Add to cart
11% discount
Garden border 400…
Garden border (curb) 400×50×188…
47 rub. / PC.
Favorites Add to cart
Garden borders are reinforced concrete products of various profiles and sizes, which are widely and universally used in the arrangement of paths, platforms and areas of territories.
Usage
The use of garden borders allows you to radically change any house or adjacent garden plot, as a result of which they acquire an aesthetic and complete look. Such sidewalk borders play an important role in the organization of landscape design, and their use makes it possible to make any corner of the garden or city park the most comfortable place to relax.
To make landscape design more aesthetically pleasing, curb stones are produced not only in the usual gray color, but also in a red-brown hue. But garden borders play not only an aesthetic role in the design of paths and plots, but also the role of enclosing structures that protect their coverings from spreading and destruction, as well as from destruction by rain and melt water.
Manufacturing
Our company produces garden borders using brick presses. The use of such modern technology makes it possible to obtain products with strength that meets the requirements of GOSTs and Technical Specifications and with high resistance to adverse natural influences. In the manufacture of garden borders, metal molds (matrices) are used, which help to obtain the surface of the borders with the most accurate geometry and smoothness.
Marking
Marking of garden borders is carried out according to the same system for any borders and consists of a combination of letters BR - their abbreviated name and digital symbols, which also indicate the dimensions in centimeters of length, height and thickness:
BR 80-30-15-3 rotary with dimensions of length 80 cm, height - 30 and thickness - 15 cm, weight 85 kg;
BR 80-20-8 with similar dimensions - 80, 20 and 8 cm, weighing 26 kg;
BR 50-20-8 with dimensions of 50, 20 and 8 cm, respectively, weighing 20 kg.
BR 40-20-5 with dimensions of 40, 20 and 5 cm, respectively, weighing 7 kg.
Characteristics
The compressive strength class is at least B25, abrasion is less than 0.4 g/sq.cm, frost resistance is at least 200 freezing and thawing cycles.