Preparatory work
It’s not enough just to build a drainage pit - it needs to be done while observing a number of generally accepted rules.
Calculate the volume correctly . In the case of a hole without a bottom, i.e. self-cleaning, everything is simple - at least 100 liters per person. If the container is closed, the calculation should be carried out using a special formula, taking into account not only the number of residents, but also the cleaning period and the amount of water used per day.
Mark the correct location . The drainage pit must be located close to the road so that the sewer truck can pump out waste without problems (but not closer than 2 meters), at a distance of at least 5 meters from the doors and windows of buildings and at least 15 meters from a well or drinking well. If these recommendations are not followed, you will be faced with many problems in the future, starting with an unpleasant odor penetrating the house and ending with endless expenses for cleaning the container. It is prohibited to place pits outside your site.
It is not recommended to place the septic tank at the lowest point of the site - in the spring it may flood and the contents will spill throughout the entire territory. To prevent unpleasant odors from penetrating into the house, build a hole on the leeward side
Detailed information is contained in a number of regulations of the Russian Federation: this is the Law “On the sanitary and epidemiological welfare of the population” No. 52-FZ of March 1999, “Sanitary rules for maintaining the territory of populated areas” and “Hygienic requirements for the protection of groundwater from pollution” approved by the Chief State sanitary doctor of the Russian Federation on July 16, 2001. Violation of these norms entails both fines and criminal liability.
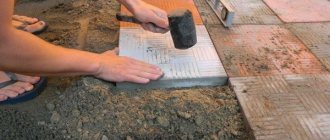
How to divide a cesspool
If you need to consider how to divide a cesspool, then there will not be too complicated actions here.
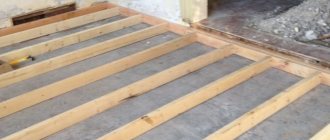
You just need to knock down another wooden box from the panels, install it in the pit next to the first box, only a little lower.
To give the structure strength, both boxes can be knocked together with boards and then protected with reinforcing mesh.
This way the cesspool will last a long time without requiring repairs.
This is what a knocked down wooden box looks like in a drainage hole
Separation of the cesspool may be necessary in two cases: when the drains from the shower, bathhouse, and kitchen are discharged separately from the drains from the toilet; when it makes sense to equip a kind of septic tank to improve the quality of water purification.
In the latter case, both containers are connected by a pipe through which wastewater will flow.
Temporary drain hole
A temporary pit can be constructed from used car tires. The advantages of this design:
- Used tires are easy to get - at any car service center, trucking company, and even at a flea market, and for mere pennies.
- One person can build such a pit.
- No need to use additional equipment or tools.
- The material does not corrode, which is why the drainage pit lasts for more than 10 years.
But there are also significant disadvantages.
- In severe frosts, rubber drains freeze and interfere with the complete drainage of sewage.
- The tire pit is not suitable for a large family - maximum 3 people.
- It is difficult to seal the joints between tires, so over time, sewage begins to seep out.
It is advisable to install such a structure on well-drained, light soil (on heavy soil, moisture will stagnate), with a wastewater volume of no more than 1 cubic meter per day.
Do-it-yourself waterproofing of an inspection hole in a garage
When constructing an object
do waterproofing yourself, without turning to specialists. Do primary protection as follows:
- Before starting the concreting process, pour gravel onto the bottom; its layer should be 15 cm.
- After this, add 5 cm of sand. The pillow needs to be compacted, the layers will perfectly remove moisture.
- It is recommended to lubricate earthen walls with greasy clay before applying waterproofing material. Red is best suited for this purpose.
There are various materials on the market that are excellent for protecting the recess. Manufacturers produce bitumen materials Cover the shelves and niches that are in the recess with material. Divide the roll into fragments; you need to lubricate all parts with special solvents in advance.
Lay the material so that the sheets overlap by at least 10 cm. Pay attention to the joints . To glue them together, you need to use a torch, or cover the joints with molten bitumen. solvent for this purpose .
Polymer membranes. They are laid overlapping on the frame, and a metal mesh is used for reinforcement. Cover the entire surface of the pit with material. The membranes are connected by welding. A hot air stream can be used. Since the method is based on the use of welding equipment, it is better to entrust such work to specialists.
Penetrating materials. Buy a special mixture, mix with water. The solution should be applied to a slightly damp surface of the inspection hole. After crystallization, the pores in the concrete are reliably sealed.
Liquid rubber. Apply the material to a damp surface. This method is suitable if the ambient temperature is in the range from + 10 to + 24. After completing spraying, wait a few hours.
Waterproofing during the construction of a garage must be done in a complex, it must be internal and external. It is important to correctly determine the depth of the pit .
When making calculations, be sure to take into account how thick the preparatory layer will be. The height of the ceiling of the pit is also important.
Dig a pit, taking into account the indentations. Make them at least 1 meter . Level the bottom of the pit, making a slight slope towards the walls from the center. Make a water seal from clay and lay it. The layer should be at least 10 cm, compact the base.
To drain water from the object, make drainage trenches . Their depth must be at least 0.5 m. Do not forget that the trenches must be made with a slope. Lay geotextile , position it so that it protrudes a meter beyond the edges of the trench.
Place a 5 cm layer of gravel on the geotextile. Buy drainage pipes and place them in the trenches. Make a slope of 50 cm per 1 linear meter. To install drainage pipes, buy asbestos-cement products, or polymer or ceramic pipes. They need to be taken to the place where water will collect . Cover the pipes with a layer of gravel 30 cm thick. Wrap the “pie” with a geotextile sheet protruding above the trench.
Fill the pit with crushed stone and sand. Alternate layers, tamping each of them. Sand is needed to protect the waterproofing , because the sharp edges of large fractions can break through it. Place roofing felt , be sure to weld its edges using a gas burner. Coat with bitumen mastic. Repeat the procedure, laying the material in 3 layers. If groundwater can rise above the pit , then it is necessary to make even more layers.
Prepare the formwork, pour the concrete floor . Use those mixtures that contain modifying additives.
Watch the video on how to waterproof a hole in a garage with your own hands:
Pit made of wood
A drainage pit made of wood is constructed in the form of knocked down boards in the form of formwork.
Pros:
- Wood is significantly cheaper than concrete rings and plastic containers.
- The work does not take much time, can be completed in one day and does not require special skills.
- The soil is well protected from sewage pollution.
But do not forget that wood begins to rot over time, especially when exposed to moisture. Therefore, the treatment of boards with special protective mixtures and compositions must be mandatory (however, the service life of such a structure does not exceed ten years). And its volume is small - the height is no more than one and a half meters, the length of the side is no more than a meter. Therefore, a wooden cesspool can be used as a temporary option, for example, at a summer cottage until it is possible to build a pit from more durable metals.
The top cover of the pit should be higher than the ground level - this will reduce the risk of rainwater getting into the pit and filling it ahead of time.
Types of cesspools
Depending on whether you live in the house permanently or use it as a summer cottage, the number of its inhabitants and other factors, you can choose different types of cesspools. Moreover, often several different types of designs successfully complement each other and provide comfortable living.
- Sealed storage tanks require pumping; wastewater is not disposed of in them, so they are used for small volumes of wastewater, for example, in a country house with a minimum number of drain points.
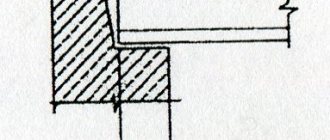
- Pit without bottom can be primarily used for relatively clean drains (showers, baths) and is preferable on sandy soils that drain water well. The filter layer of expanded clay or crushed stone, which replaces the bottom of such structures, retains insoluble inclusions, draining purified water into the soil. Installing a pit without a bottom in addition to a sealed storage tank will reduce the filling speed of the latter, which makes it possible to call a sewer truck much less often. A cesspool without a bottom can only be organized if the amount of waste does not exceed one cubic meter.
The photo shows a diagram of a cesspool without a bottom
- Septic tanks are more advanced structures in which wastewater settles and the sediment decomposes with the help of microorganisms. After such treatment, the water can be used for irrigation (if the most effective ready-made models are used, which usually have several stages of purification) or the liquid can be drained into the ground.
Brick cesspool
Brickwork is suitable for creating structures of any configuration and any size; it perfectly retains impurities and is durable. It is not afraid of groundwater and swelling of the soil when it freezes in winter. A brick cesspool can be constructed on any soil: both heavy clay and light sandy. It is not necessary to buy new bricks - those that were previously used will also do.
It is more convenient to make a hole in the shape of a cylinder or cube, no more than 3 meters deep. Use a building level to make the walls level, but it is better to give the bottom a slight slope - the liquid will accumulate in the corner and in the future the waste will be easier to pump out.
To dig a pit, you can order an excavator, but you can also do it manually by digging the soil with a bayonet shovel, and lifting the soil to the surface in a bucket on a rope.
Construction of an inspection pit
In order to create conditions for convenient repairs and maintenance in the garage box, it is necessary to equip an inspection hole.
It is very important to do this work efficiently.
At the same time, a foundation pit is being dug under the inspection hole in the garage during the construction of the foundation, since earth-moving equipment can be used in open space.
We decorate the inspection hole with our own hands:
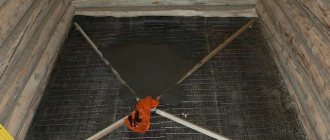
- First stage. It is necessary to strengthen the walls of the prepared pit using a mixture that contains cement and formwork, or line it with brick. Place a concrete screed at the bottom of the hole before you fill the garage floor. To do this, level and then compact the base. After which the gravel cushion is placed on the bottom and compacted.
- Second phase. Pour a small layer of sand and compact it well. To protect against moisture, before facing the basement walls, waterproofing is done from any moisture-resistant material.
- Third stage. It is necessary to install reinforcing mesh in two layers along the walls. First, install the first row close to the waterproofing material, and the second row at a distance of approximately 10 cm. Then the mesh is fixed on the base.
- Fourth stage. Before filling the bottom of the pit, it is necessary to mix a coarse mixture solution, which consists of sand, gravel and cement. Pour the solution onto the rough base and level it.
- Fifth stage. They are installing the formwork. The structure is fixed around the perimeter and filled with solution.
- Sixth stage. The outer part of the formwork is mounted and mortar is poured to complete the finishing of the top of the ceiling. Then a metal corner is embedded into the already set concrete mixture inside the pit and secured by welding at the corners.
Then you need to leave the basement so that its surfaces harden and begin to prepare the base for pouring the flooring in the garage.
Concrete drainage pit
A concrete pit is the most durable of all: it can serve a person for decades. The chemical resistance of concrete allows it to withstand the processes of fermentation and decay, and its water resistance guarantees the absence of contamination of groundwater and soil. Another “plus” is that concrete can be used regardless of the groundwater level and geological features of the soil.
The disadvantages include the mandatory use of special equipment (for example, a truck crane), a large waste of energy and dirt during work.
When buying rings, choose elements with the same internal diameter. This will allow you to assemble the structure with maximum tightness. Use waterproofing materials (cement mortar, rubber gaskets) and metal brackets.
Construction of a conventional shallow foundation for a garage
If you plan to equip a small inspection hole in the garage with your own hands, then the depth of the foundation strip should be at least one meter. This will ensure high load-bearing capacity of the base and prevent deformation of the base during excavation work.
Let us dwell on the important points of construction work that will prevent the negative effects of heaving soil and moisture on the foundation strip and the walls of the building:
- It is necessary to insulate the foundation on the formwork from the outside with sheets of extruded foam or polystyrene foam along the entire height of the tape, including the base. We choose the thickness of the penoplex based on the climate of the region;
- a blind area (50 cm wide) with foam insulation will prevent freezing of the soil and deformation of the brick and concrete walls of the garage;
- storm drainage will ensure water drainage from the foundation;
- additional drainage at the base level is necessary if the groundwater level is high on the site;
- It is necessary to install high-quality waterproofing of the concrete strip using penoplex or ordinary sheets of roofing material. You can also use bitumen waterproofing.
Related article: Proper production of pipe piles with your own hands
If you do not skimp on waterproofing and drainage work, then the stability, strength and durability of the foundation is guaranteed.