How to cut regular ceramic tiles and porcelain tiles
duet27 posted a topic in Ceramic tiles, January 12, 2005, topic
The impact of groundwater and precipitation negatively affects the strength of all structural elements of the building.
Comprehensive protection of structures from moisture penetration includes mandatory waterproofing and vapor barrier of walls.
It is important to carry out the specified work in accordance with the technology requirements. Otherwise, vertical insulation will not fulfill its purpose, but will only aggravate the problem. Water penetrating through an unsealed layer of film will cause the rapid development of mold and mildew, which will lead to the destruction of the structure of the wall material.
Vapor barrier for siding: technology for installing waterproofing with insulation
When insulating a house with simultaneous cladding (ventilated facade system), everyone is faced with the recommendation to protect the insulation from moisture, wind, and steam. This is where most questions arise regarding the selection, purpose and use of materials. Without claiming to be a comprehensive solution to these questions, we will try to answer most of them.
Vapor barrier and waterproofing under siding: when and why is it needed
Studying the recommendations of insulation manufacturers for the installation of ventilation systems, you can see that most of them recommend protecting the insulation with a vapor barrier on the wall side, and moisture and wind protection between the insulation and the curtain wall.
Many homeowners who insulate their homes on their own want to save on expensive films, so it’s worth understanding what vapor barriers, waterproofing, moisture-windproof membranes are, and when and how to use these materials.
What is vapor barrier
Any design is carried out in accordance with regulatory documents, now these are SP - building rules, each of which has a section “Terms and Definitions”. From the point of view of building codes, a vapor barrier is a layer of rolled or mastic material that prevents the passage of water vapor through it.
Many vapor barrier materials have been developed for wall insulation, most of them are 2…3-layer films made of non-woven material or special polyethylenes.
What is waterproofing
Waterproofing is building materials (roll, mastic, plaster) that prevent the structure from getting wet under the influence of wastewater. These materials are usually used in floors, underground structures, and structures located in aquatic environments.
Regarding insulation systems, it is more correct to use the term moisture and wind protection, since the heat insulation should not come into direct contact with water in the insulation system, but rainwater or snow can get into the cracks of the cladding in strong winds, and therefore thermal insulation needs protection from water, water vapor and wind.
Diffusion membranes are used as waterproofing in insulation systems, a feature of which is the ability to release water vapor to the outside, preventing it from penetrating inside. As a rule, these are 3...4-layer films with markings of the location of the sides relative to the insulation (inner and outer layer).
Why do you need a vapor barrier in general?
Water vapor can be of atmospheric origin or operational. Any building material has vapor permeability, for some it tends to zero (extruded polystyrene foam - 0.013, metals, glass - 0.0) for others it is much higher (wood across the grain - 0.03, mineral wool - 0.06).
The higher the vapor permeability, the more moisture the material can absorb, while its thermal insulation characteristics decrease, and it ceases to play the role of insulation. To prevent this from happening, vapor barrier materials are used. The use of vapor barrier is especially necessary if the wall material has the ability to breathe - that is, to allow water vapor to pass through it.
How can condensation damage your home?
Using the example of a wooden frame insulated with mineral wool, the damage from condensation is as follows: vapors pass through the wood. Since the dew point at which gaseous vapor turns into liquid is located in the insulating layer, the vapor settles in the form of condensate and accumulates in the insulation. It gets wet, and in winter this moisture freezes.
Instead of insulation, the owners receive an ice compress, which prevents the escape of vapors, which leads to rotting of the walls, deterioration of the microclimate inside the house, and the formation of mold and mildew. In turn, mold and mildew are the cause of many diseases of the human respiratory and immune systems - primarily allergies and asthma. The task of the vapor barrier layer is to prevent steam from penetrating into the insulation.
When is vapor barrier and waterproofing needed?
Vapor barrier is required in those structures where the vapor permeability of the wall and heat insulator is high. For example, when insulating a panel house with polyurethane foam, a vapor barrier is not needed, but to remove water vapor, a forced ventilation system will be required so as not to get high humidity in the house, and with it mold and mildew. A brick house will already require a vapor barrier.
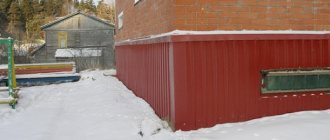
Waterproofing walls before covering with profiled sheets
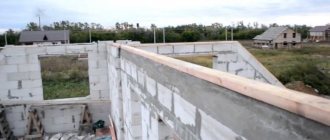
Cladding facades with cold-formed metal corrugated sheets is an economical and very common solution for low-rise buildings. The cladding technology is simple, but has its own characteristics. A cross-section of an external wall lined with corrugated sheets looks like this:
- Wall.
- Insulation.
- Waterproofing film.
- Profiled sheeting.
Vapor barrier layer.
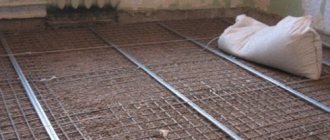
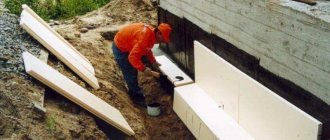
The first stage of work will be horizontal waterproofing of the walls. To do this, two layers of roofing material are laid on the horizontal surface of the finished foundation, after which the walls are laid. Ignoring this stage makes vertical waterproofing useless.
Waterproofing walls - causes and consequences
The fact is that a concrete foundation absorbs and retains moisture in its pores . Next, capillary suction (moisture absorption by the wall material) is included in the process. Groundwater freely rises up the load-bearing walls, sometimes to a considerable height (up to the second floor). This causes permanent dampness in the room. It is very difficult to correct the situation: trimming the walls, practiced in these cases, is a very labor-intensive and ineffective solution to the problem.
Vertical waterproofing is a sealed covering of the building's load-bearing frame with rolled material . With today's construction technologies, such an approach is becoming an urgent necessity. Even 30-40 years ago, the thickness of a brick wall reached 75 cm, without requiring additional protection. Today, most walls are two to three times thinner, but have a multi-layer structure.
According to modern regulatory requirements, the strength base of a residential building, consisting of blocks, bricks or timber, has an average thickness of 25 cm. The rest is insulation, waterproofing and cladding. If the frame is even thinner, then insulation boards are laid on the outer and inner sides of the wall. The main attention is paid to the tightness of the layers.
Waterproofing films
For high-quality waterproofing of walls, the following materials are traditionally used:
- Roofing felt is roofing cardboard impregnated with petroleum bitumen and coated on both sides with refractory resin.
- Roofing felt is insulating cardboard treated with coal or tar compounds.
- Glassine is a soft roofing material impregnated with bitumen.
Of the new developments, Gidrostekloizol, Stekloelast, Rubitex, Linokrom, Bicroelast, Bikrost have already stood the test of time.
Vapor barrier of walls
When using residential and utility rooms, moisture inevitably forms. Evaporating, it tends to escape through the walls and penetrates the thermal insulation material used in frame construction. change their structure and geometry when wet .
The filler layer begins to sag, forming voids and cracks. As a result the thermal contour of the building is disrupted , since the main condition for high-quality thermal insulation is a tight fit of the mats to the wall. To reduce the rate of water penetration into the insulation, vapor barrier films are used.
Vapor barriers have a porous multilayer structure. In the West they are called vapor retarders. The front side of the film has a rough surface, the back side has a smooth surface.
The walls of bathhouses, saunas, and summer kitchens are lined with vapor barrier materials inside and out. The basic rule here is this: the vapor permeability of the partition should increase from the inside out, so the outer film is placed with the rough side facing the wall, and the smooth side facing the outer insulation . Special vapor barriers should be used:
- Polypropylene films – Yutafol, Yutavek.
- Membrane films - foil Izospan, Izover, Izovek, Tyvek Solid, Tyvek Supra.
- All the nuances of finishing a wooden house with siding are described in detail in this publication.
- Our article will tell you how to properly heat and waterproof roof pipes.
- Read about the types of soft roofing TechnoNIKOL here.
How will the vapor barrier be positioned?
Which side is the correct way to lay the vapor barrier on the ceiling and what is the layout of this layer, worries many when installing a roofing pie. In fact, it all depends on how the attic is used.
If you do not plan to use the unheated room and space in any way, then the material is laid only along the ceiling plane. In this case, the insulation does not need additional waterproofing or wind protection, although a water barrier along the slopes is still installed to prevent precipitation from penetrating.
If the attic space will be used for storing things or for some household purposes, including drying clothes, then the insulation in the roofing pie must be covered with a vapor barrier on both sides. Waterproofing is still done on sloped surfaces.
Procedure for covering walls with corrugated sheets
First, brackets are attached to the load-bearing wall , through which the corrugated sheeting will be installed. The fasteners use disc-shaped polyamide dowels that will hold the insulation. U-shaped leveling strips are attached to the brackets , which are necessary, among other things, to form a ventilation gap.
U-shaped profiles are screwed to the slats , facilitating the correct installation of the profiled sheet. The sheet itself is attached to the profiles using self-tapping screws equipped with rubber gaskets. The lower part of the profiles is fixed with anchor bolts driven or screwed into the foundation. The result is a frame with panel guides and rack-mount thermal profiles.
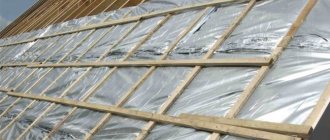
Next, strips of vapor barrier membrane are applied , with a 15-centimeter overlap, the rough side facing the wall. The joints should be taped with tape , and accidentally torn areas too. The panels are attached to the wall with countersunk self-tapping screws.
in the frame and fixed to the lintels . Next, rolls of waterproofing film are rolled out from top to bottom, leaving horizontal and vertical overlaps . The waterproofing, and at the same time the insulation, is attached to the racks with dish-shaped (hat) profiles , screwing them with self-tapping screws. You cannot stretch the film; it should sag in width by 10-15 mm .
The final stage is attaching the corrugated sheet . Screw it in the lower deflections, through one wave. Vertical joints are secured with rivets. A gap is left between the waterproofing and the corrugated sheet - this allows the insulation to be ventilated.
Finally. Vapor barrier and waterproofing of walls covered with corrugated sheets will provide the necessary microclimate in the room and extend the service life of the structural elements of the building. In addition, the walls will retain heat and allow steam to pass through, which will reduce the cost of heating and air conditioning the building.
Main stages of installation
For a pitched roof, there is a certain sequence according to which a high-quality vapor barrier is installed. It is installed after laying the insulation, the surface of which should be free of defects. The beams for the sheathing are treated with antifungal compounds, after which a pre-calculated amount of film is prepared (covered area + 15%) and the following:
- construction stapler;
- special double-sided tape for insulating and fastening fabrics;
- construction/stationery knife;
- self-tapping screws;
- roulette;
- single-sided adhesive tape for joints, defects and crevices (from the same manufacturer);
- screwdriver;
- pencil;
- scissors.
On the rafters, between which the thermal insulation boards are laid, fill the lower part of the sheathing with two boards. Apply a strip of special tape with two adhesive sides. Cut the roll into sheets of appropriate length. Then, starting from the bottom of the sheathing, lay the membrane horizontally with the markings up on the insulation, slightly stretching the panel.
Further:
- Attach the edges of the canvases to the rafters using a stapler.
- Release the top layer of the tape and carefully glue the bottom of the film to the sheathing.
- Stepping back 15 cm from the top, stick the next piece of tape without removing the top protective layer yet.
- Having secured the edges of the membrane with staples, glue the overlap, gradually removing the protective layer from the film. In this case, the film must be straightened.
- Lay the required number of rows in a similar manner. Cover the ridge with a solid sheet, making a sufficient overlap, avoiding the joint at the corner. Cover the other side of the roof in the same way.
- The laid membrane is additionally secured along the edges of the roof using beams with a cross section of 3x5 cm. This is important, because these parameters are necessary to create an optimal ventilation gap. Condensation will escape through it.
- Mount the sheathing, securing the beams with self-tapping screws.
- Install the roof covering, paying special attention to ventilation in the area of the ridge and eaves.
When laying the membrane, it is necessary to ensure the integrity of its surface. If defects are found in the fixed area, the damaged blade should be replaced or (if the damage is minor) sealed with mounting tape.
Purpose and distinctive characteristics
The main purpose of the vapor barrier layer is to protect building structures from the penetration of moisture in a vaporous state onto their surface and the subsequent formation of condensation, which negatively affects the performance characteristics of these structures (materials). As a rule, vapor barrier is installed from the inside of buildings (structures), which is explained by the fact that the air humidity in the internal space is higher than outside. The distinctive characteristics of vapor barrier from waterproofing are:
- location in the “pie” of the building structure (ceiling, roof, walls, etc.);
- purpose - waterproofing protects against the penetration of water from the outside, and vapor barrier - against the penetration of water vapor from the inside;
- vapor barrier does not allow moisture (steam) to pass through, which is retained on its surface both from the inside and outside, while waterproofing does not allow moisture (steam) to pass through in one direction and retains it in the opposite direction.
How to properly install a vapor barrier on a ceiling?
An operation such as vapor barrier must be performed on all surfaces without exception, including the ceiling, roof, floor and walls.
And, first of all, let’s take a closer look at the features of installing vapor barrier on the ceiling. Protection from moisture is necessary for the ceiling due to the fact that it is constantly exposed to the negative effects of water vapor arising from high humidity in the room. Such conditions arise indoors due to the fact that we regularly have to perform such household operations as washing, bathing, cleaning, cooking, etc.
All these processes are accompanied by the release of warm air, which tends to the top and seeks a way out. However, the ceiling does not allow this. Using a vapor barrier allows you to extend the life of these materials and at the same time prevent the formation of fungus and mold in the attic. A positive aspect of using a vapor barrier is that it gives the ceiling increased fire resistance.
In accordance with the technology of laying vapor barrier on the ceiling, the prepared material is fixed to the rough ceiling surface , clamping it using a metal profile or sheathing. While rolling out the rolls, the owner will have to deal with streaks. They must be overlapped with each other by 10-15 cm. To connect the joints to each other, it is recommended to use special self-adhesive tapes.
Types of vapor barrier materials
Currently, the building materials market offers a wide selection of vapor barriers of various types, differing in composition and structure, as well as installation method and cost. Here are some of them:
- films made from polyethylene of various structures (single-layer, double-layer, reinforced);
- films with one side coated with a layer of foil (foil films);
- films with a coating that prevents the formation of condensation (anti-condensation foam);
- films with a porous structure (membranes) are classified as: pseudo-diffusion, diffusion and super-diffusion and are vapor-permeable (steam-out) materials used on the outside of the insulation.
Pseudo-diffusion membranes are capable of transmitting up to 300 g/m2 of evaporation per day, diffusion membranes - from 300 to 1000 g/m2 during the same period, and super-diffusion membranes - more than 1000 g/m2 per day.
Pseudo-diffusion membranes are used for vapor barrier of interior spaces, and membranes of diffusion and super-diffusion types are used when installing building facades, additionally performing the function of protection from wind (wind barrier).
How to attach vapor barrier to metal profiles
A vapor barrier is necessary to protect the insulation from intense attacks of household fumes. Proper installation of this barrier affects the frequency of repairs, the service life of finishing and structures, and the formation of a microclimate in the housing being equipped.
In order for the protection to cope with difficult responsibilities, you need to clearly know how to lay a vapor barrier, how to build it into a reliable barrier to the path of vaporous moisture that destroys building materials.
Specifics of the vapor barrier device
A vapor barrier is a thin, almost weightless film material that blocks moisture from entering the body of the roofing pie and rafter system. This barrier is installed on the inside of heated rooms to prevent getting wet and subsequent rotting of the thermal insulation and wooden roof frame.
If you do not install a vapor barrier, moisture accumulated in the thickness of the insulation will contribute to heat loss. After all, water is an excellent conductor, transmitting both electrical and thermal waves through itself. Then, instead of the task assigned to thermal insulation, which is to insulate the house, the wet material will create a feeling of dampness and dank cold in the rooms.
In addition, the accumulation of moisture in the roofing pie will invariably lead to the settlement of colonies of fungal microorganisms. As a result of their life activity, the wooden elements of rafter structures will quickly lose their load-bearing capacity and become completely unusable. The same thing will happen with insulation and other components of the system.
The vapor barrier is always installed as the first layer, if we consider the roofing pie from the side of the space being developed. Since the air, containing vapors of all types and of any origin, is warmer and lighter than itself, but in a less humid and colder form, the vapor, together with warm air currents, according to physical regulations, rushes upward.
According to the natural direction of steam movement, protection against it is installed in the upper zones of rooms with a characteristic high degree of humidity, along the ceilings and slopes of equipped heated attics. The entire wall is protected with a vapor barrier if it separates two rooms with sharply different operating conditions.
As an example, let’s take a partition between an ordinary living room and a home sauna or steam room. In this case, the vapor barrier is placed on the side of the bathhouse objects, and if they are located in the attic or on the second floor, then they are also placed on the floor as a ceiling.
Materials for constructing a barrier
Before we begin to analyze the principles that determine how to correctly and where to lay vapor barriers, it is worth studying the materials used in this area and their defining characteristics.
The most ancient option, protecting roofing systems from moisture coming from inside houses, was crumpled clay, laid in a dense layer on ceiling beams with decking. In terms of insulating and environmental qualities, it is unlikely that it has yet found competitors, but the method of constructing such a barrier is not always and not applicable everywhere. True, in eco-houses they give preference to it.
The era of the reign of glassine was interrupted by polyethylene, which was ahead of its predecessors both in terms of technical data and technological indicators. It is easier to work with, it is quite durable, but is not resistant enough to mechanical stress such as punctures and breaks. And ordinary polyethylene can easily be destroyed by traditional atmospheric phenomena: sunlight and low temperatures.
Due to the poor resistance of polyethylene films to phenomena that could critically damage them, improved materials began to be developed based on these polymers. Their creators sought to reduce the disadvantages and enhance the advantages of polyethylene, which was also joined by polypropylene along the way.
As a result of the persistent work of developers of vapor barrier materials, the consumer is now presented with the following options:
- Reinforced films with a base of polyethylene and polypropylene. These are modernized versions of their predecessors of the same name, but with optimized resistance to UV rays and fluctuations in thermometer readings. They are used both in pitched roofs and in ceilings.
- Foil membranes. Polymer films with the working side covered with aluminum foil. They are used where increased heat-saving qualities are required, for example, in steam rooms, because when properly installed they serve as a reflector that reflects heat waves.
- Anti-condensation membranes. Universal roll materials that can play the role of both vapor barrier and waterproofing. On the side of steam movement, these materials are endowed with a rough surface that prevents dew from falling. The side facing outwards is smooth and water-repellent.
The listed types have significantly, but not completely, replaced the position of glassine with unreinforced polyethylene. Outdated vapor barrier materials are still used to this day in insulating floors; they are laid under backfill insulation such as expanded clay or dried earth. They are used in cold roof structures of cottages and cabins, in the construction of which insulation was not pursued as a goal.
The principle of taking into account vapor permeability
Vapor permeability is an important characteristic in construction. It indicates how many grams of water contained in the air flow can pass through 1 m2 of insulation or building material in one day. Literally all products used in construction have the designated quality, but their capabilities differ radically.
Brick, all types of foam blocks, and wood allow steam to pass through with varying degrees of intensity. If structures made from them are not equipped with thermal insulation, then a barrier against vaporous moisture is not constructed. The evaporation will simply pass through the slopes and walls with ceilings to the outside, where there is a deficiency of it for the majority of the year.
If structures are equipped with insulating material, there is an urgent need to install a vapor barrier. This more complex scheme usually combines options with different abilities to transmit steam, and some of the building materials generally tend to accumulate moisture that is harmful to them.
It is better not to allow evaporation into the roofing pie of an insulated roof at all. And if something managed to penetrate, then this saboteur moisture should be removed as quickly as possible by all methods available in construction. The list of methods is headed by organizing ventilation of the under-roof space and the attic itself.
Installation of a vapor barrier
Installation of vapor barrier material is an important stage of work when insulating building structures, determining their ability to retain heat and provide protection against moisture penetration into the insulation.
A vapor barrier is installed during the construction of a building (structure) before finishing the premises or installing the roofing, as well as when performing repair work on these structural elements.
Performing this work requires knowledge of the installation features of a vapor barrier.
They can be divided into several stages: preparatory, execution of work and final.
Preparatory stage
During this period of work, the material that will be used as a vapor barrier is selected and purchased, and the selection criteria will be:
- place of use, installation (facade of the building, interior, etc.);
- requirements for technical characteristics (ability to pass evaporation);
- operational indicators;
- the possibility (features) of installation on a particular building structure.
Initially, prepare the surface on which the vapor barrier will be mounted. These works depend on the material from which the base is made and the location where they are carried out.
Wooden structures are treated with antiseptic solutions and fire-fighting substances, and brick and concrete are treated with deep penetration primers to prevent the appearance of microorganisms (fungus, mold, etc.).
Execution of work
At this stage, the installation of a vapor barrier is carried out on a selected area of building structures, while the installation is carried out on different elements of the building (ceiling, wall, rafters, etc.) made of different materials (metal, wood, concrete, etc.) differently.
Ceiling mount
The installation of a vapor barrier layer on the ceiling is required when performing work on insulating rooms on the upper floors of a building that have a cold attic, when insulating the roof of buildings that do not have an attic, when insulating basements, as well as the ceiling in a bathhouse.
For these purposes, films of various types, as well as pseudo-diffusion membranes, are used.
The film (membrane) must be solid to cover the entire required area. If this is not possible, installation is carried out with an overlap of 10.0 - 20.0 cm.
Attaching the vapor barrier membrane to the ceiling
The joints are taped on both sides with construction tape or special tape to prevent the possibility of moisture penetration.
When using foil film, the strips are laid end-to-end, without overlapping. The joints are taped with aluminum tape.
When installing on a wooden surface, use a construction stapler or nails with a large head.
Vapor barrier can be attached to wooden surfaces with a stapler
The vapor barrier layer should extend onto the walls and there should be no gaps in the corners. If possible, the joints of the strips of the material used (film, membrane) should be located on the rafters or elements of the ceiling frame, which will allow the vapor barrier to be securely fastened and prevent the connecting tape (adhesive tape) from peeling off. The canvas should not sag, but be taut.
Ceiling covered with vapor barrier film
Floor fixing
When performing floor insulation work, the vapor barrier is laid after the waterproofing is done and the insulation is laid.
The film (membrane) must be solid or overlapped to prevent water vapor from penetrating into the insulation layer.
The vapor barrier should lie on the walls, and between it and the insulation layer there should be an air gap of 45.0 - 50.0 mm.
Wall mount
When installing a vapor barrier to a wall indoors, galvanized nails with large heads or staples are used to secure it.
Fastening is carried out directly to the surface of the wall, if it is a wooden structure, or to a wooden sheathing mounted on a wall made of concrete or brick.
When performing facade work, the vapor barrier layer is mounted on the frame for fastening the facade finishing elements.
Final stage
During this period, excess film (membrane) that interferes with the finishing of the insulated room (corners, excessive overlap on the wall, etc.) is removed. The fastening of the installed vapor barrier is checked.
Which side should the vapor barrier film be attached to?
In the process of erecting the foundation, walls, and roof of a building, you will definitely have to take care of their insulation, as well as maximum protection from the destructive effects of moisture. For this purpose, the modern market offers an incredible variety of materials, but almost all of them require the use of vapor barrier. This layer prevents the appearance of condensation, the formation of which is caused by temperature differences. The vapor barrier film allows you to remove excess evaporation into the atmosphere, preventing drops of water from flowing down the walls, penetrating into the under-roof space or destroying the foundation.
How to attach a vapor barrier during installation
Modern vapor barrier materials do an excellent job of performing their basic functions, preventing the formation of cold bridges and maintaining the required humidity conditions in the room. However, their wide variety can create problems during installation work. Especially for those who do not have relevant experience.
The most common question that arises during installation is: which side should I fasten the material to the walls or wooden sheathing? The answer to this depends on a large number of factors. Including what kind of film is used in a particular case. Here are a few examples with videos that will help you properly attach a vapor barrier:
- An ordinary polyethylene film will not create any problems for you; you just need to stretch it well and leave the required gap between it and the structure. At the same time, it doesn’t matter at all which side you attach it to - it will still perform its functions;
- Izospan insulation is quite popular today, differing from conventional vapor barrier by the presence of two layers, each of which has its own structure. It must be mounted so that the smooth side is adjacent to the insulation, and the rough side faces the inside of the building. It is this that makes it possible to retain and remove condensate;
- Very effective membrane insulation also has its own characteristics, which is successfully used in roofing, foundation and wall structures; it allows moisture to pass through only to the outside, excluding penetration into the room. Which side should it be attached to the insulation? All manufacturers of this material put a special pictogram on the reverse side, which will help you orient yourself correctly;
- The two types of films with foil can be laid differently. The first of them, reflective, is mounted with the aluminum side into the room, which allows us to fully explain the origin of this name. The metallized film is attached with foil to the insulation to increase the efficiency of its use;
- Polypropylene films laminated on one side can also be used as a vapor barrier. It is she who is fixed to the insulation. The wicker surface is designed to effectively capture condensate, so it is directed into the room;
- During the installation of floor coverings, a two-layer polypropylene vapor barrier is also installed, which is installed in exactly the same way as the previous one.
A material such as a perforated membrane, used for the installation of roofing coverings, has its own characteristics. It should be installed in compliance with two important rules. The marked side of the film, as usual, is laid against the insulation. However, a special ventilation gap must be left between it and expanded polystyrene (mineral wool).
Why is it so important to know which side to strengthen the film on? The thing is that incorrect fastening can lead to a significant decrease in insulating properties, and in some cases, to the redirection of condensation into the room and a significant increase in humidity levels.
How to choose the right vapor barrier
We have already mentioned that vapor barrier is necessary in the process of erecting any building structures. But most materials are not universal, so they should be purchased depending on the characteristics of certain premises.
For example, foil films are ideal for those rooms where the humidity conditions can be affected by sudden temperature changes. In a bathhouse or sauna, these materials will help not only provide protection against condensation, but also reduce heat loss to a minimum. Polypropylene products can be used for foundations, walls and any type of roofing - they have high strength and can be reinforced with a special mesh or fiberglass, which significantly extends the life of the structure.
Some installation features
When installing a vapor barrier, it is necessary to take into account some features of the work and know the answers to the following questions:
- Which side should the vapor barrier material be installed on?
- How to attach vapor barrier membranes?
- Is a ventilation gap necessary?
- How should the overlap of the canvases be?
- Do I need to glue the joints and with what?
- How long can the membrane be left open?
Which side to install the vapor barrier material
For various types of vapor barrier materials, the answer to this question is as follows:
- All types of polyethylene film - its side does not matter, because... they are equivalent in technical characteristics.
- Foil film - placed in a foil layer in the interior space of the room.
- Anti-condensation film - laid as a base inside the room, and with an anti-condensation layer on building structures.
- Membranes are laid with the smooth side facing the insulation, and the rough side into the interior of the room to be insulated.
How to attach vapor barrier membranes
As already written above, to fasten materials used for vapor barriers, special staples and galvanized nails with a wide head are used, but this is not a reliable method of fastening, which is due to the large windage of the membranes.
Reliable fixation of the vapor barrier on the surface to be coated can be achieved using counter-battens mounted along the elements of building structures on top of the vapor barrier layer.
When installing curtain facades, the vapor barrier is attached to the thermal insulation fastening elements (fixing dowels, fastening brackets) by means of a bolted or other connection provided for securing the heat-insulating layer.
When installed on roof joints and other building elements (window and door openings, pipes, ventilation ducts, etc.), the vapor barrier is secured using double-sided tapes. On uneven surfaces, when it is impossible to use adhesive tapes, special adhesives based on polyurethane and rubber are used.
How to install a vapor barrier: correct installation of the film + how to attach
A vapor barrier is necessary to protect the insulation from intense attacks of household fumes. Proper installation of this barrier affects the frequency of repairs, the service life of finishing and structures, and the formation of a microclimate in the housing being equipped.
In order for the protection to cope with difficult responsibilities, you need to clearly know how to lay a vapor barrier, how to build it into a reliable barrier to the path of vaporous moisture that destroys building materials.
about the rules for laying vapor barriers
A video with a detailed explanation of the rules for constructing a vapor barrier carpet and laying the components of the roofing pie in a visual form represents the essence of the process:
Vapor barrier is an important component of the roofing pie, the proper installation of which determines the service life of the roof and the conditions in the furnished room. Information about the features of its structure is needed both by independent craftsmen and by owners who want to control the actions of a hired team of builders. Armed with useful information, you can eliminate a lot of troubles with the operation of the roof and the house as a whole.
Source: https://KrovGid.com/izolyaciya/kak-klast-paroizolyaciyu.html
Fastening vapor barriers during construction and repairs
The walls of buildings must be protected from excess moisture and steam.
Insulation of the house should be done both inside and outside.
For vapor barrier, special vapor barrier materials are widely used. What materials are these, and how to attach the vapor barrier? This information is of interest to many owners of private buildings and apartments . The industry supplies vapor barrier materials for free sale, which are divided into two groups: roll and sheet. Belonging to one or another group determines the methods of fastening vapor barrier materials during their installation.
Most often, protective materials are used for vapor barriers indoors and in buildings. But if the walls of the building are thin, and in the cold season the outside air temperature drops below 28-30 degrees, it is recommended to install vapor barrier materials both inside and outside the room.
How to properly install a vapor barrier for drywall
Drywall is the undisputed leader in the construction market in terms of frequency of use in interior finishing work. With its help, you can completely redesign the room and change it beyond recognition.
Plasterboard finishing
This finishing material can be used in any premises, apartment buildings or country houses. When planning construction work, especially in rooms where it is necessary to carry out thermal insulation, the issue of the need for vapor barrier is relevant.
Why do you need a vapor barrier?
Vapor barrier is the process of applying a special vapor barrier film to the walls and ceiling. This process is carried out to insulate and protect the roof, external and internal walls, as well as ceilings from the penetration of water vapor into the room. Installing such a film prevents the formation of condensation in the house during cold times. Vapor barrier of walls from the inside is especially important.
Installing a vapor barrier will allow you to:
- insulate a pitched roof that has a metal coating (seam roofing, corrugated sheet or metal tile);
- insulate a pitched roof consisting of a non-metallic coating (slate, “soft” bitumen roofing, natural tiles);
- insulate walls with external insulation;
- insulate attic spaces, as well as basement floors;
- create insulation in baths or saunas;
- make a vapor barrier for the floor.
Although many are quite skeptical about the need for a vapor barrier procedure, it should not be neglected. Of course, without it, repairs will be a little cheaper. But installing a vapor barrier will allow you to avoid condensation. The presence of condensation in the house during the cold season negatively affects the appearance of the repairs.
It can cause wallpaper to peel off, paint to deteriorate, and mold and mildew to appear in areas where condensation forms. Vapor barrier will allow you to keep your home warm and finally get rid of condensation. In addition, such a film will increase the thermal insulation capabilities of the floors, which, again, will only play into your hands.
The procedure for installing a vapor barrier under drywall is relatively easy, and the material itself is not very expensive. Therefore, this procedure is still worth carrying out, since the advantages from it will be much greater than the disadvantages.
Advantages of internal insulation
Many people believe that if the outside of the house has been insulated, then an internal vapor barrier is not needed. But this is not an entirely true statement. Carrying out internal vapor barrier will help you:
Installation of insulation
- eliminate deficiencies in external insulation;
- increase the efficiency of external insulation;
- make the room warmer;
- prevent the appearance of mold and mildew. This is especially true for window openings;
- reduce heat loss, which will allow you to save on heating, the prices of which are constantly rising.
Among the relative disadvantages of insulation and vapor barrier carried out under drywall, we can mention a slight decrease in the free space in the room. But drywall, in most cases, already requires the installation of frame floors, which lead to a reduction in space.
Do-it-yourself vapor barrier work
To ensure moisture resistance of the floor insulation at the border of the basement and living areas and the walls itself, it is necessary to create a vapor barrier layer. Such work is carried out during construction or regular renovation of a building. Installing a vapor barrier is not difficult, so such work can be performed by a person who has the skills of simple repair work.
Balcony vapor barrier diagram.
Possible materials for vapor protection
More recently, the only materials for this kind of work were roofing felt and glassine. The modern construction market amazes with its diversity and the wide choice offered:
- Vapor barrier film is standard. This is a vapor barrier that prevents the formation of condensation on walls and insulation of roof structures.
- Membrane film with an insulating effect and protection against steam penetration. With its help, it is possible to control the removal of excess moisture from the room; the removal limit is determined by the vapor-permeable membrane.
- Membrane film with variable vapor permeability for wet and dry conditions. As humidity increases, the membrane increases its throughput.
- Film with aluminum foil. It has a reflective function and increased vapor protection properties. It is also capable of reflecting and returning a small part of thermal radiation into the room.
The Russian industry produces films “Izoslan” and “Megaizol”. They have proven themselves over many years of use in construction work.
Ceiling vapor barrier in a cold attic
Published by: Arthur Kanapatsky 0
If an apartment or private house has an unheated and, accordingly, cold room above the ceiling, homeowners may encounter an unpleasant problem - the formation of condensation on the ceiling surface. To avoid this disaster, in a cold attic, a vapor barrier on the ceiling is essential. What it is and how it can solve the problem will be discussed in this article.
Types of vapor barrier. Possible ways to install it
There are two types of vapor barrier: roll and sheet. Briefly about each:
Roll vapor barrier
It is very popular when doing DIY work; it is used when performing vapor barriers on walls. The procedure is as follows:
- a roll of material is rolled out from ceiling to floor;
- secured with galvanized profiles or wooden slats;
- holes for ventilation are placed between the finish and the vapor barrier layer, the gap is 4 cm.
Sheet vapor barrier
To install sheet vapor barrier, a profile frame is pre-made. It is possible to make a frame from thin wooden slats. But the profile is preferred for the reason that it has grooves made to fit the dimensions of standard sheets. The sheets are subsequently inserted into the frame and secured. Fastening is carried out with self-tapping screws, the joints are covered with isospan or PVC film. It is important to emphasize that the vapor barrier sheet should be placed with its back surface facing the place of insulation.
Features of attaching a layer of vapor barrier material
To carry out the work, you need to prepare tools and fasteners:
- screwdriver;
- Screwdriver Set;
- hammer;
- stapler with accessories;
- special tape;
- nails and screws.
All rolled vapor barrier materials are secured with a special tool - a stapler (stapler). The material should be laid overlapping along the perimeter of the walls of the building. In the corners you need to lay only a solid sheet, pieces are not needed here, they will not be able to provide a reliable coating. The corner must be completely covered in one piece. This applies to both internal and external corners.
When installing vapor barrier material on the ceiling, be sure to cover part of the wall. The material is overlapped so that there are no gaps between the walls and ceiling. The amount of overlap is about 15-20 cm.
When performing external vapor barrier, three layers are made: the first layer of direct vapor barrier, followed by a heat-insulating layer, and again a vapor barrier layer on top of it. Is it possible to do this work with your own hands without the help of specialists? Yes, with some effort, careful and high-quality work, you are guaranteed dry walls without unwanted moisture and condensation.
Wherever the vapor barrier is installed, the work should be carried out in accordance with established and practice-tested rules. If a membrane film is used, it should be placed on the inside of the building in front of the thermal insulation layer.
To maintain the integrity of the vapor barrier of a house or apartment, it is necessary to provide protection with a continuous layer, without the formation of gaps and holes. It is preferable to fasten the canvas with the staples of a construction stapler (staple hammer) onto a thin strip. This ensures that the film is tightly pressed against the structural elements of the ceiling or walls.
The canvas is laid with an overlap of individual canvases of 10 cm. The canvases are carefully glued with special tape in the places of contact in the openings of windows and doors. When performing work, it is not recommended to stretch the film, because temperature changes may cause destruction of its integrity. It is recommended to fasten the material with a margin of 1.5-2 cm.
If a building or an extension to a house is built from timber, vapor barrier can be abandoned. Natural wood material has the ability to absorb moisture, thereby preventing the formation of condensation.
How to perform a vapor barrier on the floor, roof and walls?
Steam can also negatively affect the condition of the floor. First of all, this applies to the first floors, which serve as the ceiling for basements, and, in addition, for the surfaces of baths and saunas.
Installation rules
The technology for laying the material involves carrying out work in the following sequence:
- first, thermal insulation material is placed;
- then lay a waterproofing layer;
- The vapor barrier is placed last.
When laying the film, you must ensure that it is not stretched too tightly. It is also not recommended to allow it to sag. Pieces of vapor barrier must be overlapped using double-sided tape or special staples .
An important point is that the coatings must be laid out in two layers: the insulator should lie below the insulation, outside and on top.
If you have to solve this problem in large rooms, then liquid rubber made from bitumen should be used as the material. The application technology is reduced to manual installation or you can use the compressor method. By waiting for it to dry, you can subsequently see the appearance of an elastic film of rubber that will reliably retain moisture.
Realizing the importance of vapor barrier, the owner must ensure that it is carried out on all surfaces of the house that may be exposed to moisture. In addition to the fact that you need to choose the right material to carry out this work, you also need to figure out which side to lay it correctly. Only in this case can its effective functioning be ensured, which, in turn, will extend the service life of the coatings on which it is created.