Home / Repairing holes and cracks / Installation, repair, maintenance / How to repair a hole in the ceiling?
The appearance of a hole in the ceiling is an unpleasant thing. It attracts attention, is annoying and certainly does not decorate the house in any way. It is necessary to get rid of this problem, but not everyone knows how to do it correctly. How and with what to repair a hole in the ceiling - we will tell you further.
Filling holes in wood floors
Holes from buried nails and screws can be easily filled with flexible wood filler using a putty knife. If you plan to leave your plank floors bare and scrub them with appropriate cleaners, try matching the putty or sealant to the color of the wood the floorboards are made from; At the same time, apply a layer of putty after each floor sanding cycle.
Deeper depressions can also be eliminated with elastic putty, but if a knot has fallen out of the board, leaving behind a large round hole, insert a short wooden plug into it, having previously smeared it with glue, and then clean out this place with a plane. Match the corks to the color of the floor or paint over them after cutting them flush with the floor.
Sealing through holes in concrete
Such holes may occur when moving plumbing fixtures or other communications. The sealing technology is slightly different from the described methods of sealing holes. With the through option, you will have to process it from both sides. To seal through holes, specialists use mounting foam or cloth soaked in a solution.
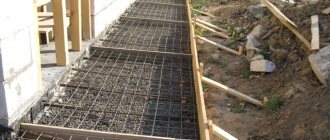
If there is access to the hole only from one side, for example in the floor or ceiling, then in this case it is necessary to prepare a support so that the building material does not fall through. To do this, use at least four dowels, which will prevent it from falling through. After their installation, the construction mixture is laid mixed with filler (stone or brick).
After the hole is completely filled, allow time for the mixture to harden. Then the patched hole is puttied and treated with abrasive paper to eliminate defects.
The time it takes to seal holes depends on their size. Small holes will require a minimal amount of time. When filling a large hole or gap, it can increase significantly. But if you follow the technological process and algorithm, the final result will differ little from the work of specialists.
Sealing cracks in the floor
You'll find two main types of gaps in plank floors: gaps from cracked ends along the edges of the boards and gaps between the boards themselves. Such cracks can most often be eliminated by tightening them with nails: one nail must be driven into each edge of the board near the end and further into the beam at an angle to its center. As you drive in the nails, these cracks should disappear.
Eliminating gaps between boards is more difficult. If they are not wide, you can use wood putty; however, for wider gaps you will have to prepare thin slats and hammer them, after covering them with glue, into the resulting gaps. When the glue has dried, plane or sand the edges of the slats protruding above the floor; if necessary, paint over the installed wedges.
If there are many wide gaps between the floorboards, the best solution is to lift all the boards one by one, starting from one side of the room and ending on the other. Special clamps will help you put the boards back in place by holding them together while you nail or screw them in place.
Sealing cracks in the floor. To seal wide gaps, hammer glued strips between the boards. When the glue has dried, use a plane to plane the edges of the slats that protrude above the floor.
To fill holes left when nail heads or screws are driven in, use flexible wood putty. When sealing a crack at the end of a board, first fill it with glue, then tighten it by hammering nails near the end.
Dust removal of floors
To remove dust from rough concrete floors, you can use domestically produced mixtures Ashford, Elakor-PU or Neomer. They are suitable for floors in outbuildings and utility rooms of industrial enterprises.
The appearance of cracks is one of the most pressing problems of plank floors. Creaking floorboards, heat leaks, penetration of dust and insects - all these are unpleasant consequences of such defects, and if measures are not taken in a timely manner, the floor will have to be completely replaced. Meanwhile, there are several effective ways to seal the gaps in the floor between the boards and significantly extend the service life of the coating. All of them are quite simple, do not require special skills, and therefore everyone can do them. So, why do gaps form in the floor and how can you fix them?
To choose the best method for sealing cracks, you first need to accurately determine and eliminate the cause of their appearance. If this is not done, the result of the repair work will be short-lived and after a while everything will have to be repeated again.
The following factors contribute to the formation of cracks:
- natural drying
- any wood is subject to drying, only with different intensities. Boards processed in vacuum chambers almost do not change their geometry during their service life, but ordinary lumber can dry out by 5-10%, or even more, depending on the initial moisture content and the type of wood; - low humidity in the room
- if the air in the house is too dry, the boards will intensively release moisture and decrease in size. For wooden floors, the optimal air humidity should be between 40-65% at a temperature of 18 to 25°C; - improper installation
- violation of laying technology leads to loosening of the boards, their subsidence and deformation, as a result of which gaps form between the floorboards. The most common mistakes are failure to maintain the plane when installing joists and weak fixation of the flooring; - rodents living under the floor
- mice and rats are able to chew through the thickest boards in order to get into the room. The more active the pests are, the more cracks and holes they will create, and such damage is the most difficult to eliminate; - laying raw lumber
- drying of the boards during the use of the floor almost always leads to significant deformations of the flooring and the appearance of gaps between the floorboards. That is why when choosing, you should give preference to well-dried, smooth boards with a relative humidity of 8-12%.
Depending on the number and size of cracks, as well as the general condition of the wooden elements, repairs can have varying degrees of complexity - from repairing individual damage to completely replacing the flooring.
Leveling a wooden floor
Some uneven areas of the floor can be sanded by hand - just like you did after using putty - but where there are depressions in the floorboards or a thick layer of old paint, grease and mastic, the best solution is to borrow a commercial sander and sand it down. the floor again. Start sanding the floor with a coarse sanding belt, then gradually move to a finer abrasive, aiming the machine across the boards. Finish sanding by going along the floorboards with a fine-grit sandpaper.
For hard-to-reach surfaces, also rent a special sander (if you don't have a belt sander), since the sander won't reach areas of the floor directly next to the baseboards.
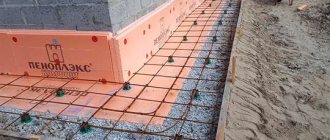
Sealing cracks and holes in monolithic concrete floors
If the screed floor is in generally good condition and dry, you can repair cracks and holes using a quick-setting repair mortar. Before this, it is necessary to remove all unbound particles from the cracks, and, if necessary, clean the edges of the cracks to provide the solution with a surface for setting. The edges of cracks and holes must be treated with a PVA solution (white) in a combination of one part glue to five parts water to reduce the absorbent properties of concrete and help the solution absorb into the floor.
To prepare cement mortar, use PVA glue and water in the same ratio as a base; then cover the cracks with the resulting solution, and apply two or more layers to areas with large depressions. Level the surface with a spatula.
To help the freshly prepared mixture “adhere” to the edges of the crack, brush them with a solution of PVA (white). Apply a layer of quick-setting repair mortar to cracks in the cast-in-situ concrete floor. Rub the solution onto the damaged surface and leave it to harden. If the floor surface is excessively porous, apply an insulating layer of PVA adhesive solution with a brush.
Acceptable crack sizes
Measuring the width of a crack in concrete.
There are standards that define the limiting parameters of the cracks that form in the concrete layer. It is important to take into account the operating conditions. Cracks in concrete require repair if they are characterized by a larger opening width than specified in the document DBN V.2.6-98:2009:
- deformation cracks, shrinkage up to 0.5 mm wide does not need repair if the concrete is not exposed to negative external factors (freezing, moisture, temperature changes, ultraviolet radiation, etc.), i.e. the structure should not be affected weather conditions, since it is located indoors;
- on the street, the concrete layer may deform slightly, the maximum crack size is 0.4 mm, in this case the coating is affected by negative factors: precipitation, ultraviolet radiation, etc.;
- if the concrete structure is operated in the most aggressive conditions, then repairs must begin when cracks 0.3 mm wide appear;
- restoration of the coating should be carried out if leaks formed as a result of concrete deformation have reached 0.2 mm in width; such restrictions apply to structures with reinforcement inside.
Failure to follow the rules for repairing concrete pavements can lead to accelerated expansion of cracks. Conversely, it is not always necessary to begin restoring a structure if it is not affected by negative external factors. If any deformation cracks appear, their parameters should be monitored. Until significant expansion has occurred, there is no risk of complete destruction of the coating.
It should be borne in mind that horizontal cracks, which are characterized by minimal opening, do not require intervention. They are harmless and cannot lead to the destruction of the structure. However, there are conditions under which there should be no gaps in the concrete layer:
- operation at facilities with increased requirements for the quality and durability of coatings;
- when the structure comes into contact with liquids and gases, since it must be sealed and reliable.
We invite you to familiarize yourself with the Black Bathhouse, or How to build a traditional Russian steam room without a chimney?
Leveling monolithic concrete floors
It doesn't take much skill to create a smooth, flat surface because the self-leveling floor compound will do the job for you. There are two types of such a mixture: these are dry powders that must be diluted either in water or in a special latex (synthetic substance used for the production of adhesives, paints, foam rubber) emulsion.
Before you start pouring, clean the room and remove doors and baseboards. Attach slats (shingles) with nails along the entire length of the thresholds to prevent unwanted spreading of the mixture. Treat all cracks and holes with a depth of more than 6 mm with a solution of PVA and water, as described earlier. Dilute the self-leveling mixture in a bucket of water and pour it onto the floor, then level the resulting layer with a spatula or plaster trowel. Give time for the mixture to settle. As soon as it dries - after at least 24 hours - you can install baseboards and doors; However, make sure that the door does not touch the floor when opening: you may have to trim the bottom slightly.
Dilute the self-leveling floor mixture according to the manufacturer's instructions. Start filling the floor with the mixture from the corner farthest from the door. Using a plaster trowel, level the layer of mixture to a thickness of 3 mm.
Sealing cracks and holes in the floor
To lay new flooring, the floor itself must be sanded and smooth. Along with repairing or replacing floorboards, you'll likely need to seal cracks and holes in your plank floors, as well as remove rough spots and possibly deal with dampness in your cast-in-place concrete floors. Any imperfections that are not corrected can ultimately affect the quality of the flooring and damage it.
Long-term repair of defects
When it is necessary to restore a concrete coating with a guarantee of a long period of operation without further destruction, resin-based compositions are considered. They are characterized by good adhesion, increased strength, and do not allow cracks to increase in size. In addition, such mixtures are versatile. Another advantage of sealing cracks in concrete floors and walls using this method is the rapid drying of the composition.
Prepare tools and materials:
- containers for preparing the solution;
- spatulas;
- grinding machine, diamond-coated discs;
- vacuum cleaner;
- primer;
- resin-based composition;
- fine sand.
Sequence of actions when repairing concrete pavement:
- The crack is being repaired. At this stage, use a chisel and a hammer to remove deformed areas of the coating along the crack. The recommended leak width is 5 mm or more.
- To strengthen the coating, transverse grooves are created in this area using a grinding machine and a diamond disc. They should be located in increments of no more than 400 mm. The length of each groove is up to 150 mm. Their width corresponds to the thickness of the diamond blade.
- Use a vacuum cleaner to remove dirt and construction dust.
- The grooves are fixed using special brackets.
- The side surfaces of the crack are treated with a primer. Without this material, sufficient adhesion strength will not be ensured.
- Considering that the epoxy resin mixture hardens quickly, it is necessary to prepare it immediately before use. The composition must contain sand and a hardener, in addition to resin. The ratio of components is indicated in the mixture manufacturer's instructions.
- The crack is filled with epoxy resin. Hardening time: 10 minutes.
- When the gap is filled, sand is sprinkled on top of the mixture. It is removed before finishing work.
We suggest that you familiarize yourself with the weight of a concrete block for a foundation
Epoxy resins for sealing cracks in concrete.
If cracks in concrete need to be filled, higher strength materials should be considered. These include:
- epoxy resin ED-16 and ED-20, the kit does not include a hardener, so it is purchased separately (price up to 500 rubles), the cost of the base material is 2000 rubles. for 3 kg of resin;
- Epoxy 520 (manufacturer Spolchemie), price 3500 rub. for 5 kg;
- UZIN KR 416 is more expensive than its analogues (RUB 2,700 per 0.75 kg), but is characterized by increased reliability and is produced in Germany.
Depressions and peaks in the rough coating may appear after the beacons are dismantled. The reason for the appearance of flaws will lie in the physical and mechanical properties of the material used. The cement mixture has a low level of plasticity, adhesion and a high coefficient of linear expansion.
What are the main reasons for the appearance of defects on the surface of the screed?
- The solution was mixed incorrectly, in which the concentration of water will be too high.
- Rapid (forcible) drying of the coating.
- Uneven drying of the screed around the entire perimeter.
- Lack of a membrane base under the finished solution (polyethylene).
- The presence of large temperature changes and drafts that interfere with normal drying.
- Direct contact of the cement mixture with communications and the wall.
- Using a fine-grained mixture that is simply not suitable for pouring the solution.
- Failure to comply with or lack of required distances for expansion joints.
The reasons for the formation of defects, namely that the floor screed of the rough foundation is cracking, can be very different and will not be limited to the list presented. In addition, the quality of the concrete pavement can be affected by:
- Improper installation of waterproofing and thermal insulation.
- Poor quality cement based mixture.
- Inhomogeneous solution in preparation.
- Lack of required tools to pour and level concrete.
- Failure to comply with proportions when preparing the working composition.
Let's look at what is best to do during the floor renovation process.
Filling holes in wood floors
Holes from buried nails and screws can be easily filled with flexible wood filler using a putty knife. If you plan to leave your plank floors bare and scrub them with appropriate cleaners, try matching the putty or sealant to the color of the wood the floorboards are made from; At the same time, apply a layer of putty after each floor sanding cycle.
Deeper depressions can also be eliminated with elastic putty, but if a knot has fallen out of the board, leaving behind a large round hole, insert a short wooden plug into it, having previously smeared it with glue, and then clean out this place with a plane. Match the corks to the color of the floor or paint over them after cutting them flush with the floor.
Sealing cracks in the floor
You'll find two main types of gaps in plank floors: gaps from cracked ends along the edges of the boards and gaps between the boards themselves. Such cracks can most often be eliminated by tightening them with nails: one nail must be driven into each edge of the board near the end and further into the beam at an angle to its center. As you drive in the nails, these cracks should disappear.
Eliminating gaps between boards is more difficult. If they are not wide, you can use wood putty; however, for wider gaps you will have to prepare thin slats and hammer them, after covering them with glue, into the resulting gaps. When the glue has dried, plane or sand the edges of the slats protruding above the floor; if necessary, paint over the installed wedges.
If there are many wide gaps between the floorboards, the best solution is to lift all the boards one by one, starting from one side of the room and ending on the other. Special clamps will help you put the boards back in place by holding them together while you nail or screw them in place.
Sealing cracks in the floor. To seal wide gaps, hammer glued strips between the boards. When the glue has dried, use a plane to plane the edges of the slats that protrude above the floor.
To fill holes left when nail heads or screws are driven in, use flexible wood putty. When sealing a crack at the end of a board, first fill it with glue, then tighten it by hammering nails near the end.
Methods for eliminating defects
The choice of sealing method should be approached carefully, taking into account the cause of the damage, the location of the cracks, as well as the labor costs and time it will take to repair. The financial aspect is no less important, because the larger the work, the more funds you will need.
| Sealing method | Description |
| Used to eliminate small gaps and cracks in the floor. You need not simple tape, but reinforced tape, 50 mm wide. The floor is cleaned of dirt, degreased and dried, after which the cracks are sealed with tape, the edges of which are fixed to the floor with a stapler. The method is very simple and inexpensive, takes a minimum of time. Disadvantage: a floor with stripes of adhesive tape does not look aesthetically pleasing, so carpet, carpet or other rolled covering must be laid on top | |
| It is used to eliminate gaps between the floor and walls that appear as a result of wood shrinkage. This is carried out after dismantling the baseboards and cleaning the gaps from debris and dust. If the cracks are too wide, pieces of foam plastic are placed in them before blowing the foam. After the foam has dried, its excess is cut off at the level of the floorboards, the sections are puttied so that dust does not accumulate in the pores of the material, and the baseboards are installed back. The method is convenient, does not require much physical effort, and takes little time. Cons: high foam costs, fragility | |
| This option is suitable for small gaps between floorboards. Only special wood putty is used. The composition is applied with a spatula, carefully filling all the recesses and gaps, and after drying the surface is sanded. The method is fast, does not require special skill, and is quite affordable. The downside is its fragility - putty tends to crack and crumble, especially with intense loads on the floor | |
| Homemade repair compounds are often used to seal wide gaps and cracks in the floor. Traditionally, a mixture of wood glue and sawdust is used, which is applied with a spatula to problem areas, compacted into the recesses, and sanded after drying. To seal cracks gnawed by mice, add cement and broken glass to the adhesive solution. To speed up the hardening process, use epoxy glue instead of wood glue. This method of sealing is very affordable and durable, and also simple to implement. | |
| Wood sealant can easily seal both narrow and wide gaps between floorboards. The syringe-shaped nozzle allows you to effortlessly distribute the composition evenly and fill all the recesses. Thanks to its elasticity, the sealant will not come off the boards during temperature deformations and will reliably serve for many years. To mask the repaired areas, putty is applied over the sealant to match the color of the coating. The method is convenient, simple and durable, material costs are low | |
| This method allows you not only to eliminate cracks, but also to effectively get rid of creaks in the floors. Construction stores sell special synthetic cords of varying thicknesses, which are selected according to the width of the gap. Instead of a cord, you can use regular hemp rope. To seal the defect, the cord is generously lubricated with wood glue, laid on the floor and firmly driven into the crack with the corner of a spatula so that 2-3 mm remains from the cord to the floor surface. This recess is filled with a mixture of sawdust and glue, leveled, and sanded after drying. Plumbing tow can be used in a similar way. The method is reliable, inexpensive, although a little labor-intensive | |
| Used to eliminate wide gaps in the floor. Wooden slats are hewn into wedges to fit the gaps, thickly coated with glue and hammered into the gap with a rubber or wooden hammer. After the glue has dried, the part of the wedge protruding above the floor is removed with a plane, the working surface is sanded and painted. One of the most practical methods is inexpensive and durable. Disadvantages: trimming and fitting take additional time; the work process requires some effort and skills in working with carpentry tools | |
| Used when floorboards have significantly dried out and wide cracks appear in the floor. To do this, the boards are carefully dismantled and then laid again, compacted using wooden wedges, clamps, a jack or a special lever. As a result of tightening, additional 2-3 floorboards will be needed, depending on the degree of shrinkage of the floor. The method is characterized by high reliability, durability and low costs. Disadvantages include the length of the process and its complexity | |
| It is used in cases where there are many cracks and the appearance of the floor leaves much to be desired. The plywood is laid on the floor so that there are 1-2 mm gaps between the sheets, and the joints in each row are offset by at least a third of the sheet. The sheets are fixed with self-tapping screws, recessing the caps into the wood, then the recesses are filled with putty, the flooring is sanded and the finishing coating is laid. This method allows you not only to repair all damage, but also to insulate the floor, as well as level the base for a decorative coating. Cons: high costs of materials, labor-intensive work |
Prices for reinforced tape
reinforced tape
All the described methods have been tested many times in practice and are widely used by home craftsmen. Now let’s take a closer look at the most popular options for sealing cracks: what tools to use, how to properly prepare the surface and workflow technology.
Prices for silicone sealant “Moment”
silicone sealant moment
Leveling a wooden floor
Some uneven areas of the floor can be sanded by hand - just like you did after using putty - but where there are depressions in the floorboards or a thick layer of old paint, grease and mastic, the best solution is to borrow a commercial sander and sand it down. the floor again. Start sanding the floor with a coarse sanding belt, then gradually move to a finer abrasive, aiming the machine across the boards. Finish sanding by going along the floorboards with a fine-grit sandpaper.
For hard-to-reach surfaces, also rent a special sander (if you don't have a belt sander), since the sander won't reach areas of the floor directly next to the baseboards.
Sealing cracks and holes in monolithic concrete floors
If the screed floor is in generally good condition and dry, you can repair cracks and holes using a quick-setting repair mortar. Before this, it is necessary to remove all unbound particles from the cracks, and, if necessary, clean the edges of the cracks to provide the solution with a surface for setting. The edges of cracks and holes must be treated with a PVA solution (white) in a combination of one part glue to five parts water to reduce the absorbent properties of concrete and help the solution absorb into the floor.
Leveling monolithic concrete floors
It doesn't take much skill to create a smooth, flat surface because the self-leveling floor compound will do the job for you. There are two types of such a mixture: these are dry powders that must be diluted either in water or in a special latex (synthetic substance used for the production of adhesives, paints, foam rubber) emulsion.
Before you start pouring, clean the room and remove doors and baseboards. Attach slats (shingles) with nails along the entire length of the thresholds to prevent unwanted spreading of the mixture. Treat all cracks and holes with a depth of more than 6 mm with a solution of PVA and water, as described earlier. Dilute the self-leveling mixture in a bucket of water and pour it onto the floor, then level the resulting layer with a spatula or plaster trowel. Give time for the mixture to settle. As soon as it dries - after at least 24 hours - you can install baseboards and doors; However, make sure that the door does not touch the floor when opening: you may have to trim the bottom slightly.
Dilute the self-leveling floor mixture according to the manufacturer's instructions. Start filling the floor with the mixture from the corner farthest from the door. Using a plaster trowel, level the layer of mixture to a thickness of 3 mm.
How to repair a hole in a plank floor? What about the hole punched in the plywood flooring? How to fix a deep pothole in a concrete screed or a through hole in a reinforced concrete floor slab?
In this article we will try to answer these questions.
Coating repair
In order to understand how to repair a hole in the floor, you need to assess the extent of the damage. Small areas can be repaired by replacing part of the board between two joists. Sometimes, if the damage is significant, it may be easier to replace the entire floorboard or even several adjacent ones.
Using a chisel, part of the wood around the fastener is cut off until it is easily accessible. Then the fasteners are removed, depending on whether nails or screws were used, a nail puller or a screwdriver is used.
Use a jigsaw, saw blade or manually using chisels to select the damaged area. Next, using a crowbar chisel and a hammer, the defective areas of the floor are removed.
The hole in the floor is covered with new, healthy boards. In order for them to fit into their seat as much as possible, the lower part of the groove is cut off. The board is installed in its place and attached to the joists using self-tapping screws.
The fastener caps are masked using putty. The appearance of the floor is finally restored after painting the repaired area.
Causes
First, let's find out where a hole in the floor can come from.
Agree that the situation when the surface suddenly collapses under your feet is quite unlikely.
- Falling heavy objects . This is a very real situation for weightlifting halls and industrial premises with wooden flooring (which, however, is rather an exception).
Note: platforms in gyms are usually assembled from timber, secured with staples. The platform is laid directly on the screed and covered with a sheet of hard rubber. In general, if a fallen barbell breaks through the floor, this indicates either a gross violation of building codes, or poor discipline of athletes training with heavy weights outside the platform.
- Rotten boards . The picture is typical for houses built more than half a century ago. Harmless antiseptics were not yet available at that time, and creosote and impregnations based on petroleum products were not used in residential premises.
- Dried boards . Actually, in this case, what we have in front of us is not a hole in the floor, but a gap.
As the tree dries, it changes its linear dimensions. Hence the cracks.
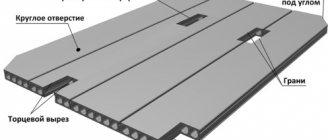
- Defects in slabs and screeds due to flaws during their casting or installation . In apartment buildings in this category, gaps between hollow-core panels predominate.
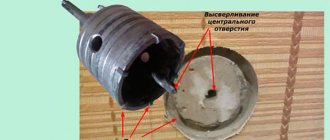
- Finally, holes are punched in the ceilings for laying communications - during construction or major repairs . They, of course, also have to be sealed - for reasons of heat and sound insulation.
How to get rid of a hole around a riser?
The hole that appears around the riser under the heating system does not appear so often, but there are still cases. If prerequisites for the formation of a crack or any other defect in this place have been noticed, it is worth taking special care to eliminate the problem. You can seal a hole in the ceiling using the following steps:
- If there is a small gap, the size of which is 0.5 centimeters, then it can be eliminated using silicone sealant. This material is characterized by excellent plastic properties, so when pipes expand under the influence of heat, no obstacles will arise.
- If there is a large hole, installation work will become more complex. Here, first you need to apply reinforcement, for example, using welding electrodes. Then fill the space with polyurethane foam. And only then seal it with cement mortar and putty.
Elimination
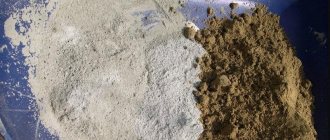
How to fill holes in a concrete floor? In general, it is quite logical to use the same concrete for this. More precisely, a cement-sand mixture.
Potholes in the screed
- The pothole is cleared of debris and dusted with a vacuum cleaner.
- If you have floor primer on hand, priming the recess would be a great idea. This will improve adhesion with cement-sand mortar.
- The pothole is then filled with mortar; the surface is smoothed with a spatula, trowel or regular board. The ratio of cement and sand suitable for these purposes is 1:3.
- If the pothole is large, you can use backfill made from fragments of bricks, stones and crushed stone.
Floor Primer – It is a great idea to prime the recess. This will improve adhesion with cement-sand mortar.
- The pothole is then filled with mortar; the surface is smoothed with a spatula, trowel or regular board. The ratio of cement and sand suitable for these purposes is 1:3.
- If the pothole is large, you can use backfill made from fragments of bricks, stones and crushed stone.
- The pothole is then filled with mortar; the surface is smoothed with a spatula, trowel or regular board. The ratio of cement and sand suitable for these purposes is 1:3.
- If the pothole is large, you can use backfill made from fragments of bricks, stones and crushed stone.
Floor primer - types, characteristics and application features" href="https://shkolapola.club/ustroystvo/izolyaciya/393-gruntovka-dlya-pola">floor primer - a great idea would be to prime the recess. This will improve adhesion with cement-sand mortar.
Repair with cement mortar and mixtures
When deciding how to repair cracks in concrete, such materials are most often considered. They are affordable, easy to prepare, and durable, provided the solution mixing technology is followed. With their help, you can fill shrinkage leaks, which are characterized by a small width. It is important to properly prepare the base surface. This will ensure high adhesion of the cement mortar to concrete.
Repairing a crack
Regardless of what materials you plan to use to fill the gap, the preparatory stage is always the same. Thus, it is recommended to joint the deformed area. If it is filled with a mixture for sealing cracks in concrete without preparing the base, then as a result the mortar layer will be deformed. You need to follow the instructions:
- Check the edges of the crack for strength. If the concrete in these areas has crumbled, it is removed. The jointing is carried out along the entire length of the gap. Its width after removal of exfoliated concrete should be 5 mm or more. Work at this stage is carried out using a chisel and a hammer. You can use a spatula.
- The surface is cleaned of dirt.
- Remove dust using water. In addition, moistening the crack will improve the adhesion of materials when applying the solution.
- Remove excess liquid.
- A cement-sand mixture is being prepared. You will need sand (3 parts) and cement (1 part). To increase the strength of the solution, PVA glue is added.
- Fill the crack with the mixture. It is important that the solution covers the entire surface of the concrete in the recess.
- While the cement dries, it is periodically moistened with a small amount of water.
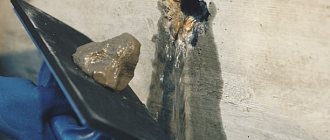
Filling the hole
To repair a large crack or hole in a concrete wall, follow the instructions:
- The resulting hole in the coating is cleaned of contaminants and the crumbling material is removed.
- An anti-corrosion compound is applied to the walls and bottom of the hole. This need is due to the fact that there is reinforcement inside, which will begin to oxidize upon contact with moisture.
- The wire is being laid (the diameter can be 4 mm or more). It is cut into pieces, the length of which must correspond to the diameter of the hole in the concrete.
- The surfaces are treated with a primer composition, which will ensure increased adhesion of materials. A layer thickness of at least 3 mm is considered sufficient.
- Filling of leaks is carried out immediately after treating the surfaces with a primer. Then the coupling will be the best. If the hole is shallow, it can be filled immediately. In cases where it is large enough, restoration of the coating is carried out layer by layer with breaks for treating the solution with water from a spray bottle.
- The surface is leveled. To do this, use a rail. Movements are performed from side to side.
- When the mixture has set a little, remove its excess.
- The surface must be covered with a plaster composition. This will provide additional protection. Deep holes are leveled with a grinding machine.
It must be taken into account that the cement mixture is subject to shrinkage during the drying process. This will lead to slight subsidence of the solution layer. To avoid such consequences, it is recommended to use a little more mixture when filling the crack. The described method is suitable only for cases where it is not necessary to ensure the tightness of the coating and there are no increased requirements for surfaces.
In addition, cement compositions cannot be considered as an effective measure providing long-term results. The coating will soon continue to deteriorate. This means that the cement composition should be used only as a temporary measure.
This type of repair can be considered the simplest and at the same time the weakest. This is a temporary partial filling of floor, wall and foundation cracks in both dry and wet areas.
This filling of cracks does not seal them, but protects them from contamination for a while and prevents their further opening for a short time.
Repairs begin according to SNiP rules with the preparation of the opening itself.
It should be checked for chips, as other cracks and openings may form in them in the future. Use a chisel to run along the entire length of the crack to make it wider.
Next, clean the crack with water and a brush to remove various contaminants; you can also use a vacuum cleaner. Remaining water should be collected with a sponge.
Using a spatula, you should also deepen the crack to 5 mm so that the solution holds more firmly.
For repairs, make a solution of 3 parts sand and 1 part cement, to which you also need to add PVA glue. The solution should be thick enough.
Pour it into the crack with a trowel and moisten it on top. If you carry out repairs using a polymer mixture rather than using a concrete solution, you do not need to wet the composition.
In medium cracks, reinforcement is usually visible; it must be cleaned and coated with a special product that will prevent corrosion. Next, you need to make grooves and place 4 mm pieces of reinforcement in them.
Now we apply the adhesive composition evenly over the entire surface so that the layer thickness is about 3 mm, and without waiting for it to dry, you need to fill it all with the solution.
The solution must be compacted so that it gets into all the recesses and irregularities, and the surface must be leveled with a wooden strip, which must be moved along the surface of the solution to the right and left and towards you.
If the gap is very deep, it is advisable to lay the solution in several passes. At each stage, the surface should be sprayed with a little water.
A special metal trowel will help make the concrete surface perfectly smooth. When the solution has hardened, the excess must be removed with a spatula.
If you paint or cover the concrete surface with a laminate, then such work can be done within a day after the repair is made, but you should wait longer to lay the tiles.
If this does not happen, use a grinding machine to level the surface of the former crack to the desired level.
We invite you to familiarize yourself with Screed on a wooden floor under tiles: how to fill
If you are dealing with a crack whose width and length are large enough, you can process it before repairing it with a circular saw with a diamond disk, after which the repair is carried out according to the scheme described above.
This method of sealing is most often used as a temporary solution, since sealing does not occur during such repairs.
The method is relevant for both dry and high-humidity rooms where good waterproofing is required.