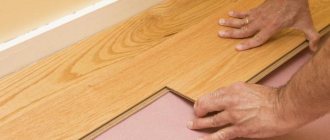
Requirements for a subfloor under laminate
The most suitable option for leveling the floor is self-leveling floors. Before laying the laminate, you need to prepare the base. It should be different:
- rigidity and evenness (for every two meters, a height difference of no more than 2 mm is allowed);
- there should be no holes, holes, potholes on the surface of the base;
- small irregularities (up to 2 mm) can be easily eliminated by placing a special backing made of cork or polyethylene foam under the laminated boards;
Important: you cannot use several layers of substrate in the hope of leveling out significant defects in the base.
- the optimal thickness of the screed for laminate is 4 cm (for a relatively flat base, it is permissible to use a smaller layer of self-leveling mixtures);
- if the leveling is carried out using a heat- or sound-insulating material, the mortar layer must be reinforced;
- in some cases, the screed is laid on a layer of insulating material placed on the walls. This is necessary to prevent the concrete from absorbing moisture from the base or premature dehydration of the screed on hygroscopic bases, for example, wood.
To level a wooden floor, plywood or OSB boards are used.
Why is it so important to level the floor under the laminate? It's all about the locking connection of the laminated boards. This is the most vulnerable place. When laying the product on an uneven base, the locks quickly wear out and break. When laying planks on an uneven base, the following may happen to your flooring:
- the boards will wear out quickly;
- the ends will begin to stick out;
- under load the floor will creak or pop;
- the joints between individual elements may stick out, causing the floor to become covered with waves;
- The locking joints will break and the boards will come apart.
To avoid all these problems, you need a screed under the laminate. It will level the base, give the floor the necessary rigidity, evenly distribute the load, help hide communications and perform the functions of sound and heat insulation.
Where to begin
First, you need to stock up on the necessary tools and materials so that you don’t have to be distracted from work in the future.
- Jigsaw - useful for cutting plywood.
- Construction level - this device is necessary for marking surfaces. In order to achieve minimal error, it is recommended to use a laser level. Its errors are much smaller than usual.
- A drill with a mixer attachment is its function to stir the solution. You can, of course, do this by hand, but it will take much longer and does not guarantee that there will be no lumps.
- The rule is that it is advisable to use the longest possible one, this will allow you to cover more surfaces at a time.
- A spatula is the same rule, but in a smaller size.
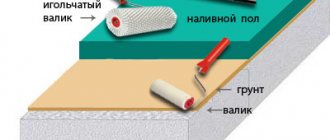
- Needle roller - used only for self-leveling floors.
You will also need a hammer and a screwdriver; after the floor is prepared for laying the laminate, installation work cannot be avoided, but for now the above tools will be sufficient.
Choosing a laminate leveling method
To level a concrete or wooden floor, you can use several types of screed:
- cement-sand (connected and not connected to the base, floating);
- dry;
- self-leveling composition;
- semi-dry floor screed.
It is better to level a wooden floor with a floating reinforced layer or do a preliminary leveling with plywood, and then pour in a self-leveling compound.
For cement-sand screed, a solution of a grade of at least 75 is used. Sand and cement are mixed in a ratio of 3:1. The composition should have a thick consistency, so it will be stronger. Using this solution, it is better to level a concrete floor with a height difference of 3 to 5 cm. Sometimes, under the laminate on top of the cement layer, it is necessary to make a final leveling using a self-leveling compound.
How to make a floor screed in a private house?
Ready-made self-leveling mixtures are used to level concrete
Ready-made self-leveling mixtures can be used to install screeds with a height of 0.5 to 3 cm. To level the floor under the laminate using the ready-made mixture, you simply need to add water to the dry composition in the proportion indicated on the package. There are rough leveling mixtures, on top of which it is necessary to lay a finishing self-leveling mortar, and more expensive universal compounds, which allow you to simultaneously create both a screed and a smooth finishing layer for laying the laminate.
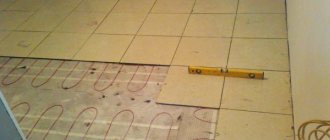
If you plan to make a heated floor, then it is better to use a semi-dry screed for leveling. Essentially, this is the same cement composition only with less water content. Due to this, the leveling layer is less susceptible to shrinkage and is protected from the formation of cracks and temperature changes.
If the floor structure is unreliable and the unevenness of the base is significant, then it is impossible to make a thick, heavy cement screed. In this case, dry leveling is used. To do this, insulating material is laid on the base, beacons are installed on it and granular backfill is poured. Sheets of plywood, chipboard, OSB or GVL are laid on top and attached to the guide beacons. There is no need to do additional leveling of this floor. It is suitable for laying laminate flooring.
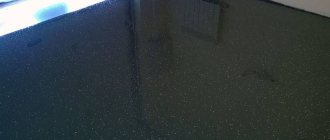
Choosing a self-leveling floor
We've sorted out the first question, let's move on.
Which gender should I choose? Today, a lot of enterprises offer their products in this area. It is important to decide what we want. Here there is a gradation based on wear resistance, product quality and, of course, prices. A person who does not know how to count money will take the extreme or the best, while others will think twice. The differences between these sexes are simple:
- time required for hardening and shrinkage;
- the coefficient of this shrinkage, the thickness and composition of the working mixture.
One more nuance. To complete the understanding, let’s define what the “mixture for liquid floors” consists of? Everything is simple here. Polymers, gypsum, limestone. And it's all? And you don’t need more.
Pouring such a floor usually occurs in two stages: the first, rough (rough) and the second, more liquid and viscous. It is this that will spread over the surface being poured, hiding flaws and irregularities. Actually, we have decided on the need for filling and we can begin the process itself.
Preparing the base
Primer of the base before laying the laminate underlay
Before leveling, any base must be prepared. To prepare a concrete floor you need to do the following:
- First, you should clean the base from debris, dust and loose parts of concrete.
- All cracks and crevices are widened with a grinder, cleaned, primed and sealed with mortar.
- To perform a bonded screed, the concrete floor must be primed. If you decide to make a floating screed, then you do not need to use a primer.
To prepare a wooden floor for leveling, do the following:
- All boards and joists are inspected. Rotten and damaged boards are replaced with new ones. Sometimes the joists need to be replaced or strengthened.
- Wooden base elements must be treated with antiseptics.
- All cracks on the floor are carefully puttied.
- The surface is primed with a moisture-resistant compound in two layers.
- Insulating material (polyethylene film) is laid and placed on the walls.
Wood coverings
First, you should stretch the floorboards to avoid squeaks. Replace worn rotten boards and cover them with sheets of plywood.
To fasten plywood, it is recommended to screw in screws at intervals of 15-20 cm.
Cut the plywood into small tiles and lay them at intervals of 5-10 mm. each other. This is necessary so that when the floor deforms and moves, the ends of the sheets do not rub against the adjacent ones.
If a deeper screed is needed, or the floors are too uneven, plywood or chipboard should be laid in two layers. This option will be more reliable, although the costs will increase slightly.
The floor must be horizontal
The second layer should be laid so that the joints of the upper layers do not overlap with the joints of the lower ones.
This floor leveling method is suitable for parquet boards, linoleum and wooden flooring.
Cement-sand screed for laminate
Laying a cement-sand screed to level rough floor surfaces
To level a concrete floor under a laminate using a cement screed, work is performed in the following sequence:
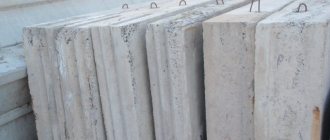
- After preparing the base and breaking down the finished floor level, beacons are installed on the walls of the room. They are leveled. Drywall profiles, slats, boards or pipes can be used as beacons. The pitch of the beacons from the wall is 30 cm, between each other - a meter or along the length of the rule.
Tip: beacons can be laid on mortar piles or attached to the base with self-tapping screws. The latter option cannot be used when installing screeds over insulating material.
- Along the perimeter of the room, a damper tape is attached to the walls, protecting the screed from deformation damage. Its height should be 2 cm greater than the thickness of the screed.
- The prepared solution is placed between the beacons so that it slightly exceeds their level. Then the mixture is leveled using the beacon rule (see video).
- Every other day, the beacons are removed from the screed, and their recesses are primed and sealed with fresh mortar, and the surface is rubbed down. The semi-dry screed hardens in 3-4 hours.
- During the first week, the drying screed must be moistened with water to protect it from drying out. Also, to ensure uniform evaporation of moisture, the surface is covered with plastic film for the first 4 days.
Video instructions for performing cement leveling for laying laminate:
How to make a dry floor screed with your own hands?
Self-leveling mixture
Just as in the previous case, after removing the old coating, the surface is primed in order to increase the adhesion of the base to the mixtures and prevent the accumulation of moisture. To carry out the work, use undiluted primer. Alignment of cracks, differences, and holes is carried out using the dry mixture “Betonit 5000”. The final filling is carried out using Betonit 3000 or Osnovit Scorlight T-45. To improve sound insulation, you can use dry Knauf screed. A dry screed is a prefabricated surface made of gypsum fiber panels and expanded clay sand. Dry mixtures are prepared in small portions, since after about 15 minutes the composition hardens and loses its plasticity.
Self-leveling screed
Using ready-made compounds, you can level a wooden or concrete floor for laying laminated boards. Just keep in mind that the unevenness of the base should not exceed 3 cm. Work is carried out in this order:
- After preparing and priming the concrete base, prepare the mixture by adding water to the dry composition according to the proportion indicated on the packaging. The wooden floor is prepared as indicated above and covered with plastic film.
- The mixture is poured onto the base and leveled using a needle roller. In principle, beacons are not needed to fill a self-leveling composition, but professionals sometimes perform pouring according to benchmarks (see video).
- After 3-4 days you can walk on the screed. Make sure the leveling layer is completely dry before laying the laminate. To do this, place and press a paper napkin to the floor surface for a day. If it remains dry, you can lay the flooring.
Video on pouring self-leveling mixture:
Dismantling the old coating
- Before laying the laminate, all old floor coverings are removed, with the exception of linoleum, and only if the floor is level and the floor measurement gives the standard values for the slope and unevenness.
- For high-quality installation of laminate flooring, the base of the floor must have a difference of no more than 3 mm per linear meter of the floor and an unevenness when checking for clearance of no more than 1 mm per 1 linear meter.
- If the old floor is made of wood, then it should not sag or creak. In case of large unevenness of the wooden floor, it is necessary to shaving or sanding it through the light.
If during dismantling the old cement coating peels off or defects in the screed are revealed, it is necessary to carry out focal repairs of the screed. Cracks, potholes and delaminations of the screed are expanded and sealed with fresh cement mortar.
Dry screed
To level and prepare very uneven floors and bases on dilapidated floors for laminate installation, it is better to use a dry screed. It is done in this order:
- The wooden or concrete base is covered with plastic film, placing it on the walls of the room. The joints of the film are taped with tape.
- Then the beacons are installed. It is better to fix the guides on the mortar piles so as not to damage the insulating material. All beacons are set according to level.
- Granular material is poured between the guides and leveled as a rule. You can use expanded clay sand or small crushed stone (see video).
- Then sheets of plywood, OSB, gypsum fiber board or chipboard are laid on top. They are attached to the guides using self-tapping screws.
- This screed is quite smooth, so finishing leveling is not required. The laminate is laid on a special backing made of cork or polyethylene foam.
To learn how to level a floor with a dry screed, watch the video below:
Construction material
After the leveling screed is completely ready and has dried, before laying the laminate, it is necessary to lay a layer of vapor barrier and a special underlay. A protective vapor barrier layer will prevent moisture accumulation and protect the coating from damage. It is laid in strips with an overlap of adjacent sheets of at least 15 cm. The edges should fit onto the wall with an allowance protruding above the laminate.
A porous synthetic or cork underlay dampens sounds, absorbs weight loads on the laminate flooring, and reduces heat loss through the floor. Synthetic material has good insulating properties for a limited time, after which it loses volume with a deterioration in its performance properties. Cork backing is more durable, but costs more and is inferior to synthetics in terms of initial performance.
You need to decide what will be used as a substrate:
- Cement screed - used for concrete surfaces. Required materials: sealant, plaster, dry building mixture.
- Wood flooring - For relatively flat floors, plywood is usually used. Used in cases of parquet flooring, also when laminate is built on top of linoleum.
Advice! Laminate flooring can be installed on any surface except carpet.
Choosing a subfloor for the flooring
In addition to choosing the above building materials, you need to choose a substrate for the laminate; a lot will depend on this choice.
- Protects laminate flooring from moisture
- Additionally equipped with a layer of foil, which eliminates the need to buy polyethylene rolls for covering floors.
- Rotting, mold and fungi formation are excluded.
- Easy installation
- The price is significantly different from the others.
- Environmentally friendly, natural laminate.
- Keeps you warm
- Durable, will last a long time
The base of the substrate is kraft paper coated with bitumen. Moisture-resistant material, but slightly higher in price compared to analogues.
Product made from pine needles
Natural material retains heat and does not sag during prolonged use. The disadvantages of such a substrate are that they are manufactured exclusively to order and have a high price category.
Once you have decided on the material, it's time to start working.
- First, we rid the floor of unnecessary objects and debris.
- Afterwards, mix the floor screed in the prepared container.
- Along the perimeter of the room on the walls we mark the required floor level.
- Using a level, we transfer the marks to the beacons, attached to the floor over the entire area of the room, obtaining a surface where the upper edge of the beacon is the boundary of the screed, to which the substrate and laminate will later be added.
READ MORE: Water-heated floors on a wooden floor, do-it-yourself heating system on joists on slats