When building a house or other buildings, preference is most often given to a strip foundation, since such a foundation has many advantages. A strip foundation for a house is quite simple to install and, if necessary, it can be poured without the involvement of construction equipment. Such a foundation is a universal design and is used in the construction of light wooden and heavy stone buildings on various types of soil. We will look in more detail at what a strip foundation is, its types, and how it is installed in our article.
Advertisement
Sectional strip foundation
Features and distinctive features of the “inverted bowl” foundation
A monolithic foundation poured onto a strip foundation has several features and important advantages over other types of similar structures. When constructing low-rise buildings, it is necessary to take into account not only the load that the structure will have to withstand, but also the quality of the soil, the depth of groundwater, and climate features.
High level of groundwater
The construction of buildings based on a foundation in the form of an “inverted bowl” is justified:
- At a high level of groundwater. In this case, the floor is located high enough and is not exposed to moisture. Expanded polystyrene and roll waterproofing materials can be used as protection. During construction, medium-fraction crushed stone is used. This use is justified by the presence of such qualities as excellent drainage properties.
- Construction on heaving soil is possible due to the presence of high-quality drainage, which avoids heaving. The premises in the constructed building do not freeze thanks to the thermal insulation of the blind area.
- When constructing buildings whose foundation is a monolithic slab, it is possible to construct them not only from foam and aerated concrete, but also from brick.
In addition, a foundation built like an inverted bowl can significantly reduce material costs. A monolithic concrete slab has a thickness of no more than 20 centimeters, which significantly reduces the amount of concrete and reinforcement required. There is no need to spend money on additional finishing, since we are talking about ready-made floors on the ground. Hydraulic glass insulation laid under the slab acts as a material that has become a reliable protection against radon.
The foundation is prefabricated reinforced concrete strip foundation.
This type of foundation is built from ready-made blocks, which are laid in a strip along the perimeter of the future cottage, under heavily loaded areas, at the intersection of load-bearing walls.
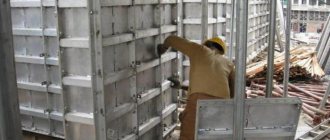
Construction of a foundation from FBS in the photo
Blocks are required for construction. Usually they use ready-made purchased ones, which are delivered to the construction site in advance. A trench is dug under the tape according to preliminary markings on the surface of the site in accordance with the drawn up drawing.
Next, the blocks are laid in horizontal and vertical rows, as in a construction set, to form a ribbon. Hence the name of this type of foundation. The second layer is laid on top of the first layer perpendicular to the first. The thickness of the tape depends on specific calculations. The top row of blocks must protrude above the ground. Then the top row of blocks is waterproofed and the crown of the cottage is built on its basis. This is a fairly common type of foundation that does not require much effort and time. Two workers can handle laying the tape. This is the main advantage of such a foundation.
In addition, this foundation is able to fairly evenly distribute the load of the house on the underlying soil. Even if the bearing capacity of the soil is small, due to the large base area of this foundation (sole), it is able to withstand a large load.
The foundation is usually made shallowly buried, that is, the boundary of its deepening is higher than the depth of soil freezing characteristic of a given region.
On rocky and clastic soils, such a foundation is not buried at all, since the soil is very strong, does not retain moisture and, accordingly, is not subject to heaving during frost periods.
However, this situation is rather an exception for most regions of Russia. Most regions of the central zone have damp, soft soils with large admixtures of clay particles and, as a result, are susceptible to heaving during cold periods.
Of course, on such soils it is undesirable to build this type of foundation for a cottage, or it is necessary to reduce the possible effect of heaving forces of the soil: change the soil under the foundation, build drainage, deepen the base of the foundation below the freezing line of the soil, and so on.
Another problem is the presence of seams in the blocks. As practice shows, through such seams, even if well sealed with masonry mortar, moisture will still pass into the foundation.
Another advantage worth noting is the possibility of building a basement in a cottage on such a foundation. The same applies to slab monolithic foundations and strip monolithic foundations (see below).
A characteristic feature of such a foundation is easy construction and relatively low costs. In addition, complex construction equipment is not required.
You can find out more about this technology here.
Construction work order
The foundation, created according to the “inverted bowl” type, is the basis for low-rise buildings. These are country houses or buildings on personal plots. All work on the construction of this foundation begins with site preparation. It is cleared, getting rid of debris and excess vegetation, and markings are made on the freed soil surface. The marking cords are stretched at a distance of at least one meter from the future pit.
The pit must be at least 1.5 meters deep. When preparing it, it is necessary to remove the layer of clay and replace it with carefully compacted gravel. The surface must be leveled to the building level so that there is not the slightest slope.
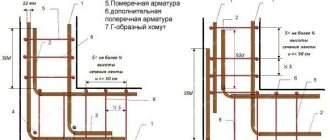
Trench for stiffening ribs
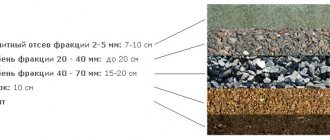
First, the fertile layer of soil is completely removed, and then they begin to dig trenches under the tape. The depth of the trenches reaches from 30 to 70 centimeters, and their width is determined depending on the soil resistance. Along the entire outer perimeter of the future building, corrugated pipes are laid in trenches under the foundation, installing inspection wells. A prerequisite is the presence of a slope of at least 70 to ensure gravity flow into a container installed at the lower level and hidden under a layer of earth.
The bottom of the trench is lined with geotextiles, on which a cushion of sand and gravel mixture at least 40 centimeters thick is erected. This composition can be replaced with layers of river sand and crushed stone of large fractions. They are filled in layers and each layer reaches 20 centimeters.
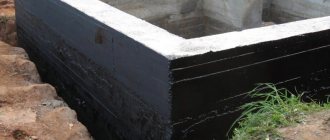
The next stage is the installation of waterproofing. In order to achieve high-quality waterproofing, use waterproofing or ordinary polyethylene film, which is laid overlapping (overlapping width 10 centimeters).
After completing the preparatory work in the trenches, they begin to construct the formwork for the future foundation. As a reliable and durable material for the construction of formwork, you will need OSB, laminated plywood 20 mm thick or edged board.
We recommend watching a video describing the choice of material for formwork.
The upper edge of the outer formwork should rise above the edge of the inner formwork strictly by the thickness of the monolithic slab. The internal formwork is permanent, so for its installation it is customary to use L-shaped modules made of polystyrene.
The inner part of the formwork is covered with non-metallic material, laying and compacting it in a layer up to 10 centimeters thick. Tamping is carried out using a vibrating plate. The bottom of the tape is waterproofed using polyethylene film or waterproofing agent. When performing insulation work, polystyrene foam is used, which must be laid flush with the inner side of the formwork.
Do-it-yourself slab foundation - step-by-step instructions on how to do it correctly, pros and cons
Modern construction uses a slab foundation, which provides the basis for assembling the building. If the structure is strong, solid and made under the entire structure, then it is not afraid of ground movements, since the house and the foundation move simultaneously. That is why such a base is called a monolithic floating foundation.
The main distinguishing feature of a monolithic foundation is its versatility, since its construction is possible in areas with any soil. In this, the pile-slab foundation differs from the strip and pile varieties of the foundation.
The structure, consisting of slabs, can be installed in areas with peaty, sandy, and marshy soils. A base made of slabs can be used for a long time, even where groundwater is located close to the surface and seasonal heaving is observed, that is, the volume of the structure changes in harsh conditions with a decrease in temperature.
In addition to the above properties, slab foundations differ:
- high load-bearing capacity, so it is possible to build one-story and multi-story buildings that are assembled from bricks, concrete and gas silicate materials;
- the possibility of arranging a full-fledged basement floor;
- slab foundation technology is easy to construct, so anyone can do it, even without any special skills;
- possibility of operation for 150-200 years;
- almost complete absence of earthworks.
Many people who dream of building a house are interested in the question of how to make a slab foundation with their own hands? First you need to dig a pit and level it. Such work does not require any special skills. But it is worth paying special attention to the procedure, since the fate of the building in the future depends on it.
At the next stage, it is necessary to install a kind of floor, consisting of sand and gravel, under the slab foundation:
- Sand is poured into the bottom of the excavated pit. Choose one that does not contain clay, chalk, lime or any other impurities, due to which the structure shrinks after some time. The sand is pre-washed. With the help of such a pillow, the building evenly affects the ground surface.
- The sand is compacted in layers, that is, a small amount is trampled down, and then the next layer is poured. This will help ensure the integrity of the structure.
- Builders carry out communications necessary to provide better living conditions in the future.
- Geotextile material is spread on top of the sand, thanks to which the previous layer and crushed stone will not mix. If you ignore this, the house may sag.
- Even distribution of gravel. The horizontal level is checked using a level or a regular hydraulic level. Next, the crushed stone is compacted to prevent the risk of future damage to the building caused by movement and shrinkage of the level.
A cross-section of a slab foundation also consists of the above layers of formwork and waterproofing material. The formwork is made from boards 50 mm thick. It is installed around the perimeter of the building.
The formwork is set to a height that is the same as the thickness of the slab foundation. After this, using cords and a level, the structure is leveled horizontally. On average, foundations with a slab from 20 to 30 cm are used.
After placing and rigidly securing the formwork, the builders carry out work on laying the waterproofing layer. Basically, roll materials that have a bitumen base are used for this. Laying of waterproofing materials is carried out with a small overlap necessary for the formwork.
The waterproofing is laid along the entire height of the formwork, and then welded together. This will prevent water and moisture from reaching the surface of the foundation slab. The best waterproofing is ensured precisely when materials are poured onto the formwork. Among other things, this will eliminate voids and holes between the boards. The formwork can be easily dismantled after the concrete has hardened.
To ensure better waterproofing properties, sometimes slab insulation in the form of extruded polystyrene foam, which has a high density, is laid underneath it.
After the waterproofing layer has been completely laid, the slab foundation is reinforced using metal reinforcement having a diameter of 10 to 14 mm. The reinforcement frame is knitted twice. First, the bottom layer is placed on special fixing elements in such a way that the reinforcement and waterproofing have a small gap of 5-7 cm. Then the reinforcing mesh is knitted, with a pitch of 20 to 25 cm, from knitting wire.
After finishing the first layer, knit the second one. Concrete is poured, hiding the reinforcement underneath. Both rows of the structure are connected using vertical posts, which are also made of reinforcement.
Such devices, placed vertically, help hold the top row of the mesh. In addition, the slab will not delaminate under the negative influence of any loads.
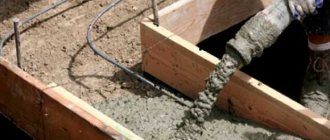
After the reinforcement frame is manufactured, concrete of grade M200 and higher is poured into the formwork. Typically, builders use the M300 grade when installing foundations. In order for the structure to be durable and reliable, the foundation should be poured immediately after the concrete is delivered to the construction site.
After pouring the concrete, you need to use an industrial vibrator to help get rid of voids. Next, the poured slab is leveled horizontally, which will help build smooth walls and arrange floors. Leveling is carried out using a flat slats or boards.
In the future, the slab foundation should stand for a month at an air temperature of 20 degrees Celsius. As the temperature increases, the poured base is spilled with water and covered with film material, which will prevent the rapid evaporation of moisture.
If the foundation will stand throughout the winter period, then it should be covered to prevent the negative impact of atmospheric phenomena in the form of rain and snow.
You can easily pour a slab foundation yourself by viewing photos of this process step by step. If you do not have the necessary skills, use the services of professional builders.
Save the article to your page:
Join the discussion:
WE EQUIP THE PILLARS
To arrange the pillars, we need concrete. First, let's do one waterproofing trick. We twist the roofing material into a tube (2 layers) and glue the joints with tape in several places, as well as in a circle from the outside. We install this structure in the ground. Next, we knit and weld a frame from a 10-14 mm rod and 6 mm wire, placing it in roofing felt tubes so that the metal rods protrude 15-25 cm from above.
First, about 20 cm of concrete is poured, the roofing felt tube is slightly raised so that the concrete spreads and a strong base is formed. After waiting a little, we pour all the concrete and prepare for the next step.
What are the types
A brick house has quite a lot of weight, especially if it is planned to build several floors.
The following types of tape can be used for it:
- Team. It consists of ready-made reinforced concrete blocks (FBS), which requires the use of lifting equipment, but speeds up the work many times over. The prefabricated foundation can withstand heavy loads; the blocks have high quality materials and are resistant to external influences. Construction consists of digging a trench, preparing a pad and installing blocks, bypassing several stages of assembling formwork, pouring and drying concrete.
- Monolithic tape. The entire support is a solid concrete casting. The reliability and strength of this option are high, but construction takes much more time due to several added stages of work and the need to hold the concrete until it hardens. At the same time, you cannot leave the site and do other work, since drying the tape requires observation and some action (watering).
There are options for strip foundations with varying degrees of depth of immersion in the ground:
- Shallow. The dimensions of the tape are relatively small, which provides considerable savings in material. The depth of the trench is also reduced, making it possible to do the work yourself.
- Recessed. The volume of work and building materials increases significantly, which means additional financial investments and a longer period of time for creating the foundation. At the same time, the load-bearing capacity and resistance to external influences increase significantly.
The difference between these options is the depth of immersion - in the first case it is less than the level of winter freezing of the soil, in the second it is greater. The shallow-depth option is more economical and faster, but it is only suitable if there are suitable conditions and for relatively small and light buildings.
A brick residential building of several floors requires a full-fledged recessed foundation capable of carrying maximum loads and ensuring complete safety and durability of the building.
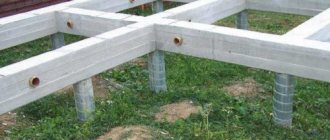
Columnar foundation for a house.
This foundation can be either prefabricated, when it is based on pillars assembled from ready-made or individual cast blocks, or monolithic, when the base is formed by cast pillars at the installation site.
Thus, the cottage rests on these pillars. Accordingly, the pillars are located at the intersection of the walls of the cottage, under the most loaded areas of the building, as well as along the entire perimeter.
Pile-screw foundation in the diagram
The distance between the nearest pillars, their total number and the cross-sectional area of each of them is calculated manually on the basis of strength materials or using engineering programs.
Such a foundation is quite simple to build, it is cheap, so it is often used in construction, but only for light buildings. A cottage, as a rule, is not one of these.
According to the type of deepening, it can be not deepened or slightly deepened. In any case, such a foundation will be located above the soil freezing line. Therefore, it will not be able to withstand the heaving of the soil in winter. This explains the limitations of its use: usually these are not heaving solid soils.
Now you can determine for yourself which foundation is best for your home.
Choosing concrete and reinforcement
The best option for pouring the tape is concrete grade M300. It has excellent performance qualities, strength, resistance to external influences, and frost resistance. The diameter of the reinforcing bars depends on the width of the tape.
Typically, for a tape width of 30 cm, a 12 mm rod is chosen, for 40 cm - 14, for 50 - 16, etc. However, it must be borne in mind that this technique is very approximate and may turn out to be erroneous. The diameter can be calculated based on the cross-sectional area of the tape.
The total cross-section of the rods is 0.1% of it. Having received the general cross-section, suitable rods with a small margin of safety are selected according to the SNiP tables.