Support sole is a stepped expansion at the bottom of the strip foundation structure. It is used in the construction of foundations for heavy buildings erected on weak-bearing heterogeneous soils. This sole allows you to distribute the weight of the structure more evenly, thereby reducing pressure on the ground. Depending on the magnitude of the loads, as well as the size of the building and the characteristics of the soil, the foundation on the supporting base can be single-stage, two-stage, or three-stage.
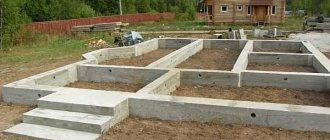
Construction of a strip foundation with a support base
The design of this foundation is not particularly complicated. The walls of the building being erected rest on a strip support, which is buried in the ground. The tape is laid under all the internal and external walls of the building, while maintaining its identical cross-section along the entire perimeter of the foundation. All these tapes together create a foundation that transfers the load to the ground.
The strip foundation with a supporting base is buried to a depth of 30 cm below the soil freezing level. Such a foundation can be made of various materials, such as:
— Rubble or brickwork;
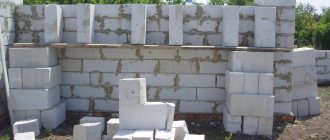
— Monolithic concrete;
— Reinforced concrete blocks.
In modern construction, the most common are strip foundations made of monolithic concrete . While foundations made of rubble stone and brick, although they were widespread in the middle of the last century, today have already lost their relevance. In turn, prefabricated foundations made of reinforced concrete blocks are used in large-scale construction, because this technology requires the use of special construction equipment.
Determining the dimensions of the base: example
Here is an example of manually calculating a shallow strip foundation:
- The hydrogeological parameters of the soil at the construction site, and the characteristics of the occurrence of groundwater, as well as the properties of heaving and buoyancy of the soil are studied;
- A structure with a shallow burial is placed on sandy or homogeneous soil;
- The reinforcement parameters of the strip foundation and the dimensions of the foundation itself are calculated;
- The mass of the entire structure and individual elements is calculated;
- Dimensions and design calculation results are adjusted.
Laying the tape
An amateur, but quite accurate manual - calculating the foundation - requires determining specific values:
- Parameter b is the width of the side wall of the tape, h is the height of the fill, p is the perimeter of the house;
- Formula to calculate the volume and amount of concrete: N {amp}gt; / Z 10 cm, where H is the height of the foundation, Z is the depth;
- The result is compared with the length, width and height of the reinforcement for the foundation: the depth of the base must be greater than or equal to the height of the reinforced belt;
- The ebb volume is calculated by multiplying the values of b, p and h;
- Now you need to calculate the area of the formwork. the area of the side wall of the tape must be multiplied by the perimeter of the foundation, previously multiplied by the height of the trench. The area of one board for formwork is also determined;
- The number of boards is calculated as follows: you need to divide by the sum of the lateral areas of the concrete base by the area of the entire formwork.
The required width of the sole is determined by the ratio of the calculated resistance of the base to the linearly distributed load.
Previously, we determined the linear load acting at the level of the foundation base - 7925 kg/m. Our accepted soil resistance was 2.15 kg/cm2. Let's bring the load into the same units of measurement (meters into centimeters): 7925 kg/m = 79.25 kg/cm.
The width of the base of the strip foundation will be: (79.25 kg/cm) / (2.15 kg/cm2) = 36.86 cm.
The width of the foundation is usually taken as a multiple of 10cm, that is, rounded up to 40cm. The resulting width of the foundation is typical for light houses built on fairly dense loamy soils. However, for structural reasons, in some cases the foundation is made wider. For example, a wall will be faced with façade bricks with 50mm thick insulation.
Diagram with dimensions of the strip base
Now you can begin to calculate the concrete needed to pour the foundation. The amount of fittings is most often not counted, since it will be minimal, given the mass of the bathhouse. Therefore, the volume of concrete is taken as the only correct indicator. For a bathhouse with an area of 100 m2, a concrete strip width of 0.4 m and a depth of 0.6 m, the required amount of concrete will be 100 x 0.4 x 0.6 = 24 m3. This is the volume of concrete that needs to be initially prepared, to simultaneously pour the strip foundation for the bathhouse.
You can also take into account the reinforcing belt. It is made from longitudinal metal ribbed rods with a diameter of 12 mm and vertical rods with a cross section of 10 or 8 mm. Horizontal belts are installed at intervals of 20-30 cm from depth to surface, but the edges must be hidden in the foundation at a distance of up to 5 cm from the surface.
Permanent formwork is often used, which provides additional load-bearing capacity to the base and makes the surface as smooth as possible. In this case, the vertical rods should be hidden in concrete, the interval between the belts is 50-60 cm. All connections should be made only with wire or clamps; it is better not to use welding.
It is recommended to make calculations of strip foundations for any building, even a small garage or outbuilding. Since only after correct calculation of the zero level, selection of optimal building materials and structures will there be a guarantee that the structure will last the longest possible period.
You can also calculate materials using our online calculator available in the menu.
Disadvantages of a strip foundation with a supporting sole:
— You cannot build on deeply frozen and highly intumescent soils;
— A foundation made of monolithic concrete will require more time and labor compared to other types of foundations;
— High consumption of materials (formwork, reinforcement or concrete);
— For buried types of strip foundations, the use of special construction equipment is required;
— High cost of foundation construction.
Even with all the existing shortcomings, a strip foundation with a supporting sole is the most popular and widespread in modern construction. By choosing this type of strip foundation, you guarantee your future construction high reliability and durability.
Prices for strip foundations
The cost of building a strip foundation with a support base includes:
— Terrain marking, binding;
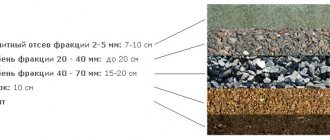
— Digging a trench for the foundation 10 cm;
— Sand cushion 10-20 cm, compacted;
— Installation of reinforcement cages;
— Installation of formwork;
— Pouring concrete grade M250.
| № | Foundation type | Unit | Cost in rubles |
| 1 | Shallow strip foundation | m/n | 4400 |
| 2 | Recessed strip foundation | m/n | 7000 |
| 4 | Strip foundation with support base | m/n | 7600 |
Finding the calculated soil resistance
We find the calculated resistance of the foundation soil taking into account the accepted depth and width of the foundation base using formula (7) SNiP 2.02.01-83*:
R = (γ c 1 γ c 2 / k ) (M g kz b γII + Mq dl γII +( Mq -1) db γII + Mc cII ) (kPa)
Where:
γc1 γc2 - operating conditions coefficients adopted according to Table 3 of SNiP 2.02.01-83*;
k - coefficient taken equal to: k = 1, if the strength characteristics of the soil (j, c) are determined by direct tests;
k =1.1, if they are adopted according to Tables 1-3 of Appendix 1 of SNiP 2.02.01-83*;
Mg, Mq, Mc - coefficients accepted according to Table 4 of SNiP 2.02.01-83*;
kz - coefficient taken equal to:
for b < 10m kz = 1;
for b > 10m kz = (z0/ b) + 0.2;
b—width of the foundation base, m;
γII - averaged calculated value of the specific gravity of soils lying below the base of the foundation (in the presence of groundwater is determined taking into account the weighing properties of water), kN/m;
γII - the same, lying above the sole;
cII is the calculated value of the specific adhesion of the soil lying directly under the base of the foundation, kPa;
dl—foundation depth, m;
db - basement depth.
Installation of formwork
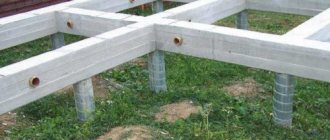
We continue to understand how the strip foundation is installed on the sole.
The installation of the poles is completed, all that remains is to build the formwork. To do this, you should use lumber whose cross-sectional dimensions are 50 by 300 mm, connecting it with metal brackets in the shape of the letter “P” that hold the formwork panels outside and inside the structure. The optimal interval for their installation is about fifteen centimeters.
The formwork is placed in such a way that the foundation walls are distributed in the center of the base. After this, a pair of boards are connected at right angles, which are removed from the marking cord at a distance of 17.5 cm. Such actions are necessary to form the outer corners.
Having completed this activity, we install and fix the boards under the internal formwork wall. Fastening brackets are placed on each side of the joining area of the boards.
If the boards are not joined too tightly, the detachable areas are sealed with overhead boards stuffed from the outside. The long ends are placed on the adjacent board and overlapped.
Formwork boards should be leveled and adjusted, since this factor has a direct impact on the strength of the element being installed and on the ability to perform its intended functions.
Having completed the installation of the formwork, its weakest areas are partially covered with a soil composition. As a rule, this precaution is necessary in connecting areas or in places where fasteners are missing. Adding sand will prevent concrete mortar from leaking under the formwork boards.
The final stage is the installation of the upper level of the edge of the foundation base. This marking must be done using a theodolite. To clarify the level, fasteners are made with small nails driven to half the length in increments of one meter. These guidelines will help you pour the concrete solution evenly.
Determining soil type
Not only the depth of the foundation, but also the width of the load-bearing sole depends on the type of soil. Since there is a factor of soil heaving in winter, and this property of the soil can lead to irreparable damage to the foundation and house.
The type of soil can be determined not only with the help of specialists, but also with artisanal methods. To do this, just take the earth and moisten it with water, and then bend it into a ring. The clay will retain its structure. Loam crumbles into several parts, and sandy soil immediately crumbles into powder. This way you can determine the structure of the soil. Sandy soil with a fraction of 1.5 mm perfectly withstands heavy loads, it is optimal for the construction of strip foundations and does not contain much moisture.
Then, you need to determine the depth of groundwater. To do this, you can go to the nearest well and measure the depth of the water layer; this should be the maximum height of the soil horizon. Using a little math, the depth of the aquifer will be calculated.
You don’t have to do a soil composition analysis yourself. It is enough to contact the geodetic service. It will give a complete map of the soil composition, taking into account even the depth of soil freezing, and this parameter for choosing the depth of the sole will be considered key.
Exploring geology with our own hands
To check the geological structure of the soil with our own hands, we arm ourselves with a shovel. At all five points - at the corners of the future structure and in the middle - you will have to dig deep holes. Size: meter by meter, depth - at least 2.5 m. We make the walls even (at least relatively). Having dug a hole, take a tape measure and a piece of paper, measure and record the layers.
To explore the soil under the foundation yourself, you will need to dig similar holes to a depth of about 2.5 meters
What can be seen in the section:
- On top comes the darkest layer - the fertile one. Its thickness is from 10 cm to 1.5 meters, sometimes more. This layer must be removed. Firstly, it is loose, and secondly, various animals/insects/bacteria/fungi live in it. Therefore, immediately after marking the foundation, this layer is first removed.
- Below is natural soil. This is how it was before “processing” by animals and microorganisms. There may be such soils here; Dense sand (coarse, medium, with gravel). An excellent foundation for building a house: the water drains quickly and the foundation is reliable. On such soils, you can build a house on a shallow foundation (laying depth from 50 cm).
- Quick sands (fine and dusty). If the groundwater is deep, construction is possible. But these soils are dangerous because they float when saturated with water.
- Clay, loam, sandy loam. They behave exactly the same as dusty sands: when wet, they float if there is little water, but their bearing capacity is high. Here you also need to look at the amount of precipitation in the region.
- Peat bogs. The most unreliable grounds. They can only be built on using columnar foundations. And then, only on the condition that the soil layer with good bearing capacity is not very deep.
It is necessary to determine what kind of soils are in each layer
Difficulties often arise when trying to distinguish clay-containing soils. Sometimes it is enough just to look at them: if sand predominates and there are inclusions of clay, you have sandy loam in front of you. If clay predominates, but there is also sand, it is loam. Well, the clay does not contain any inclusions and is difficult to dig into.
There is another method that will help you make sure how correctly you have identified the soil. To do this, roll a roller from moistened soil with your hands (between your palms, like you used to do in kindergarten) and bend it into a donut. If everything has crumbled, it is low-plasticity loam; if it has fallen into pieces, it is plastic loam; if it remains intact, it is clay.
Having decided what kind of soil you have in the selected area, you can begin to choose the type of foundation.
Required amount of reinforcement for the foundation
The calculation example will be incomplete without calculating the amount of reinforcement used in the reinforced belt of the tape. Typically, tapes use two belts of two longitudinal rods, periodically (every 0.5 m) connected by horizontal and vertical jumpers. All elements located horizontally in a load-bearing volumetric structure use reinforcement of a periodic cross-section (corrugated), vertical posts are made of smooth reinforcement.
The calculation can be done in a special online program; when doing your own calculations you will have to take into account:
- overlap of horizontal rods 10 cm (+0.2 m at each joint);
- the specifics of the location of the rods in the corners (the bends extend onto the adjacent wall by 0.5 m, counting from the corner of the internal formwork);
- vertical posts extend beyond the lower/upper horizontal belts by 5 cm.
The reserve recommended by experts is 5-10%, depending on the configuration of the walls. When purchasing, please note that the fittings are sold by weight, not by footage. Each retail outlet has a table for converting footage to weight. The rods are connected with wire, each joint takes 25 cm of material. When knitting with a gun, the consumption is less, but you will have to purchase the tool itself, most often for one-time work.
We make a calculation
The calculation of the foundation base occurs in several main stages. First you need to find the weight of the future structure, including the mass of walls, roof, coverings, etc. This also includes snow and payload, specific pressure. Let's look at this process in detail.
Weight calculation
To find out the most accurate weight, you need to find out the mass of all the elements of the future building. Any house consists of a foundation, a ground floor, floor and ceiling ceilings, walls, including internal partitions, windows, doors, roofing (rafter system, pie), etc. It is clear that to calculate the mass of each element it is necessary to imagine what size it will be and what materials it will consist of. Walls, for example, include not only brick, wood or concrete, but also insulation, interior and exterior finishes. This is why it is so important to make detailed sketches and plans.
If one of the building elements has a rectangular shape, its volume can be calculated very simply by multiplying the length by the height and width. With more bizarre shapes, the situation is not so easy, but it is also quite understandable - they need to be “disassembled” into simpler shapes (triangles and rectangles), find out the volume of each part, and then summarize the results.
The specific gravity of each element is determined by the material from which it is made. The indicators of traditional building materials are indicated in SNiP II-3-79, but when referring to any SNiP, one should take into account that these standards were prescribed quite a long time ago. Since then, the construction industry has made several big strides forward, so these guidelines can only serve as additional sources of information. Today there are many modern materials on the market that, while having high strength, have a low specific gravity. They are not listed in SNiP, so all information should be obtained from the manufacturer.
If you are building a house from elements of a standard shape, for example, foam blocks, beams, etc., you should refer to the regulatory documents, which indicate the weight of each element. Knowing the number of blocks or beams and the mass of each of them, you can easily calculate the weight of the house.
Since the weight of the foundation should also be taken into account in the calculations, you should know its initial parameters. In the future, they can be adjusted in accordance with the calculation results. In this case, you should establish approximate dimensions and select the material for the manufacture of the future base. The choice of material depends on the characteristics of the soil, the depth of water, and the depth of the freezing point.
The volume and mass of the foundation can be calculated by analogy with the volume and mass of other building elements. It should be remembered that the determining factor in the calculation is the width of the sole, because the degree of impact of the house frame on the ground depends on it.
Load calculation
The pressure on the ground is increased every year by the snow load, which is especially noticeable in the northern regions, where a lot of snow falls every winter. To determine the snow load, it is necessary to multiply the roof area by the characteristics of the mass of the snow cover (these parameters are prescribed in SNiP 2.01.07-85).
Good to know: When calculating the snow load, you need to take into account the angle of the roof. So, if the roof is flat, snow will linger and accumulate on it, giving a greater load. If the angle of inclination is large, the snow will not be able to linger on the surface, and accordingly the snow load will be minimal.
First, the snow load is calculated, and then a correction factor is applied depending on the angle of the roof and the number of slopes. If the angle of inclination is less than 25°, the correction factor will be equal to one, but if the angle is greater than 60°, the coefficient will be zero. In the range from 25° to 60° it will extrapolate between 1 and 0.
There is also a payload, which includes a lot of furniture, all household items and the occupants themselves. It is simply unrealistic to accurately calculate such a value, so an average value of 180 kg/m² was provided.
When you have found the weight of all the components of the future building, you can determine the total weight of the house and the load on the foundation. In the process of distributing this mass over the area of the sole, the specific pressure on the soil will be obtained (calculated in t/m²).
Size calculation
The key to the quality and durability of any foundation is the condition in which the specific pressure of the house was lower than the calculated soil resistance. We have already said that the design resistance is the value at which the soil does not deform under load. The corresponding values for all regions of Russia can be found in DBN V.2.1-10-2009 “Foundations and foundations of structures”. Since you have already conducted tests and know the characteristics of the soil, you can determine the design resistance according to the standards.
Resistance for different soils:
- coarse sand – 60-50 t/m²;
- medium-grained sand – 50-40 t/m²;
- sandy loam – 30-20 t/m²;
- loams – 30-10 t/m²;
- clay – 60-10 t/m²;
- crushed stone – 60-40 t/m²;
- gravel – 50-35 t/m².
If in your case the calculations show that the resistance is greater than the load at home, then everything is correct. It is recommended to set a certain margin of safety for the base. To do this, you need to make sure that the resistance is 15-20% greater than the load. If the results show that it is less than or equal to the load, then the sole needs to be expanded, and then everything must be re-calculated. And vice versa - if the resistance is greater than the load, the sole must be reduced. This will save on building materials and labor costs. When recalculating everything anew, remember that due to the reduction in the size of the sole, its volume and weight will decrease.
Sole reinforcement
During the operation of a house, it is often necessary to strengthen its foundation. This can happen due to increased loads, damage or insufficient bearing capacity of the soil. Over time, soil characteristics may change, and their load-bearing capacity changes accordingly. One of the most effective strengthening measures is to widen the base of the strip foundation, that is, to increase its size. As a result, part of the load from the existing foundation will be transferred to reinforcement elements - reinforced concrete slabs, monolithically connected to the existing foundation through a reinforcement frame.
To build up the base of the foundation, first holes are made in its body in a checkerboard pattern, where metal pipes are installed. A reinforcement cage is attached to these pipes by welding, formwork is installed and concrete is poured. Reinforcement of the base of a strip foundation must be carried out in any case, regardless of the loads and degree of soil resistance.
It is absolutely necessary to calculate the base and other parameters of the strip foundation, but this work requires extensive knowledge of construction, including various fields. Therefore, if you are not confident in your abilities, you can do the preparatory work yourself (determine the type of soil and snow load, for example), and entrust the rest to specialists.
_ _ _ _ _ _ _ _ _ _ _ _ _ _ _ _ _ _ _ _ _ _ _ _ _ _ _ _ _ _ _ _ _ _ _ _ _ _ _ _ _ _ _ _ _ _ _ _ _ _ _ _ _ _ _ _ _ _ _ _ _ _ _ _ _ _ _ _ _ _ _ _ _ _
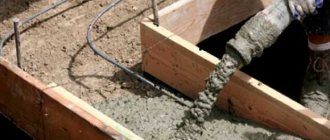
Pouring concrete
Having completed the preparatory activities, we move on to the main stage - concreting. By the way, it is proposed to consider the second method of reinforcing the sole.
After pouring concrete into the formwork, we lay out reinforcing bars in two even rows, moving them fifteen centimeters away from the formwork walls. We push the reinforcement under the partition elements from the fastening brackets. Having finished the layout, we “drown” the metal twenty centimeters into the concrete mixture with a bayonet shovel, and carefully perform “bayoneting” to eliminate the air remaining inside the concrete.
As soon as the surface of the concrete rises to the nails driven into the upper edge of the future sole, the U-shaped brackets are raised by five to seven centimeters.
Two operations remain - constructing the sole and grouting its surface. The first stage is considered important and responsible; the keyway must be cut with special attention. This work is performed from above, along the central axis of the edge. The keyway will help ensure the strength and quality of adhesion between the sole and the foundation wall.
Work on constructing the groove begins when the poured concrete solution has hardened a little.
To work, you will need a small block that is pressed evenly along a straight section of the foundation sole.
The formwork system is carefully dismantled, all marks made on its panels are transferred to make it more convenient to erect foundation walls.
Now it is extremely clear what is meant by the name “base of the foundation.” It remains to consider the advantages and disadvantages of the design.
It is believed that a strip foundation on a sole is erected in any weather conditions, including in winter. Such a base is considered universal, suitable for the construction of load-bearing walls made of brick or stone materials, concrete, and wood.
As a disadvantage, many note the complex technological process of arranging the foundation base.
It should be noted that the sole is poured under the FBS blocks, and when installing a pile foundation, the supporting soles are placed in ten to fifteen places (according to the number of supporting elements).