PREFACE
Stone material treated with binders is one of the widely used materials for constructing base layers of road pavement, and in the construction of roads of low technical categories it can also be used for constructing pavement with a wear layer of black mixtures.
These Methodological Recommendations set out a set of issues regarding the requirements for source materials for the preparation of crushed stone-sand-cement mixture (SchPCS) and mixtures for the construction of ShchPCS and layers of road pavement made from them.
It should be noted that ShchPTsS is recommended to be used as a material for constructing foundations in the construction of roads of IV technical categories, and coatings on roads of IV-V categories.
The Methodological Recommendations present the technology for constructing layers of road pavement both from a mixture prepared in a mixing plant and by mixing on site. But it should be noted that the best quality of road pavement is ensured when it is constructed from a mixture prepared in a mixing plant.
The technology for the preparation of APC is set out in the parallelly developed “Methodological recommendations for obtaining optimal compositions of crushed stone-sand-cement mixtures”.
To carry out linear work (laying, compaction, maintenance), modern machines with a high technical level, both domestic and foreign, are recommended, and for the first time, the technology of laying CPPS with asphalt pavers from a mixture prepared in the installation, and the technology by mixing on site using recycler.
In all cases of application of recommendations, it is necessary to link them to local working conditions, taking into account the availability of road construction machines and mechanisms, local materials, clarification of work and calculation of labor costs.
Recommendations prepared by: Head. Laboratory of Technology and Mechanization of Road Works O.B. Gopin; head laboratory of stone materials V.S.Isaev; General Director of FSUE “Soyuzdornii” V.M. Yumashev; Art. scientific employee L.M. Kirillova; Art. scientific employee of I.A. Afonina.
Requirements for a sand bed
Depending on the type and characteristics of the soil, the height of the pillow should be 60.0 cm. Taking into account the characteristics of the Russian climate and soil, builders recommend using triple the width of the base for calculations. When building on highly heaving soils, the thickness can be 80.0 cm. The width of the bedding should be 15.0 cm greater than the width of the foundation on both sides.
For its construction, only coarse-grained material is used. The requirements for bedding and the technology for its installation are determined by building regulations.
GENERAL PROVISIONS
1.1. These Recommendations are intended to guide the construction of bases or pavements of road pavements from crushed stone-sand-cement mixtures (ShchPTsS), standardized by GOST 23558 “Crushed stone-gravel-sand mixtures and soils treated with inorganic binders for road and airfield construction. Technical conditions".
1.2. These Recommendations are intended to provide guidance in quality control of the used AGPSCs, layer construction technology and assessment of the quality of the constructed layer of ASPSCs.
These Recommendations have been developed as a development of GOST 23558-94 and SNiP 3.06.03-85 and are intended to provide guidance in the construction of layers from the materials in question in non-rigid and rigid road pavement structures.
Issues of construction, design and calculation of road pavements with layers of the materials under consideration, as well as their operation under the influence of transport and climate, are discussed in the relevant instructions for the design of rigid and non-rigid pavements.
1.3. The list of regulatory and advisory documents on the basis of which these Recommendations were developed and to which there are references in this document is given in Appendix 1.
1.4. In these Recommendations, the following terms and definitions apply.
Mixtures of crushed stone-gravel-sand and soils treated with inorganic binding materials
, for road and airfield construction - this is
a processed material
- cement-mineral material (SHPTsS, PUS, ShchPTsM, PTSM) - an artificial material obtained by mixing sand-crushed stone, sand-gravel, sand-crushed stone-gravel mixtures, ash and slag mixtures and sand with cement or other inorganic binder and water and meeting within the design or intermediate terms the standardized quality indicators for strength and frost resistance.
Crushed stone-sand-cement mixtures (ShPCS), sand-cement mixtures (PCS)
– these are artificial mixtures obtained by mixing in mixing plants or on the road surface, crushed stone (gravel), sand, cement and water in designed proportions.
Crushed stone-sand-cement material (SCMP), sand-cement material (PCM)
– processed material that meets standardized quality indicators for strength and frost resistance within the design time frame.
Base (covering)
– one of the structural layers of road pavement.
1.5. To construct the base or coating, cement-mineral materials (CPMS) are used, which must have a design grade for compressive strength and a design grade for frost resistance in accordance with GOST 23558. The composition of cement-mineral materials (SCMPS), which provides the design grades, must be selected before the start of construction and approved by management construction organization.
1.6. The mixture produced by the plant must have optimal humidity, ensuring maximum density in accordance with GOST 23558.
1.7. The duration of transportation of mixtures of stone materials with cement, the beginning of setting of which is at least 2 hours, should not exceed 30 minutes at an air temperature during laying above 20 ° C and 50 minutes at an air temperature below 20 ° C. Compaction of the mixture should be completed before the cement sets. To improve the quality of the cemented concrete cement, it is advisable to organize the work so that the compaction is completed before the cement begins to set.
1.8. The volume of adhesive cement for laying a layer in bulk is determined by the length, width and thickness of the layer in a compacted state, taking into account the safety factor for compaction equal to 1.2-1.4, and is clarified by trial rolling at the first stage of construction with the drawing up of a report.
The maximum thickness of the installed layer in a compacted state, depending on the rollers used, should be, according to SNiP 3.06.03-85, no more than 22-30 cm.
1.9. When constructing bases and coverings from AGPs prepared in the installation, its laying can be done with universal asphalt pavers, profilers, concrete spreaders, and motor graders.
1.10. All machines used for laying the mixture must be equipped with automatic systems for ensuring evenness and cross-slope.
1.11. The use of motor graders without automatic systems is permitted if all requirements for levelness and geometric parameters of the layer are met.
1.12. When constructing bases and coatings from AGPs using the mixing method on the road surface, cutters, profilers, recyclers paired with cement distributors or recyclers and equipment for preparing and supplying a water-cement suspension must be used.
1.13. To compact the layer of APC, squads of self-propelled rollers with the appropriate amplitude-frequency vibration characteristics must be formed. The number of rollers in a squad is determined by the width of the strip being laid and the rate of laying the mixture.
1.14. Maintenance of a freshly laid base layer or coating made of CPCS should be carried out by pouring film-forming materials or using an asphalt distributor with an adjustable distribution system or a machine for the care of freshly laid concrete, or covering with wet sand using a motor grader with a watering machine, depending on the type of maintenance.
1.15. In the case of a two-layer base or coating, the top layer must be laid during one shift with the laying of the bottom layer, with the speed of construction transport limited to 5 km/h or after the material of the bottom layer has gained at least 70% strength.
1.16. Movement of construction vehicles is permitted on the day of laying or upon reaching 70% of the design strength.
Construction of the overlying layer is permitted on the day of construction of the foundation or after reaching 70% of the design strength.
Crushed stone base
Crushed stone bases, in the construction of sports fields, owe their popularity to such relatively young types of coatings as artificial grass and self-leveling rubber coating with a binder. The thickness of such a base can range from 15 to 60 cm (depending on the characteristics of the soil and the expected loads on the finished coating and base). On sandy and gravel soils, the base thickness is minimal. On heavily clayey soils, the depth of the trough reaches 0.5-0.8 m and is filled in several layers.
When laying, each layer is thoroughly spilled with water until completely wet. All layers of the crushed stone base, including the subbase (soil base), are compacted with a vibrating plate with an impact load of at least 1.5 tons or a manual roller with the same weight, by longitudinal and transverse rolling until 95% of the compaction coefficient of each layer is achieved. The surface of the prepared base must have a horizontal surface with a tolerance of +/- 3 mm on a 4 m rail. A curb/curb is installed around the perimeter of the finished base to prevent the base from spreading. When constructing this type of base, internal drainage is used, and bypass drainage is used (if the coating is waterproof). Coatings:
artificial grass, self-leveling rubber coating with polyurethane binder (water-permeable and water-impermeable)
REQUIREMENTS FOR MATERIALS
2.1. Source materials
2.1.1. Crushed stone in accordance with GOST 8267 of fraction 5-20 or 5-20 and 20-40 mm should be used as components of the mixture; sand according to GOST 8736.
The grain composition of the optimal crushed stone-sand mixture must meet the requirements of GOST 23558-94. It is most advisable to use mixtures with a maximum grain size of 20 and 40 mm, corresponding to the curves of dense mixtures with a runoff coefficient of 0.65-0.75. The content of silt-clay particles in the mixture should not exceed 10% of the mixture mass. In this case, the content of clay particles must meet the requirements of GOST 8267 and GOST 8736.
2.1.2. Crushed stone and gravel in terms of frost resistance, strength, content of harmful components and impurities, resistance to silicate and ferrous decomposition must meet the requirements of GOST 8267, GOST 3344, GOST 25592.
2.1.3. Natural sand and from rock crushing screenings must comply with the requirements of GOST 8736, sand from slag - GOST 3344, fine-grained ash and slag mixture - GOST 25592.
2.1.4. To prepare the processed materials, the following binders should be used: Portland cement and Portland slag cement in accordance with GOST 10178 grades of at least 400 for coatings and 300 for bases.
2.1.5. To prepare ShchPTsS, you should use water in accordance with GOST 23732.
Construction of a sandy underlying layer
A technological map has been drawn up for the installation of a sandy underlying layer
0.3 m thick when developing group II soil in a quarry with excavators and transporting soil by KamAZ dump trucks.
1. ORGANIZATION AND TECHNOLOGY OF WORK
1.1. Before installing the sandy underlying layer, you must:
· ensure the readiness of the roadbed in accordance with the requirements of current building codes and regulations, as well as guidelines for the construction of roadbeds;
· prepare temporary access roads for supplying materials to the work site;
· carry out marking work to ensure compliance with the design thickness, base width and transverse slopes.
1.2. At the first, second, third, fourth grips, the following technological operations are performed to construct a sandy underlying layer
in the following technological sequence:
development of sandy soil in a quarry using an excavator with loading into dump trucks;
transportation of soil by dump trucks to the embankment;
layer-by-layer leveling of soil in the embankment with a bulldozer;
layer-by-layer moistening of the soil with water to optimal humidity (if necessary);
layer-by-layer soil compaction with self-propelled rollers on pneumatic tires.
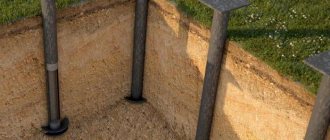
1.3. The width of the embankment along the top at the level of the bottom of the trough with an accepted thickness of the road pavement of 0.73 m and a slope steepness of 1:3 is 12.58 m (see Fig. 1).
1.4. The technological map provides for the installation of a sandy underlying
layer with soil development by excavators and transportation by KamAZ dump trucks over a distance of 5 km.
The soil is transported to the work site and unloaded every 5 m along the embankment and every 5 m along its width.
1.5. The soil is compacted in a layer 0.30 m thick with successive circular passes of a pneumatic roller across the entire width of the embankment.
The soil is compacted at the optimum moisture content, determined according to GOST 22733-77, which should not exceed the limits indicated in the table. 1 for different types of soil.
If there is insufficient moisture, the soil is moistened using a watering machine. In the technological map, water consumption for these purposes is assumed to be 3% of the soil mass.
The first two passes of the roller should be performed at a distance of 2 m from the edge of the embankment, and then, shifting the passes by 1/3 of the width of the track towards the edge, compact the edges of the embankment, not reaching 0.3 - 0.5 m from the slope. After this, compaction is continued in circular passes from the edge to the middle (Fig. 2).
In order to compact the soil of the edge parts of the embankment adjacent to the slope, it is poured 0.5 m wider than the design outline.
Each subsequent pass along the same track begins after the previous passes have covered the entire width of the roadbed.
Table 1
| Type of soil | Humidity, %, at the required compaction coefficient | ||
| 1 — 0,98 | 0,95 | 0,90 | |
| Silty sands, light sandy loams, coarse | No more than 1.35 | No more than 1.6 | Not standardized |
The required soil compaction coefficient is given in table. 2. At optimal soil moisture, to achieve a compaction coefficient Ku = 0.95, approximately 10 passes of the roller are prescribed.
The required number of roller passes along one track is determined by test compaction.
table 2
| Elements of the subgrade | Layer depth from the coating surface, m | Lowest soil compaction coefficient for the type of road pavement | |||||
| capital | lightweight and transitional | ||||||
| in road climate zones | |||||||
| I | II, III | IV, V | I | II, III | IV, V | ||
| Working layer | Up to 1.5 | 0,98 — 0,96 | 1,0 — 0,98 | 0,98 — 0,95 | 0,95 — 0,93 | 0,98 — 0,95 | 0,95 |
At the initial stage of compaction, the pressure in the tires of the pneumatic roller should not exceed 0.2 - 0.3 MPa, at the final stage - 0.6 - 0.8 MPa.
The first and last passes along the section strip are performed at low speed of the pneumatic roller (2 - 2.5 km/h), intermediate passes at high speed (up to 8 km/h).
1.6. At the final stage of work, the following technological operations are performed:
leveling the top of the roadbed using a motor grader;
leveling slopes using a motor grader.
Before planning begins, the position of the axis and edges of the roadbed is checked and restored in plan on straight lines, transitional and main curves, as well as in the longitudinal profile. The procedure for carrying out geodetic work is carried out according to the technological map “Geodetic work during the construction of the roadbed”.
Planning begins with the lowest areas of the terrain (in a longitudinal profile).
The top of the roadbed is planned by successive passes of the motor grader, starting from the edges with a gradual shift towards the middle. The overlap of the tracks is 0.3 - 0.5 m. The work is carried out according to the shuttle pattern with four passes of the motor grader along one track.
The embankment slopes are planned in two passes of the motor grader along one track when it moves directly along the slope.
The technological sequence of processes with calculation of the volume of work and required resources is given in Table. 3.
The technology for operational quality control of work during the construction of a subgrade embankment is given in Table. 4.
Cement-sand screed: advantages, types and calculator for calculating proportions for floor screed
A level base of the floor is the key to ensuring that the finishing coating lays beautifully and will last for many years (this is especially true for materials such as laminate or tile). Cement-sand floor screed is an opportunity to create not only a smooth and even, but also a durable base. However, the work of filling it is not as simple as it seems at first glance. Let's figure out how to create such a screed yourself.
Construction of a base for a strip foundation
In order for the foundation to serve for many years, it must be laid on a properly prepared foundation. Typically, a sand cushion 20-30 cm thick is used as the base for a strip foundation. On heaving soils, the layer can reach 60 cm, well protecting the foundation from uneven loads. When digging a trench for the foundation to the design level, there are often cases of digging through the soil. In this case, you cannot backfill with the selected soil. Its density, even when compacted, will be significantly lower than the density of compacted soil. Backfilling should be done with sand.
Many manuals on the construction of sand preparation recommend compacting the sand with a spill of water. However, on soft soils this can lead to erosion. Therefore, on clayey and dusty soils, it is better to backfill with sand moistened in advance. On soft soils, instead of sand preparation, you can perform a sand-gravel backfill in which the sand content is 40%, and the gravel or crushed stone content is 60%. When installing a strip foundation on weak heaving soils, it is recommended to insulate the slopes and the bottom of the trench with geotextiles before installing the sand backfill, starting installation of the foundation and then filling the cavities with sand. This solution will help protect the sand backfill from silting with clay particles during periods of high groundwater levels.
Cement-sand screed
A screed made from a mortar made from sand and cement is an almost perfectly flat base that is suitable for laying absolutely any floor covering, be it tile, laminate, linoleum or parquet. It is with the help of such a screed that most often they level rough foundations - concrete floors in houses, brick floors, and even simply create a foundation lying on ordinary soil. On average, the thickness of a cement-sand screed varies from 3 to 8 cm. It can be larger, but due to the large weight of the mortar used for pouring, when calculating the thickness of the screed, it is necessary to take into account the strength of the floors.
Cement-sand floor screed
Concrete floors are leveled using cement-sand screed
The main tasks of the screed are not only to level the surface, but also to the fact that it will redistribute the loads experienced by the floor, create a solid foundation, make it possible to equip heat and waterproof layers, and even in itself is an excellent option for heat and waterproofing. Inside this structure, you can lay various types of communications, equip a heated floor system, etc.
Reinforced screed on the ground
On a note! Certain types of screeds, called self-leveling floors, will help bring to life the most daring design solutions. Such floors can be of different colors or have a very interesting pattern. Special compositions make it possible to create real 3D paintings on the floor.
3D self-leveling floor in the bathroom
What does the foundation base consist of?
If you want to try to install a concrete base directly on crushed stone, without sand, part of the slab or tape will be overloaded, and the second part will be unloaded. In such a situation, the concrete casting will quickly become unstable, cracks and deformations will form.
Sand filling and its functions
Sand in this case plays the role of glue and elastic cushion, which makes it possible to compensate and distribute evenly all efforts, and even heaving of the earth or settling of the foundation base.
The sand material used for preparation and filling must meet the criteria and requirements:
- The best option for a sandy base for a foundation is gravel sand, it is clean and coarse, and the fills will weigh less, but such sand will easily allow water to pass through.
- Minimum amount of soil, clay, salt and lime contaminants.
- The sand should not contain any organic matter, plant remains, silt or peat, which is what water bodies are rich in. Otherwise, after some time, the sand cushion will become a full-fledged waterproof layer of dirt, which will be full of decomposition products of organic elements.
Helpful advice! You can easily check the quality of sand even with the means at hand. For example, if you pour sand into a hole dug in the ground and pour in about 5 liters of water, then with high-quality material, the water will go away within a few minutes, and if the sand is dirty, then a puddle will remain.
Classic foundation structure
In the classic version, the technology for creating a cushion for a concrete slab or tape uses crushed stone, since it is a material that provides a rigid base and drainage. Because of this, the base is covered with at least one layer of crushed stone. To use this material, you will have to spend a lot of money, since the price of material and delivery always amounts to a tidy sum. Despite the shortage and high cost, it is impossible to abandon the use of crushed stone.
Unlike a sandy foundation, crushed stone fill uses excavators and bulldozers to grade the surface and remove a lot of earth to dig out the slope. It is not always possible to perfectly level the gravel bed, so builders have found a way out and use concrete preparation or intermediate concreting. This is a thin layer of concrete that is laid on a base of sand and crushed stone. After this, all that remains is to lay out the waterproofing and insulation.
If the soil has high load-bearing characteristics, the preparation technology can be simplified. In this case, the installation of a sand base for the foundation is done in a simplified manner, and a plastic film is laid on the compacted and leveled layer of sand, a layer of screenings or fine gravel is poured, and after compaction, insulation and waterproofing are laid. After this, you can start laying the reinforcement and filling everything with concrete solution.
Benefits and Features
Cement-sand screed has many advantages. This applies to its physical and physico-chemical parameters.
Cement-sand floor screed
Advantages of sand-cement screed.
- Evenness . Thanks to this method of leveling the floor, you can create an almost perfectly level base.
- Durability . Such a screed can easily serve for decades - on average, the service life is about 50 years.
- Durability . The screed does not deform under the pressure of heavy furniture; it is one of the most durable types of bases for a finished floor.
- Possibility to hide communications . Inside the screed you can lay water or sewer pipes, a heated floor system, or electrical wires. There they will not disturb anyone and cannot be damaged. If it is necessary to repair communications laid inside the screed, the cement-sand layer will have to be partially or completely dismantled.
Warm floor scheme
Leveling screed over insulation
But, like any other method of leveling the floor, cement-sand screed has its drawbacks, which you should be aware of before installing this type of base. The disadvantages of cement-sand screed are given below.
- Considerable mass . Cement screed exerts significant pressure on the floors, and therefore its use may be limited by this factor. For example, 1 m 2 of cement-sand screed, laid in a layer of 1 cm, weighs about 20 kg.
- Long drying time . Before you can safely move on the screed and carry out further finishing of the floor, it is necessary to dry it well. The drying time is long - about a month.
- It is difficult to achieve a smooth surface by hand . Fortunately, if this was not possible, but evenness is necessary, you can pour a self-leveling mixture on top of the screed.
- Difficult installation . Pouring screed is a very complex process, which is often carried out with the help of strangers. The work, of course, can be done independently, but it is important to follow all the steps and key points when pouring the screed. Otherwise it will crack.
Cracks in the screed
In any case, a properly poured screed is an excellent base option for any type of finishing coating. In addition, after drying during use, it is easy to clean, even if not covered with finishing, and is also not afraid of water.
Construction of underlying and leveling base layers made of sandy materials: sand and washed sand in Moscow and the Moscow region
.
Sand
- inorganic granular bulk material formed during the natural destruction of rocks or obtained by artificial crushing of rocks and their subsequent sieving. It is a mixture of rounded grains (rock fragments) to varying degrees with sizes ranging from 0.15 to 5 mm. The granulometric composition of sand (minimum and maximum grain size) is determined depending on how it is considered: as a soil particle or as a building material.
· Sand as soil
- material with a grain size from 0.05 to 2 mm. Non-cohesive mineral soil, in which the mass fraction of particles with a size from 0.05 to 2 mm exceeds 50%, is called “sandy soil”.
Sand as a building material
— bulk material with grain size from 0.15 to 5 mm. Sand in which the number of grains larger than 5 mm ranges from 7 to 15% is called “gravel sand.” In various areas of the national economy that use sand, there may be their own classifications of sand, which determine a different granulometric composition (different from the above).
Purpose and scope of sand Sand is one of the multi-purpose minerals. Nowadays, sand mining has become a thriving industry with an annual turnover of many billions of dollars. Along with gravel, the total world consumption of sand exceeds the consumption of any other raw material (except water). The largest consumers of sand are the glass and construction industries (production of concrete mortars for the construction of buildings and concrete blocks, production of mortars and dry mixtures, cement production, preparation of mixtures for asphalting roads, etc.).
Application of sand in various industries
In road construction, natural sand and sand from crushing screenings are used to prepare asphalt concrete and various organomineral mixtures, which are used for paving roads, territories and small areas
. In addition, sand is used as a material for constructing layers of the base of road pavement (laid between a compacted layer of soil and a layer of crushed stone base).
Each of you is certainly interested in the following questions: the cost of such services as the installation of underlying and leveling layers of the base from sandy materials: sand and washed sand?
To get answers to all your questions, you can call +7(926)91-56789 or write to us by email and check with our specialists, who will competently draw up an estimate for the project according to your requirements and provide a price list for the installation of underlayment and leveling base layers made of sandy materials: sand and washed sand. Get a free consultation
Types of cement screeds
There are a large number of ways to make such a screed. However, we can distinguish the main ones - tied and untied screeds and floating.
bonded screed method is used if the permissible leveling layer can be up to 4 cm thick. The base becomes one with the floor and walls. This type of screed requires careful preliminary preparation of the rough foundation - all large holes, cracks, cracks in the floors are sealed, all significant irregularities are removed as much as possible. If there are small bumps or pits on the surface of the ceiling, they do not need to be sealed. Builders even recommend artificially roughening freshly laid floors by walking over them with a metal brush - this way, the adhesion of the mortar to the surface will be better.
The solution for pouring the screed should have the consistency of sour cream or cake cream. It turns out quite liquid and about 20 minutes after pouring it will begin to gradually harden. Therefore, you need to have time to fill and arrange the screed during this time.
The solution for pouring the screed should have the consistency of sour cream
Attention! Large rooms are usually filled in stages, since one person cannot quickly level such an amount of mixture.
You can carefully walk around the room the next day, but the drying time for such a screed is long - up to 40 days. It is important to properly dry such a base - the water cannot quickly evaporate from the layer, it must come out gradually, so it is recommended to moisten the fresh screed with water and cover it with film.
There is an untied screed , which, on the contrary, is mounted on a perfectly smooth surface. In this case, the base should not have water-absorbing properties, so as not to draw moisture out of the screed. The thickness of such a layer can reach 5 cm. The main difference from the previous type is that a primer is not used before pouring such a screed. Also, no methods are used that can increase the adhesion strength of the solution and the rough base.
Floor screed - mortar and grout
Also often installed is a so-called floating screed . It is usually used if its thickness should be 5-7 cm. The design of such a layer is different in that it does not even directly come into contact with the rough base - on the contrary, layers of hydro- and thermal insulation are laid between the solution and it, various materials that simply will not give the solution will adhere to the ceiling.
Attention! It is this type of screed that is most often strengthened using reinforcing mesh. Fiber fiber can also be added to the solution to increase its strength, reduce the risk of cracks and reduce the risk of shrinkage.
Fiber fiber for floor screed
Fiber fiber mixture
Due to its large thickness, such a screed could have the maximum weight, but it is poured using the so-called semi-dry technology. That is, the solution is mixed using a small amount of water and resembles the structure of wet sand.
Prices for fiberglass for screeds
Semi-dry screed over heated floor
Composition of the foundation cushion
To build a sand-crushed stone cushion, you need to use materials such as:
- concrete;
- sand;
- crushed stone (gravel).
When choosing materials, you should be guided by the geological features of the area where the construction will take place. For example, if the soil is mobile and its surface is not too strong, then there should be sixty percent crushed stone, and forty percent sand, respectively.
Fine sand is not suitable for a pillow; at least a medium fraction is required, preferably a coarse one. Crushed stone is also recommended to be used in medium sizes, around 30 millimeters.
You can often hear, even from construction companies, that clay will ideally serve as a pillow. The main argument of this advice is that clay has waterproofing properties. However, sometimes it is not enough, since this material will be useless on heaving soils. In cold environments, clay can expand and put pressure on the foundation.
Proportions of cement and sand
Depending on which screed option is chosen, the composition of the mixture for its manufacture is also determined. The proportions of the two main components are selected depending on what brand of cement will be used and what quality of sand. To install a screed in an apartment, it is enough to use M200 cement. The finished base will be able to withstand a significant load - about 200 kg/cm³. You can take 1 part of M500 cement and mix it with 3 parts of sand. And you will need as much water as is necessary for the solution to achieve the required consistency. This is approximately 1 liter per 1 kg of cement.
Attention! There is no need to add a lot of water, as this will make the solution of less quality.
Screed mortar
It is very important to choose the right sand to create the solution. It should not contain (or at least contain) various inclusions - silt, clay, etc. These components negatively affect the strength characteristics of the finished screed. It is best to use washed river sand. Quarry sand is also suitable, but its quality is somewhat worse than river sand due to the angular shape of the sand grains.
Table. Mixture compositions according to GOST when using M400 cement, wt. h.
| Brand of solution | Cement | Water | Sand |
| 150 | 1 | 0,55 | 3 |
| 200 | 1 | 0,48 | 2,8 |
| 300 | 1 | 0,4 | 2,4 |
Calculator for calculating the amount of ingredients of a mortar for floor screed
Construction of a sand base with layer-by-layer compaction
from 650 rubles per cubic meter depends on the distance of the location from the quarry and the type of sand
Sand backfill is used to strengthen the strength and increase the moisture resistance of the bottom of pits, road bases, platforms and other objects that require cutting and excavation of the surface layer of soil. Sand is one of the most beneficial materials. It is inexpensive, easily compacted and can withstand significant loads without compression or destruction of the constituent particles.
Usually, to prepare the bases for road surfaces, foundation slabs and other structures, quarry sand of different fractions is used. It has a homogeneous composition and forms a coating with identical mechanical properties over large areas.
The thickness of the sand layer is determined by the project, and control of the design elevation of the sand base is carried out geodetically, using a level, tacheometer, etc.
How sand is compacted
Usually, before compaction, the material is slightly moistened - this way it becomes more mobile, and the connection between sand grains increases. When preparing a sandy base of great thickness - above 1 m, compaction is carried out layer by layer. This method makes it possible to obtain a monolithic section that does not cause further shrinkage and cracks.
The construction of a sand base with layer-by-layer compaction is carried out using special equipment:
- rammers
- vibratory rollers
- vibrating plates
- regular skating rinks
Rammers are heavy metal structures with a flat base that are lifted to a certain height using cranes or excavators and lowered down. Under the influence of gravity, the rammers forcefully hit the base material and compact it. Typically, maximum density is achieved after 10 - 12 impacts on one impact site. This compaction method is convenient for preparing sites of limited size on fairly strong soils.
Conventional and vibrating rollers are best used when preparing road bases. They influence the sand both by their own weight and by vibration of the rollers. After multiple passes, the density of the sand becomes the same as after compaction.
When equipping sandy bases with layer-by-layer compaction, it is necessary to take into account the fact that during rolling and compaction the soil also sags somewhat. The volume of sand for preparing the base must be calculated taking into account the decrease in the level of the bottom of the pit or road trough.
Construction of sandy foundations with layer-by-layer compaction is one of the types of services provided. The enterprise's fleet includes a full fleet of necessary special equipment. All work is carried out strictly according to technology, taking into account environmental standards and SNiP requirements. Orders are fulfilled on time at facilities located in Tula and the Tula region.
Types of foundations and requirements for them
There are three types of bases for subsequent laying of paving:
- sand, for fixing the coating on a compacted cushion without additional materials;
- sand-cement, obtained by preparing a mixture of dry sand and cement for the purpose of its further laying as a top layer;
- concrete, for laying tiles with adhesive solutions on a prepared hard surface.
Base options: sand, sand-cement and concrete.
Preparing the base for laying paving slabs requires compliance with certain requirements, failure to comply with which can lead to poor-quality results, and in the future to possible damage to the integrity of the coating. Such requirements include:
- backfilling the drainage layer to drain accumulated water and prevent the tile covering from being washed away;
- waterproofing device in the form of a special substrate to prevent moisture from entering from below;
- ensuring drainage due to the inclined surface and the presence of special drainage grooves;
- surface leveling to ensure precise fit of all paving stone elements;
- deepening into the ground to ensure the required level of the paving surface;
- mutual stability of individual layers and absence of deformation.
People often ask the question, “Is it possible to lay paving slabs on old flooring?” The possibility of such work depends on two factors: the condition of the coating itself and its base. In the case where the asphalt, concrete or tiled layer has a flat surface, does not sag and is not washed away by water, then a new coating can be laid without removing the old one.
Otherwise, you will have to completely disassemble what was there and do all the work from scratch. In addition, it is necessary to take into account that when laying tiles over the old surface, the level of the path will rise and you will have to additionally level the levels with the adjacent territory.
Types of bases
Typically, tiles are laid on the following bases:
- Sandy. In this case, paving slabs are laid on sand and additionally fixed with the help of enclosing borders.
- Sand-cement. A dry mixture of sand and cement is laid on a gravel “bed”.
- Solution. This base is a liquid construction mixture. In this case, it is necessary to prepare a monolithic concrete base.
It is much easier to lay slabs in even rows on a concrete base. Concrete also “smoothes out” soil unevenness, so the finished structure will not sag.
However, it is worth considering that laying on mortar is usually carried out if the tiled elements will experience heavy loads. For example, if the path is affected by heavy equipment or a car. If you only plan to walk on the paving stones or ride a bicycle on it, then there is no point in making such a strong and more expensive support for the paving slabs.
Another disadvantage of a concrete monolith is the problems associated with water drainage. The fact is that the cement slab does not allow moisture to pass through, which will accumulate in the gaps and crevices between the slabs. When frost sets in, the liquid will begin to expand, which, in turn, will lead to the destruction of the tile elements.
A sandy base, on the contrary, allows water to pass through well, but under the influence of moisture such a base is eroded quite quickly.
The best option is a sand-cement cushion under paving slabs. It has good strength and allows water to pass through.
Having decided on the best option for laying the support under the tiles, we will consider the technology for constructing such a structure.
Excavation
Preparation of the base for paving slabs begins with removing the soil, so that the final location of the upper level of the surface of the site or path is flush with the upper edge of the adjacent ground. In addition, often the top layer of soil turns out to be quite loose and unable to withstand the weight loads that will fall on it due to the weight of the laid materials.
The depth of the removed soil layer should be such that the surface of the finished base is 2-4 cm below the adjacent area. Usually the soil is selected to a depth of 20 cm, but if the site is intended for parking or driving a car, then the depth must be increased by 8-10 cm.
After excavating the soil, the bottom of the trench must be compacted well. In the case when there is a fertile layer on top, it is recommended to take all the soil to flower beds and beds, and not spread it next to the future path.
Sand base construction
To pour any foundation, it is necessary to prepare a base of sand. Let’s name six reasons to buy sand from us and lay it as the foundation of your house:
Sand base
- Ensuring leveling of the trench bottom, facilitating subsequent pouring of concrete;
- A pillow made of high-quality sand prevents compression of the soil under the base of the building, evenly distributing the weight along the perimeter;
- Good sand will provide a reliable drainage system, which in the spring saves the foundation slab from exposure to water;
- In winter, the device protects concrete from freezing;
- Without the use of a cushion, moisture from the soil, under the action of capillary forces, penetrates into the concrete;
- The layer acts as a softening cushion during soil movement.
The construction of a sand base depends on the type of foundation and the size of the building. Most often, the tape type is used; it is the most common for low-rise buildings.
Depending on the conditions and scale of the construction, a cushion with a thickness of 15 to 25 cm is laid. For example, if you are building a one-story bathhouse, then a cushion is made with a thickness of 15 cm, and if a good three-story house - at least 25 cm. Its width directly depends on the dimensions of the foundation.
The sand should extend beyond the tape by 5-10 cm on each side. This size is selected depending on the dimensions of the building. Our specialists will tell you the required amount of sand you will need.
The production of the layer begins with laying out a sand layer at the bottom of the trench and leveling it. Watered with water and compacted using a vibrating plate. You can use a thick meter-long log with a handle, but why do you need such difficulties?
You compact until the embankment becomes so dense that no traces are visible on it, even after a jump. Levels out. If the house will stand on a concrete slab, then a layer is made under it throughout the entire pit, having previously leveled the bottom.
The construction of a sand base depends on the type of foundation and the size of the building. Most often, the tape type is used; it is the most common for low-rise buildings.
Pour crushed stone or gravel in a layer of approximately 10-15 cm to increase the density of the base. Add a layer of sand 10-20 cm thick and compact it.
A similar sand and gravel layer is used for a columnar foundation, the only difference is in its size. The thickness is usually 20-30 cm, the width is 10-20 cm larger than the pillar on each side.
Before pouring concrete, the compacted embankment is covered with polyethylene or roofing felt so that water from the concrete being poured is not absorbed into it. As you can see, you need to buy sand for construction in large quantities. Order the required volume on our website and we will deliver the material to you on time.
Gravel drainage pad
After completing the excavation work, a 5 cm thick layer of sand is poured onto the bottom of the trench. The sand must be compacted well, poured with water from a hose, and leveled. The next layer to be filled is made of gravel, preferably of the middle fraction.
When backfilling gravel of a different fraction, difficulties may arise: coarse gravel will not provide dense packing and, over time, subsidence of the base will become possible. The fine fraction, on the contrary, will weaken the drainage properties of the layer due to the too dense arrangement of particles.
To level the surface of the crushed stone layer, it is covered with sand, which is spilled with water and compacted. The total thickness of the drainage pad is usually two-thirds of the total thickness of the base and is equal to 14-15 cm.
Leveling the sand according to the plaster rule.
Rules for placing sand and crushed stone cushion
As such, there is no proven rule for laying a pillow under the foundation. Too many factors influence this process: the type of soil and building, the quality of the soil, the type of foundation. But there are still certain stages from which you should not deviate.
An important step is compaction. This is especially true during the construction of multi-storey buildings, when there is a lot of materials, and each filled batch has to be leveled using machinery. In this case, approximately every twenty centimeters, a layer of sand and crushed stone must be filled with water for the best compaction.
If you are determined to start laying the pillow without the help of specialists, then you need to know the following:
- The bottom of the trench must be level. To do this, you need to fill the sand in several layers. The height of all layers is from twenty to twenty-five centimeters. All layers are filled with water and compacted. The surface is checked for unevenness with a level.
- The layers of sand are followed by a layer of crushed stone, which is compacted in a similar manner. Its height should be about twenty centimeters.
- Next comes another layer of sand, which is moistened to give the cushion durable properties. Sand must be poured until it fills the void in the crushed stone layer.
The procedure for laying the pillow is not that complicated, just by following the plan, you can do it yourself.
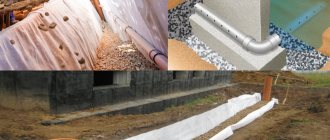
Waterproofing the base
After installing the drainage layer, you need to spread waterproofing on its surface, which will prevent moisture from reaching the upper load-bearing layer. The best material for this is a new modern material - geotextiles.
It does not rot, does not decompose over time, has good strength and provides reliable protection against water. If you were unable to buy geotextiles, then the waterproofing layer can be laid from polyethylene film folded in half.
The waterproofing layer should have a slight slope for more effective moisture removal. This should be provided for at the stage of installing the drainage cushion.
How is the foundation made?
Depending on the results of the study, the designer chooses the type and technology of preparing the base for a concrete foundation. On rocky, durable soils, the cost of preparation will be small, but on peat and swampy areas, a full cycle of expensive measures will be required.
First of all, the groundwater level is measured and, if necessary, a drainage system with natural or forced water drainage is installed around the site.
After digging the pit, the bottom is leveled and the soil is compacted. For this purpose, electric rammers, vibrating plates, rollers with cams, and more productive equipment are used.
The area with compacted soil is covered with geotextiles and a cushion is placed on it under the foundation slab. In the standard version of construction technologies, it is created by installing a sand base (bottom layer), on which a layer of crushed stone is applied through a separating membrane. In foundation bases, all layers of materials must be separated by geotextiles or polyethylene film to avoid unwanted mixing of materials.
The thickness of the sand base under the foundation is, as a rule, 200 mm, the thickness of the crushed stone layer on top is 100 mm.
In justified cases, the design of the base for the foundation is simplified, limiting its production to just filling it with crushed stone. In other options, only a sandy base is used for the foundation.
Three types of bases
As mentioned above, three types of bases for tiles are used for arranging paths and platforms. The choice depends on the thickness and type of tile. The sand base is used for large thickness tiles, which are also called paving stones.
The sand-cement base is prepared for paving slabs of medium thickness.
In turn, the concrete base is well suited for thin paving slabs, which are glued onto it using adhesive solutions.
sand cushion
After the work on filling the drainage layer and installing waterproofing is completed, you can begin filling the final sand layer. The best material to use here is sifted river sand.
To ensure good stability of the paving stones, the thickness of the supporting layer must be at least 7 cm. It should be taken into account that when laying the tiles will be partially immersed in the sand, and pour a layer that will ensure that the upper level of the path or platform exceeds the ground level by 2-3 cm.
Sand should be backfilled in three layers of 2-3 cm each. Each prepared layer, after backfilling, is watered and compacted.
For high-quality compaction, it is better to use a construction vibrating machine, but if you don’t have one, you should do this work manually, more actively pouring water on the sand.
The top layer of sand must be carefully leveled using the plaster rule. It will be possible to start laying paving stones only after obtaining a perfectly flat surface.
Sand-cement base
The installation of such a base for paving slabs is done in the same way as a sand cushion, but a dry sand-cement mixture must be used as the top layer. To prepare the mixture, take one part cement and three parts sand by volume. This layer is also compacted, like the previous layers.
This layer should be laid in dry weather, immediately before laying the tiles. Most often, the lower layers are filled and compacted, and the third, sand-cement layer, is filled in small sections immediately before laying the paving slabs.
Concrete base
Concrete, as a base, is used for laying thin paving slabs on adhesive cement mortar. This preparatory work is carried out after you have been able to prepare the waterproofing layer, and consists of four stages:
- installation of formwork;
- reinforcement;
- installation of beacons;
- pouring concrete.
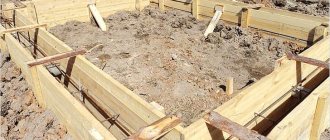
Formwork
The formwork is necessary to prevent concrete from spreading when pouring if its upper level exceeds the ground level.
Installing formwork allows you to leave gaps for the subsequent installation of curb stones and ensures a smooth edge of the concrete layer.
Any flat material with at least one smooth side is used as a material for formwork. These can be boards, chipboard, sheet plastic, etc. The sheets are secured using stakes driven into the ground or by installing spacers.
Reinforcement
The best material for concrete reinforcement is a ready-made welded wire mesh with a diameter of 6 mm and a cell size of 100x100 mm.
All metal parts will need to be tied together with binding wire. The mesh is laid at the bottom of the trench. It will be even better if you raise it a little by placing stones or pieces of brick underneath.
Lighthouses
After installing the reinforcing materials, you need to set up the beacons. These are longitudinal metal slats, the top level of which will indicate to you at what height the base for the paving slabs to be laid will be located. It is very convenient to use galvanized steel profiles as beacons for installing drywall.
The beacons are fixed in slides made of cement masonry mortar at the required height, parallel to each other. Plaster solutions cannot be used to secure beacons.
Pouring concrete
Before pouring concrete across paths and platforms, it is necessary to install inserts made of sheet material 3-4 mm thick. After the concrete has set, they are removed and technological seams remain in the monolith to compensate for possible thermal expansion.
Carefully pouring concrete onto a reinforced mesh.
Concrete for pouring the base for laying paving slabs can be ordered ready-made and delivered to the work site. It is advisable to do this if the amount of concrete poured exceeds 3 cubic meters. With a smaller quantity, you can prepare concrete yourself. This will require the presence of cement, sand, crushed stone and a concrete mixer.
The ratio of the components of the concrete mixture directly depends on the brand of cement. If you purchased M400 cement, then for each volumetric part you need to add 4.2 parts of crushed stone and 2.5 parts of sand, and for M500 cement you need 4.9 parts of crushed stone and 3.2 parts of sand. As a result, you get M200 grade concrete, the strength of which will ensure the durability of your path or site.
First, all dry components are loaded into the mixer, mixed, and only then water is gradually added until the required mixture thickness is obtained. Pouring is done in such a way that there are no voids left in the concrete mass. The surface is leveled using a plaster rule or a strong wooden lath, by pulling it along the installed beacons.
Soil is the basis of the foundation
Recommendations:
- if the soil is weak and the load on it will be quite high, it makes sense to install a pile foundation;
- if the soil allows it and you do not plan to create a large load, install a columnar foundation;
- if there is fluctuation in groundwater, then make a continuous type of foundation;
- if the soil does not float and you are building a house of brick, then consider the option of a strip foundation.
There are cases when, using some construction tricks, several types of foundations are installed. However, for this you need to seek help from specialists. And remember: it’s better to overpay a little and make the foundation better than to later worry about a crack creeping up the wall.
Foundation depth
Most often, the foundation is laid just below the soil freezing depth - this is done in order to prevent their heaving. The foundation is calculated based on:
- climate features of the region;
- depth of underground communications;
- the nature of the loads acting on the foundation;
- features of the waterway;
- depending on the properties of strata soils, etc.
In this case, the laying depth must be sufficient to ensure the stability of the foundation and eliminate the possibility of soil heaving.
In non-heaving soils, when groundwater is located at a large distance, it is allowed to lay the foundation base above the freezing depth of the soil. However, for this, specialists must correctly calculate the average pressure on the foundation and the design features of the building.
The foundations of buildings that are equipped with basements, with an increased groundwater level, must have special waterproofing that can eliminate the possibility of flooding. Dense concrete, lining, coating and other types of waterproofing are also used with certain additives.
Construction of foundations
Most often, before starting construction work, the contractor already has a construction project, which contains calculations of the foundation, linking it to the type of soil, terrain, etc.
The foundation base (pillow) is part of the soil mass on which the foundation itself is located. The durability and strength of the foundation, as well as its susceptibility to shrinkage, depend on the quality of this pillow.
Today, when building houses, many developers use concrete strip foundations. In this case, the foundation on which it must be laid can be of several types:
- poured concrete pad;
- bulk crushed stone cushion.
Thus, when choosing the type of foundation base, you should definitely take into account the regulations and design calculations, which indicate the depth of the cushion.
Required measurements
The first step is to measure the horizontal differences of the entire room, all rooms. The final decision on the use of certain materials depends on the result. Our task is to make a map of the floors of the room, this is the height from a conventional point to the rough base in all rooms, in all four corners plus the middle.
It is convenient to take measurements with a laser level - if it is not available, you need to try to get it. A laser level will greatly simplify and speed up measurements, and will also greatly help in setting up beacons. In the categorical absence of this useful device, you will have to use a conventional bubble or hydro level; naturally, accuracy and speed will suffer. Although this is more a question of your skill - an experienced master can completely do without a laser, but will never refuse to use it!
During the measurement process, you need to find the highest and lowest points on the base, as well as find the more dominant height that occurs most often.
Next, you need to decide on the height of the screed and to what level the subfloor will be filled. You should start from the highest point plus three centimeters (minimum DSP layer). Here you need to pay attention to the thickest layer at the lowest point - the load on the floor slabs should not exceed those included in the building design. Here everything is not so simple.
Since there are a great many building projects, both new and Soviet-built, there is no universal figure. You will have to search and study the documentation for your building or use a simple rule that I use myself. For solid floors of 100 mm, these are the floors of most panel houses, the thickness of the DSP screed should not exceed 5 cm. For hollow floor slabs (brick buildings), the thickness should not exceed 7 cm.
Using this rule, it is not difficult to calculate that the maximum difference on panel floors should not exceed 2 cm (minimum layer 3 cm + difference = 5 cm at the lowest points). But this is a rare case when the difference throughout the apartment is no more than 2 cm. Thus, the easiest way out would be to fill the highest place from scratch. Since DSP without additives can snap off on layers thinner than 3 cm, these areas should be filled with special mixtures designed for thinner layers.
And even when pouring from scratch, it happens that at the lowest point it comes out under 10 cm. Here the problem can be solved by using expanded clay concrete. The volumetric weight of expanded clay concrete is approximately 500-800 kg/m3 versus 1700 kg/m3 - approximately two times lighter. From this we can conclude that with expanded clay it is possible to pour layers twice as thick. This is provided that expanded clay is added to the batches in sufficient quantities, I would even say the maximum possible.
Strip foundation design
Since ancient times, during the construction of buildings and structures for various purposes, reinforcement of their foundations has been used. At the same time, a trench was torn off and filled with natural stone mixed with clay. Such a foundation was strong and quite mobile, which made it possible to use it on heaving soils. Since then, construction solutions regarding the installation of strip foundations have undergone significant changes. Today, strip foundations made of monolithic reinforced concrete, foundations made of reinforced concrete blocks, and brick foundations are widely used, selected depending on the soil conditions and dimensions of the structure being built. In individual construction, rubble concrete foundations made of natural stone are sometimes used, filling the space between the stones with concrete. When building a strip foundation in difficult soil conditions, it is best to prefer a monolithic reinforced foundation that works as a rigid frame and can withstand loads well. If you are not sure of the bearing capacity of the foundation soils or simply do not know what soils are on your site, then choosing a monolithic shallow foundation will also be optimal. It is much easier and cheaper to build a shallow strip foundation with your own hands than a foundation that is buried below the freezing depth. Shallow foundations have sufficient load-bearing capacity for the construction of a bathhouse, garage or 1-2 storey cottage. Design options for shallow strip foundations depending on the type of soil are presented in the table below:
| Degree of soil heaving | Priming | Foundation design |
| Non-heaving | Hard clay, dry and poorly saturated gravelly soils, coarse rocks, coarse and medium sands | Prefabricated reinforced concrete blocks laid without connecting to each other |
| Low heaving | Semi-hard clay, moderately water-saturated sands, coarse clastic rocks filled with clay or silty sand from 10 to 30% by weight | Prefabricated reinforced concrete blocks laid without connecting to each other |
| Medium heaving | Refractory clay, water-saturated silty sands, coarse-grained rocks filled with clay or silty sand over 30% by weight | Prefabricated reinforced concrete blocks with reinforcement outlets interconnected with concrete embedding |
| Highly heaving | Soft-plastic clay, water-saturated silty sands | Monolithic reinforced concrete foundation on a sand or concrete base. |
Material calculation
Before calculating the amount of sand and cement, you should determine the volume of the future screed. This can only be done approximately: the area in square meters is multiplied by the average thickness in places, for example, 40 m2 with an average thickness of 4 cm - 40X0.04 = 1.6 m3. Based on the volumetric weight of sand concrete 1700 kg/m3, we calculate the total weight of sand concrete: 1.6 m3 X 1700 kg = 2720 kg of the finished mixture. If you use ready-made sand concrete, packaged in 30 kg bags, everything is simple: 2720_30 = 90.6 - ninety bags.
A cheaper solution would be to purchase sand and cement separately. The principles of calculations remain the same, but it should be taken into account that packaged sand can have completely different humidity, and accordingly the weight/volume ratio. The proportions of the batches also matter. From my own experience I can say: CPS in the proportions of cement to sand 1 to 3, 1 to 4 has sufficient strength to satisfy all floor coverings. Let's calculate for the proportion 1 to 4: 2720:5 (5 parts - 1 cement, 4 sand) = 544 kg of cement (11 bags) + 2176 kg of sand (44 bags of 50 kg each).
For thinner layers, the calculation principle is the same, with the difference that you need to choose a ready-made mixture, calculated specifically for the required layers; the manufacturer always indicates the range of recommended layers. Calculation of expanded clay concrete should be made on the basis that 35-40 percent of the volume is occupied by sand concrete, the rest is expanded clay (depending on the expanded clay fraction). The volumetric weight of expanded clay is about 400 kg/m3. For the same 40 m2 and a thickness of 4 cm, the calculation will be approximately the following: 1.6 m3 X 0.7 (70%) = 1.12 m3 expanded clay, 1.12 X 400 kg/m3 = 448 kg - in terms of bags of approximately 30 kg - 448 :30 = 14.9 bags of expanded clay. Next, we find the volume of sand concrete: 1.6 X 0.4 (40%) = 0.64 m3, 0.64 X 1700 = 1088 – 36 bags of sand concrete, 30 kg each. Please note that in the calculations there was an extra 10% (70% + 40% = 110%), the fact is that during pouring all the gaps in the expanded clay are filled with sand concrete. I would like to note that the calculation is very approximate and the amount of expanded clay can vary greatly, it depends both on the raw materials and on the proportions of the batches.
Preparation for monolithic foundation slabs and pile grillages
The maximum deviation of the position of formwork elements, reinforcement and constructed monolithic foundations relative to the alignment axes or reference marks during acceptance should not exceed the values specified in SNiP 3. Permissible deviations for a protective layer thickness of more than 15 mm are 5 mm; with a protective layer thickness of 15 mm or less - 3 mm.
Displacement of reinforcing bars during their installation in formwork, as well as during the manufacture of reinforcing cages and meshes. The step of repositioning the vibrator should not be more than 1.5 times the radius of action of the vibrator, the immersion depth should be slightly greater than the thickness of the laid concrete. Favorable temperature and humidity conditions for concrete hardening should be ensured by protecting it from exposure to wind, direct sunlight and systematic moistening.
The mobility of the concrete mixture should be 1 - 3 cm of cone slump according to SNiP 3. Experimental pumping of concrete mixture with a concrete mixture truck and testing of concrete samples, production of concrete mixture samples taken after pumping. A crack in the wall is a clear sign that the foundation of the building has subsided, causing the foundation to deform. The soil at the base of the house is the weak link in the entire structure “You are the weakest link! Therefore, the type of foundation and its design features are chosen depending on the properties of the soil.
Sand cushion thickness
Sand, like any building material, has its own cost. For large areas of the building base, the thickness of the preparation significantly affects the volume of rock required. Accordingly, this affects the cost of constructing the foundation of the building. Therefore, it is very important for the developer to calculate the optimal thickness of the pillow.
One of the most common types of foundations is a strip foundation. Trenches for a strip monolithic or prefabricated foundation are dug 200 mm wider than the strip. Therefore, the width of the pillow will be the same. The rock must be poured into the trenches in such a way that after watering and compacting, the thickness of the cushion is 150-200 mm.
This thickness of the sandy underlying layer is quite sufficient for the strip foundation of a low-rise building. For large buildings made of heavy structures, the dimensions of the underlying layer are determined by design organizations.
We recommend watching a video on how to correctly determine the thickness of the underlying layer for the base of the house.
The installation of a sand layer under a slab foundation is carried out in the same way as under a strip monolith. The size of the base allows the use of large-width vibrating plates for sand compaction. When erecting columnar supports, the cushion is compacted with hand-held wooden tampers.
The simplest way to determine the sufficient density of a sand cushion is that when a person walks on sand, his shoes do not leave marks on it.
Preparing the base
In preparation for the construction of the base of the roadway, the top layer of soil is removed with a bulldozer, after which the base is strengthened with a soil vibratory roller. The base of the roadway can be sand, crushed stone, crushed stone-sand, cement concrete, and can also be made of black crushed stone and mixtures reinforced with binders. This or that type of foundation has its advantages and disadvantages in terms of operational characteristics and capital costs. The underlying layer of sand serves to reduce the load on the earthen base from vehicle traffic, accumulates moisture, and performs a drainage function on clay soils. Compaction of the sandy base is carried out with rollers weighing 5–6 tons, vibratory compactors or pneumatic rollers. When constructing a sandy base, in order to add moisture to the sand, it is watered.
The construction of crushed stone foundations has a number of advantages compared to foundations made of other materials. The crushed stone base can be laid in any weather, without blocking traffic. Also, crushed stone can be stored for a long time on the road or in the highway area. The quality of the crushed stone base determines the strength of the road pavement, which is influenced by the rigidity of the crushed stone base layer and the compressive stress during compaction that occurs under the influence of automobile traffic. The crushed stone base is compacted using heavy pneumatic and vibratory rollers. The rigidity of the base is increased by using easily compacted crushed stone. It is very important to choose crushed stone of a certain shape, since the shape of the grains affects the bearing capacity of the crushed stone layer. Compaction of the crushed stone base occurs due to the filling of pores with propping materials, due to the spatial reorientation of grains, and also due to the fine-grained fractions of the main placer.
The construction of a crushed stone-sand base is optimal for the construction of road foundations. Laying a crushed stone-sand base eliminates the possibility of “reflected” cracks appearing on the road surface. The possibility of long-term preservation in the open air under any weather conditions characterizes the crushed stone-sand mixture as a high-tech raw material for laying the foundation. The base of the roadway made of crushed stone-sand, gravel-sand, crushed stone-gravel-sand, ash and slag mixtures can be strengthened with binding materials. Binders fill voids, increase adhesion between particles of mineral material, while increasing the density and water resistance of the mixture. When compacting mixtures with binders, choose a binder that could bind the loose material into a monolith and, at the same time, lay as a thin film over the surface of the material.
When constructing bases from black crushed stone, the crushed stone is prepared in mixers with forced mixing. Depending on the laying temperature and the type of binder used, black crushed stone is divided into hot, warm and cold. Accordingly, the temperature for laying a mixture of black crushed stone varies from 150 ° C to sub-zero temperatures. Binders can be used from viscous and liquid bitumen and bitumen emulsions. Compaction of the base of black crushed stone occurs first with medium rollers and then with heavy rollers (combined vibratory roller or soil roller for rent).
The equipment necessary to carry out these types of work can be rented. Go to information about skating rink rental >> Special equipment rental
Road bases made of cold black crushed stone are usually compacted with self-propelled pneumatic rollers. If you want to learn in detail about the design and compaction of cement concrete foundations and other types of foundations, contact our specialists.
Why do you need a sand cushion?
Upon completion of excavation work for the installation of strip and other types of foundations, unevenness remains on the soil surface. For reliable operation of monolithic or prefabricated reinforced concrete foundation structures, it is necessary to make an ideal, flat surface of the supporting area. A sand preparation thickness of 100 to 200 mm will eliminate all unevenness and provide a perfectly flat support area for the building.
When installing the base, you must carefully observe the order of layers
In the construction of small houses, the thickness of the sand cushion under the foundation is sufficient, measuring 150 mm. The sand cushion under the strip, slab and columnar foundation resists soil compression and evenly distributes the load from the total weight of the structure.
The cushion prevents capillary penetration of moisture from the ground upward into the building structure. The preparation device on the ground prevents the occurrence of negative temperatures at the base of the building.
Preparation of sand and crushed stone at the bottom of trenches, pits and pits, as drainage, removes rain and melt water away from the foundation structures of the house.
You need to pour a layer of crushed stone on top of the sand preparation, and not vice versa. Why do you need to do this? The rock, due to its fine-grained structure, can penetrate deep into the crushed stone layer. As a result, mixing of two dissimilar layers of base preparation occurs. This will negatively affect the properties of the sand cushion.
It is imperative to pour crushed stone onto the sand preparation, and not vice versa.
Geotextiles will help further protect the future foundation of the house.
Although there are exceptions. Crushed stone or gravel is poured into the bottom of the pits of the columnar supports, then sand. Due to the small size of the supporting area, slight mixing of the layers does not affect the quality of the underlying layer.
A waterproofing material (polymer film, geotextile, etc.) is laid between the soil and sand, sand and crushed stone. This will protect against the penetration of moisture from the seasonal rise of groundwater.