Self-installation of natural stone
Laying natural stone enhances any landscape and exterior.
This natural building material has been used since ancient times, it has its own wild beauty, is durable, environmentally friendly (does not emit harmful substances even under the influence of temperature fluctuations), and the variety of textures and colors is amazing. The only disadvantages of natural stone can be considered the high cost, compared to artificial materials, and the strictness of the worker’s skill. Uneven shapes require painstaking selection. Wild stone is used for cladding buildings inside and outside, for paving sidewalks, and to highlight architecture.
Species used as facing material:
Types of adhesives for marble tiles
Standard for tiles
To implement cladding surfaces according to standard requirements, MajsterPol recommends GLAZLEP, universal for ceramic tiles. The glue has a class “C1T”. This means a cement “C”, usually a binder “1” with a reduced “T” approach. GLAZLEP is a product designed for fixing glazed and terracotta tiles.
This is an adhesive with increased adhesion that allows you to fasten tiles on horizontal and vertical surfaces. The properties of the adhesive ensure excellent results inside and outside the building.
Adhesive for underfloor heating and critical surfaces such as painting surfaces, porous concrete
For fixing tiles on deformable surfaces, as well as on so-called critical substrates, for example on existing boards, MajsterPol has developed GRESLEP class C2TE. This means cement “C”, with increased parameters “2”, with reduced travel “T”, with increased open time “E”.
The mixture can be used outdoors, inside buildings and on underfloor heating. GRESLEP has an extended open time, which allows you to make adjustments when laying tiles. Thanks to increased adhesion, it can be applied to vertical and horizontal surfaces
Fast drying tile adhesive
A contractor for whom short deadlines are important can take the quick-drying SPEEDLEP for tiles. The adhesive is classified as C2FTS1. This means cement “C”, with increased parameters “2”, quick-drying “F”, with reduced movement “T”, has “S1”.
The adhesive is recommended especially when » covering surfaces in public places, or if there is a risk of developing unfavorable atmospheric conditions during the work.
The surface can be used within 2 hours. SPEEDLEP is intended for indoor and outdoor use, as well as underfloor heating. It is characterized by increased adhesion and can be applied to vertical and horizontal surfaces.
Special elastic adhesive for complex overlays such as granite, marble, natural stone
For complex overlays, MajsterPol has developed GRANLEP class C2TES1. This means cement “C”, with increased parameters “2”, with reduced travel “T”, with increased open time “E”, has “S1”. GRANLEP is ideal for light-colored, natural stones, marble, or coarse-grained rocks.
It is also good, it can be used in the case of ceramic tiles or mosaics. GRANLEP is intended for use inside and outside buildings, as well as on underfloor heating.
The increased open setting time allows adjustments in tile laying up to 30 minutes from the moment of applying the adhesive. This makes it easier to attach to horizontal and vertical surfaces.
Preparation
Before laying natural stone, you need to do preparatory work. Having determined the surface area that will be lined, we add a margin of 15–20% to it. The resulting figure will correspond to the required amount of building material.
It is important to sort the wild stone after delivery to the construction site. Remove the coloring one, distribute the whole one by size and shade to make it easier to lay out the drawing. Next, the stones are washed with water pressure and dried in air.
Preparing the concrete base
To lay out the stone at the very beginning, it is necessary to prepare a suitable foundation. As a rule, we are talking about an ordinary concrete screed. It is strongly recommended to use either self-leveling floors or screed on lighthouses.
In this case, the horizontal level will be obtained as close as possible to the ideal. Only after the base has completely hardened can you begin laying natural stone.
But he himself must also be prepared for the procedure. The following are the steps for preparing natural stone:
- the stone is laid out on a plane;
- using a jet of water washing, dust and other mechanical pollutants are removed;
- A pattern is laid out directly on the ground, which will be transferred to the installation site.
In the case of large flat surfaces (floors), everything is extremely simple. However, do not forget that laying natural stone will require the use of additional tools.
Stone paths
The technology for making a natural stone path is not complicated, but it requires painstaking work and the use of physical strength.
You need to mark the area for the path with your own hands using pegs and a cord.
The width of the garden path can be from 40 cm, the sidewalk - from 80 cm, depending on the number of people who will walk there, the main entrance is provided with a width of 3 m. The slope of the territory must be at least 2 degrees. The sidewalk can be made convex, then water will flow from it to all edges, and not in one direction. It is necessary to think through a drain or drainage system in advance.
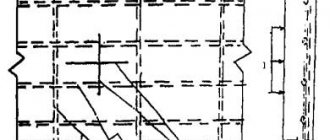
A layer of soil is removed from the marked area. The depth of the selected soil depends on the function of the area. For pedestrian and bicycle paths, remove about 300 mm:
- 200 mm for a cushion of crushed stone and sand;
- 50 mm on concrete base;
- 50 mm for stone and mortar.
Crushed stone and sand are alternated in layers of 50 mm. Flagstone for this purpose should be from 20 to 35 mm thick. For a road that involves vehicle traffic, the trench depth should be from 500 mm:
- on a sandy base 300 mm;
- on concrete screed 100 mm;
- the rest is for facing material and adhesive solution.
The cobblestones must be at least 40 mm thick.
Before making a stone path with your own hands, it is advisable to distribute and mark them. When laying stones, the excess can be cut off with a grinder with a special cutting wheel (sold with the stone mark). In order for the boundaries of the site to have smooth edges, it is necessary to make formwork.
Features of working with natural stone and its advantages
Varieties of natural stone have been used in construction for a very long time. This is facilitated by the impressive performance properties and characteristics of the material, as well as the active development of technologies for its extraction and processing. The undoubted advantages of natural stone, which are the main reason for the popularity of this building material, include:
- durability.
The service life of a coating or structure made of natural stone is practically unlimited, which is ensured by the unique structure of the material. The main thing is to ensure reliable adhesion of the stone to the base or between individual masonry elements, for which the mortar is used - frost resistance.
An important parameter, especially valuable for the climatic conditions of Russia; - waterproof.
Most types of natural stone not only easily withstand exposure to water, but also protect the lined surface from it. However, for this it is extremely important to choose the right solution to ensure waterproof joints; - variety of colors and surface textures.
The stylish and elegant appearance of the covering or masonry made of natural stone should be emphasized by the aesthetically pleasing appearance of the seams. The latter is achieved by selecting the color of the mortar on which the stone is laid; - strength.
No artificial material that has similar characteristics can compete with natural stone in this parameter.
The described features and advantages clearly demonstrate the importance of proper selection of the mortar on which natural stone will be laid. It is this that largely determines the final performance indicators of a coating or structure created using natural stone.
Main works
Laying natural stone is done in several ways.
Laying wild stone on sand. The method is suitable for creating:
- sidewalks;
- terraces;
- areas with low traffic volume.
A flagstone with a thickness of 50 to 80 mm is required. The pillow should be made of sand, 50 mm deep. The sandy base is leveled, well watered and compacted. The stones are fitted tightly to each other, with minimal gaps up to 20 mm, which are then filled with sand or pebbles, less often with clay, and generously filled with water.
This type of laying of natural origin material on sand is recommended for regions with a mild climate - at sub-zero temperatures, icy unevenness appears on the paths. This method is also not suitable for heaving soils.
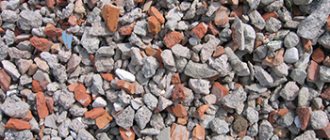
Laying material on a gravel base
The bed is made with a depth of 200 to 300 mm. First, a sand cushion is created - the filled sand is compacted well. Next, gravel is poured in the same amount and leveled.
The entire base is watered and compacted additionally. The next stage is laying stone on the paths with cement mortar.
The layer of construction mixture should be about 30 mm, with its help you can level the surface of the site even if the thickness of the stones is different.
The thickness of the flagstone depends on its type - gray flagstone is up to 30 mm, white or orange should be 40–50 mm. Natural stones are adjusted to each other, keeping an eye on the level and leveling the path with a wooden mallet. The mortar on which flagstone was laid is also used to fill cracks. To prevent the pavement from collapsing after the first winter, expansion joints are created at intervals of 600–700 mm, the width of the joints being 10–50 mm.
Wide seams can be decorated by pouring fine gravel or soil on top and planting lawn grass there. After 24 hours, water the sidewalk and clean the surface with a stiff brush. To create the effect of wet stone, polyurethane varnish is applied to the flagstone. To protect natural stones from stains, they are treated with a specialized compound.
Laying building material with glue
The base is also made of sand and crushed stone. A concrete screed is made on top. Construction adhesive is prepared before its direct use due to its rapid drying.
To save money, you can add cement and sand to the glue. The consistency of the finished solution should be uniform, like liquid sour cream.
Glue is applied to the prepared stones using a hard brush. Excess glue is applied to the screed with a trowel, so that cavities do not form later, which can lead to the destruction of the path. Dried stones are placed, pressing them down well to distribute the building mixture. Carefully remove excess from the stove, immediately wiping the contaminated surface with a hard rag.
Subsequent elements are pressed against the previous one, so you can remove excess adhesive solution, keeping the already laid part of the sidewalk clean. The path must dry thoroughly before use. Next it:
- washed with water pressure;
- inspect for cracks or smeared elements;
- correct deficiencies;
- cleaned again.
Laying stone on a concrete base
Depending on the stone you choose and the characteristics of your site, you can choose one or another paving option.
When choosing a method for laying stone, it is necessary to take into account the type of soil layer and groundwater level. Sometimes it is enough to lay the stones on a thin layer of sand, in other cases it is necessary to carefully follow the technological cycle.
Paving technology involves preparing the sub-base. It must be remembered that the natural stone chosen for paving has natural irregularities that contribute to water retention, therefore, immediately before paving, it is necessary to plan a “trough” 250 mm deep with gutters and sufficiently pronounced drainage. The profile on the sides of the paving area is made with a slope of about 3%.
The ideal building material for paving is wild natural sandstone. These can be flat slabs with torn edges or processed. A covering made of torn or processed natural stone is not only practical, but also very beautiful and decorative. Working with sandstone is accessible to anyone who has even minimal knowledge of paving technology.
If you have chosen a stone for paving, the thickness of which ranges from one and a half to three and a half centimeters, then you need to lay it on a finished concrete slab.
Preparation of the foundation comes down to pouring the planned area with concrete (concrete screed). When the screed is ready, lay out the stones next to the work surface in order to have a complete understanding of the selection of all elements, the choice of masonry pattern and to facilitate their further installation (to obtain the most natural look, alternate elements of different sizes, textures and shades of color). Then the stones are washed with a brush under a strong stream of water, dried and laid out near the site so that their configuration can be seen.
When starting installation (dry), determine the highest point of the area. The thickest stone is placed in this place (since natural stone may have slight natural irregularities). The stone is marked with chalk with the number “1”. All other stones can be “adjusted” in height to this stone using an adhesive mixture. This “dry” selection of stones will allow you not to waste extra time when the adhesive mixture is diluted.
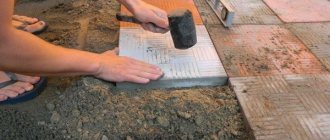
For laying stone, you can use a cement-sand mortar or a deeply penetrating primer such as CERESIT or other similar mixtures and adhesives. When the stones are selected, you can lay them on glue. To do this, the stones are carefully removed in the reverse order. A thin layer of adhesive mixture is applied evenly to the lower part of the stone. It is diluted to the consistency of thick sour cream. Remember the location of stone "1". The empty area is thoroughly cleaned (swept, washed, or better yet, vacuumed). Stone glue can be diluted with cement or fine sifted sand in a 1:2 ratio, also bringing the mixture to the consistency of thick sour cream. The glue must be homogeneous and plastic. If a contrast effect is needed, then it is better to use white cement. Glue or adhesive mixture is applied to the site with a special trowel with some excess, without leaving any cavities. If water then gets into the cavity, the stone will tear off in winter.
Having placed the stone on the surface, carefully tap it with a rubber hammer (to release air, the adhesive mixture is evenly spread over the entire surface, and excess adhesive mixture is squeezed out along the edges of the tile). Excess adhesive mixture is removed with a trowel back into the bucket. Next, the second and subsequent stones are laid in the same way, first pressing the side that is adjacent to the already laid stone, and then pressing the opposite side. Excess adhesive mixture is also removed. When laying stones, monitor the level of coverage, leveling with the first stone.
Never use wet rags or solvents for cleaning, and never rub the mixture over the surface of the stone! There are two types of installation: with jointing and without jointing. For seamless masonry, lay the elements tightly pressing them against each other. If you choose cladding with jointing, the recommended gap between the elements is on average 3-10mm. Joining is a very important stage. Its result is complete sealing of the seams, eliminating the ingress of moisture and a more aesthetic appearance. Grouting the joints must be done with the same mixture that you used for laying the surface, but with a more liquid consistency.
When the adhesive mixture has not yet hardened, but has already set, as a rule, the next day after laying, you can use a brush to clean the area with a large amount of water, then the adhesive mixture washed away with water will take the shape of a concave hollow (when facing with jointing). Until the adhesive mixture has completely hardened, the area should be sprayed with water for several days. After drying, rinse the masonry thoroughly with water (it is most convenient to do this with foam sponges. - to increase the durability of the stone, it is possible to use various hydrophobic impregnations, it is advisable to treat the jointing twice, acrylic hydrophobic impregnations create the effect of “wet stone”, create a protective film that protects the surface from moisture .
Wild stone for wall cladding
Before laying natural stone on a vertical surface, it is checked for chips and cracks. Potholes and bumps larger than 20 mm are eliminated.
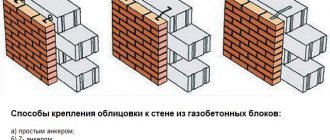
Important! The wall must be strong enough to support stone cladding (such as brick or other block materials). For a plasterboard partition, it is better to choose light rocks (tuff) or chalk-based artificial stone.
The surface of the wall is cleaned of dust with hard brushes or rags, and covered with a primer. The base of the masonry is strengthened with a reinforcing mesh so that the cladding is durable and does not crumble after two years. The metal mesh is secured using self-tapping screws with dowels or reinforcement. For 1 sq. m of mesh requires 10 fastenings.
The washed and sorted stone must be laid according to the principle of a pyramid - the largest are at the bottom, with the height of the masonry the size of the elements decreases.
To make it easier to monitor the vertical level, a lighthouse rope is pulled, against which the laid stone should rest but not pull back.
The tiles are first coated with a thin layer of construction adhesive, which will clog the pores of the material, and then the base layer is laid on the surface.
The stones are laid out taking into account the dressing, the principle is the same as for brickwork - the element of the next row should cover the seams of the previous one. The stones are laid on which mortar – adhesive or cement; in any case, they are adjusted to each other so that the seams are not wide, up to 30 mm.
Correct geometry
The texture of the basement of the building should be successfully combined with walls and other structural elements
Natural stone is expensive, so many people decide to make do with false stone. The most popular artificial stone:
- Clinker flagstone;
- Polymer sand;
- Artificial material made from painted concrete.
In this case, a laying technology identical to natural stone is used. To improve the adhesion of artificial flagstone, they spray it on the walls of the plinth, wait for it to dry for a day, and then plaster it. As a rule, artificial flagstone is quite heavy, so a metal mesh is installed to strengthen the structure. After the plaster has dried, the tiles are installed. It must be laid in such a way that the rules coincide, forming a flat surface. Torn stone and dolomite are placed in a joint, which makes it more natural and aesthetically pleasing. If you notice any imperfections on the tiles, cut them off with a grinder.
Another method is laying along a runner line. You don't have to plaster the wall for this. For finishing, a thin layer of glue is used, which will make the base hidden behind the protruding wall. However, this method is not popular due to the laboriousness of the process, so it should be done only in case of emergency.
Materials and tools for work
The owner of a country house will definitely have tools in his storage room, the use of which involves the technology of laying flagstone on a personal plot.
Having purchased the material, you also need to prepare the means at hand.
You will need:
- pegs, cords, tape measure, shovel for marking paths according to the work plan;
- grinder for cutting flagstone;
- level;
- mallet;
- geotextiles;
- curbs;
- Master OK;
- rule board;
- cement, sand, crushed stone;
- device for manual or mechanical compaction.
Having prepared the necessary things and having taken care of a sufficient amount of water on hand, you can begin the process of paving the paths.
Paving methods
The main options for paving slabs: dry mix and glue. Based on the type of base provided, they are divided into laying on a bed of sand, gravel or reinforced concrete.
For a garden path, a sand base is quite sufficient, because there are no great load requirements for it.
The stone for laying should be within 5-8 cm thickness; the larger the slab, the better. A layer of crushed stone is added if the site has clay soil, so the path will receive an additional margin of safety. On a gravel base, you don’t need too thick pieces of flagstone, 4-6 mm is enough.
Masonry joints can be filled with a sand-gravel mixture or soil with lawn grass seeds. In the latter case, the distance between adjacent pieces of sandstone needs to be increased.
The method, which assumes a base of reinforced concrete, is suitable if flagstone is laid with your own hands in places with a large load on the surface.
Sidewalks and driveways, basement around the building. The material acts as a cladding glued to a solid base.
Technology for laying flagstone on paths step by step
The procedure for laying flagstone on paths is simple. It assumes the presence of a marking plan on a section of paths along which pegs with cords are placed.
Then come the following steps:
- We dig a trench to a depth of 15-20 cm in the perimeter fenced with pegs; if borders are planned, then the bottom of the bed will be 3-5 cm higher.
- We spill the base with water and then compact it, reducing the risk of soil subsidence.
- We place a layer of geotextile that will distribute the load on the base. The coating should not wrinkle; when turning, the canvases should be overlapped on top of each other.
- Carefully distribute the gravel layer to a thickness of 10-15 cm, depending on the expected traffic on the path. We compact it, checking the result with a level.
- We lay a geotextile panel on the crushed stone to prevent interpenetration with the mixing of subsequent layers. Excess material from the sides is tucked down.
- We fill in a mixture of cement and sand and level it with the rule. Before laying the flagstone itself. The permanent foundation contains approximately the following layers: soil, geotextiles, crushed stone, sand.
- We lay the flagstone, sinking it into the top layer. We lay out the large plates, adjusting them to each other, filling the voids in the gaps with small sawn pieces.
- Cover the surface with a dry mixture of sand and cement, filling the seams to capacity.
- We sweep away the excess composition from the sandstone slabs, carefully pour the resulting path, preventing the mixture from being washed out of the seams.
- We cover it with film so that when drying, the cement sets into a homogeneous sheet, gaining maximum strength.
Avoid mechanical impact for 5-7 days until the coating has completely hardened.
By following a simple sequence of actions, you will become the owner of a beautiful plot with strong, durable flagstone paths.
Masonry of stone walls
It's no secret that a good foundation and stable walls are the key to the longevity of any home. Therefore, for the construction of buildings, it is best to use traditional stone. Stone is a universal material that is recommended for use in various building structures. Particular attention should be paid to concrete. You will learn further in the article how to make cement mortar so that the stone walls do not fall apart.
Therefore, it is very important to follow construction technology. For typical residential walls, masonry is done only after the foundation has been prepared. It must be solid and located below the freezing level of the soil characteristic of this area. Under such a foundation it is necessary to dig a trench, the width of which will be at least 1 m. A layer of a mixture of crushed stone (gravel) and sand is laid out at the bottom of this trench; it is advisable to use clean river sand, since mountain sand contains a large amount of clay residues, so it is practically not used.
To build walls made of stone, you should use a solution of cement with sand, it is prepared using the classical method, cement for this purpose is taken with grade M300 and no lower. The finished mixture must maintain a ratio of 1:3, where 3 parts of clean sand are taken for one part of cement. Cement mortar is first applied to the base of the wall, and stone is laid on top of it. Before each subsequent installation, the stone is selected in size so that they are placed as evenly and densely as possible.
To give the stone a certain configuration and shape, it should be broken into pieces and laid in such a way that the overall appearance is not disturbed by the shape of the resulting masonry.
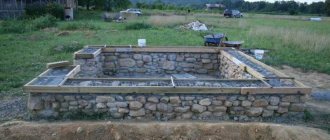
When constructing a special retaining wall, one of its cuts is made as vertical as possible, and the second, on the opposite side, which is higher, directed towards the terrace, is made flatter. If we consider this structure in cross-section, it should look like a right-angled triangle, the vertical side of which will be the outer cut of the retaining wall.
Stone masonry can also be used to build fences, and it will acquire a unique decorative look. You can also create an imitation of masonry; such masonry will look attractive on various structures.
Similar articles
- Installing a water tank If you do not have a central water supply in your country house or country house, then it is advisable to have a water tank. You can either buy it or make it yourself. If you make a water tank [...]
- Centrifuge design A centrifuge is a horizontal or vertical type installation for dewatering or thickening various types of sewage sludge. The centrifuge device includes: a conical [...]
- How to build a pond at the dacha An artificial pond is the dream of many owners of dachas or country houses. It always serves as a decoration for a plot of land, especially if you place it in the right place, for example, next to [...]
- Making a foundation for a small house After marking the contours and pulling twine onto pegs around the perimeter of the future building, work is done to dig a trench for the foundation. Its width should correspond to the width [...]
- Installation of the attic and insulation Installation of the attic The main advantage of the attic is practicality and an increase in the square footage of the second attic floor. We will look at the installation of an attic using the example of a roof with a building width of 10 […]
Laying flagstone on a concrete base
Maximum loads can be withstood by a coating made using the technology of laying flagstone on a concrete base with reinforcement. The thickness of the sandstone is allowed less than when installing on a dry mixture. The weight is supported by the base, and the stone acts as a cladding.
Paving begins with the preparation of formwork. Then a layer of gravel is laid on the compacted bed, which is leveled and compacted. A reinforcing mesh of metal is placed on top, the cake is filled with a concrete solution to a thickness of 20-30 cm. The base will be ready after drying a few days later.
The stone is directly laid out using an adhesive solution, which is applied to the base of the path and the back side of the flagstone. Pieces of material are beaten with a mallet to prevent the formation of cavities from air accumulation. The level helps to control the level, try to avoid changes in height, walking along such a path is not comfortable.
The next day, clean the resulting coating from excess adhesive solution, leave to dry without subjecting it to stress for several days. For greater adhesion strength, you can cover with a covering material or lightly wet the path during the curing period.
To reduce glue consumption, it can be supplemented with sand and cement, because their prices are an order of magnitude lower. One part of glue to two parts of the mixture, the resulting solution should not separate into fractions, the ideal consistency is like thick sour cream.
Laying flagstone on façade walls
Reliable installation of flagstone on the walls is not possible without preparing the base; it is necessary to remove the remnants of the old coating, level, prime and reinforce with mesh.
Newly constructed buildings must stand for 6 months, only then can cladding be carried out. The deadlines have been reduced to a quarter when the stress in the masonry is less than 0.5 MPa.
The actual laying of flagstone on the façade begins with sorting the stones. For finishing passages, external and internal corners, pieces with a pronounced right angle are selected.
Plates with one or more straight edges are the main masonry material, but the largest slabs are used to finish the bottom row. Try to trim sandstone only in exceptional cases, this way the facade will look more organic.
The bottom row starts from the corner, all subsequent rows are bandaged. The adhesive composition is applied to the back of the plate with a notched trowel, the plate itself is pressed against the wall with force to remove air from the solution. Grouting of joints is carried out simultaneously with installation.
As you can see, laying flagstone on walls or paths is a painstaking process, but not complicated. You can easily cope on your own, without the involvement of specialists.
Laying flagstones of irregular shape
Natural stone
Now that the field for work is leveled and prepared, you can proceed directly to laying. Finishing always starts from the most visible corner at the bottom. Experienced builders advise sorting the flagstone by color and size in advance, before laying it on the wall. It is especially convenient to do this if the material you choose (sandstone or flagstone) has an irregular shape. Lay out on a flat surface an approximate picture that should appear after finishing on the base. After this, you can without much difficulty, avoiding mistakes, lay the entire flagstone on the wall in accordance with your aesthetic preferences.
Cutting stone is not the best idea, since in its entirety it looks more natural and more advantageous than scraps.
But if this cannot be avoided, then use a grinder with a concrete attachment. It is often used to create a smooth top edge of the plinth trim.
Related article: DIY frameless sofa: manufacturing technology
Further actions differ little from the usual tile laying. The special mortar for laying flagstone has high strength and frost resistance, so it is better at this point to avoid experimenting with the installation of flagstone. It is applied to the inside of the flagstone, which is pressed very tightly against the wall in the place where it will sit for many years. Try to press the tiles as close together as possible. First you need to glue the bottom row, and only then assemble the top row, selecting tiles that are suitable in size. If there is a decent distance between the stones, then close it with a small splinter or piece of flagstone. The smaller the distance between the flagstones, the more presentable and expensive the whole house looks.
Please note that the tiles must be in the same plane relative to each other.
Laying natural stone with your own hands
Since ancient times, natural stone, or, as it is called, wild stone, has been considered the best material for covering the ground in courtyards.
The planes covered with plastic represent an inseparable part of the landscape design. Laying wild stone on the site is a design component that complements and emphasizes the design of the landscape and architecture of the house, as well as a sign of the excellent taste and wealth of the owner of the house. Well, laying decorative stone with your own hands just requires careful and careful execution of the work. If all installation rules are followed, your paths will be beautiful and smooth years later.
Secrets of laying wild stone.
Secrets of laying wild stone. Laying wild stone has its own secrets, knowing which you can create an unforgettable interior, striking in its harmony and splendor. When laying natural stone, do not neglect preliminary sketches.
A preliminary sketch is when the stone is first laid out in order to figure out how to create a more harmonious composition, and then it is placed. Designers recommend alternating large and small stones, as well as their colors, dark and lighter shades. In order for the gluing mastic to provide reliable adhesion to the wall, the entire surface must be thoroughly cleaned before laying the stone. After this, it is coated with acrylic primer paint, the base of which is water. If you go over the back surface (the side that is glued to the wall) with a second layer of the same primer, you can somewhat simplify the process of laying it.
The adhesive mastic is applied to the wall so that the cement-adhesive mixture does not dry out faster than the stone is laid. It is necessary to apply the stone to the surface of the wall with such pressure that excess glue comes out from all sides of the stone. Thus, high-quality sealing of the material with the wall is achieved. But, at the same time, it is necessary to control so that the glue does not get on the front side. Otherwise, it will be very difficult to remove it. Experts recommend starting laying stone from a corner, but not moving to the next row until the previous one is completed. To decorate the edge, you can use a cutting tool, such as a hacksaw. Wild stone, such as dolomite, etc., tends to be cut off.
But there are also natural stones that cannot be cut. It is more difficult to work with such stones. The seams between the stones are embroidered using the same cement-adhesive mastic. For expressiveness, it can be tinted. After the mastic has dried, use a brush to walk over the laid surface, removing all remaining solution. Sometimes, the laid surface is covered with a protective solution on top. This procedure is considered mandatory in the following cases: if the room has high humidity (bath or sauna); if there is a possibility of contamination of the laid surface, which may occur due to contact with pets or small children.
Secrets of laying wild stone.
Laying wild stone Secrets of laying wild stone.
Laying natural stone
Installation material
The optimal material for laying is considered to be flagstone, or rubble cobblestone , which has a slight thickness and an unedged border. The name “flagstone” itself speaks only about the outline (tiles of different thicknesses and different sizes), but not about its origin. Flagstone can be slate, lemesite, granite, quartzite, etc. The most famous version of flagstone is considered to be sandstone. There are a large number of variations of natural sandstone. This type of decorative cobblestone is rich in color shades: ranging from light gray to a shade of red. This helps create an entertaining and unusual ornament.
The advantages of rubble stone masonry are as follows:
- Its processing will not be difficult;
- It's durable;
- This is an environmentally friendly product;
- Has an affordable price.
The thickness of the flagstone reaches 30 cm .
It is sold in small, irregularly shaped layers. Rubble cobblestones are distinguished by the simplicity of laying technology. In addition to flagstone, it is customary to use paving stones (cobblestones resembling a cube or rectangular parallelepiped), limestone, tuff, shell, and granite.
Laying wild stone - a description of the process with step-by-step instructions
Back call
Leave your phone number and the manager will contact you
Send a request
Leave your phone number and the manager will contact you
Laying wild stone differs from laying paving slabs and paving stones.
After reading the article, you will learn about the preparatory steps before laying, how to mark the area and how to lay wild stone.
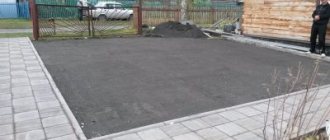
Preparing the base
Wild stone path
The basic steps for preparing the base are similar to those described in the articles How to make a base for laying tiles on soft ground, How to make a base for laying tiles on a slope, How to make a base for laying tiles on swampy and wet soils, and Preparing the base. The marking, preparation of the earth trough, calculation of the amount of materials and the procedure for laying the underlying layers are similar to those described in the relevant articles.
The only differences are in the methods of drainage. For paths up to two meters wide, drainage is arranged using drainage ditches that run parallel to the path on both sides (permissible on one side).
If it is impossible to drain water using ditches, a drainage collector is laid under the base, which is connected to the city storm sewer or river. Pipes and storm water inlets are raised from the collector to the surface of the blind area. From the article (Schemes for drainage of rain and melt water) you will learn in more detail about methods of water drainage.
How to lay it correctly
Unlike paving slabs and artificial wild stone, the back side of natural wild stone is uneven, with protrusions. This form is obtained as a result of splitting and peeling large stones (boulders) or entire layers. Therefore, the laying technology differs from that adopted for any type of paving slabs.
Having built the base, pour the sand-cement mixture (ratio 1:1) and start laying. Place the tiles on the surface of the base and tap them a couple of times with a rubber mallet to ensure a tight fit. Rock the tile. If it moves, trace the outline of the tile, then remove it.
Place a mixture of sand and cement between the tile outline and the indentations in the base, then lay the tile back. Press it and turn it clockwise 2-3 times and counterclockwise by 10-15 degrees. Rock the tile, if it wobbles, turn it 2-3 more times and lay the next one.
Sidewalk and curb made of wild stone
The distance between the tiles depends on the material with which it is filled. If you fill it with earth, on top of which you plant grass, the distance between the tiles is 4-7 cm. If you pour a mixture of sand and cement (it will additionally strengthen the blind area), the distance between individual tiles is 1-2 cm.
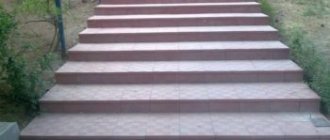
Flagstone paving on garden paths with concrete base
Paving flagstone on a concrete base
After the labor-intensive and physically difficult process of making a drainage base and concreting the base of the garden path, it would seem that only a trifle remained - paving the flagstone . But, like any finishing work that determines the final appearance of our product, this process requires knowledge of certain nuances. To decorate garden paths, as a rule, natural stone is chosen - flagstone, also called plastushka. This name does not come from the mineral, but from the appearance of the building stone, or rather its flat shape. Which is undoubtedly very convenient when decorating, since it requires almost no additional processing.
Parallel pouring of the base and its installation
A natural stone
The above method is not the only one. There is another technology for finishing the base. This can be done if the base is filled with liquid concrete. In this case, it is no longer flagstone that is used, but natural stones that are collected on the banks of reservoirs. They will create the effect of neat flagstone, but will give the structure additional strength.
As with any concrete structure, formwork is first created. It must be installed very carefully, since the reliability of the structure will depend on maintaining straight lines. Only after its installation can you begin finishing with stone, laying it in such a way that the front side is pressed closely to the formwork.
Finishing instructions:
- Place the bottom row, fixing it with cement mortar;
- Pour concrete up to the highest stone;
- Wait until the solution sets (1-2 hours);
- Set up the second row;
- Fill with concrete.
It is not recommended to create a base higher than 0.5 meters in one day. Thus, you combine the filling of the base and its cladding. After the cement has set, the formwork is removed and the surface is cleared of cement residues. You can seal the seams with regular mortar, but you can add color to create a unique exterior. 4-5 days after grouting, open the seams and finally clean all dirt. The final stage of finishing is coating with a protective impregnation, which will prevent the appearance of efflorescence and fungus.
Related article: Clocks in the kitchen interior: original wall kitchen clocks (20 photos)
What is flagstone? Selecting the type of flagstone stone.
Specialized site for stone
Flagstone is a flat stone of arbitrary shape. It is formed from rocks that break up into flat slabs along parallel areas. Flagstone of the following types is found on sale: sandstones, quartzite-sandstones, shales, limestones and dolomites. The choice of natural stone for paving garden paths is a purely individual matter. Each stone, as a creation of nature, has its own individual character, history and healing properties. Many of them are powerful magical amulets. I will only note that not all stones are ideal for floor paving in paths. Thus, the most affordable flagstone, sandstone, which is well suited for vertical decoration, very quickly begins to delaminate on paths. Of course, a lot depends on the quality of the stone itself, but it’s not always worth the risk. The same drawback applies to slates; among them, only green slate is used for paving.
Natural stone is sold in pallets and per square meter. m.
Limestone is very easy to process, but is absolutely not suitable for lining paths; the stone is too soft and requires additional treatment to prevent moisture penetration, even with vertical cladding. A good option is to choose dolomite. Marble is a noble, almost eternal material; in the winter it becomes extremely slippery, and also accumulates radiation, but quartzite can be an excellent alternative. Flagstone is sold in large construction stores or specialized places - stone sites. A stone of approximately the same fixed thickness from 10 to 70 mm is selected, formed into pallets and sold from 1 square meter.
Selecting glue for gluing flagstone.
When choosing an adhesive, you need to make sure that it is intended for external cladding of the floor with natural stone, and not just walls, and that concrete and cement screed are suitable as the base. I recommend considering only specialized adhesives; universal ones do not always provide the desired result; you have to “pay” for universalism. We select, if necessary, special brands for paths with intense load or heating, look at the shelf life and operating temperature range, especially important if the work is carried out in the autumn-spring period. If necessary, we use the necessary additives produced only by the glue manufacturer. Please note that most adhesives for working with natural stone must be mixed twice after a certain period of time, so read the instructions carefully.
Getting ready to paving flagstone on the garden path.
Place for installing a built-in lamp
Flagstone paving is possible not only on a concrete base, but also on an old concrete path. If, when casting concrete, you missed the moment of creating places for installing lamps, then it’s time to arm yourself with a hammer drill or grinder to minimize further damage when lighting the finished path. Then we prepare the concrete base for work. If it was cast a long time ago or we want to cover an old concrete path, then it must be washed and treated with a primer. If there is still residual moisture in it, then nothing additional needs to be done.
Flagstone garden path
When paving flagstone on concrete bases, we select a stone 25-40 mm thick. We lay out the flagstone along the path, selecting the pattern and uniformity of the gaps. We trim the edges with an angle grinder - a grinder with a diamond wheel. If possible, it is better to do this with water supplied to the cut site. If not, then the circle should be for dry cutting. Usually it also indicates the types of stones for which it is intended to work. For dry pruning, it is better to do it in a remote place; there will be a lot of dust. Don’t forget to protect your eyes and safety precautions in general. This is perhaps the most time-consuming part of the work, but the entire aesthetics of the future garden path will depend on its result. The glue will harden quickly in air and there will be no time left for trimming and finishing. We wash the flagstone from dust and deposits on the side where we will apply glue or mortar. To do this, we need good water pressure, and possibly preliminary manual treatment with a brush.
Cladding requirements
Before you start work, it is important to understand what we want to see in the end, what criteria a high-quality finish must meet. Only by identifying the important points for yourself will you be able to create the picture of your dreams with all the functionality.
The first and main problem is insufficient waterproofing of the base. Concrete is a porous material, so moisture penetrates it easily, and under the influence of low temperatures it begins to expand, destroying the structure from the inside. In addition, water can accumulate in the walls of a building, which is especially important for areas where air humidity approaches a critical level. Due to natural physical processes, it is attracted downwards, forming condensation in the gap between the wall and the base. Precipitation should not be ignored either. Once on the surface, they penetrate not only inside, but also flow down the outside, destroying the base. In winter, plinths without flagstone are not spared by snow, and in summer they are exposed to the sun's rays. If you decide to use the basement as a gym, heated cellar, etc., then thermal insulation includes mandatory finishing.
Finishing the basement of the building
Thus, we can conclude that the material for finishing the walls of the basement must have the following qualities:
- Have a high strength index;
- Repel moisture that gets on it;
- Smooth out critical temperature changes;
- Be resistant to all types of corrosion.
In addition, the cladding must be aesthetically appealing. Thanks to it, stunning unique exteriors are created, and the house looks more solid and stronger.
Related article: Removing an unnecessary doorway using drywall