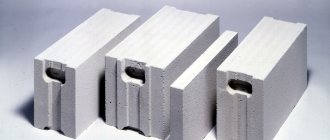
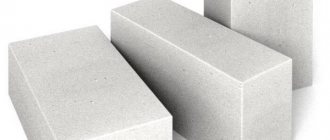
Aerated concrete, although it has a concrete base, is a very porous material. The size of the porous cell is about 1 mm. Thanks to this, in a house built from such building material, a completely healthy “breathing” microclimate is created - almost the same as in a house made of wooden beams.
Aerated concrete has high vapor permeability, which means that, like wood, it is able to absorb and accumulate moisture. Therefore, the interior decoration of walls made of aerated concrete blocks should take this feature into account.
Let's consider how to choose the right materials, what methods and technologies to use, and what work needs to be done based on this.
This is what aerated concrete looks like without finishing after a few years
Since aerated concrete has very high vapor permeability, there are certain nuances when carrying out finishing work. The fact is that almost all materials conduct vapors worse than gas silicate. This causes difficulties, since in order to ensure normal removal of water vapor from the room, the vapor permeability of the walls - from the room - to the outside must increase. Only special plaster mixtures for foam concrete meet this requirement. But subject to certain rules, the finishing can be anything.
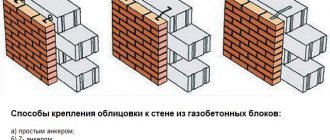
Features of the interior decoration of the walls of a house made of aerated concrete, gas silicate
Aerated concrete has high vapor permeability. This means that warm air from the room passes through the thickness of the wall and is gradually cooled to the temperature of the outside air.
In the warm air of a room, the content of water vapor is always higher than in the cold air outside.
As a result of air cooling in the thickness of the wall, water vapor condenses and the wall is moistened. The higher the vapor permeability of the wall, the greater the amount of water that condenses. To reduce the amount of water, the vapor permeability of the wall must be limited .
In addition, water should not accumulate in the wall. To do this, it is necessary that in the thickness of the wall the vapor permeability decreases in the direction from the outer surface to the inner. That is, the interior finishing should have less vapor permeability than aerated concrete walls , and the exterior finishing should be more vapor permeable than aerated concrete.
The air temperature at which water vapor condenses is called the “dew point”.
Read the details: Article about dew point and moisture accumulation in the wall.
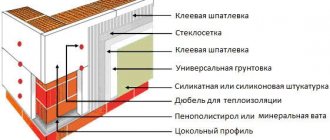
The inner surface of external walls made of aerated concrete (gas silicate) blocks must be protected with a layer of vapor barrier.
Limiting the vapor permeability of aerated concrete walls from the room side is necessary in all cases - both for walls with facade insulation and without insulation, as well as with finishing or cladding of the facade with any material.
to reduce the vapor permeability of an aerated concrete (gas silicate) wall is to impregnate the inside of the masonry with a primer and apply a layer of cement plaster:
- The surface of aerated concrete blocks is impregnated with a deep penetration primer in 2-3 layers.
- Cement plaster, which has low vapor permeability, is applied to the wall. The surface of the plaster is also primed.
- For finishing, it is also advisable to choose materials with low vapor permeability, for example, vinyl wallpaper, ceramic tiles.
Aerated concrete (gas silicate) blocks D400 have a dry vapor permeability coefficient of 0.23 mg/(m*h*Pa). For cement plaster this figure is 0.09 mg/(m*h*Pa).
Loft style, features of work production
The finishing of aerated concrete walls in a loft style can be done with different materials. One of the most popular in this case is brick. It is absolutely not necessary to use masonry on all walls. In addition, it can only be an imitation of the material. It can be combined with plaster. The color of the brick can be different - painted or natural red.
If you do not want to weigh down the walls and create a load on the floor in the room, you should use imitation brick, using panels for interior decoration. They are installed on the same frame as in the case of drywall. A fashionable and bold solution in the style described is the matte black shade of the masonry. This could be one wall or even part of it. Against this background, copper and gold accessories will look advantageous.
When considering options for finishing walls made of aerated concrete, you can pay attention to concrete or its imitation. But plain gray concrete is not associated with warmth and homeliness. In skillful hands, this material can significantly change its appearance and cause enthusiastic exclamations.
The concrete itself may look different. It has dark and light shades, as well as different textures. It is not necessary to cover the walls with pure concrete. This can be tiles in imitation concrete, which are laid on aerated concrete prepared using the technology described above.
The interior walls of a house made of this modern and practical material can be finished with wood. To prevent the walls from looking like a chalet, you should combine wood with other materials typical of a loft. The wall can be decorated with vertical boards, which visually raise the ceiling. Wood goes well with brick, especially red. You can use imitation indoors in your apartment.
The interior decoration of aerated concrete walls is often done using metal. It can be planned as part of a project. It is not recommended to get carried away with this material, because it can lead to you going into high-tech. It is better to decorate some of the walls with metal objects:
- Beams.
- Pipes.
- Ramami.
Dosed use of metal will allow you to obtain a discreet shine. Plastering aerated concrete walls indoors in a loft style can be an excellent solution. This finish acts as a level. The walls are neutral, setting off or highlighting textured areas where you can use stylistic finishes. It is recommended to choose cool and light shades that do their job better than others.
Cement plaster for interior finishing of aerated concrete walls
The main components of a solution for cement plaster are water, cement and sand. This is a traditional plaster that has been used in construction since ancient times. When independently preparing a solution of cement plaster, prepare a mixture by volume of 1 part of cement of a grade not lower than M400 and 3 - 5 parts of quartz sand.
The mortar for cement plastering of aerated concrete/gas silicate walls is prepared from a ready-made, factory-made dry mixture.
For plastering walls made of aerated concrete/gas silicate, ready-made dry mixtures of a special composition based on cement are used
Plaster mortar for walls made of aerated concrete of good quality at a reasonable price can actually be prepared only from factory-made dry mixtures. At the factory, in addition to the main components, various additives are added to dry mixtures that improve the properties of the solution and the finished coating on the wall.
Ready-made factory-made dry mixtures, in addition to the main components, also contain additives that:
- retain water in the fresh plaster layer, preventing water from transferring into the wall material;
- increase the adhesion of plaster to the base;
- increase plasticity and workability;
- adjust setting time;
- prevent the appearance of efflorescence on the surface;
- increase the strength and crack resistance of the plaster layer.
At a construction site, when independently preparing a solution from individual components, as a rule, these additives are dispensed with and the result is a solution that is not suitable for plastering aerated concrete walls. The adhesion of plaster mortars of simple composition to aerated concrete is very weak.
In addition, the factory dry plaster mixture produces a solution that is more homogeneous in composition and properties. When making a homemade solution from individual components, each batch in a concrete mixer will differ in composition and properties. Every time you load it into a concrete mixer, builders will not measure out the components “like in a pharmacy.” In addition, the purchased materials for preparing the solution may not be of adequate quality.
Ready-made compositions of dry mixtures are also distinguished by the method of applying the solution to the wall - manual or machine. Plaster solutions for the machine method are applied to the wall using a special unit.
Plaster compositions for machines are of higher quality, contain more additives, and are easier to apply to the wall. They are more expensive than hand-made mixtures.
Machine-made plasters are also well suited for manual application, but not vice versa.
Properties and parameters by which cement plaster is selected
The main properties and parameters by which plaster is selected are usually indicated in the information on the packaging:
Type of plaster - or composition of the main components, for example, cement, cement-lime, thin-layer acrylic, etc.
Application - for what walls, bases and conditions the plaster is intended, for example, facade plaster for brick walls or for interior work and walls made of aerated concrete.
Quantity per package - the weight of the dry mixture in the bag, the weight or volume of the finished solution in the bucket.
Consumption of dry mixture or solution is indicated in kg/m2/per layer thickness of 1 mm. or 1 cm. Using this parameter, you can calculate the number of packages that you will need to buy for plastering the facade.
Application temperature - ranges of temperature and humidity of outdoor air within which storage and use of a dry mixture or solution is allowed.
Compressive strength - indicates the compressive strength of the hardened layer of plaster on the wall, unit of measurement - N/mm2
Adhesion - the strength of adhesion of the plaster layer to the base. Unit of measurement - N/mm2 (the higher the better)
Vapor permeability - coefficient of vapor permeability, unit of measurement mg/(m*h*Pa). The higher this indicator, the higher the vapor permeability of the plaster layer will be. In imported mixtures from EU countries, vapor permeability is measured by the coefficient of resistance to water vapor diffusion, denoted by the letter m (mu) and is always greater than 1 unit. The lower this indicator, the greater the vapor permeability of the plaster layer.
Thickness of the plaster layer - indicates the minimum and maximum thickness for an individual layer or for the entire coating as a whole.
Depending on the type of plaster, the packaging also indicates other properties and conditions of use that are important for this type. More detailed information about the characteristics of the plaster composition can be obtained on the manufacturer’s website.
When choosing a dry mixture of cement plaster for the interior decoration of aerated concrete walls, it is necessary, first of all, to pay attention to the vapor permeability indicator. You should choose a composition with less vapor permeability . Unfortunately, domestic manufacturers do not always indicate this indicator on packages of dry mixtures.
Properties of cement plaster
Properties of dry mixture for plastering walls made of aerated concrete
Cement-sand plaster for walls made of aerated concrete has the following properties:
- High resistance to moisture.
- Good mechanical strength.
- Low water vapor permeability.
- Plaster cement mortar is less plastic, more difficult to apply and rub in, sets faster, the hardened layer shrinks and for this reason often cracks if the composition does not contain appropriate additives.
- Cement based plaster mixture is the cheapest.
The scope of application of cement plaster is determined by its characteristics.
Cement plaster is usually used to level the walls of the foundation and basement , which are always in conditions of high humidity.
Cement plaster is applied to walls indoors in order to reduce vapor permeability , for example, when finishing the inside of walls made of aerated concrete (gas silicate) blocks, as well as for finishing walls in wet rooms.
Consumption of dry mixture of cement plaster is 16 - 18 kg/m2/cm. The total thickness of the cement plaster layer on the wall is 20 - 40 mm. The thicker the plaster layer, the greater its resistance to vapor permeation, and the less water there will be in the wall.
To plaster walls made of aerated concrete (gas silicate), you should not add lime to the solution or use ready-made dry mixtures for preparing cement-lime plaster. It is also not beneficial to use plaster compositions based on gypsum. Cement-lime and gypsum plasters have higher vapor permeability and are more expensive than cement plasters.
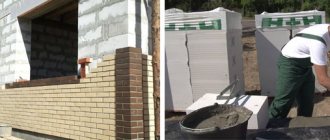
How to properly plaster aerated concrete walls
Cement mortars are applied to the base sequentially in three layers:
- Spray - bottom layer 3 - 5 mm thick. A solution of liquid consistency is poured or rubbed into the base, which ensures better adhesion of the plaster to the surface.
- Soil - a layer of plaster mortar 10 - 20 mm thick. Levels the wall surface and ensures the strength of the plaster layer.
- Covering - finishing layer 3 - 8 mm thick. rubbed with a grater. Finally levels the plaster layer and prepares the surface for finishing.
Ready-made dry mixtures and liquid solutions, primers for treating surfaces before plastering to increase the adhesion of the plaster layer are available for sale. It is recommended that such compositions be applied to surfaces with low adhesion , for example, to concrete walls and cement slabs, as well as to surfaces made of aerated concrete (gas silicate).
Walls treated with special solutions to increase adhesion are plastered without spraying - primer is immediately applied, and then a coating is applied.
To prevent cracking of the plaster layer and increase the adhesion of cement plaster to aerated concrete, it is recommended to reinforce the bottom layer with plaster fiberglass mesh.
To install the finishing layer - covering, you can use ready- made fine-grained cement-lime mixtures , which allow you to obtain a smoother surface of the plaster.
When finishing walls with cement plaster, for the finishing layer - covering, modern compositions of thin-layer plaster or putty are often used . This solution allows you to get a beautiful, textured and colored decorative surface for painting or a smooth one for wallpapering.
Cement plaster dries within one to two weeks for each centimeter of thickness.
The interior walls are finished in the following sequence:
- Fill dents and chips on the surface of the masonry with mortar for laying blocks.
- Small irregularities on the surface of the walls and seams between blocks are smoothed using a trowel.
- Use a brush to remove the accumulated dust from the wall surface.
- A deep penetration primer is applied to the masonry in two or three layers with intermediate drying of each layer.
- The walls are plastered with cement mortar. As usual, three layers are successively applied to the wall - spray, primer and cover.
- After leveling with cement plaster, the surface of the walls is treated with a primer.
- To create a higher-quality surface for painting or wallpapering, modern thin-layer finishing compounds can be applied to a layer of cement plaster.
The finishing of the prepared walls is carried out as usual.
There is little theoretical knowledge to perform plastering work. To obtain high-quality coverage, long-term practice and skill of the performer are of great importance. To make interior decoration in your home a joy, I highly recommend entrusting this work to specialists with good recommendations.
Plaster for aerated concrete in your city
Polymer cement cement plaster
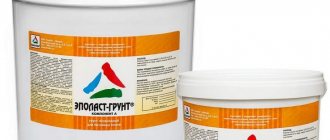
Deep penetration primer
⇆
Start plastering the walls no earlier than 2 - 3 months after the roof of the house has been erected. The walls will shrink during this time.
Look at the advice of a professional on how best to finish walls made of aerated concrete and gas silicate from the inside of a room:
How to glue a ceiling cornice:
More articles on this topic:
⇒ What is good about aerated concrete. Pros and cons ⇒ The thickness of the walls of a house made of aerated concrete - gas silicate ⇒ Laying walls from aerated concrete and gas silicate blocks ⇒ Exterior finishing of the facade of single-layer (without insulation) walls made of aerated concrete, gas silicate.
⇆
More articles on this topic
- Sound insulation - sound insulation of a house, apartment
- House made of large-format porous ceramic blocks
- Finishing, covering the walls of the house with vinyl siding
- Facade paint for exterior use
- Load-bearing, self-supporting and non-load-bearing walls - what's the difference!?
- Sheathing, wall cladding with basement siding
- House, wall made of thermal block, thermal wall, flint granite, polyblock
- We are building a house, walls made of concrete blocks
Work methodology
Finishing walls made of aerated concrete, if you plan to use drywall, begins with calculations. This way you can determine the required amount of materials. To do this, you should measure the area of the room and decide on the type of drywall, planning the frame layout. The latter will act as a sheathing.
Drywall is sometimes glued to the prepared surface, but a more popular technology is the method in which the sheets are installed on a wooden or metal frame. This approach allows for additional insulation of external walls. When installing the frame, vertical and horizontal guides are initially installed along the perimeter of the wall. Then you can proceed to installing vertical slats along the surface. The distance between them should be maintained in the range from 50 to 60 cm.
Some craftsmen claim that this is enough to fix the sheets, but it all depends on the parameters of the walls. If the ceiling height is 2.5 m, then vertical guides will be sufficient. If the ceilings are high (3 m or more), horizontal guides should also be installed. Finishing walls made of aerated concrete with plasterboard involves fastening the slats to the wall using dowels.
It is important to remember about air circulation in the room, so the frame must provide fasteners with a distance of 5 cm from the wall. As soon as the frame is ready, you can begin installing the sheets. I install them on the frame without cutting them into separate fragments. Attaching to the frame is carried out in a clear sequence. For this, 25 mm self-tapping screws are used. It is important to ensure that the edge of the sheet lies in the middle of the slats. At the final stage, sealing the joints between the slabs will allow you to create a single surface. Docking joints are reinforced with reinforcing tape. Once you have formed the frame, you can insulate the wall. To do this, appropriate material (foam plastic, mineral wool) should be placed in the cells.