2015
The mixture for laying paving slabs is the basis on which the quality of the paving surface and the degree of load it will withstand depend. Of course, the quality of the tiles plays an important role. A common problem is that it fails. This happens if the base is chosen incorrectly, so attention should be paid to this.
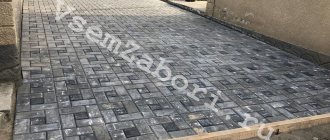
Paving in the yard
Laying paving slabs: Important nuances
So, the problem of soil subsidence can affect almost everyone who decides to lay sidewalk paths on their site. Moreover, sometimes this does not even depend on the quality of the mixture, but on the fact that the worker simply decided not to waste time and not compact the soil. This is a major mistake, because no matter what mixture you choose for laying tiles, you first need to thoroughly prepare the work surface!
Below in the photo you can see how a well-done job should look in cross-section. Not the last place is given to the base, so if you want to get a high-quality and durable coating, then follow everything according to the instructions.
The following common mixtures for styling can be distinguished:
- Sand;
- Concrete screed (in this case, either tile adhesive or concrete mortar is required);
- A mixture of cement and sand (dry).
Before choosing a particular type of base, you need to pay attention not only to the ease of working with it, but also to small details that an inexperienced person may overlook.
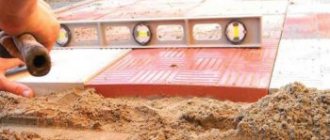
For example, when choosing a dry mortar, you should take into account that this layer should be 3 cm thick, but you must carefully ensure that the surface of the tile does not slope in any direction. If it is detected, be sure to add the missing mixture and compact it thoroughly. In some cases, this will need to be done more than once, but you can start using the track freely after 3 days.
On a concrete base, paving is done only for half a square. m. The thickness of the cement is slightly less - only 2 cm is required for the coating to be durable. It begins to dry out quickly, but in order for it to fully set, it is also better not to use the path for 3 days.
Laying on a sand bed
It is quite easy to make a mixture for laying paving slabs with your own hands from sand. First, according to the instructions, the subgrade is leveled and a layer of crushed stone is laid. After everything is compacted, you can lay out sand for leveling. The optimal height in this case is no more than 20 mm.
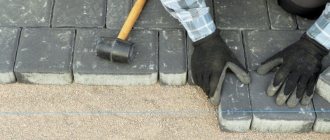
The main layer (up to 60 mm) is laid out after this. After compaction, you can begin laying paving slabs. In order for it to fit well, it is better to use a rubber hammer. Also, do not forget to leave up to 5 mm gaps between each unit. These seams are also filled with sand at the end of the work.
Laying on concrete: 2 types
One of the simplest and, at the same time, reliable mixtures is concrete screed. Compared to sand and gravel, it wins in all respects, since it is easy to achieve the desired effect using cement.
The concrete solution is prepared only when the preparation of the base is completely completed. To do this, they usually take sand and directly cement in a ratio of 5:1, fill it with the required amount of water, and then begin laying. The thickness of such a layer should be from 2 to 5 cm. After it will need to be leveled, compacted and you can begin installing the tiles.
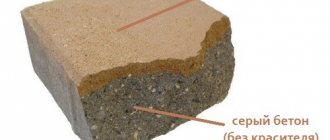
Another method of laying sidewalks involves using a dry mixture. It is also made from cement and sand, but in a ratio of 1:3. Here, as the name suggests, no water is required at all. But it is important to make serious demands on the quality of the components of the mixture. For example, concrete of the 400th grade is best suited for it, and the sand must first be sifted. This will help remove excess particles and impurities - clay, debris, shells. This mixture will be durable and strong only if you pay considerable attention to the quality of the sand.
Installation of tiles on a dry screed begins only after the layer is perfectly aligned, and you need to try not to leave gaps. Seams, if they remain, must be sealed with ordinary cement mortar. The glue that remains on the surface of the seams can be removed only after 3 days.
Paths on clay: easier, faster, cheaper
When the turn of pedestrian garden paths came, a member of our vwts portal from Moscow took the path of least resistance and economy, which he has not regretted for many years.
vwtsFORUMHOUSE Member
I read many topics here and I just don’t understand why people throw away so much money using all these cements, dry mixes, crushed stone and other “pies”. My path has been lying absolutely flat for ten years without all this, and I installed cable channels under the tiles, access to which is not walled up with mortar.
The installation technology is the simplest:
- The top fertile layer is removed by 20-25 cm;
- A layer of geotextile is laid (a wide edge is left on the sides);
- A sand cushion (20 cm) is poured in and thoroughly compacted/spilled/compacted;
- The tiles are laid in the required order, the author’s is square, 50x50x5 cm. The remaining edge of the geotextile is wrapped on a sand cushion and is placed under the tile.
VWTS has clay soil in the area, with a very high GWL (groundwater level) - sometimes 10 cm, sometimes 0 cm, and in the winter season some tiles on the paths or site lift up. But with the arrival of warmth, the soil in the garden thaws, and everything falls into place, year after year. As practice has shown, “floating” paths without fixing the finishing layer to cement mortar are more reliable and durable on clay soils – neighbors’ concrete regularly “rips” out. Yes, platforms and paths on clay soil laid in this way are much cheaper than their analogues.
The efficiency of this method is ensured by the “sand sleeves” in the geotextile, which effectively remove moisture, and by the lawn grass that has grown both between the tiles and along the edges. The vwts handles the grass the same way it does on the entire site - with a lawn mower.
vwts
I cut the grass between the tiles with a gasoline lawn mower at a level of 1 cm, you understand that if there were a slight distortion in the tiles, the mower would be left without a knife.
Types of styling
Any work on the design of a personal territory begins with drawing up a plan, choosing materials and paving methods. To implement such tasks, it is necessary to take into account a number of points.
First of all, you should determine:
- The type of soil that will serve as the foundation.
- Anticipated surface loads.
- Relief of the area allocated for paving slabs.
- Coverage area.
- Material consumption.
- Method of paving tile products.
Experts use the following methods of laying tiles:
- On a pillow of sand.
- For cement-sand mixture.
- For cement-sand mortar.
- On a concrete screed.
Laying on sand
At the same time, laying paving stones on sand is in great demand due to the following advantages:
- The presence of a sand cushion promotes good drainage - during heavy rainfall, all the water ends up in the seams between the paving stones, which eliminates the possibility of puddles.
- Due to the absence of a monolithic connection between the surface of the track and its internal structure, with minimal seismic activity or ground movements, the structure is not subject to deformation.
- Caring for sand-mixed tiles is quite simple. If one element is damaged, you can quickly dismantle it and replace it with a new one.
However, in addition to the advantages, this installation method also has disadvantages:
- If you do not provide a good drainage system and free flow of water, accumulated moisture will lead to deformation of the structure.
- Exceeding the permissible loads will also lead to cracking of the tiles. So, if you drive a car over a tiled surface, the result will be disastrous.
Owners of private houses and summer cottages often complain that ants carry away sand from under the tiles.
For a dry mixture of sand and cement
The use of a cement base mixed with sand for paving tiles is in great demand.
This technology has the following advantages:
- Ensuring high strength properties.
- Increased resistance to heavy loads.
The disadvantage of this option is its high cost. There may also be a problem with the pillow being washed out by heavy rains. To eliminate such problems, special curbs should be provided around the perimeter. The process of securing these elements complicates installation.
Otherwise, laying paving slabs on sand is relatively easy. Even if there are no skills in this field of activity, the owner of the site will be able to perform paving. But in order to prevent possible errors and problems, it is important to strictly follow the technology and not deviate from the step-by-step guide.
On a concrete screed
The most durable and resistant to heavy loads base is concrete. It protects the tile covering from cracks and deformations when exposed to precipitation, soil movements or external mechanical loads. This makes a concrete pad the only solution for those paths on which people or vehicles will constantly walk.
Paving stones can also be placed on a dry cement mixture in a ratio of 1:3. To obtain the best performance characteristics, it is recommended to use a mixture of grade 400. All components are thoroughly mixed, but no water is added. The sand should remain clean and dry, so it can be sifted through a sieve to remove impurities. Only clean sand can guarantee the strength and high quality of the screed.
Mixture of materials for laying tiles
The composition for installing paving slabs is determined taking into account the type of soil. If the soil is subsident, then a drainage layer must be provided. There is more than one technology for laying paving slabs.
Laying cover on sand
- The site for paving slabs is prepared: the soil is leveled and compacted.
- Make a compacted layer of crushed stone 20 cm thick.
- For leveling, add a 2 cm layer of sand.
- Sand is poured 60 mm thick.
- The elements are laid on the compacted sand using a rubber hammer.
- The gap between the coating elements is 3 mm.
- Fill the seams with sand.
- If necessary, install a curb stone.
Laying coating on CFRP (dry)
Laying a coating on a dry mortar
When laying paving stones on a sand-cement mixture, perform the following steps:
- Prepare the site: level and compact the soil.
- Pour a 20 cm layer of crushed stone and compact it.
- For leveling, add a two-centimeter layer of sand.
- Then pour sand 4 cm high.
- Reinforcement mesh is laid.
- Prepare a dry mixture of cement and sand in a ratio of 1 to 4.
- Pour a sand-cement mixture 4 cm thick.
- Lay the paving slabs on the dry mixture with gaps of 3 mm, driving it into the mixture with a rubber hammer.
- All seam joints are filled with dry mixture.
- If necessary, install curbs.
Preparing the bed for the sidewalk
The process of preparing a bed for future paving with paving slabs consists of several stages. First of all, you need to choose the material and place where the coating will be installed.
Selection of location and material
When choosing a location for installing a tile covering, it is necessary to give preference to flat areas where there are no depressions and close groundwater.
There are two types of paving slabs available for sale, which differ in their production method:
- Manufactured using vibration casting.
- Manufactured using vibrocompression.
When choosing the appropriate option, it is necessary to take into account the operating environment and expected loads. Vibropressed tiles are suitable for paths on which vehicles will travel. If you need to arrange a landscape design in the garden, it is better to choose a vibro-cast type.
Such paving stones are not able to withstand heavy loads, but have a wide variety of textures, shades and decorative solutions. So, the owner of the site can purchase tiles with an imitation of the texture of wood or stone.
But while additives help improve the strength properties of a structure, water worsens them. To assess the quality of the tiles, try hitting one against the other: when a ringing sound appears, you can be sure that the product is of high quality. A dull sound indicates excess water content.
When purchasing materials from different manufacturers and batches, check to see if they differ in shade. You also need to make sure that the sizes match, since sometimes it can be problematic to find similar products from different brands.
To prevent the problem of shortage of tiles, buy them with a margin of 7-10%, because... One batch may contain defective elements.
Preparing the base for installation
Starting the preparatory work, you should dig a 28 cm deepening (the layer consists of 15 cm of crushed stone, 10 cm of sand and 3 cm of dry mixture). If a lawn is being built near the path, then the calculation is performed using a different formula: 28 cm + height of the tile covering + thickness of fertile soil.
If the soil is soft, it must be moistened with water and then compacted. Then at the bottom of the recess a 15 cm layer of crushed stone is placed. The surface is leveled and compacted.
To prevent mixing of crushed stone with sand, the layer can be covered with geotextiles. A 10-centimeter layer of sand is poured on top of this material. After 2-3 days in sunny weather or the next day in cloudy weather conditions, the surface should be leveled.
The sand-cement mixture for laying paving slabs, the composition of which is selected in a ratio of 8:1, is poured over the sand and leveled. The screed should be level and have a height of 3-4 cm.
Mixture proportions
When choosing cement grade 300-400, the proportions of sand will be 5:1. The use of products under the 500-600 brand requires a different calculation: 1 part cement for 6 parts sand. Often the solution is diluted with PVA glue, which improves the bonding strength. The cement composition with sand and glue is mixed extremely carefully, and then used for its intended purpose.
Step-by-step production of the mixture consists of the following steps:
- 1 part of the cement mixture is combined with 3 parts of sand.
- Next, water is added to the composition - this will give it a creamy consistency.
- After 15 minutes, the components are mixed again.
The surface of the tile that comes into contact with the mortar should be moistened with water.
If the consistency is dry, the paving stones should be laid only after complete leveling. The rows should fit snugly together.
Materials for filling seams
The presence of seams between each element of the tile covering compromises its integrity. Water will leak through the gaps formed, and in the cold season it will begin to freeze, causing damage to the tiles. When performing installation work, it is necessary to think in advance about how the seams will be sealed.
The next nuisance that will negatively affect the tile covering if there are seams is debris. At the same time, it can be both soft and hard. In case of vibrations that occur when moving along the surface of the tile, it will begin to destroy and scratch the material.
To seal the seams on the tile surface, you need to prepare the following tools:
- Rubber spatula. For such work, it is better to choose a narrow model, but its width is determined depending on the specifics of the cracks. So, if they are long and continuous, it is better to take a wide model. The main thing is that the spatula does not damage the coating.
- Sieve. It will be used to sift sand to seal the seams.
- Concrete mixer. If the unit is missing, you can use any container and a construction mixer with an attachment.
- Shovel and container.
- Broom.
- Buckets and hose.
The materials used for sealing joints are sand or cement (you can combine materials to create a mixture of DSP or PCS), as well as water. After preparing all the tools and materials, you can proceed to the main work.
High-quality paving has long been a favorite way to decorate any designated area. Many believe that the performance characteristics of the finished canvas depend solely on the selected tile material.
Content:
However, cement for laying paving slabs is an equally important factor in determining the service life of paved surfaces. It has been calculated that purchasing ready-made concrete mixtures is economically less profitable than creating them yourself.
If you have the desire and a little special knowledge, you can easily prepare the mortar for laying paving slabs yourself. This process is not labor-intensive, which makes it increasingly popular among thrifty owners. If high-quality ingredients are included in the mixture in the required proportions, and the mixing technology is strictly followed, the result is durable concrete that can serve for many years. Or you can rely on the experience of construction workers and order paving stone laying services from them. You decide!
We use dry mixture
As you know, for paving paving slabs you will need a concrete mixture, which can be wet or dry. If you are laying paths on a personal plot, there is no need to mix a liquid solution.
What ready-made dry mixes does the market offer?
On the building materials market you can easily purchase ready-made dry mix and not bother with its preparation. Manufacturers offer the following compositions:
- universal, which are widely used when paving surfaces on different soils that have different purposes;
- characterized by increased water resistance and resistance to mechanical stress and atmospheric temperature changes;
- which are more appropriate to use when working on difficult soil.
How to prepare dry cement mixture yourself
A dry mortar prepared independently for laying paving slabs will be no less reliable if the paved areas are not planned to be subjected to large mechanical loads. In addition, the dry method of creating a concrete composition is cheaper and easier compared to the “wet” analogue, which can be considered as undeniable advantages.
The proportions of sand and cement for laying paving stones, which should be taken into account when preparing the dry mixture yourself, are easy to remember. You should take five or six parts of river sand and mix them well with one part of cement. The choice of ratio directly depends on the brand of the second ingredient. PVA glue can be added to the resulting composition to improve its concreting characteristics. In this case, installation work should begin immediately.
The proportions of dry mortar for laying paving slabs can vary, for which there are logical explanations. If you are working with M400 cement, it is enough to add only three portions of sand to one part of it. This ratio will be quite sufficient to obtain good adhesion to the tile surface.
Whatever proportions you choose for making the dry mixture, in any case you should take care of the cleanliness of the sand. If it is far from perfect, it must be carefully sifted to remove foreign impurities. The cleaner the sand, the better the quality of work.
How to calculate the required amount of dry cement
In order to calculate how much cement is needed for laying paving slabs, you can use special formulas. To determine its quantity, measure the depth of the dug base, multiply the resulting figure by the numbers characterizing its length and the width of the curb. The resulting indicator is additionally multiplied by 1.2, since the cement should be mixed with some reserve.
The final result is multiplied by a number tied to the proportional ratio of sand and cement. You can get down to business only after you have previously calculated the cement consumption for laying paving stones. Otherwise, you may face the need for additional purchases.
Laying on earthen soil
How to lay tiles on the ground? Often in garden plots they use decorative laying of individual tiles directly on the earthen soil. In this way, you can even lay out full-fledged paths around the site. In this case, it is best to take a large tile that resembles stones in shape.
The work begins with marking the location of the tiles that need to be covered with plaster. Make sure that the tiles are approximately at a normal pitch distance from each other. Then dig holes in the designated areas. The depth of the pits should be slightly greater than the thickness of the tiles, and the size and shape should be the same as the size and shape of the tiles.
The tiles need to be laid in the dug hole and fixed there with a wooden block and a hammer. It is recommended to lay the tiles slightly below ground level so that they do not interfere with the operation of the lawnmower. The gaps between the edges of the hole and the tile are filled with black soil.
Feasibility of using wet cement
When answering the question about what kind of cement is needed for laying paving slabs, one should start from many factors:
- the desired strength of the future surface;
- tile operating conditions;
- the degree of labor intensity and cost of the upcoming work.
If the tile covering must serve for a long time, withstanding mechanical and climatic loads, it is better to prepare a liquid mixture for its installation.
Features of the wet composition preparation process
It is necessary to prepare the wet concrete composition only after the work on forming the base for laying has been completed. The mixture should not stand for a long time, since its periodic stirring will require additional energy costs. Mix the combined ingredients thoroughly using a construction mixer or concrete mixer. If these are not available, you can use improvised means, for example, a shovel. But in this case, removing air bubbles and forming a homogeneous consistency will require more physical effort and time.
The classic recipe for preparing a liquid concrete composition is as follows:
- one portion of cement, preferably M500;
- three portions of well-sifted river sand;
- water is added gradually until a composition is formed whose viscosity resembles thick sour cream.
If desired, coloring pigments are added to the prepared composition at the rate of 1.5 kg of substance per 50 liters of water and a small amount of PVA glue, which can be replaced with detergents and slaked lime. Also, to obtain a composition with the desired properties, a plasticizer and agents that improve the level of frost resistance are added to it.
After the mixture is mixed, you should wait 15 minutes and mix the ingredients again. The liquid composition should not be allowed to harden, which will automatically cause a deterioration in its quality characteristics. When laying tiles, it is necessary to lubricate the surface that will lie on the mortar with water to ensure their quick adhesion.
What are the requirements for ingredients?
The quality requirements for ingredients are quite strict:
- It is customary to use fine-grained sand that is free from foreign impurities, which makes it possible to obtain a homogeneous liquid mass;
- the grade of cement, which should not have unnecessary mineral additives, is chosen to be high, which guarantees its rapid adhesion to surfaces and their strength;
- Water should be distilled or fresh at room temperature.
On what surfaces can paving slabs be laid?
Almost any. Only in this case you need to understand that each surface requires its own method of preparation, installation technology and laying of tiles. Most often, paving slabs are laid on sand, sand-cement mixture, concrete and fertile soil. Laying on soil or fertile soil is the least common and at first glance raises some questions. But subject to certain rules, this method of paving has the right to life. The result you want to achieve is important. If your goal is a driveway for a car, a complex of works will be required. And if you need to lay a path between the beds in your favorite garden plot, then simpler methods of surface preparation and installation will be appropriate.
Paving slabs laid directly on the ground file tiles on the ground
Inadmissible errors when creating a solution
If you are starting the procedure for preparing a concrete mixture for the first time, you should carefully study the list of common mistakes that do not allow you to achieve the planned result. Such errors include:
- purchasing cement of the wrong grade and quality that guarantees work efficiency;
- the use of stale and wet cement, which does not interact well with other ingredients of the solution;
- purchasing unclean sand with large fractions, which creates obstacles to obtaining a homogeneous mass of good quality;
- mixing the solution for a long time, to obtain its homogeneity, each batch is carried out for no more than 2-3 minutes.
Follow the advice provided and enjoy the worthy results of your work.