Greetings, my friends!
I’ll make a short introduction and let’s go back to the summer of 2020. At that time, I came up with the “Barberry” plan for a large-scale pouring of a concrete blind area :) Since the scope of the planned work is quite serious, I thought about purchasing a concrete mixer.
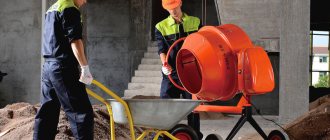
My choice fell on an inexpensive, but as it turned out, very high-quality stirrer - Kraton 180. It worked for three years. I can’t say that I was exploited mercilessly, but I had to work:
- installation of blind area
- pouring the foundation
- installation of curbs
- floor screed
- filled the floors in the dog enclosure
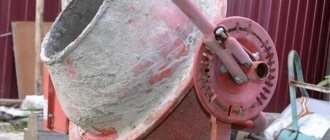
In May 2020, I started building an outdoor brick toilet. While pouring the floor slab, the concrete mixer hummed, crunched and stopped. So, I was faced with the question of replacing the bearings in the Kraton concrete mixer .
Since I have no experience in repairing concrete mixers, I called the experts. The service announced a price of 3,000 rubles, citing the fact that the drum on the Kraton is not collapsible. After thinking a little, I decided that I would change the bearing myself.
Symptoms of a problem
You don’t need to be “single minded” to understand that something is wrong with the unit. Even with proper care, a concrete mixer is a tool that is subject to significant stress. First of all, its most vulnerable part, the bearing assembly, suffers.
The first signs of a malfunction are:
- Crackling, crunching and extraneous sounds in the drum.
- The drum stops even with a slight load.
- In an empty concrete mixer, the drum has some play.
These are all characteristic signs that it is time to change the bearings.
IT IS IMPORTANT TO KNOW!
Friends, even if only one is broken, a pair of bearings are always replaced!
Prevention measures
After repairing the concrete mixer and eliminating any malfunctions in one or another part of it (or better yet, immediately after purchasing the equipment), you should try to use the device in the future so that similar or any other problems do not arise again.
To do this, you need to follow a few simple requirements:
- Do not allow the control unit to come into contact with water.
- It is necessary to fill the drum with concrete components no more than 4/5 of the specified norm.
- Make sure that the voltage in the network to which the concrete mixer is connected does not exceed the maximum permissible. The manufacturer usually reports what voltage the device can withstand.
- All working units need to be inspected periodically, and after preparing the concrete mixture, they should be cleaned of adhering sand and cement.
- Do not forget that the shaft and gears need regular lubrication.
If you try to follow all these not very complicated rules, then the concrete mixer will last quite a long time and you won’t have to think about its repair throughout its entire service life.
If the device fails, then even someone who is not a great specialist in the field of construction can quickly repair concrete mixers with their own hands. It is enough just to determine which element has become unusable and replace it with a new one.
Most often, household members carry out repairs to concrete mixers and replace some parts with their own hands.
If your concrete mixer breaks down during construction, you can repair it yourself.
Breakdown of these units can be prevented through proper operation of the concrete mixer.
Necessary tools and spare parts
To change the bearings in a concrete mixer with your own hands, you will need a set of tools that any owner should have.
Here's what I needed:
- set of wrenches
- a hammer, preferably a large one. Maybe a sledgehammer
- wd-40 for loosening bolts
- bearing puller
- circlip puller
I bought a puller at the market for 1800 rubles, which broke under minimal load. The Chinese silumin was returned with a fight :( Don’t make my mistakes - buy a quality tool.
If the drum is not collapsible:
- grinder with a small circle
- Welding machine
- piece of metal, 3 mm thick
- “end” of the pipe + squeegee
Materials
The materials you will need to purchase are two bearings - size 6203, a new oil seal. Everything really costs pennies :)
Causes of concrete mixer breakdown
Most often, during construction, when a concrete mixer breaks down, the replacement and repair of worn parts of the machine is carried out by the owner of the equipment himself. Repairing concrete mixers with your own hands is quite complicated, but there is no way to avoid it.
Reasons why construction equipment may break down:
- The loading of the concrete mixer is more than the required norm;
- Lack of lubrication on the ring gear parts;
- Improper storage;
- Failure to clean the drum immediately after use.
Concrete mixer parts often wear out:
- Gears and drive belts;
- Power button;
- Drum axis.
The damaged part can be identified by eye. It will not be difficult to remove the worn special part and replace it with an analogue.
Attention! When repairing a concrete mixer, it is necessary to completely disconnect the equipment from the power supply.
Drive replacement
If the drum does not work (no rotation), but the motor works, then the reason may be in the belt. No special effort is required to replace the belt. To assess the situation, you need to remove the protective cover. And be sure to disconnect the contacts.
It happens that the strap simply slips off, then you just need to put it back in place. If it is not suitable for use, then replace it with a new drive belt. Repairing a concrete mixer drive is not difficult.
This video describes how to tighten and replace a concrete mixer belt:
We find two bolts, they hold the motor. They need to be loosened slightly. In order to remove an unusable belt, you need to raise the engine slightly. But to install a new strap, it is advisable to do it together.
You should start with a small pulley, it is located on the motor. Place a belt on it and pull it over the top pulley. One person needs to pull back the engine, and the other needs to tighten the bolts. Actions must be performed simultaneously.
How to change a bearing
- If you notice that the concrete mixer seems to be turning quickly, but it doesn’t have such agility. It doesn't start right away, and when it jams, the engine hums rather than hums. I feel like I need to buy new special equipment. But not everything is so tragic. The problem is most likely in a pair of bearings that are located on the shaft.
- If a concrete mixer breaks down, you can replace the bearings yourself, and with the right technology it will take several hours. Unlike the work described, this one is more painstaking and will require more skill and time.
- The first step is to remove the box from the motor. Then the concrete mixer bulb is removed and the drive gear must be removed. Clamp the retaining ring on the gear side and remove it. If there is no suitable puller, we knock out the shaft. Next, carefully, placing a piece of wood on the shaft, knock out and remove the two bearings.
From this video you will learn about replacing bearings:
And we hammer the new bearings into place with a carefully selected tube to fit the diameter of the shaft. After this, everything needs to be put back together and do not forget about spare parts for concrete mixers.
Button repair
If we press the green button, the drum starts working, but if we release it, it stops. This is a breakdown of the shutdown button, the most common and the simplest. In fact, this is not a button, but a magnetic starter. This is done for our safety.
When the equipment is turned off, the starter button opens and when it is unexpectedly turned on, it will not work so suddenly and will not be able to injure anyone if someone suddenly decides to stick their finger in. If this is not the case, then you need to remove the casing. Then you carefully need to release the cover and disconnect the 5 wires that go to the starter from the inside.
Next you need to unscrew the button and disassemble it. Inspect the part, you may just need to clean the contacts. Disassemble and clean it inside. Most likely, you will notice black carbon deposits there, which is most likely why the mixer did not work as it should. Once everything is cleaned, we reassemble everything in reverse order.
Attention! When the engine temperature rises to the maximum, the emergency thermostat automatically cuts off power from the motor.
This video explains how to repair a button:
Read also: What can be done with a hammer drill
Replacing a bearing on a concrete mixer with a collapsible drum - work procedure
Optimix and Sicoma concrete mixers are mainly used with collapsible drums.
Disassembling the drum
- First you need to remove the drum. To do this, turn it over with the traverse facing up. Use a wrench to unscrew the drum mounting bolt. We remove the washer and engraver. Screw the bolt into place. Place a wooden spacer and knock with a hammer and knock the shaft out of the traverse. We remove the drum.
- After removing the drum, unscrew the mounting bolts, first filling them with WD. If you can’t unscrew them, then cut them off with a grinder.
3. We knock the shaft out of the grooves with a pipe. Using a puller, remove the old bearings. If a puller is not available, then you can use a vice, clamp the shaft in it and knock down the bearings with gentle blows.
Drum assembly
- So, we clean the shaft and seat from dirt. Carefully press the bearings using a wooden spacer. It is strictly forbidden to knock on the bearing race.
- The shaft with installed bearings is installed in the lower part of the support. We put on the top part and screw everything into place. When tightening, the nuts may turn - ask friends or family for help.
- To reduce moisture ingress into the bearings, it is recommended to apply sealant to the junction of the support and the drum.
- We put the drum on the traverse and secure it with a clamping nut.
As you can see, even a schoolchild can change the bearings in a concrete mixer with a collapsible drum. If nothing is clear, then watch the video.
Repair of equipment
The electrical part of the installation is represented by an electric motor, a magnetic starter, a starting capacitor and a start button. The most common reason that the engine does not want to start is a malfunction of the starter and button. The functionality of the starter is checked by a tester - the integrity of the coil and the fit of the contacts are determined.
The worn bearing is replaced with a new one and lubricated with lithol.
The operation of the start button is checked by a contact tester, and the non-working button is replaced. In the capacitor, the integrity of the gasket is checked. The most consumable spare parts for a concrete mixer are drive belts (for example, in the SBR-132 installation there is a five-ribbed belt 610 mm long). Replacement is carried out in the following order. The casing is removed. The motor mounting screws are loosened. Then it rises together with the plate until the belt loosens. The belt is replaced with a new one, and the engine is lowered, the required belt tension is fixed.
To repair a concrete mixer yourself, it is important to carefully remove the drum. To do this, use a gas wrench, a wrench (usually 13 mm) and a three-jaw puller. Use a gas wrench to unscrew the locknut and the drum fastening nut. Then use a wrench to unscrew the fixing bolt located on the side. The puller is secured and the shaft is pressed out. Bearings are replaced in the following order. Typically, concrete mixers use a 6203 bearing, which needs to be prepared.
Removing the ring gear in a concrete mixer.
First, the box with the electric motor is removed. Then the drum is removed from the shaft, the drive gear and the key securing it are removed. To carefully remove the bearings, you must use a puller designed for this purpose. The puller is installed on the gear mounting side. The bearing is replaced with a new one and thoroughly lubricated with lithol. When pressing a new bearing, a puller is also used. If there is no puller, the bearing removal operation will have to be carried out using a pipe according to the size of the bearing. The part is removed by sharp, gentle blows on the pipe. The pipe must be installed strictly along the inner race of the bearing.
Removing the ring gear also has its own order. To remove it, you need to remove the box with the electric motor along with the pulley. Then the locking ring is released and removed. The ring gear is removed and the failed section is replaced. At the same time, it is recommended to check the condition of the bearings and lubricate them with lithol.
Hi all! Since I work as a sales consultant in a tool store, naturally my responsibilities include not only consulting, but also assembling various equipment. And in this article I decided to give instructions on how to assemble a concrete mixer.
This refers to a factory-made device, which the buyer purchases in disassembled form. Therefore, if you came across this article looking for information on how to make a concrete mixer with your own hands, then I’m sorry, we’re talking about something else here. And in general, a new full-fledged concrete mixer will now cost 8-9 thousand rubles, which is not that expensive when compared with the rest of the cost of construction or repairs. Is it worth the bother of assembling it from scrap materials?
By the way, I recommend purchasing a concrete mixer here. This is the All Tools store. They have a large selection, reasonable prices, and free delivery to the point of delivery in your city. A 220 volt store works approximately the same way. To view their offer, click here.
So, I will show the assembly using the Skiff concrete mixer as an example, but the same unit is also sold under the brands Prorab, Kraton, Elitech, Caliber and many others. The truth may differ in color. And, if the design is slightly different than in our example, then the assembly will still be approximately the same. In our case, it is 160 liters, but the assembly process for mixers of other sizes is similar. This model is one of the most common among Chinese devices.
Let's move on directly to the assembly process. Unpack the box and lay out all the parts before your eyes. In order to assemble the concrete mixer from our example, you will need one open-end wrench for 12, 14, two for 17 and possibly one for 22. You will also need a Phillips screwdriver. We will not go into details about where the bolts go. Everything is simple here: if the bolt fits, then install it.
First you need to take the triangular shaped rear support and put the wheels on it, securing them with the included washers and cotter pins.
Now we take the frame and connect it to the support indicated above, on which the wheels are already put on. The frame is the same on both sides, so it makes no difference which side this support is attached to. True, on some concrete roads there may still be a difference. If your frame is asymmetrical, then the triangular support should be mounted on the side where the engine will be mounted.
Now we attach the second support to the opposite edge of the frame.
Next, we install and fasten the lower part of the drum along with the support attached to it onto the assembled base. It's better to do it together. If you are alone and not confident in your abilities, then you can separate the support and drum by installing them separately. For this you will need a 22mm wrench. The ends of the support are different, so the one where the engine will be mounted (the side with the drive sprocket) is placed on the side of the wheels.
Now you need to attach the inner blades to the bottom of the drum.
Place the upper part of the drum on the lower part and screw it on. The installation must be done so that the arrows glued to both parts look at each other. If there are no arrows, then we place them so that the inner blades, with their mounting holes, reach the holes on the top. When installing, it is necessary that the mounting bolts holding the sealing rubber fall into their threaded mounting holes. After installation, tighten these bolts with a screwdriver.
Now we screw the inner blades to the top of the drum.
Then we install the “steering wheel”. We find a “coin” in the fastener and throw it into the recess for the spring.
Now insert the spring.
Holding the spring, we attach the “steering wheel” to the mounting holes and thread the bolt included in the kit. We screw two 17mm nuts onto this bolt, and without tightening them to the end, we lock them. Not fully tightening is necessary so that the “steering wheel” can freely deviate to change the tilt of the drum and return to its original position under the action of the spring.
Don’t forget to tighten the spring by tightening the bolt intended for this so that the “steering wheel” itself can remain with its protrusions in the slots of the clamp.
Now let's start installing the engine. If you already have it inside the assembled case, then everything is simple. We put it on the existing spindle with a pulley and fasten it using the supplied bolts and a special plate.
Without concrete mixers of various sizes and designs, including concrete mixer trucks, it is difficult to imagine a modern construction site. These installations are widely used in individual construction, in the construction of country houses, garages and in various other cases. As long as the unit works properly, everything is fine. But there comes a time when the mixer begins to have difficulty starting, the motor begins not to buzz, but to hum strainedly.
Replacing a bearing on a concrete mixer with a non-dismountable drum. Work order
So, if everything is simple with a collapsible drum, then with a non-dismountable one you will have to suffer.
- Removing the drum
Turn the drum over with the traverse facing up and unscrew the bolt. To knock the drum off the shaft, I used a piece of wood, which I installed in the place where the shaft was attached. With a few blows of the sledgehammer I managed to knock down the drum.
2. It was not possible to remove the drum, so I had to first unscrew the fastening bolts located on the crown. There are paddles inside the drum for mixing. I couldn't unscrew the top bolts. Due to constant exposure to moisture, they simply “stuck.” The Bulgarian came to the rescue :)
3. The drum has been removed and cleaned.
4. Use a screwdriver to remove the oil seal. Using pliers, I remove the first retaining ring and use a crowbar to knock out the first bearing. You can’t get to the second one, since the plug on the inside is welded tightly.
5. This is the difference from a collapsible drum. There is no removable support here and you can only reach the lower bearing by cutting a hole with a grinder.
5. I clean the bearing seat to knock it out with a metal pipe of the appropriate diameter.
6. I pre-clean the seats from dust, dirt and other deposits. I add Litol lubricant to purchased bearings, since manufacturers often save money.
7. I press the bearing through a wooden spacer.
8. Now the second one is ready. I install the retaining ring and a new oil seal in place.
9. Done.
It would seem that the bearings have been changed, but the work does not end there. Because the plug on the inside of the drum is cut off and you need to come up with something. How I got out of this situation:
- At the market I bought a piece of ∅100 pipe with a thread and a fitting for it. I cut off all the excess with a grinder.
2. I found a piece of metal at home, 3 mm thick. I attached the squeegee and outlined it with a pencil. I cut out the plug.
3. I welded a piece of cut metal onto the squeegee and got a lid.
4. Cleaned up the welding area and welded the cover to the inside of the concrete mixer.
5. I added a couple of “hooks” to the lid to make it easier to unscrew. I screwed the lid on with plumbing flax.
Next, I assembled the concrete mixer in reverse order. Everything works great!
Drive gear
The concrete mixer works, turns, and in order to prolong the life of the drive gear and rims, you need to get used to the fact that before starting a shift, all these things need to be thickly lubricated with lithol. Turn the bowl upside down, turn on the stirrer and spread lithol on the crowns with a spatula. The stirrer purrs contentedly, chewing and thereby showing that it is feeling good now))))
Read also: How to level a house with your own hands
Jokes aside, sooner or later the gear will turn into this:
It will begin to slip over the teeth of the crown and cause a lot of not very pleasant impressions. It's time to change it! I don’t know where to buy, I buy it directly from the factory in Lebedyan, since it’s not far from us. The gear has 12 teeth and an internal hole for the shaft of 14 mm in diameter.
Replacement! If you have some skill, you don’t need to remove the bowl; just use a 10 mm wrench to unscrew the fixing bolt,
remove the washer and pull out the gear. Carefully! There is a small key there, you need not to lose it. In the photo above, everything is so easy and accessible, because the pear has been removed, and if you are too lazy to remove the pear, then you need to be smart and use all the fine motor skills of your fingers in order to fish it out. But it's real! Checked! 4 times already.
The pulley is made of plastic. The shaft on which this pulley fits is round and milled on one side. So, the trouble is that when the hole on the pulley becomes completely round, it rotates freely on the shaft. Accordingly, the motor rotates, the pulley rotates, but the shaft does not ((((
It would seem, why change it, this pulley? I removed the cover from the motor box, as when replacing a belt, removed the belt and removed the pulley. It seems to be loose, but it won’t come off, even if you crack it. But the point is this: the pulley on the back of the box is secured with a retaining ring, so it doesn’t make much sense to make efforts to remove it without removing the box with the motor. Therefore, unscrew the two nuts and remove the two bolts that hold the box to the frame. The box will be removed along with the pulley and a bare shaft will remain. Now all that remains is to open and remove the retaining ring. The pulley will fall out on its own. It is completely unclear why the pulley cannot be made from something other than metal, but I heard out of the blue that modern SBR-132s have already begun to make metal ones. But these are rumors.
If you have already removed the entire box and seen the shaft, then it costs nothing to check it for wear on the bearings. Turn the shaft with your fingers, make a few revolutions, if everything is fine, then change the pulley and put everything back together, if something sticks and the shaft rotates unevenly, congratulations))) you’ve got to replace the bearings. Read the next paragraph.
Electric concrete mixer: prices and popular models
When it comes to value for money, you should trust trusted manufacturers. In this list, Lebedyan concrete mixers occupy a special position, differing from competitors in a number of characteristics that satisfy user requirements. The Lebedinsky plant specializes in the production of SBR concrete mixers and similar machines, which makes it possible to obtain more reliable and high-quality products.
For large volumes of work, it is better to purchase concrete mixers from trusted manufacturers
The product line includes both manual equipment and electric concrete mixers, which are characterized by a long service life. A special category consists of professional machines with large capacities.
Helpful advice! If we are talking about private housing construction or low-rise construction, then you can choose Profmash concrete mixers. This company specializes in the production of small devices.
A concrete mixer is a convenient piece of equipment that is used to prepare various types of solutions, from tile adhesive to concrete for garden paths. The modern market offers a wide range of these mechanisms, which are characterized by durability and ease of operation. You can also make a concrete mixer yourself. To do this, you need to study the structure of the device, purchase the necessary materials and tools.
The post Electric concrete mixer: recommendations for selection and operation appeared first on Remoo.RU.
https://remoo.ru/instrumentyi/ehlektricheskaya-betonomeshalka
Share the news on social networks
- Related Posts
- Bedroom wall: how to choose a beautiful and functional piece of furniture
- Bathroom sealant: a universal material for solving many problems
- Red kitchen: bright and impressive, ideal for energetic and sociable people
« Previous entry
Repairing a concrete mixer - video collection
The content of the article
Video collection
Concrete mixer device
Concrete mixer repair
Replacing the drive gear
Replacing bearings
Repair of concrete mixer button
Repairing a concrete mixer: the main causes of breakdowns and tips for doing the work yourself
It's no secret that any device, and in our case a concrete mixer, has its own service life and, if handled correctly, it can not only meet the stated requirements, but also significantly exceed it.
However, unfortunately, many users do not always comply with all the rules and conditions dictated by the manufacturer, which can undoubtedly lead to breakdowns.
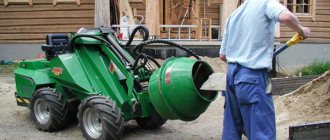
Mobile concrete mixer
What are the main reasons?
- First of all, it is worth mentioning that the loading of components for mixing the solution is exceeded. If the drum is filled more than one third, then the main parts of the equipment will gradually wear out.
- It is also worth mentioning a common mistake that owners make is lubricating the gears and ring gear. During kneading, dust will settle, which will create favorable conditions for damage to the main parts.
- If the engine overheats frequently, your concrete mixer will eventually need repairs.
- Frequent causes of breakdowns are also: voltage surges, contamination of individual mechanisms and parts, wear of components.
There may, of course, be other factors, but the above are still the main ones.
So what to do if the equipment does break down? There are only 2 options: contact a specialized workshop or carry out repairs yourself.
Don't know how? Check out the video instructions to help you troubleshoot problems yourself.
beton-house.com