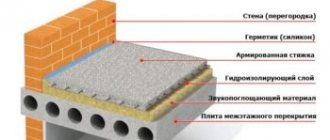
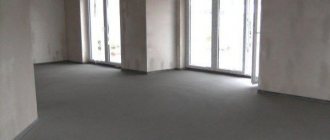
Any major cosmetic renovation or finishing work of a new room begins with the preparation of the floors. A high-quality multi-layer screed enhances the strength of floors, and also gives them noise and heat insulation properties and ideal flatness.
In multi-level buildings, for example, interfloor ceilings are laid taking into account the relative flatness of the ceilings. At the same time, the floors of the upper level (the reverse side of the ceiling) may have not only differences, but also significant flaws. Consequently, laying floor coverings becomes impossible. It is the screeds that level the floor surface, eliminating initial defects.
DIY floor screed
Installing a floor screed is a labor-intensive process, but quite simple. Even an untrained person can do it. Please read the instructions carefully. There is no need to pay for the expensive services of specialists if screeding the floor with your own hands (a video on this topic will be an excellent guide for a beginner) is very easy.
The technology of floor screeding involves preliminary preparation of the surface. If the premises are a new building, then preparation consists of clearing the surface of construction and other debris. A little more work will have to be done when preparing floors in residential areas - old floor coverings must be completely dismantled. In all other respects, the preparatory stages are similar and consist of:
- eliminating local defects in floor slabs, for example, an existing hole or chip must be filled with non-shrinking cement mortar;
- precise level markings, which are needed to determine the height of the screed layer;
- if necessary - laying construction mesh, hydro- and sound insulation, installation of heated floors;
- treating the prepared surface with a special primer;
- installation of beacons using a building level.
Key Process Details
First of all, you need to keep in mind that the process of creating a screed itself is quite simple, but most attention should be paid to a preliminary assessment of all possible problems that you may encounter. The interesting thing is that there can really be a lot of unpleasant situations. As already mentioned, it all depends on the specific room.
Pipes may be present directly at floor level. This is a fairly common occurrence, especially in older buildings. As practice shows, in most cases, owners simply move the pipes a little. However, everything is simple only in words. In some cases, this can be quite a labor-intensive process, for example, if the pipes are in use at a particular moment. If possible, of course, it is best to get rid of the pipes, since sooner or later they will still make themselves felt.
The situation is much more complicated in cases where heating systems are located at floor level. In this case we are talking about batteries. Of course, you can’t just move them. However, if there is an urgent need to create a concrete screed, then a solution can always be found. Changing the batteries would probably help. In a specific situation, you can purchase more compact heating elements that will be located significantly above floor level.
You should take the doorway especially seriously. The creation of a concrete screed must be carried out in such a way that it does not in any way affect the use of the door. It’s good if the door opens outward - here you can simply limit the spread of the concrete screed when pouring. If the door opens into the room, then we are faced with a number of problems. In this case, you can replace the door with one that matches the new floor level. It is also possible to resort to more original solutions. For example, you can get rid of the door altogether, or place it in such a way that it opens outward. If all the above tips are too complicated, you can saw the door, but you need to properly process the sawn surface so that the results of the work are not noticeable.
In addition, you need to keep in mind that a wooden floor is a rather specific base. As temperatures change, wood expands and contracts. This, in turn, can negatively affect the quality of the screed. In such cases, the wooden floor must have complete freedom from the pressure of other construction resources for at least 2 years, and only then can a screed be created on top of the natural material. It is obvious that even after 2 years the wood will change its dimensions depending on the temperature inside the room, but this process will not occur as actively.
Thus, throughout the entire period of operation, a wooden floor is a serious threat to the concrete screed. However, there are some tricks to avoid trouble.
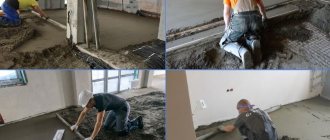
Preparation of solution and installation of beacons
After waterproofing the wooden floor screed with your own hands, you can begin installing metal profiles, which are used as beacons for leveling the surface.
To install them, do not use nails or screws. The best way is to lay a continuous strip of concrete mortar, which will firmly press the plastic film to the floor. When working with beacons, the film will not rise or warp.
The preparation of concrete mortar is carried out based on the following quantities of materials:
- cement – 25 kg;
- sand – 75 kg;
- water – 6.5-7 l;
- fiber fiber – 800-900 g/m³.
The distance between the outer strip and the wall is 25-30 cm. Parallel strips are located at a distance that allows you to easily level the poured concrete. If the length of the rule is 1.5 m, then the distance between the profiles should be 1.2-1.3 m.
You can increase the strength of a thick floor screed in a wooden house by using a fiberglass reinforcing mesh. To secure it to the floor, you can use metal brackets. But it is better to lay the reinforcing mesh during the process of pouring the solution. Since its correct location is approximately in the middle thickness of concrete.
But a more expedient solution would be to use fiberglass, which is added to the solution. There will be no need to lay the reinforcing mesh with an eye on the waterproofing material. And in order to correctly place the mesh, you will have to pour the concrete solution in two stages. This will significantly increase the time it takes to complete the work.
Features of a floating screed
Floating screed technology is very often used, which makes it possible to reduce to a minimum all the negative phenomena associated with the expansion of wood. In this case, you will have to create a special layer between the screed layer and the moving wood. On the wall side, you need to use a damper tape, which is very often used in such construction work, and the base itself will be separated from the horizontal surface of the wood floor with polyethylene.
This is how an “independent” screed is obtained, which is not connected either to the wood base or to the walls.
Practice shows that such flooring is quite durable and also practical. If necessary, the concrete screed can be easily removed. Also, this method of creating a concrete base cannot be called costly, unlike many other tips, which often involve the use of fairly expensive construction resources.
Floor construction
Start the screed installation process by creating a waterproof layer. It will separate the base into two parts - so the concrete layer will not be connected to the wooden base. The border can be made from the following materials:
- damper tape;
- polyethylene film.
The tape is needed to ensure that the concrete layer does not come into contact with the walls. The plastic film will prevent the screed from touching the boards.
If you choose this method of screeding to repair your floor, you will get an independent, “floating” slab. It will not come into contact with the boards, and such a slab will not affect the walls. Even if the floor boards begin to dry out or begin to swell due to high humidity in the room, the slab itself will not crack.
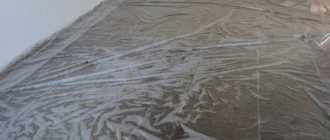
Buy a quality antiseptic. Treat the boards with it, this will protect them from fungus. After this, it is worth covering the wooden base with a primer. The water-repellent coating will make the floor resistant to mold. Only after such preliminary preparation is it worth laying plastic film on the boards.
It is necessary to understand that polyethylene has a negative effect on wood. Usually, to protect the floor, waterproofing is made from boards; most craftsmen use materials impregnated with bitumen or suitable mastic to install it.
All this is true, but not when laying a concrete screed on a base made of boards. Here it is best to use film. This is done for a number of reasons:
- The film does not stick to the concrete base. It can expand and contract many times without damaging the slab.
- Moisture from the solution will not be absorbed by the wood. There will be no recesses in the slab.
- Moisture from the wood will not enter the concrete. The slab will not crack or begin to crumble.
The main advantages of the polyethylene layer
It must be said that many people perceive polyethylene quite negatively. This is due to the fact that it actually has a negative effect on wood, but in this case polyethylene has many positive aspects.
First of all, the wood, and the screed itself, will be able to freely “slide” along the accessible boundaries of the floor. Moreover, the polyethylene layer is a unique feature that prevents the wood base from accumulating moisture, which usually comes from throughout the room. Accordingly, the tree will only minimally deform during temperature changes. In the same way, concrete will not absorb moisture from wood, and this is a fairly common phenomenon in cases where a concrete screed is created directly on the basis of a wooden floor.
Before such construction activities, it is necessary to understand that there are also negative aspects of using polyethylene. Most often, we are talking about the fact that this layer creates a kind of vacuum for the wooden floor, so you need to treat the wood in advance with antiseptic agents that will easily repel moisture.
Wooden floor with joists
A more complex arrangement of wooden floors along joists than others is necessary in rooms with a height deviation of more than 1 cm. Most often, this design is used in private or old housing construction. In its composition, in addition to the described layers, logs are used, laid on the base. For sound insulation, there must be a special substrate underneath. The logs are attached with screws to the base. In this version, plywood is attached with screws to the beams. Thermal insulation material is laid between the joists.
Installation of wooden floors using joists
Design advantages:
- the ability to equip additional thermal insulation of the floor;
- leveling a base that has significant differences in height;
- the structure can be installed directly on a concrete base without the need to level it.
Installation features:
- the use of such a design significantly reduces the height of the room;
- the distance between adjacent logs should not be less than 60 cm;
- the thickness of the plywood or OSB panel laid on the joists should not be less than 2.2 cm.
Step-by-step instructions for creating a floating screed
Despite the relative simplicity of the idea, the process itself is quite labor-intensive.
- First you need to remove the wood base and carefully check the entire structure. If the floor is old, then you will probably find deformed joists, as well as cracks in the boards. Obviously, all this needs to be replaced, since later it can all make itself felt. If, after replacing some elements, the floor has become too flimsy, you need to increase the number of joists. The step between these elements should be up to 40 cm.
- After the wooden floor has been put back together, you need to arm yourself with sealant and seal all the cracks between the boards. This is a mandatory step, since during the creation of the screed various troubles associated with cracks can occur. You also need to make sure that the floor surface is actually smooth and does not have any special flaws.
- After using the sealant, you need to wait some time before continuing any manipulations with the floor.
- Often the screed layer is 5 cm. At the same time, you need to understand that in such conditions there is enormous pressure on the wooden floor, so you should make sure several times that the wooden surface can withstand a heavy load.
- First you need to make markings for the future screed. This will allow not only to assess the scale of the work, but also to visually analyze all possible obstacles. In this case, you can use special laser devices that do their job more accurately than other devices. You can also create some marks using a pencil.
- Now it's time to create a floating floor. First we need a damping tape. In this case, it is best to use polystyrene-based material. This tape must be stretched along the walls so that the future screed is on the same level with it. The thickness of the damper should be up to 2 cm. There is no need to worry that the tape will be slightly higher than the screed. After all the work, part of the damping material can be cut off.
- It is worth noting once again that with the help of the above tape we not only create a so-called floating floor, but also provide a high level of sound insulation. The damper is attached to the wall using regular tape.
- Now it's time to use polyethylene. You need a large canvas, which, among other things, will extend 20 cm onto the walls. If several canvases are used (most often this happens), it is necessary to overlap them.
- It is necessary to carefully check the surface of this layer for the absence of even the most minor flaws, since after pouring the floor with concrete they can make themselves felt. If any problems are discovered, you must immediately replace part of the synthetic fabric. All joints are sealed with tape so that nothing leaks under the polyethylene.
- Do not forget about the reinforcement of the concrete layer. This is especially important in cases where the screed is quite thick. Reinforcement will significantly strengthen the building material, while creating additional load on the wooden floor. Often, reinforcement is used as reinforcement, but in this case it cannot be used in any way (completely inappropriate scale). However, in specific conditions, microfiber or basalt fiber will perform excellently. At first glance, these materials are incredibly light and useless, but they are used in large-scale construction where it is necessary to strengthen concrete.
- Beacons will also help, as they will allow you to evaluate the screed layer being created.
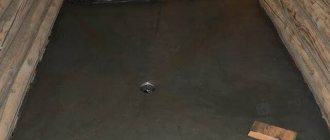
- Pouring screed is an incredibly simple process. Here it is enough to evenly pour the concrete mixture so that all located beacons are at the same level in the binding material. Leveling the screed must be done using a large spatula or a long, even board. This stage of work is very important, since any deviations from the assigned level can negatively affect the integrity of the coating.
How to make the right concrete floor in a wooden or frame house
In a wooden or frame house, the floors of the first floor are usually made on wooden joists. Wooden floor joists rest on the ground or the ends of the joists (beams) hang on the walls of the foundation or basement of the house.
Wooden floors on the first floor are less durable, are susceptible to moisture, are not sufficiently resistant to mechanical stress, and have low soundproofing ability. It is difficult to create a full-fledged heated floor on such floors. There are problems when installing floors in wet areas of a wooden or frame house - a bathroom, boiler room, etc.
The installation of a reinforced concrete basement floor is beneficial only for a house with a basement.
For a private house without a basement, the most advantageous floor design for the first floor is to install a concrete floor on the ground. When choosing such a design for wooden and frame houses, there is a prejudice that the proximity of the soil to the lower crowns and beams of wooden walls, the lack of sufficient ventilation in these units will contribute to the accumulation of moisture and rotting of wooden parts.
For the reason stated above, developers who are building a house for themselves experience certain difficulties when choosing the design of the junction of the floor on the ground, with the foundation (plinth) and the wooden walls of the house.
The figure below suggests an option for installing a concrete floor on the ground for a wooden (log, timber) or frame house.
A wooden or frame house with concrete floors on the ground. The foundation of the house is shallow, protecting the heaving soil from freezing
Here the designers tried to make the unit as open and ventilated as possible. In addition, in the area of contact between the wood and the plinth, a thermal regime is ensured that prevents the formation of condensation in this area.
A shallow, thermally insulated foundation was chosen for the house. Thermal insulation protects the soil under the foundation from freezing. As a result, the foundation is not affected by the forces of frost heaving of the soil.
The foundation is strip made of monolithic concrete. A brick plinth is installed between the foundation strip and the wall of the house.
The use of brick for the construction of the plinth is due to two reasons:
- Brick has a lower thermal conductivity compared to concrete.
- The base has a thermal insert made of extruded polystyrene foam. Laying with a liner is easier and more convenient than embedding it in concrete.
To protect the soil at the base of the foundation from freezing, vertical and horizontal thermal insulation is used. A distinctive feature of the unit is that the layers of thermal insulation are located inside and under the foundation strip. The thermal insulation dimensions shown in the figure are selected for the climate conditions of the Moscow region.
The figure below shows a heat map of this node, which shows the distribution of temperatures in the soil thickness and in the structures of the house in the design mode.
The heat map shows the distribution of temperatures in the soil and in the structures of the house. The temperature of the soil under the base of the foundation is close to zero degrees.
How to make a concrete floor on the ground can be found in another article - concrete floor on the ground in a private house. Next article:
Previous article:
watch this funny video
domekonom.su
The final stage of work
Now that the most difficult stage has already passed, it is necessary to monitor the condition of the screed. Concrete is a rather finicky material, which under certain conditions can begin to crack or rapidly lose its original properties.
Thus, the concrete layer must be constantly moistened. This process should continue throughout the day. Next, when the most critical stage has already passed, you need to spray water on the surface of the screed. This procedure must be done within a week. Again, it is worth saying that spraying should be carried out evenly so that the concrete is in the same condition over the entire area of the room.
It is also very important to create conditions under which the temperature inside the room will be at the same level. No sudden fluctuations should be allowed. Moreover, this applies not only to the first days after the filling, but to several weeks, during which concrete is a rather vulnerable place in the home.
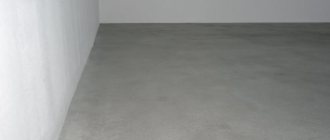
In addition, high humidity can negatively affect the condition of concrete. It is worth protecting the screed from this phenomenon. Within a month after creating the concrete layer, you can fully use the surface. If any problems arise with the screed, you need to respond immediately, since a huge area of the home may be at risk.
Pouring and drying
The concrete base is poured onto a wooden flooring according to the following algorithm:
- mix cement mortar (M400 cement and sand in a ratio of 1:3 or 1:4), or use a ready-made mixture (the main thing is to ensure sufficient fluidity of the composition);
- fill, evenly distributing the solution between the beacons and preventing the appearance of air voids;
- take a rule and level the surface along the beacons;
- leave the filling to dry for 48 hours;
- remove the beacon slats and fill the voids left behind with fresh solution;
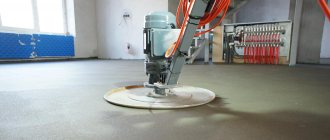
- Perform final leveling of the surface using wet half-tracks.
Filling must be done in one step. If you divide this process into stages, the screed will turn out to be non-uniform, which can lead to the rapid appearance of cracks and irregularities.
Apply the solution to the surface using a notched trowel; control the thickness of the layer using guides or marks on the walls.
On a note! Concrete must gain strength before final curing. Therefore, you should slow down the drying process. To do this, moisten the surface and cover it with polyethylene. The solution will gain brand strength within 3-4 weeks. During this period of time, it must be moistened at least once every two to three days.
Within a couple of weeks after pouring, you can walk carefully on the concrete base, but it is better not to rush with laying the tiles. Keep in mind that in the cold season the solution will dry more slowly. When it has completely hardened, cut off the film protruding along the edges and complete the final leveling of the surface using a sanding machine. After this, you can lay a new floor covering.
Floor with adjustable joists
In the floor structure, the adjustable joists are supported by plastic stand-up bolts. By rotating the bolt, you can change the installation height of the joists. The rest of the floor arrangement is similar to the previous version.
Installation of a wooden floor with adjustable joists
Design advantages:
- using the adjustable design, you can level out significant deviations in height at the base, up to 20 cm;
- The design is quite lightweight and can withstand any ceiling.