Natural wood floors deteriorate over time. Due to improper operating conditions, constant mechanical stress, temperature changes and exposure to moisture, the wooden floor in the apartment begins to creak and collapse. In some cases, minor repairs with filling cracks are sufficient, but in apartments such as Khrushchev-era apartments, the floors are already so old that minor repairs are clearly not enough and it is necessary to replace not only the entire wood, but also repair the concrete base. Next, we will analyze the entire process step by step in more detail and provide photos that clearly show the result.
Reasons for replacing an old floor with a different flooring material
If a wooden floor is constantly exposed to dynamic loads, temperature changes and moisture, this will eventually lead to deformation and destruction.
Then, at best, the coating will need to be repaired. But if the boards have been severely damaged and rotten, then there is only one way out - to replace the old coating with a new one. An alternative to a wooden floor in an apartment is concrete; its installation is carried out on an old screed or on a new one. Laying a concrete floor indoors requires dismantling the wooden covering and carefully preparing the old rough foundation on which the screed is applied.
Replacing a wooden floor is not an easy job, but it is not overly difficult either. You can handle this task yourself, if you have the desire. This work consists of a number of stages, each of them is important and determines the quality and service life of the future coating.
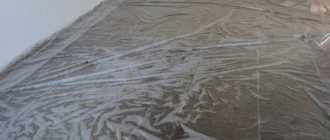
In addition, there are a lot of nuances that need to be taken into account when removing the old coating and installing a new one. Much attention needs to be paid to the quality of the concrete base screed. So that you can fully imagine the complexity of such work, it is worth familiarizing yourself in more detail with each stage of the repair of replacing the old wooden floor with a new concrete coating.
The reasons for replacing wood flooring with concrete flooring vary, but the main ones are:
- The wooden covering in the room does not meet operational standards. Boards may not withstand the impact of loads on them, even if they are in very good condition.
- The condition of the wooden floors is too bad. There are large gaps between the floorboards, the wood rots and collapses, and when walking on the flooring the floor makes unpleasant squeaks. These reasons most often force apartment owners to carry out repairs or completely dismantle the old foundation.
Old boards need replacing
- A major renovation is planned for the premises. In this case, many people replace the floor coverings with a stronger base.
Replacing flooring is a difficult job that requires special skills, so if you are not confident that you can repair or dismantle the old floor and lay the concrete base yourself, then it is better not to experiment, but to immediately entrust these tasks to professionals. Because if you pour the concrete solution incorrectly and make a poor-quality screed, this will negatively affect the quality of the future floor.
The slab, freed from the floor, joists, construction debris and other dirt, is inspected. Level measurements are taken. A laser level is useful, which can be used to determine height differences and their nature.
Several situations may arise:
- the base is formed by several narrow slabs forming a “step”;
- there is a trough-like appearance or there is a bulge in the center of the room with a drop in height towards the perimeter;
- there is a uniform slope of the base in one direction or the other.
It is necessary not only to evaluate the work according to the level of investment of funds, but also to plan for the smallest possible mass of the screed. To do this, the concrete layer is made to a minimum thickness, placing it on backfill or lightweight mortar.
The procedure for assessing the work of the future floor with a large difference in floor heights, from 70 mm, looks like this:
- the thickness of the concrete screed is 40-50 mm;
- the remaining space can be filled with expanded clay concrete class mortar.
A cheaper method is to fill the rough surface with sand, but the mass of such a cushion will be significant. In practice, it is ideal to make a base of plywood, under which expanded clay is poured to level the level. This method of carrying out work simultaneously provides a smooth, even surface for the screed; the rough filling has a low mass and provides a certain degree of additional sound insulation.
The base for the plywood screed can be made on logs made of small-section timber. This is a convenient and fairly cheap way. The logs are laid on the floor, ensuring horizontality, while small supports are placed under them in the right places. After this, the free space is filled with expanded clay.
When filling the base with sand, it must be spilled with water and compacted thoroughly. It is not recommended to use a vibrating tool - neighbors below may damage the plaster finish or experience other troubles. After finishing the work, the sand should be given a couple of days to dry.
- Removing skirting boards around the perimeter of the room.
- Raising old flooring. Use a nail puller to remove nails, and a screwdriver to remove screws, respectively. It is advisable not to reuse wooden boards; take them to a landfill or leave them for firewood.
- Dismantling the logs. This step is only available if the space in the room is completely free. The joists must be removed carefully; they are often firmly attached to the rough base. Otherwise, you will waste time repairing the remaining damage.
- Thorough cleaning. Remove all debris and notice any remaining boards or other waste.
These steps will help you prepare to begin your renovation. Now the room is free and clean, you can safely replace the boards in it.
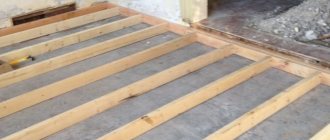
To carry out work on reconstructing the floor and preparing it for a heated water floor, we have to do several operations: dismantling the old wooden covering, leveling the ground, pouring pillows, laying insulation, preparing a solution, pouring screed.
To work we will need the following tools:
- Buckets (plastic).
- Construction level.
- Shovel
- Rule.
- Concrete mixer.
- Fomka.
During the work process, a person will need to perform several actions. First you will need to disassemble the wooden floor. Then you will need to level the soil, lay insulation and fill the screed using a pre-prepared solution.
The feasibility of concrete flooring on a wooden floor
Disputes continue regarding the advisability of using a concrete screed on a wooden floor. Many people say that concrete will make the structure heavier and, accordingly, the pressure on the foundation will increase. On the other hand, the fragility of the wooden base will lead to cracking of the concrete surface and deformation of the floor covering. There is also a high chance that the floor will be uneven. However, there are many facts that speak in favor of concrete covering on a wood floor:
- Concrete screed on a wooden floor is poured using a separate technology, taking into account the characteristics of the wood base. Laying is carried out according to the principle of an unbound screed, which neutralizes the possibility of deformation.
- It is recommended to pour cement when leveling and strengthening the base for installing hard floor coverings is required.
- Concrete is ideal for installing heated floors.
To avoid possible negative consequences from the interaction of wood and concrete, you should strictly follow the recommendations for the work. An important step in the preparatory phase is priming the wooden surface in order to ensure sufficient moisture resistance. It is recommended to use durable polyethylene film without defects as waterproofing. Its individual parts must be overlapped. To obtain a flat surface, beacons must be installed before pouring. The thickness of the concrete layer should not exceed 5 cm.
Since concrete itself is a massive and heavy material, which can lead to sagging of the screed on a wooden base or breakage in weak areas of the floor, it is recommended to add plasticizers to the masonry mixture. These additives give the solution sufficient fluidity, ductility, strength, water resistance, and the screed does not collapse for a long time even under high loads.
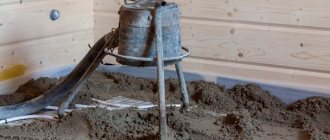
Preparing the solution and pouring the screed
In walk-through rooms, it is recommended to fill the screed twice. Before starting work, it is necessary to build a special wooden structure. A regular long board is suitable for this.
The applied solution must be leveled. The screed must have a thickness of at least 5 cm. A screed of less thickness may burst. After filling, you must wait two days.
During this time, the solution will already have time to harden. At the second stage of filling, the actions are similar. I would also like to note that the concrete itself reaches maximum strength after a month from the moment of pouring.
Therefore, during this time, you cannot put any serious load on the screed, jump, etc. To strengthen the floor, some experts recommend moistening the concrete with plain water a month in advance.
If you want to replace a wooden floor with a concrete screed and worry less about the pressure on the floor, you can use ready-made building mixtures. For example, KREISEL 440, 441, MZ150, which allow you to create a layer of up to 70 mm with a minimum of 35 mm. In this case, there is no need to stir the dry mixture - the composition is immediately ready to add water.
READ MORE: Dimensions of PVC skirting boards: types and sizes of skirting boards, rules for choosing and calculating the length of the profile
The standard approach is to use a classic cement-sand screed. To prepare it you will need:
- 1 part of cement grade M400;
- 3 parts sifted construction sand;
- 0.1 parts of lime paste, acting as a plasticizer;
- fibers for reinforcement in the quantity recommended by the manufacturer.
Before mixing with water, the dry mixture must be thoroughly mixed until a uniformly colored composition is formed. After this, they begin to add liquid, continuing to stir until the consistency of thick sour cream is obtained.
Recommendation: for quick and high-quality work, you should prepare a large amount of dry mixture in advance. As needed, you can quickly dilute it with water. If you measure out equal parts of the composition, it is easy to figure out the amount of liquid required and prepare the solution extremely quickly.
If the room is a walk-through and is actively used (as in our case), we fill the screed in two stages. First one half, then the other. To do this, we install formwork from a long board.
To prepare the solution, we will need cement - 1 part, sand - 2 parts and granite screenings (fine gray fraction obtained when calibrating crushed stone, i.e. granite dust and very small fragments of crushed stone) - 3 parts.
Advice on how to mix the solution if the components are dry: first put the screenings into a concrete mixer, then sand, then cement, mix everything thoroughly until dry and only then add water.
Advice on how to mix the solution if the sand or screenings are wet: first pour 0.5–0.7 volumes of water into a measuring bucket, then add cement, mix thoroughly, then sand, and lastly the screenings. This way you will avoid wet sand sticking to the walls and, as a result, not mixing the solution. Then add water to the desired consistency.
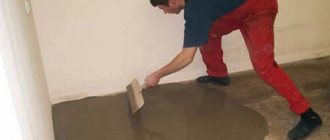
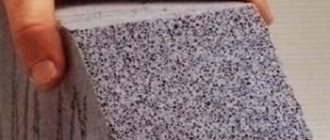
The consistency of the finished solution should not flow, but should not be too thick. On a flat surface, when falling out of the bucket, it will spread into a “cake”, as shown in the photo below.
We carry the solution and level it with a rule or a board of suitable size. The thickness of the screed should be 4–5 cm; it cannot be thinner, as it may burst. If desired, you can lay a reinforcing mesh, but you can do without it, since in the future, when installing a heated water floor, the mesh will be used in the second layer of the screed. This screed is rough and is only preparing the base for a heated floor.
After pouring, let the solution set for at least 48 hours.
We begin to prepare the second part of the room. All works are identical. We remove the formwork, clean the “locks” of the slabs from sand and lay the insulation. Don't forget to level each sheet!
We fill the second part of the room with cement mortar in the same way as the first part.
We align the thickness of the fresh screed with the already poured one.
When the concrete is completely poured, let it sit for at least two days.
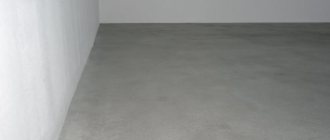
After all the work we should have a floor like this. You can already walk on it. The screed gains full strength within a month. At this time, it is advisable to moisturize it by watering it twice a day from a watering can. In the future, on this basis, a warm floor based on water heating will be made.
Screed structure
The photo shows that the screed (concrete or cement-sand) resembles a multi-layer cake. For high-quality pouring of the mixture, it is necessary to have a “pillow”, and it is advisable to make the bottom layer from river sand, pouring it at least 20 millimeters thick.
Before this, a polyethylene film or roofing material intended for cut-off waterproofing is laid. The edges of the material should be placed on the walls higher than the future layer of mortar. After the replacement of the joists in a wooden house with a screed is completed, the excess can be cut off.
Fine crushed stone or expanded clay is poured on top of the sand cushion. The second option is more preferable, since a thermal barrier is created, as a result of which the cold coming from the ground does not reach the cement.
The thickness of this layer depends on the degree of thermal insulation that is required and on the fractions of expanded clay.
Their size can be:
- 5-10 millimeters (small);
- 10-20 millimeters (average);
- 20-40 millimeters (large).
When the size of the fractions is less than 5 millimeters, such material is called expanded clay sand.
A pillow is considered to be made with high quality if the granules overlap each other without gaps. As for expanded clay, which has medium-sized fractions, the height of the backfill layer cannot be less than 50 millimeters, but if necessary, this parameter is increased to the required value.
The topmost layer is cement mortar - it is poured, focusing on the beacons. When the floor joists in a wooden house have been replaced, the final finishing begins, installing the flooring of your choice: wood, laminate, ceramic tiles, etc.
If you plan to install a heated floor system, it is better to make the base concrete. True, at home it is not entirely convenient to knead using crushed stone, so it is replaced with screening. The composition is made in the proportion of 1 kilogram of cement/5.2 kilograms of screenings.
Removing a wooden floor
When dismantling the floor, all safety requirements must be observed. To carry out this procedure, you can use a crowbar, as well as improvised means.
If you are wondering whether it is possible to renovate an apartment by replacing wooden flooring with a concrete floor, the answer is yes. First, the wooden floor laid in the room is dismantled; this step will allow access to the lower floors. However, keep in mind that during dismantling, debris and dust are generated, and the work itself is noisy, so carry out repairs in such a way as not to disturb your neighbors. It’s better if there is an assistant who can help you tear off boards, take out trash, make mortar, and so on.
Dismantling begins from any part of the room, but it is more convenient to proceed from the front door. If the wood flooring is in poor condition, you can leave only the intact elements and throw away the rest. Good material will be useful for some other purposes and auxiliary operations.
Dismantling begins with the removal of baseboards. After this, they begin to remove the old coating and rough flooring, which is located under the floor. If there is old insulation, it is also removed, and the base is thoroughly cleaned of debris.
Removing old flooring
What is needed to replace the flooring in a private home?
Replacing a floor is considered a job that you can do yourself with minimal construction skills. However, this requires the following tools:
- Tools for dismantling old flooring (boards, ceilings, wooden joists): crowbar;
- Shovel, trowel;
- Rule, building level, marking chalk and ruler;
- Coating for making a waterproofing and thermal insulation layer;
- Concrete mortar, expanded clay, sand, small crushed stone, stone or slag.
The list of preparatory work before laying the screed will depend on the area of the covering, as well as the depth of the base under the joists. It is recommended to fill the space under the house, which will prevent the rise of moisture and the formation of dampness.
Arrangement of the pillow
Now that the old coating has been removed, you can begin installing the concrete floor.
- A waterproofing layer is installed.
- Insulation is being installed.
- Installation of reinforcing mesh and damper tape is in progress.
- This whole pie is filled with concrete mortar. The layer of solution is 10 - 12 centimeters.
Diagram of a concrete floor
The entire work process involves several stages:
- Installation of the waterproofing layer. Hot bitumen mastic is used as waterproofing or material with water-repellent properties is laid. If the water-repellent material is in roll form, during installation, make sure that its edges protrude slightly above the floor level. Those places where individual sheets are connected to each other are coated with mastic.
Waterproofing layer
- When the waterproofing is laid, a thermal insulation board is installed on top of it. Such a heat insulator will help save on creating a screed, since it will require less mortar. In addition, such a step will improve the thermal insulation in the room and reduce heating costs. In addition, slab insulation also improves sound insulation, which is important if you live in a multi-story building.
Laying the thermal insulation board
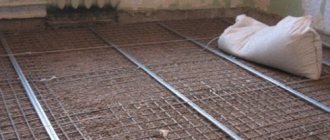
- At the next stage of repair, the reinforcing mesh is installed. For ease of installation, you can use beacons, and use welding or wire for fixation. A damper tape is attached around the perimeter of the room.
- Now it’s the turn of the solution. First, a solution for the concrete screed is prepared, then it is laid out on the floor surface and leveled, starting from the middle to the corners of the room.
Pouring a concrete floor
- When the solution is evenly distributed over the surface of the base, it is left to dry. The lifespan depends on the thickness of the layer.
- After the moisture leaves the concrete, a screed of a self-leveling mixture is applied on top. The floor repair is complete, all that remains is to lay the finishing coating.
After the ground is leveled, we begin to arrange the pillow. We fill in a layer of granite crushed stone of fraction 20–40 with a layer of 5 cm. We use crushed stone to protect the floor from mice. You can replace it with small broken bricks or broken slate. Lightly compact the poured layer of crushed stone.
To compensate for the thermal expansion of the screed, foam plastic sheets are laid around the perimeter of the room. It will also act as permanent formwork and insulate the ends of the finished slab. The thickness of the foam sheet is from 20 to 50 cm, thicker is not necessary.
Pour a layer of sand up to 10 cm onto the crushed stone. The sand must be clean, free of debris and foreign inclusions.
Let's move on to the floor screed device
After the mesh has been laid and secured, we prepare the solution and lay it on the floor. To find out how much mortar can be laid (the height of the mortar), you need to know the load per 1 square meter. In our case, the calculated load is 400 kg/m2, so a solution was placed at a height of 5 cm.
Now we wait until everything dries. According to the rules, you will have to wait 28 days. In our case, our builder waited until the solution hardened “in appearance” and began the final stage of leveling the floor. A self-leveling solution was poured in, which completely leveled our floor.
All. When everything is dry, you can cover the floor with linoleum, parquet and other materials, it depends only on your desire. The work is finished, you can relax and enjoy a reliable and durable coating.
Laying insulation
We use extruded polystyrene foam with a thickness of at least 50 mm as insulation. The sheet sizes are standard 1.2 x 0.6 m.
The sheets have a “locking” device in the form of a “step”, this is clearly visible in the photograph. When laying the sheets, the locks are connected, and the surface is continuous, without cracks.
Since extruded polystyrene foam (extrusion) is completely indifferent to moisture, you can do without waterproofing. We lay the sheets, checking with a level that they lie level. Add sand in the right places and check again.
An excellent material that can be used as insulation is polystyrene foam. In this case, close attention should be paid to its thickness. For greater effect, it should be at least 60 mm.
READ MORE: Which coating is better for a warm water floor? Find the answer here
The insulation sheets have special locks, which, due to the tight connection, give the surface a perfectly flat state without any cracks.
How to properly remove and replace floors in a house or apartment
In old houses where the floors were made of wood, the problem of squeaks and fragility of the coating arises very often. The board wears out, rots and dries out. Replacing a wooden floor with a concrete one in an apartment looks rational. This can be done, including in old houses. Concrete floors have excellent strength and service life, and can be covered with laminate if the technical requirements for this process are fully met.
Replacing a wooden base
There is often a need to replace floors. This procedure is time-consuming and financially expensive and requires a lot of labor. Unfortunately, once the work is done poorly, efforts and money are invested to correct it. Our article will help you avoid mistakes and share tips on how to optimize coating repairs.
Typical reasons for changing floors.
- Old age house;
- Ancient wooden boards;
- Major repairs;
- Installation and installation of “warm floor”;
- Thermal and sound insulation;
- High humidity;
- Deformation and creaking of floorboards or joists.
The most difficult thing to repair and change is in an old house. The boards there are dried and therefore difficult to remove.
Some repair features
Over time, any floor under the influence of temperature changes and various mechanical loads sooner or later fails. Naturally, there is a need for its repair. This process can be done quickly and easily, or it can be difficult and time-consuming. Everything will depend on the nature of the breakdown.
We suggest you familiarize yourself with How to sew an original rug from a clothesline
For example, everyone can easily eliminate such a nuisance as creaking floorboards on their own. For these purposes, holes with a diameter of 12-16 mm are drilled opposite the logs, into which “milk” of cement is then poured (cement and water 1:1). As soon as the solution hardens, a wooden plug with glue is driven into the hole as deep as possible until it stops. The remainder is cut off, and the surface at the repair site is cleaned and treated with a protective substance (wax or varnish).
However, if the floor defects are more serious, then, most likely, it will be necessary to replace the floor in a wooden house - partial or complete. In this article, we will focus on the process of replacing some boards. It’s worth noting right away that this work will be quite troublesome, if only for the reason that you need to select a material that will best suit the previously installed boards.
Removing old flooring
Dismantling the old covering is the first step in replacing a wooden floor with a concrete one in an apartment. For this, standard tools are used: sledgehammer, crowbar, crowbar.
- Linoleum floor coverings are removed.
- Using a tool, the coating is disassembled.
- In areas where pipes and other communications enter, you should be especially careful.
After removing the old boards, access to the base opens. In apartments, logs are laid on reinforced concrete slabs, often they are not even secured. The space between them is filled with the remains of construction waste for sound insulation.
Everything needs to be removed. To collect garbage you will need bags and a place for their temporary storage.
After construction debris and dirt have been removed, the joists are assessed. If the wood is in good condition, you can create a base for pouring screed over plywood or chipboard, which will be placed on the existing substrate. But this will cause the floor level to rise, so it is worth deciding what is better: to make a new coating on the joists, without insulation, or to remove the joists and form a layer of concrete over the floor slabs.
In practice, most apartment owners act according to the second option. The logs are dismantled. After this, you need to carefully evaluate the condition of the pipes - cold and hot water, sewerage. If there is damage or signs of poor condition, the interfloor section should be replaced immediately. Later, after the concrete floor has been created, repairs will cause much more problems and time.
Removing a wooden floor
Preparing the screed
Before you repair a wooden floor in an apartment, you need to decide in advance whether the floor will be insulated or not. Additional waterproofing may be required if there is a cold and damp area under the floor.
Ways to eliminate creaking wooden floors in an apartment
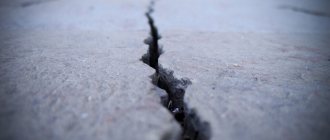
After removing the old floor, it is necessary to carefully examine the concrete base and its quality. If the concrete surface is covered with cracks, there are traces of concrete peeling in the form of a dull sound, or areas affected by fungus, then before replacing the wooden floor in the apartment, the old concrete screed must be completely dismantled. This is done using a hammer drill with a blade-shaped attachment. If the old screed is partially damaged, then only some parts of it can be removed.
For your information. In many cases, it is necessary to dismantle even a good screed if you plan to install a wooden floor in a new apartment. This is done in order to deepen the base, since installing joists and floor boards raises the floor level, and this is not always possible. Before replacing wooden floors in an apartment, you need to take into account that if there is insulation, the floor level will increase significantly, especially if large logs are used and polystyrene foam or expanded clay is used as insulation.
To ensure high-quality installation of a new layer of screed, the following steps are taken:
- After removing the old screed or repairing it, the room is thoroughly cleaned with a vacuum cleaner to remove as much dust as possible from the surface;
- Then wet cleaning is carried out, which removes fine dust and the room is thoroughly dried.
At this point, the preliminary preparation of the base is completed and you can then begin laying a new screed, the type of which is selected depending on the floor level and the preferences of the owner.
Self-leveling screed
If replacing a wooden floor in an apartment does not include insulation, then a regular self-leveling floor is used to restore the evenness and integrity of the coating. If there are large cracks or potholes, they are sealed with cement mortar or putty with additional reinforcement with paint mesh. Then the base is cleaned of dust and coated with a deep penetration primer in several layers.
Mix the self-leveling mixture according to the instructions on the package and fill the floor surface. For leveling, a needle roller is used to remove air bubbles and level the mixture. After hardening, the surface is perfectly flat and ready for laying a wooden floor.
Insulated expanded clay screed
If the floor needs to be insulated, then a screed made of expanded clay is installed. Expanded clay is a lightweight material and does not weigh down the floor, and also has good soundproofing characteristics. Before re-laying a wooden floor in an apartment and insulating it with expanded clay, the material must be purchased only in sealed bags or dried well before use. The process of laying expanded clay screed is as follows:
Do-it-yourself repair of a wooden floor in an apartment
- Beacons are installed on the surface of the base, the height of which should be equal to the thickness of the floor, taking into account the cement screed on top of the expanded clay. Beacons are installed strictly according to level;
- Next, expanded clay is poured in and carefully leveled. The expanded clay layer should be below the level of the beacons;
- Then the cement-sand mortar is mixed and laid on the surface of the expanded clay, leveling it along the installed beacons;
- After drying, the screed will shrink, which is additionally leveled with the self-leveling solution.
Important. If the apartment is on the ground floor or there is a damp and unheated room underneath, then before installing a wooden floor in an apartment with expanded clay screed, it is necessary to provide additional waterproofing. For this purpose, a mounting film is used, which is laid with an overlap on the walls or a coating type of insulation in the form of bitumen mastic. A damper tape is installed around the perimeter of the room.
A little about very old houses
In houses where there is no reinforced concrete floor slab, there is one way to replace a wooden floor with a concrete screed: build a subfloor from plywood or chipboard. Some people recommend repairing the existing wood floor or adding additional covering.
However, in practice, such work takes a lot of time, money, and requires replacing damaged areas, removing old paint and other coatings to assess the condition of the boards.
Therefore proceed as follows:
- all flooring boards are removed;
- in houses with ceilings on beams or a metal profile, construction waste is poured between the floor and ceiling of the lower floor for sound insulation. All this needs to be removed;
- the state of the lag is assessed. If bad, they are deleted. If good, the logs are cleaned, treated with anti-mold and antibacterial agents and secured in such a way as to ensure the evenness of the plywood or chipboard flooring.
Preparation of the base for the screed begins with filling expanded clay into the interfloor ceiling on beams or I-beams. This layer will have low mass and have good sound insulation. Backfilling is carried out to the upper level of the lag. After this, they lay plywood or chipboard and operate in the same way as in an apartment.
Screed base
Evaluation of the work list
First you need to make all the measurements and calculate the errors.
The reinforced concrete slab needs to be inspected and then the level measured. For this, it is better to use a laser; with its help you can quickly determine whether there is a difference in height.
We invite you to familiarize yourself with DIY landscape design of a private house with 30 photos of courtyards
One of the following situations often occurs:
- Several slabs are laid in the room, they form a step;
- a convexity or concavity is visible in the center of the room;
- The slab is placed at an angle.
If the height difference is large, from 70 mm or more, then the order of work is as follows:
- the concrete screed is made from 40 to 50 mm thick;
- the remaining free space is filled with expanded clay concrete composition.
There are also cheaper ways. The first is that the rough surface is covered with sand, but such a pillow will have a large mass. You can choose the second option by making the base from plywood sheets. Light, bulk material is poured under them on the ground. It could be expanded clay. It is needed to level the level.
The result is a smooth surface suitable for pouring screed, and the rough filling will be of small mass. It will additionally serve as sound insulation. This coating is suitable for laying parquet.
Expanded clay is spilled with water and then compacted. After the work is completed, you should wait 2-3 days until the layer dries completely.
Construction of waterproofing and insulation
After the rough base for the screed is ready, they begin to create a waterproofing layer. For this you can use:
- roofing felt or glassine;
- bitumen roll insulators based on fiberglass or fiberglass;
- polymer film;
- one-sided vapor-permeable membrane.
Before spreading the rolled waterproofing material, it is necessary to carry out preparatory work. To do this, the entire perimeter of the room is taped with a special construction tape. Afterwards the coating is coated with bituminous mastic of a cold type. Some compositions will require time to dry, so it is worth warning your neighbors in advance about the need to tolerate the unpleasant odor.
After the mastic has hardened, the perimeter is glued with damper construction tape 20 mm thick and the roll waterproofing can be spread. The strips of material are placed with an overlap of 10-15 cm, each subsequent strip overlaps the previous one. Along the perimeter of the room, the waterproofing agent should extend 10-15 cm onto the walls.
The seams are processed as follows:
- when using a polymer film, the area of the edge of the strip located on the previous one is glued with wide tape;
- roofing felt and other bitumen-containing materials are thoroughly heated with a construction hair dryer over the joint area and rolled over it with a gluing roller.
It is not recommended to use floating class materials in an apartment. They require processing with a kerosene burner, which can be a problem in conditions of limited space and ventilation.
Rolled waterproofing insulators on a self-adhesive basis will speed up the work. They cost more, but will speed up the flooring significantly.
After the waterproofing is laid, insulation is placed on it. This stage of work is carried out if a heated floor heating system is being built. In other cases, it is not necessary to use thermal insulation.
Waterproofing concrete floor
This work is complex and painstaking. It is performed according to the following principle:
- Flooring film for waterproofing. It should be placed directly on the base.
- Putting up damper tape.
- Placing reinforcement on the material to protect it from water.
- Installation of beacons on top of the grid. Beacons are located at the appropriate level of the plane.
- Pour concrete solution. It needs to be positioned 1.5 - 2 cm higher than the landmark on the far wall. This is the distance by which the fill will sag. When laying the mixture, you need to move only along the guidelines.
- After leveling the entire floor surface, the screed must be left to dry. This takes from 3.5 to 4 weeks. It all depends on the substances used to make the screed. Temperature and humidity levels are also important.
- Laying lags.
- Placement of insulation.
- Laying floorboards.
READ MORE: How to choose parquet boards for an apartment
Laying the screed
Reinforcing the apartment screed is recommended, but with a layer thickness of 40-50 mm you can use the following methods:
- classic, laying a 10 mm steel mesh with a mesh size of 5 cm on the floor with a gap to the insulation or waterproofing insulation;
- using plastic reinforcing mesh;
- adding special fibers to the solution.
You can also place an aluminum mesh inside the screed. But the method using fibers is the leader in terms of convenience and rationality. This will allow:
- do not worry about the presence of an expansion gap to the waterproofing or insulation;
- lay a heated floor heating system inside the screed;
- work at high speed.
Fibers for screed reinforcement are affordable, and their use can ensure uniform strength of the concrete layer. But when constructing a floor not on a reinforced concrete floor slab, it is recommended to proceed in the classical way, using reinforcing mesh.
Mesh reinforcement
The screed is laid from the window or far wall to the door. The solution is laid out in large portions and leveled with a long rule along the beacons. There are no difficulties during the work, you just need to act quickly so that the solution does not set and is easily smoothed out. It is recommended that two people work together to lay the screed.
Installation of beacons
Beacons on the floor on the prepared surface are installed simply: special profiles or a corner for decorating corners during plastering are placed on small mounds of gypsum putty. The evenness of the surface formed by the upper points is checked using a long building level.
If the base is poorly prepared and there is a difference in levels in certain areas of the area, the height of the putty mounds varies. The beacons must be placed at a distance of 40-50 cm, directing them along a line from the window to the door. Parts cannot be moved until the putty has completely hardened and the beacons are securely fixed.
Replacing wooden flooring with self-leveling flooring
If the floors are in poor condition and require dismantling, but there is no desire or money to lay new wooden flooring, then a self-leveling self-leveling floor can be an alternative.
One solution is to abandon the wooden floor in favor of a self-leveling self-leveling screed.
Ready-made compositions for self-leveling floors are designed to dry quickly and bring the reinforced concrete floor surface into perfect order.
The installation of a self-leveling coating consists of several stages. Moreover, the first, preparatory, is no less important than the finishing one.
Defects in the concrete base must be repaired.
- The surface is being checked. If cracks are found on it, they must be carefully repaired. To do this, the crack is expanded, primed and filled with a homogeneous cement-sand mortar or special repair putty. In some cases, a sealant designed for use with concrete may be suitable for small cracks. If there are depressions or protrusions on the surface, they also need to be removed. The protruding parts are cleaned off with a grinding machine or simply knocked off. The depressions are filled with repair compound to the general level of the base. In order for the solution to have good adhesion to the concrete surface, it is necessary to make notches in the depression area, then clean it of debris and prime it.
Primer of concrete base for self-leveling floor.
- The next step is to apply the primer to the entire floor surface. This composition is designed to create the required high adhesion between the base and the self-leveling floor solution.
- Then, the solution is mixed in the prepared container, according to the manufacturer’s recommendations on the packaging. Mixing must be done using a construction mixer, or an attachment that is installed on an electric drill or hammer drill.
Leveling the solution over the surface with a needle roller.
- The solution is poured onto the concrete base in puddles starting from the far wall of the room. First, the solution is distributed over the surface with a wide spatula or squeegee. And then it is finally leveled by rolling with a needle roller.
- When the entire surface of the floor is covered with a layer of self-leveling compound of the required thickness, time is given to dry and gain strength. The drying time for each specific composition may be different - this information must be indicated on the packaging of the mixture.
This method is good because the work is done quite quickly. And with due diligence and following the technological instructions, even a novice master can do it. The solution dries quickly, which means you can soon move on to the next stage of work. Once ready, this base is suitable for almost any type of decorative floor covering.
* * * * * * *
Now, having information about the methods of repairing floors in Khrushchev-era houses and assessing the condition of the floors in your own apartment, you can decide on the choice of the optimal method. However, before undertaking a major reconstruction, you need to properly weigh both your financial capabilities and your experience in construction and finishing. If you carry out repairs on your own, you can save a decent amount by spending only on building materials.
In the apartment, I want to achieve maximum strength and at the same time the aesthetics of the concrete floor covering. There are several ways to do this:
- sand the floor with sandpaper;
- apply special polymer compounds or paint with paint for concrete;
- iron the surface of the screed after 3-4 days, when partial hardening occurs;
- form a thin layer of self-leveling floor.
If you plan to lay tiles on the floor, you can do without additional surface treatment. For laminate or linoleum coverings, it is recommended to carry out ironing. The most expensive version of self-leveling flooring allows you not only to obtain a smooth and even surface, but also to create an effective final coating. For example, a popular 3D floor or with graphic images.
Finishing option
The issue of creating the final coating should be considered in advance. The self-leveling floor will raise the overall level by about 30 mm, a similar situation with ceramic tiles. However, the final design can be considered as a secondary measure. As for the concrete floor itself, if you follow the given rules and methods, after complete drying in 2-3 weeks, you can create a very strong, durable coating at an acceptable cost of money and time.
Make a new one or restore?
When analyzing the condition of the surface, you should pay attention not only to the safety of the floorboards, but also to other components of the coating. Often all elements require restoration: logs, black coating and thermal insulation. The best way to do this kind of work is to completely dismantle the floorboards. If the house was built relatively recently and there is firm confidence in the correct organization of the above elements, then you can limit yourself to cosmetic repairs and partial replacement of boards.
In what cases is floor repair required in a private home? There are several signs that it will happen as soon as possible:
- Deflection of boards even under light load. This indicates a loss of integrity of the floorboard due to rot, cracking or chipping.
- The appearance of characteristic sounds - creaking. Under the influence of moisture or temperature changes, the geometry of the board changes, as a result of which it can partially disrupt the tightness of its attachment to the joists.
- Increasing the gaps between the floorboards, or the reverse process - increasing the pressure of the ends on each other. The reason for this is the lack of a thermal gap during installation, which should compensate for the expansion of the entire flooring.
Having determined the type of defect and its area, you can calculate the costs of eliminating it. In this case, financial costs and labor intensity of the work should be taken into account. If they exceed the same indicators for installing a new floor, then it is better to completely replace the coating.
But this situation rarely arises - in most cases, repairing the floor in a house is more profitable than a global restoration.