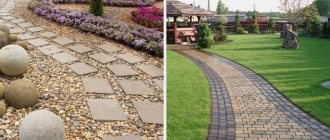
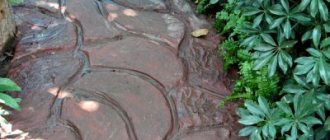
A cozy path running from one corner of the garden to another, carefully transporting us, along with garden tools or barbecue meat, to where we need to go.
Why not make just such neat paths in your own garden. Literally a small element - a border - can change the entire appearance of the garden beyond recognition.
If you have a bunch of broken bricks on your site, then curbs can be made from it; this is the most popular solution in Russia. It is laid on a corner and lightly sprinkled with earth, or a solid brick is laid on its end and also lightly sprinkled. In the second case, the brick can be strengthened with cement by smoothing the seams between them.
Very original borders are made of wooden chocks, which can be used in the fall by cutting off excess branches of fruit trees. This “planting” of chopped branches can be done either on one side of the path, or on both sides, or only in a certain section of it - depicting a bridge over a stream, for example.
Natural stones look very beautiful as a border; they don’t have to be selected according to size - let them be different, including in color, it’s more interesting. Small stones can be held together with cement, and large ones can simply be lightly buried in the ground. Small flowers and decorative grass look great next to such “boulders”, so you can also decorate the path with such greenery.
You can, if you have time and opportunity, make a border out of concrete, because it can be easily transformed into any, the most interesting shapes, if you know how to work with wood to make formwork. At the same time, you should not forget about the metal reinforcement, otherwise the concrete will not please your eyes for long, but it is very important to hide the reinforcement deeper in the concrete so that it does not rust.
If you are making a terrace, or limiting an alpine hill near the house, then it is best to build a wall - from concrete, stones or other material; seedlings of climbing plants will look great on top of the wall.
The wall can also be built from logs - they are best placed vertically, slightly dug into the ground, reinforced with cement for greater safety. To prevent the logs from rotting quickly, it is necessary to arrange drainage, and with the help of a pipe in the lower part of the wall, accumulations of melt or rainwater can be drained away.
Before you decide to make borders for a path or wall, you need to carefully consider their configuration and the amount of material so that your garden does not become a permanent unfinished landscape misunderstanding.
Wooden border
Many garden plots have supplies of logs. They can serve as an excellent material for making a wooden border. To do this, select logs of approximately the same diameter, and then cut them into stumps of the height you need. Clean and sand at least a little on the top (visible) part.
Our saw cuts, and especially the lower (buried) part, require good protection from rotting and all “living creatures”. To do this, use antiseptic agents or hot drying oil. For processing, you can use a brush, or simply dip the hemp in a container with an antiseptic for a few minutes. For the lower, buried part, waterproofing is sometimes used. In this case, we dip our saw cuts into molten bitumen.
After the antiseptic has dried, the hemp is treated with varnish. The same methods are used for this. They are installed on a sand cushion. We align them relative to each other using gentle blows with a rubber hammer (or a metal hammer through a block).
Of course, there are other options for wooden borders. These can be ordinary boards, or you can purchase ready-made sets of small wooden blocks, already processed and fastened together.
Brick border
A very popular material for laying borders is brick. Perfect for edging a gravel path or natural stone path. It is better to use facing bricks, which will last much longer. There are different options for laying bricks. The most popular is to install them at an angle of 45 degrees in the form of teeth. For this option, a trench is dug about 10 cm deep and about 20 cm wide. And the bricks are laid on cement mortar. To ensure that the bricks are the same height, use a pre-tensioned rope on the pegs as a guide.
Materials for production
The materials used to make curbs can be varied. For example, brick, concrete, wood, plastic, plants, even metal. Each of them has its own installation and maintenance features.
When choosing borders, the main thing is to harmoniously combine them with the existing design of your site. Next, we will consider each type of curbs in detail.
Wooden borders
Wooden fences are perfect for areas decorated in country, Provence, as well as Russian and Ukrainian styles. Look good with paths made of gravel, wood or simply planted with grass.
You can use a simple board or timber. In this case, to install, simply dig a small trench in half the board, place a border in it, and cover it with earth. However, it is worth considering that untreated wood is a short-lived material. It is very susceptible to weather conditions, and after a year it will lose its appearance and turn gray. To prevent this from happening, you need to follow several rules:
- The board must be without a top layer and sanded;
- The elements should be approximately the same size;
- All parts of the future structure must be treated with special preparations to protect 75% of their length;
- Used machine oil can be used as a treatment agent;
- After the boards have dried, paint or varnish the untreated part;
- The wooden elements of the border should be mounted on a sand cushion.
A border for paths made from wooden blocks looks much better. You can make them yourself by sawing thick tree branches into identical elements. It is better to do this in the fall, when you remove excess branches from fruit trees. To install self-made stumps, you need to dig a trench, put the stumps in it, and cover them with earth. Before installation, it is advisable to treat the wood with protective compounds that will extend the life of your fence.
Ready-made logs can be purchased at a hardware store. They are completely ready for installation: tied with fishing line, coated with special compounds to prevent destruction and pests.
Brick borders
Brick fencing is easy to make with your own hands. They are perfect for garden paths made of stone or concrete. For the construction of a border, facing bricks are more suitable. It is more durable and resistant to negative environmental influences.
Making a brick curb is quite easy. It is best to assemble it before laying out the tracks.
- Mark the contours of the paths on the ground;
- Dig trenches 2/3 brick deep;
- If desired, you can lay sand or gravel at the bottom of the trench, but then it needs to be made a little deeper;
- Then install the bricks close to each other. It is best to do this at an angle. The tilt angle should be approximately 45˚. Then the edge of the border will turn out jagged;
- Bury the bricks well with earth and compact them. The beautiful curb is ready.
If you decide to lay bricks one on top of the other, then they need to be held together with cement. Otherwise, the fence will quickly become unusable.
Plastic borders
Plastic borders for garden paths are among the most reliable. In addition, their construction does not require much effort. In appearance, such curbs look like a wide, long ribbon. There are shaped elements, but they are more decorative. This tape is usually sold in reels. To cut it, unwind the roll and place the material in the sun. Dig a narrow trench 7-8 cm deep and place structural elements in it. Dig it in with soil.
If you are installing fences with a height of more than 4 cm, then strengthen them with plastic pegs. They need to be dug into the ground at regular intervals from the outside of the structure.
A distinctive feature of plastic curbs for paths is their flexibility. With the help of such structures you can give the paths any shape. In addition, the choice of colors for plastic is very large. You can easily choose the color that suits your design. Plastic fences are also easy to store in winter when folded.
Metal borders
Metal borders look beautiful and last for quite a long time. For their manufacture, as a rule, aluminum, copper or steel are used. They are least susceptible to corrosion. Keep in mind that each metal exhibits individual characteristics over time and acquires its own characteristic shade. For example, copper turns green and aluminum turns dirty gray. Such curbs would be ideal in combination with crushed stone paths.
You can purchase curbs with embossed elements or curly edges. Such barriers look especially advantageous. At the end of the strip, as a rule, there is a fastening that provides a strong connection between the parts of the curb. If your structure has a closed shape, then thanks to this lock they will be securely fastened.
Installing metal barriers is very easy. You just need to dig the tape along the edges of the garden path. In this case, strictly observe the vertical position of the fence.
Concrete curbs
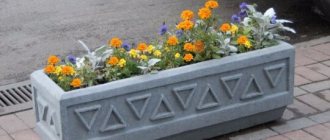
Concrete curbs are considered the most durable. Fences with the following dimensions will look best: 20 cm high and 15 cm wide.
You can use ready-made concrete blocks. To install them, dig a trench, make a backing of sand, and compact it properly. If desired, apply any waterproofing. Place concrete blocks tightly in the trench and cover with soil. It is worth considering that the finished blocks mostly look the same. Manufacturing companies produce rectangular shapes or round posts with a recess. Besides, they are expensive. But the quality of such curbs is higher than that of homemade ones.
If you need an unusual shape for the curb, you can pour the concrete yourself. In this case, make formwork from plywood or thick tin. You can also buy a ready-made form for pouring concrete. These forms are made of polymer materials and are easy to work with. But if you use them carelessly and violate the manufacturing technology of concrete structures, they will quickly deteriorate.
Prepare the solution. To do this, pour sand and dry concrete into the trough in a ratio of 4 to 1, mix well. Add water. Watch the consistency: the solution should not be too liquid or too thick. Pour it into the formwork. Lay the reinforcement in the shape of a ladder (four-millimeter rods must be connected to each other using welding or thick wire), place it in the solution.
Metal parts should not be visible from under the concrete, otherwise they will quickly rust. Level the surface of the fences using a trowel. Go over the surface with a hammer drill or sander. Thanks to vibration, concrete is pressurized, thereby increasing its strength. The formwork can be removed after 1-2 days. For 7 days, such borders must be watered with water from a hose or watering can once a day. Otherwise, cracks may appear in the concrete. For the same purpose, you can cover them with polyethylene.
Important! If you do not plan to use reinforcement when making borders, then you should not make its elements too long (maximum 1 meter) and thin. Otherwise, the structure may break.
Hedges
Plant borders are the most spectacular, but the most difficult to make. Boxwood or horizontal cotoneaster are best suited for creating hedges. The width of such a wall should not be more than 30 cm, otherwise it will not look very neat. Shrubs should be planted at small intervals. When the bushes grow, the distances will be filled.
This type of fence needs to be carefully monitored. It needs to be cut three times a year and watered periodically.
Borders made from low-growing herbaceous plants look beautiful. For example, from marigolds, barberry, lavender, etc. In this case, the edges of the path are framed by long narrow flower beds.
Bottle borders
When arranging fences, you can use bottles. This is one of the most budget-friendly fencing options. You can build it yourself in just a few hours. In addition, bottles are a durable material that is not subject to corrosion and rotting.
To create a barrier, bury the bottles with their necks halfway into the ground. It is better to cut off the neck of plastic bottles. And before digging in, they must be thoroughly washed and then dried. Otherwise, the coating on them will ruin the entire appearance of the borders. You can use bottles of any color; they will diversify the design of your site.
Glass bottles are much stronger than plastic bottles. When installing them, they should be filled with sand or small crushed stone and the neck should be closed. Dig a trench and fill it with cement mortar. When the solution hardens a little, carefully insert the bottles into it and level it.
Wicker borders
Wicker borders will become a very original element of decorating your territory.
To make them you will need:
- thin logs;
- willow twigs of equal length;
- hard wooden sticks.
Soak the willow twigs in water in advance, this will make working with them easier. Place logs along the paths. The spaces between them should correspond to the length of the rods. Stick wooden sticks between them. Braid the rods. To do this, take 2-3 twigs, fasten them into a bundle and pass them behind the first stick, then in front of the second, then again behind the third, etc. Fasten the twigs with a thin fishing line, and also fix them on the logs. In this way, secure all the elements of the border.
Natural stone border
Curbs made of natural stone are distinguished by their long service life and beauty, but are quite expensive. To design paths, you can use granite, large pebbles, tuff, sandstone, basalt, dolomite, etc. Sandstone, limestone and tuff tolerate the effects of the external environment well.
To construct such a border, dig a trench. The width of the trench should be equal to the size of the largest stones. Cover it with geotextiles and fill one third with sand. Compact it. Place the stones on the sand and cover any gaps with soil. If you plan to make a fence of several rows, then it is better to fasten the second and subsequent layers with cement. You can lay them out this way, but then select the stones according to size. They should cover the gaps in the previous row well.
Tire curbs
If there is no money at the moment, but you want to make curbs, then you can use old tires. Of course, this is not the most environmentally friendly material, but it is resistant to negative environmental influences. Curbs can be made from either whole tires or cut strips.
Just dig the whole tire into the ground and tamp it down well. Secure the strips made from tires to bars, the length of which will be equal to the width of the strip. Secure the beams into the ground. For reliability, you can fill such curbs with concrete mortar.
As you can see, the border can be made from almost any material. His choice depends only on your preferences, the features of the landscape design of the site and your financial capabilities. At the same time, you can make and install almost any curb yourself. It won't take much time or effort.
In addition, you can always turn to professionals in your field. They will make barriers of any shape for you in the shortest possible time. And neat, clean, weed-free paths framed by beautiful hedges will delight your eyes every day.
Stone border
A natural stone border is not just a functional element of your garden, but also a spectacular and colorful decoration. You can use almost any stone as a material. It can be sandstone, marble, limestone, granite. Granite combines most harmoniously with paths made of paving slabs and stone. The stone is laid identically to the previous option, on cement mortar, sand or pebbles. It is better to select stones of the same size and place them as tightly as possible.
Since natural stone is quite expensive, borders that imitate natural stone have appeared on sale. They are quite popular, and not only because of their price. Such borders are neat and aesthetic and do not require special care.
Technical characteristics and markings
In private construction, garden border stones and, somewhat less frequently, road stones are mainly used. Main fencing is not used in private construction due to its large size and high cost. At factories, curbs are made using semi-dry vibration pressing technology. The technical characteristics stated by the manufacturers are as follows:
- strength grade of concrete products not lower than M400;
- frost resistance 200-300 cycles;
- concrete class B30;
- estimated service life up to 20 years.
The most common size of road curb is 1000x300x150 mm. Factory-made garden path borders have dimensions of 1000x200x80 and 500x200x80 mm.
The marking of factory-made products is the letter designation BR and the next three numbers corresponding to the length, height and width in cm.
Curb sizes.
Plastic border
Plastic border is the simplest and cheapest option. Nevertheless, it has a number of significant advantages. The first is, of course, its price, the second is that, like metal ones, it can be easily installed without preparation, and the third is their long service life.
You don't need to dig a trench or prepare a foundation. They are easily installed using pegs and attached to each other using anchor pins. With them you can easily create a functional border for the most winding garden path.
Garden paths: design and construction
The complexity of the garden path “pie” largely depends on the soil on your site. And it varies in many regions. The consumption of building materials, as well as preliminary preparation for the construction of paths, will depend on this. If your groundwater is far away, and there is dense clay after the fertile layer, then you will need to remove the fertile layer and level the base.
Why remove the fertile layer when building garden paths? 1. You will need good land for farming. 2. The height of the paths should be slightly higher than the ground level by 1-2 cm, so that water does not stagnate on it during rain. 3. The layer of sand and crushed stone should be approximately equal and be about 30 cm high. In many regions, groundwater is very high and can be at a depth of 50 cm. In this case, there is a high probability that in the fall after heavy rains the entire base of the sidewalk paths will be saturated water, and in winter this whole pie will freeze. When thawing and freezing, garden paths can “lead”, they will take on a wavy appearance, which is often observed even on city streets.
What are the recommendations for constructing garden paths if the groundwater is high? 1. Use non-woven geotextile fabric when constructing sidewalk paths and platforms. The service life of geotextiles in the ground is about 25 years. It does not rot, does not mold, is tear-resistant and easy to install. Its cost is relatively low. 2. To prevent gravel from entering the clay and mixing with it on unstable soils, lay the geotextile fabric on the ground with an overlap above the soil line. 3. A greater effect will be achieved if geotextiles are laid between the soil and sand. 4. If garden paths will be the blind area of the house, insulate them with polystyrene foam sheets to prevent freezing.
Materials for building a garden path at the dacha Before starting to build a path at the dacha, determine its width and length. The best width of the path is considered if two people can move freely along it. The gate at the dacha is made approximately 100 cm in size, which means that, taking into account the fact that the standard dimensions of paving slabs are 30x30 cm, we will make a path 100-120 cm wide. Building materials for the construction of a garden path:
- geotextile - density 200 g/sq.m;
- paving slabs - 30x30 cm;
- curb stone - 30x 50x 4 cm;
- crushed stone;
- river sand;
- hand tamper, shovels, wheelbarrow.
Concrete curb
One of the most practical and reliable curbs. There are several options for this border. The first is concrete blocks. You can buy them ready-made or make them yourself. That is, we make a form at our discretion and fill it with concrete. The second option is pouring concrete in situ. Let's take a closer look at this option:
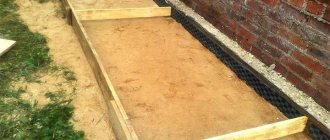
- The route of the future curb is marked.
- According to the markings, we dig a trench with a width slightly larger than the expected width of the curb and a depth of 1/3 of its height.
- The bottom of the trench is leveled and compacted, after which a layer of gravel or sand is poured.
- Now the formwork is being done. Traditionally, boards are used, but since garden paths are usually winding, we use flexible materials such as hardboard or flexible plywood.
- Fill the resulting container with the solution. Using a trowel, smooth and compact the mixture.
- Protect the poured form from direct sunlight and leave to dry for 5-7 days. During this period, the solution should not dry out, so from time to time its surface should be moistened with water.
- The border can be decorated in many ways, this is described in detail here - a garden path made of concrete slabs.
Making a curb with your own hands
There is also the possibility of making curbs yourself for fencing a lawn, decorative paths or flower beds.
For this work you will need the following items:
- Polyethylene film
- Metal plates
- Trowel or mixer
- Container for preparing the solution
- Channel
- Fiberboard sheets
Initially, it is necessary to find a perfectly flat surface on which the work of pouring concrete into the mold will be carried out.
The dimensions of the manufactured curb will depend on the height and width of the channel. A channel is a long “U”-shaped profile, made of metal capable of withstanding strong expansion loads. To make several curbs, before pouring, it is necessary to insert fiberboard partitions at an equal distance from each other.
Metal plates are inserted into the pre-cut edges of the channel. After that, polyethylene film is placed in the molds. 1 layer of liquid cement mortar is poured. After hardening, a 2nd layer of thick cement is laid. Then pieces of reinforcement are laid out and again filled with thick mortar. The last layer is covered with a liquid solution.
"Living" border
A green or living border is a hedge of plants. It looks very original and beautiful. To create such borders, low-growing and unpretentious plants are used. The ideal option would be boxwood; also popular are: horizontal cotoneaster, lavender, cloves, sage, Carpathian bellflower, alyssium, bergenia and others. They are planted along the paths so that their width and height are about 30–40 cm.
When choosing a material for a future border, remember that it should be organically combined with the overall style of the site, with individual elements of landscape design. Borders made from the same material as the house fit in very harmoniously. For their long life, consider water drainage and prevent excessive grass growth. You can read about the various types of garden paths by clicking on the link.
Preparation of concrete
The concrete mixture for making curb stones is best mixed in a concrete mixer. This will ensure better quality and high strength of the finished products. Kneading by hand is long, difficult and of poor quality, since the components include crushed stone.
Pay attention to the purity of the water and the absence of clay in the sand. The presence of impurities reduces the grade of concrete and reduces the durability of curbstones. Therefore, before preparing the mixture, it is recommended to sift the sand and use tap or well water.
To ensure that the finished curb stone is easily removed from the molds, lubricate their inner surface with machine oil or other liquid lubricant.
The volume ratio of cement, sand and gravel is determined as 1: 2.5: 3 for M400 grade cement, or 1: 3: 4 for M500 grade. Initially, you need to load half of the required sand, half of crushed stone into the concrete mixer and mix for 2-3 minutes. Then add all the cement, the rest of the sand and crushed stone, and mix the dry mixture for 4-5 minutes.
Dissolve plasticizer or liquid soap in water and pour into the dry mixture. Add water gradually until the required viscosity is obtained. To obtain colored borders, pigment is added to water and poured into the mixture. All laying of materials is carried out with the concrete mixer running.
Concrete is prepared in the same way for pouring into molds and formwork. The only difference is the quantity required. The number of forms determines the speed of the process. Therefore, if possible, they need to be made at least 8-10 pieces.

