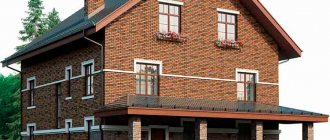
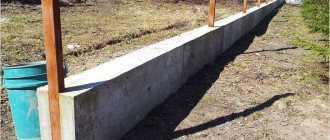
The foundation is the basis of any building and the future fate of the building will largely depend on its quality. Will the foundation shrink or will cracks appear? The foundation is poured using various materials (concrete) - cement. sand, slag, screenings, crushed stone as filler. Depending on the proportions of the constituent components, concrete may have a different grade, but it is desirable that it is not lower than M150-200. After pouring concrete into the foundation formwork, the concrete, under the influence of various factors (ambient temperature, presence of precipitation), goes through several stages of gaining strength characteristics. According to science, concrete gains strength in 3-5 days - 35%, in 14 days - 70%, in 28 days - 100%. So, when can we continue further construction on a new foundation? Regulatory documentation allows this to be done with a strength gain of 70%, i.e. somewhere 14-15 days after pouring. But I will give 2 examples from personal experience. We built an extension to the house and built a garage. In the first case, the foundation was left to settle in the winter (the old-fashioned way), and the construction of the garage continued about 20 days after pouring (the builders were in a hurry). After the passage of time, the following result was obtained: - the extension to the house does not have any cracks, it stands perfectly, there are no cracks in the area where it adjoins the old house; — the foundation of the garage has shrinked slightly and unpleasant cracks have appeared in two places on the wall, which have to be constantly plastered. So, it’s up to you to decide which path to take: let the foundation stand for a long time or continue construction after reaching 70% strength. Make the right choice.
- You must be logged in to post comments.
A common question. The foundation is the foundation. The strength must be one hundred percent reliable. Builders often worry about calculating when to lay bricks. I’ll say right away: a month is not enough, you’ll have to wait longer. Some developers wait a year! Concrete, of course, needs time to dry completely. The maximum possible time must pass after pouring before standard construction begins. Otherwise, the foundation will be defective and the structure of the house will be damaged. Perhaps immediately, perhaps in the future. In the first three days of pouring concrete, it is thirty percent harder if conditions are normal. After two weeks, the concrete strength reaches eighty percent strength. After two months, one hundred percent strength of the poured concrete can be guaranteed. Experienced builders wait up to a year, since there is no limit to perfection when it comes to concrete hardening. The longer it takes, the stronger and more reliable it becomes, but then the process progresses more slowly. Brick can be installed after two months (full). Although, there are many opinions. Experienced builders wait half a year to protect both themselves and the building.
- You must be logged in to post comments.
You are right - the foundation is the most important thing during construction. Just as your friend's words are true. In general, the strength gain of the foundation is approximately as follows: • 3 days - 35%; • 7 days – 50%; • 14 days – 70%; • 28 days - 100% (in accordance with brand strength). All this is true for moderate weather and above-zero temperatures. In special conditions, it is necessary to do a special strength examination.
As a rule, construction begins with laying no longer than the third day after the foundation begins to set. Which is theoretically possible and true. But here you should take into account the standards of SNiP 3.03.01-87, according to which construction must begin after the foundation has reached 70%. And not before. To determine the strength, as a rule, they hire a specialist who does an analysis (research) and then gives the go-ahead (if the strength is equal to or greater than 70%).
True, for private, small construction, this procedure is usually skipped. And everything is done at the behest of the owner. Accordingly, the responsibility lies with the owner; in your case, it will be yours.
Better wait 2-3 weeks or a month.
- You must be logged in to post comments.
Number of questions displayed: 3
You must be logged in to post answers.
Latest questions and answers
Popular questions
Social media
Statistics
We recommend that you read:
Developers are often faced with the question of how long the foundation should stand after pouring. The strength of a reinforced concrete foundation depends not only on the quality of the reinforcement and concrete. The monolith must still gain sufficient strength before walls can be erected on it. Let's try to figure out how long the foundation should stand before building a house.
Masonry standard: how many bricks per day?
Very few people know how many bricks need to be laid per day and how long it takes to build a building of several floors. Today we will together try to understand the standards for brickwork, the duration of construction processes, and also talk about possible ways to speed up the construction of brick projects.
The duration of construction processes often depends on the skill of the masons.
Advantages of brickwork
Brickwork is usually understood as a brick structure that has a certain sequence and size. As a rule, modern buildings are made of sand-lime and ceramic bricks, which are fastened together with mortar.
Brick is a universal building material that is inexpensive, easy to install, and also has good performance characteristics. That is why this building material is so popular.
The construction industry is developing very rapidly nowadays; every year more and more multi-storey buildings and large structures made of brick appear. This is not at all strange, because thanks to the stability of this material, buildings can last for decades. Laying a brick wall is a long and labor-intensive process, but if everything is done efficiently, the result will justify all the time and effort.
All about brick partitions
The arrangement of the premises and its redevelopment must comply with certain standards. Brickwork of partitions SNP regulates everything and there are specific requirements for such types of construction, namely:
- The thickness of the partition cannot be less than 10 centimeters;
- The material used to make the wall must have fire-resistant qualities;
The most suitable building material in this case is brick. A brick partition will last much longer; moreover, it is quite durable and practically does not allow sound to pass through.
All work is done in the following order:
| Marking | Brickwork of internal partitions begins with markings:
|
| Choosing material | The price of brickwork partitions will depend on the material of manufacture:
|
| Carrying out masonry | The cost of brickwork partitions will be finalized after laying. It can be done using simple cement mortar. It is essentially universal. If you need to make the wall warm, then a lime composition is best suited. Well, if the wall is not large and you don’t want to knead a lot, then you can use dry mixes that are commercially available. |
Features of the work of a mason and established standards
The work of a mason is very difficult; you not only need to constantly meet certain standards, but also maintain the quality of the masonry, and this, in turn, requires physical effort and certain skills.
During one day, according to the standards, you can lay no more than 4 rows of bricks. The fact is that if there are more rows, the wall will turn out weak and uneven. If you want to increase the speed of laying bricks, then try to make 4 rows on different walls. Even if, at first glance, it seems to you that 8 rows look smooth and strong enough, you can be sure that the next day you will find a crooked, sagging wall.
A team of 4 people will be able to lay up to 3 m 3 of bricks per day, with one of them being a master, two on a concrete mixer and one assistant. 1 m3 consists of 400 bricks. This option for performing the work varies depending on the type of masonry, the width of the walls, the number of floors and other features.
Brick calculation table.
To fasten the bricks together, a solution of sand, cement and water is used. It is very difficult to work with this liquid, which slows down the construction process. Experienced foremen, in order to speed up the process, recommend adding clay or lime to the solution. Thanks to this addition, the solution becomes plastic and easier to use.
As for other building materials, such as foam blocks, for example, the masonry standard for a team of 4 people per day is up to 4 m3. If only 1 person will lay out aerated blocks, then laying out 60 blocks in 8 hours of work is considered normal.
Laying the first row of aerated concrete with your own hands
Installation of aerated concrete blocks is quite simple, so it is possible to lay the first row of aerated concrete with your own hands , without the involvement of professionals. The most important thing is to follow the technology, then the walls will be smooth and the house will last a long time.
If you or the organization you work for constructs knowledge from aerated blocks, you may be interested in purchasing equipment for their production. The AltaiStroyMash company sells high-quality equipment for the production of non-autoclaved aerated concrete . You can find all the necessary information on this topic on our website. It is possible to supply equipment anywhere in the world : throughout Russia, to the CIS countries (Uzbekistan, Kazakhstan), etc.
Go to catalog
Determining appropriate performance standards
Nowadays, there are already many architectural universities and technical schools. Famous engineers and builders are constantly working to improve brickwork, come up with new methods for building walls and try in every possible way to reduce the time spent on building brick walls.
Modern scientists and specialists in the field of construction offer a certain formula that allows one to calculate production rates.
It looks like this:
Work operations for preparing partial bricks and cutting its edges.
Additionally, the number of personnel and the size of the construction project are taken into account. This allows you to accurately determine the time required to construct a building. Each type of masonry, and there are several of them, requires a certain amount of time. Pressed masonry is considered the most difficult; it is usually used for the construction of important objects. Even for experienced masons, building such a wall requires a certain amount of time. Well masonry is considered the simplest; it is used for country houses whose walls do not require additional heating.
Useful tips for a novice builder
If you are new to the construction industry, then in order to speed up construction and achieve the norm, try to prepare everything in advance, for example, stack the bricks in one place, so as not to constantly run for a new batch at the other end of the building. All ingredients and the solution itself must be at hand by the builder. It is very good to involve apprentices and helpers in construction. It is quite difficult for one person to cope with all the necessary stages of work and comply with acceptable regulatory requirements.
Now you know how many bricks, according to the standards and laws of a mason, can be laid per day. Even if you want to finish the construction faster, remember that high-quality brickwork will delight your eye for a long time and will serve as a reliable fence from the outside world. The hastily constructed masonry will not last long, and additional finishing will definitely be required, since uneven seams and distortions will be noticeable from afar. Haste never leads to good things; it is much wiser to get everything right and get a good result than to overload and constantly rush workers.
It is quite difficult to calculate exactly how many bricks a mason should lay per day, since some craftsmen focus on the accuracy of the seams, while others take longer to develop the mortar and level the wall itself. To a large extent, it all depends on the specific skills and experience of the specialist. It is clear that highly skilled craftsmen will lay many more bricks in an 8-hour working day than those new to the construction industry.
Laying brick pillars for a fence
In a combined brick fence, an important role is played by the correct and durable laying of brick pillars. To build strong and reliable cabinets, it is important to strictly adhere to the installation technology. You can build brick pillars with your own hands or invite a team of builders. Before this, it is necessary to draw up a work plan and coordinate the drawings.
Laying the first row of aerated concrete
As you can see, everything is quite simple. Consistent laying of aerated concrete blocks is important - the first row is the most important element. A brief installation technology looks like this:
- Level the surface of the strip foundation. If it is smooth, remove dust, coat it with mastic and lay roofing material.
- Using a tape measure and a laser level, we find the upper corner and lay the first block; We lay blocks on it in the corners.
- We stretch the cord between the blocks and begin laying with the blocks aligned vertically and horizontally.
- We wait for the solution to harden, after which we perform reinforcement.
- Lay the next row of blocks.
Material calculation
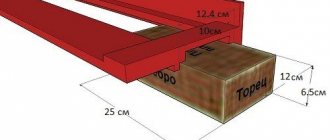
Before you start laying brick fence posts, you need to correctly calculate the amount of material required. Often the masonry is formed into one and a half bricks, so one row will require 4 blocks. Standard brick sizes are 120x250 mm. As a result, to lay columns of 1.5 bricks on one side you will need a size of 250 + 120 + 10 = 380 mm, where 10 mm is the width of the joints.
The thickness of 1 block is 65 mm, and if you take into account the allowance for inter-row seams, then for 1 column 2 m high you will need an average of 108-110 pieces. Let's calculate the total thickness of the row with seams:
- 66 + 10 = 75 mm.
From here you can find out how many rows you will get:
It is important to take into account that it is recommended to lay out the base of the brick pillar in the first 2-3 rows from solid blocks. And the 3rd row and above can be lined with bricks with voids or a row can be formed from facing bricks. This technology will provide the pole support with stability and reliability. If the height of the brick pillars exceeds 2 meters, it is recommended to lay two bricks.
What bricks are needed?
Fence posts are laid mainly from solid silicate brick, which is resistant to sudden temperature changes and precipitation. It is important to pay attention to the appearance of the blocks, color, as well as the combination with the overall style of the facade. Often brick pillars are laid using ceramic blocks. Good performance characteristics of clinker, hyper-pressed material. Laying brick columns is often carried out in one of 2 options - 1, 2 or 2 bricks. Much less often, masonry is formed in one or half brick. In this case, the pillar support is strengthened with screw piles, and the brick laid around it performs only a decorative function.
Pouring the foundation
Before you start building a brick fence, you need to draw up a drawing of the future fence and agree on a work plan. The next stage is the formation and pouring of the base over which the pillar stand will be built. It is recommended to follow this procedure:
The pillars themselves need to be laid out when the foundation has hardened well.
- Using an earth drill with a screw, build a hole 500 mm deep and 200 mm wide.
- Place a layer of sand at the bottom of the recess and compact it well.
- Afterwards, the embedded pipes are installed, filled with concrete and reinforced.
- The laying of columns is carried out only after the concrete base has completely hardened, otherwise the foundation will begin to collapse and the brick fence will have to be redone.
Return to contents
Scheme for laying brick pillars for a fence
To build an even and strong brick column, you need to prepare equipment and other equipment:
- level, plumb line, tape measure and rule;
- hammer with rubber head;
- Master OK;
- bayonet and shovel;
- container for mixing the solution;
- buckets;
- putty knife.
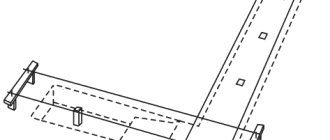
The first row of material should be laid as evenly as possible.
It is important to place the first row under the level so that it turns out as even as possible. The solution is applied to the surface of the foundation and to the brick block, which is firmly applied to the base and tapped with a rubber or wooden hammer. The screw pile is laid in a circle, and the column is formed by laying one block along the length and the second along the end. To ensure that the seams between the posts are uniform, it is recommended to use plastic spacers. After the first order has been placed, its evenness is checked. For this purpose, a control device is used - a level. If everything is normal, the formation of the brickwork of the pillars continues.
The lining of a twisted support is much more difficult. Therefore, if you want to build twisted gate posts, it is better to turn to a team of builders for help. A round twisted post will be an original decoration for the fence, so when you really want to experiment, you shouldn’t give it up.
Tools for working with aerated concrete blocks
Before you start laying 1 row of blocks, you need to prepare all the necessary tools:
- Wall chaser. It will be useful to you for making grooves on the surface of aerated blocks, into which the reinforcement will then be laid.
- Carriage with dispenser. Needed to lay the mortar in an even layer.
- Saw for cutting gas blocks to the required dimensions.
- Tape measure for marking blocks and measuring distances, pencil.
- Sanding board and plane for leveling the surface.
- Rubber mallet. With its help you will need to knock out blocks.
- Corners for fastening laid elements.
- A cord for reference (it can also be used as a level).
- Laser level to determine the top angle and control the installation.
- Container for the mixture.
In addition, you will need an adhesive solution to “glue” the gas blocks together (if desired, you can use DSP).
Facing
When the bases are ready and the brickwork of the fence is completed, facing work is carried out if necessary. The finished structure is covered with decorative brick products or plastered. During cladding, it is important to take into account the overall design of the courtyard area, auxiliary structures and front gardens. If the pillar is initially lined with decorative bricks, then additional cladding is not needed. To protect the posts from the damaging effects of moisture, it is recommended to protect the top of the structure with a metal cap. There are different types of heads, so everyone can choose the right option for themselves. After all construction and facing work is completed, the gates and wickets are installed.
How many friends can you add on VK per day?
The VK social network is built in such a way that it allows you to add people’s requests to your friends list. Thus, the people you communicate with will be located in the “My Friends” tab located on the left. If necessary, they are easy to find and write a message.
However, the platform set a limit on VK friends. This was done so that when promoting your account online, you do not use prohibited methods and do not gain subscribers. It is imperative to know how many subscribers you need to have for various actions. Limits related to adding friends on VKontakte:
- The largest number of friends, together with submitted applications, should not exceed 10,000.
- There are 30 people on the list of hidden people.
- The private list includes max. 24 friends.
- You must have at least 100 friends for the lists of possible ones to be added to disappear.
- A minimum of 25 communities is needed to remove the tab of interesting friends or subscribers.
- In order to be displayed in the “Interesting Pages” tab, the user must have more than 1000 subscribers.
- The appearance of the “Calendar” tab, which contains birthday data, requires the addition of at least 10 friends.
- Send invitations to communities to 40 users once every 12 hours or 2 times a day.
- If you want the logo link to take you directly to the page, then the number of friends should be 5 people.
Brick walls
Depending on the requirements for brickwork walls, it can be lightweight, solid, reinforced and with a facing layer. A layer of masonry consisting of bricks laid out at the same level is called a row. The layout of bricks within one row is carried out according to certain rules. To ensure the solidity of the masonry, adjacent rows also alternate in a certain way. The set of rules for laying out bricks and alternating rows is called the masonry dressing system.
A brick laid across a wall is called a butt and forms a butt row if located on the outer façade side of the wall. If the brick is laid along the wall, it forms a row of masonry. The outer rows of brickwork are called verst rows, and the inner ones are called backfill.
Types of brickwork
- Solid masonry Ordinary brickwork without voids or insulation. Consists of bricks and mortar only. It is used for the construction of load-bearing walls and enclosing structures, provided that heat conservation is ensured or when installing insulation on the outside of the masonry. The size of solid brickwork can be half a brick, a brick, one and a half bricks and then every other half brick. This corresponds to sizes 120 mm, 250 mm, 380 mm and beyond.
- Lightweight masonry It is used to install insulation inside the wall, to lighten the structure and save materials. In this case, the wall must provide the required level of strength and stability.
- Masonry with cladding On the front side of the wall, facing brickwork . A special facing brick is used, facing the front side of the wall. Moreover, it has the same dimensions as the main one. This is important to ensure that the facing layer of the wall is connected to the main masonry. The masonry can have a single-row bandage with a facing layer or a multi-row bandage. With a single-row dressing, five rows of facing bricks are laid out with a spoon and every sixth with a poke. When multi-row, every second row is laid out with a poke.
- Reinforced masonry Performed to increase the strength of masonry walls and pillars.
Reinforcement of brickwork
When reinforcing masonry, reinforcing mesh is laid in horizontal rows. Meshes can be rectangular with mutually intersecting reinforcement bars, and zigzag, made of bent wire in one plane. Since the average width of a horizontal seam is 12 mm, and the seam must be 4 mm wider than the mesh thickness, the mesh thickness is limited to 8 mm. Consequently, zigzag mesh is made of wire with a diameter of 8 mm, and rectangular mesh is made of 4 mm; at the intersections of the reinforcement, the thickness of the rectangular mesh is 8 mm.
The grids are laid according to the design, but at least every fifth row. At the same time, zigzag meshes with reinforcement in only one direction are installed in adjacent rows mutually perpendicular. In columns and piers, brickwork is always reinforced, regardless of the loads.
Dressing systems
Masonry bonding systems provide seam bonding to combine layers of masonry into a single monolithic structure. There are vertical, longitudinal and transverse seams. Longitudinal seams are tied with bonded rows of bricks, transverse seams are tied with spoon rows. Let's consider a single-row, three-row and multi-row masonry dressing system.
- Single-row With this system, each vertical seam is overlapped by the next row of bricks. This is achieved through the use of brick quarters. Thus, the seams are offset relative to each other by at least a quarter. This ligation system is also called a chain ligation system.
- Three-row This system is used for laying pillars and partitions up to 1 m long. With this ligation system, the rows overlap by 1/2 brick, which increases the rigidity of the structure.
- Multi-row With this system, the wall is laid out in equal layers of 6 rows of bricks. Moreover, only every sixth row is a splice row and the rest are spoon rows. Consequently, the vertical part of the longitudinal seams is tied only every sixth row. The advantage of such a system is that, compared to a single-row system, fewer bricks are laid in verst rows. This increases the speed of laying, since backfilling is easier to complete.
Cost of brickwork
The cost of masonry work depends on factors such as the region of construction, type of masonry, type of material, volume of the building, number of architectural elements in the wall of the building. At the same time, when calculating the cost of work, prices for specific elements are taken into account. For example, the voids of openings, the framing of openings, pilasters at the corners. Facing masonry is counted piece by piece or by quadrature, rubble masonry in cubes or in pieces when building from large-sized blocks. Here are some average prices in the regions of Russia as of autumn 2009.
Laying the first row of aerated concrete on a strip foundation
If you already have a strip foundation, laying the first row of aerated concrete is greatly simplified, since you will be placing the blocks on a more or less flat surface. First, we determine the highest angle on the foundation (we check the correctness of its position on all sides using a laser level). This is where you should start laying blocks.
Next, we prepare the solution, take a carriage with a dispenser and begin laying the blocks. First, waterproofing (you can use ordinary roofing felt). After the first block is laid, we lay three more blocks on each of the corners. Our task is to align the blocks in height so that they are on the same level.
After this, you need to pull the cord between the blocks: it will allow you to control the evenness of the masonry. For additional quality control, you can also perform a diagonal comparison. To do this, take a tape measure and measure the distance between diagonally opposite corners; it must match.
The laying of the first row of aerated concrete blocks is carried out with the alignment of each block along vertical and horizontal planes. For leveling we use a rubber mallet (a metal hammer can crack the block). So, gradually leveling block by block and guided by the cord, we lay each side.
Usually, at the end of laying a row, the need for an additional element arises. Then we measure out the “piece” we need, mark it with a pencil and saw off the required element using a saw. All stacked blocks must have the same height . To do this, the surface of the blocks is processed with a plane and a sanding board; Remove block pieces and dust from the surface immediately. After this work is completed, we wait 2-4 hours: the solution should harden, and then construction can continue.
The laying of the first row of aerated concrete has been completed, but preparatory work for the next row has not yet been completed. Now you need to reinforce the first row: this will prevent the formation of cracks. We take a wall chaser and make grooves at a distance of 60 mm from the edges of the block and then run the wall chaser along the entire length of the masonry. We make arc grooves at the corners; in the future, reinforcement of the same shape will be laid there. The thickness of the groove should be slightly greater than the thickness of the reinforcement.
Next, pour glue into the resulting grooves and lay the reinforcement along the entire length of the masonry. After the solution has set, we can lay the 2nd and subsequent rows of blocks.
How many bricks are needed for a 2m fence post?
How many bricks do you need for a 2 meter high fence post?
A fence post 2 meters high can use a different number of bricks, it all depends on the size of the material, the thickness of the seam (horizontal seam is taken into account) is on average 12 mm. For 1000 mm of height, on average, 13 rows of single bricks with a height of 65 mm or 10 rows of thickened bricks with a height of 88 mm are required. For a fence post, there must be at least 4 bricks in one row. As a result, we get that for a two-meter pole it will go:
- single – 104 pcs.;
- or thickened 80 pcs.
It is most acceptable to make such a 2-meter column of bricks, lining a vertically placed metal pipe securely fixed in concrete. The brick lining goes like this:
Here it is important to maintain the same seam gap between the bricks, which is achieved using metal rods (5-8 mm), and it is also necessary (after laying the first layer) to use a level and carefully check the horizontal position. The gap between the pipe and the bricks is filled with concrete.
Accordingly, counting the number of bricks is simple; the main thing is to know the thickness of the brick and take into account the error in laying the mortar - at two meters a certain thickness will “drip”.
Let's turn to the GOST we need:
There is a corresponding table for sizes:
From the table data we find that the thickness will range from 55 to 88 mm. One row is laid out of 4 bricks, for convenience in calculations we take a thickness of 65 mm. The thickness of the seam is usually from 8 to 12 mm (depending on the type of mortar), let’s take the average - 10 mm. Total: brick with mortar -75 mm. Now we divide 2000 (converting 2 meters to mm) by 75. We get 26.7 - round down, because at the very top a solution (10 mm) is not needed. Now all that remains is 26 (number of rows) multiplied by 4 (number of pieces in a row). The final figure is 104 pieces.
In my case, and I installed fence posts using the very minimum version of 2x1.5 bricks, with a brick thickness of 65 millimeters and a joint thickness of 10 millimeters, 84 bricks were needed for each linear meter of the fence, that’s 14 rows of brickwork.
For the same 2-meter fence, it will take approximately 162-168 bricks (let me remind you that my brick was 6.5 centimeters thick.
But it is better not to use this figure, since the quantity is influenced by factors such as:
1) Laying option, and in the standard there are 3 options - 2x1.5; 2x2; 2x2.5.
When laying out 2x1.5, the number of bricks per row of masonry is 6 pieces
When laying out 2x2, the number of bricks per row of masonry is 8 pieces
When laying out 2x2.5, the number of bricks per row of masonry is 10 pieces
There are also other options where 4 bricks or even 18 pieces are involved, as well as options when the pillar is not solid, but simply lined with brick, and inside there is, for example, a pipe.
2) The thickness of the masonry joint, which can be from about 5 millimeters and reach 30 millimeters, and this is an average difference from 7 to 30 centimeters per meter of pillar, which can equal from 1 to 5 bricks.
3) Size of brick used. This factor can bring down all of the above, since the thickness of the brick varies from 5 to 15 centimeters, i.e. 3 times.
In order not to make a mistake when buying bricks, you need to create a formula:
How much money can you put on a Sberbank card? Rules
Hello, dear guests of the womanforex.ru blog, today we will find out how much money can be deposited on a Sberbank card, since this information will be useful to all clients of the credit institution in question.
It is important to mention the fact that card products are among the priority areas of the credit institution in question.
It is for this reason that Sberbank’s assortment includes many types of bank cards designed to meet the needs of different groups of the population.
Cards issued by the credit institution in question can be connected both to traditional payment services MasterCard and Visa, and to the domestic payment system MIR, which has recently been rapidly gaining popularity.
My two best brokers
▶ Rate the link here ◀ ▶ Rate the link here ◀
The demand for bank cards among our compatriots is due to the fact that they are a very convenient tool for paying for a variety of services and goods, both in regular retail outlets and in online stores.
If you have a bank card, you can almost completely abandon the everyday use of cash. In addition, storing available funds on a card ensures their safety.
Practice shows that those who use cards in everyday life have had virtually no questions regarding their use for a long time. This is because using the cards is quite simple.
At the same time, citizens who have become bank card owners for the first time periodically arise such questions.
One of the questions that new customers often ask is how much money can be loaded onto a card through an ATM that has a bill acceptor. This is the question we will try to answer.
How much money can you put on a Sberbank card? Current restrictions
The current rules of the credit institution in question do not provide for any restrictions on the amount of funds deposited into the card account. Thus, theoretically, you can deposit almost any amount into your card account.
However, there are certain limitations associated with the peculiarities of the functioning of self-service devices.
In accordance with this restriction, the ATMs of the credit institution in question cannot accept more than forty bills in one deposit transaction. This does not mean that you will not be able to deposit a large amount into the card in small denominations.
In such a situation, you will simply have to repeat the deposit operation several times, depositing no more than forty bills at a time.
Features of using an ATM for depositing funds onto a card
If you plan to use the ATMs of the credit institution in question, then it will be useful for you to know some of the features of this process. After each operation to deposit money onto the card, the self-service device will issue a receipt, which will contain a report on the operation you performed.
Professionals recommend keeping this receipt until you are sure that the money has arrived in your account. If funds are not credited, you can use the saved receipt to resolve a dispute with the credit institution.
All checks issued by an ATM have their own number, with the help of which, when contacting the contact center, the operator can easily find out the details of the transaction you performed. It is quite simple to make sure that the funds have been credited to your card account.
If you use the services of a mobile service, then an SMS will be sent to your phone with a message that money has been credited to your card account.
You can also check your card balance yourself using the online service’s mobile application, provided that it is installed on your phone.
You can also use the ATM you used to deposit money to check the current balance of your card account.
When using cash to top up your card account, you should be prepared for the fact that the ATM may not accept some new bills. Solving this problem is quite simple. You can try using another self-service device to deposit money or simply change the bill that the ATM refuses to accept.
The credit institution in question has different models of self-service devices. However, some of them can only be used to withdraw funds, since they are not equipped with a device for accepting money.
Self-service devices equipped with a bill acceptor also come in different types. Most of these ATMs accept banknotes one at a time.
At the same time, there are self-service devices that can immediately accept a stack of banknotes.
It is important to understand that both types of ATMs do not accept more than forty banknotes in a single deposit transaction. After the self-service device has completed the recognition procedure for the deposited banknotes, the screen will display information about how many banknotes you have deposited, as well as their total amount.
Safety rules when using an ATM
When using the ATMs of the credit institution in question, both for depositing funds and withdrawing cash, it is recommended to remember fairly simple security rules. All self-service devices are equipped with small mirrors that are placed approximately at eye level. With this mirror you can find out exactly what is happening behind you.
It is recommended that you inspect the ATM before using it. If the device is equipped with non-standard inserts, overlays or other questionable elements, it is recommended not to use it.
It is recommended to pay special attention to the pads located next to the card slot, as this may be a disguised device for reading card data.
If criminals manage to obtain data from your card using this device, they will be able to get to the funds stored in your account.
If you find strange overlays on a self-service device, it is recommended to report this to the employees of the credit institution so that they can deal with this problem. If, after using one of the ATMs, you notice that funds are being written off from your card without your participation, then you should promptly contact the contact center and block it.
Sberbank online service
It is also necessary to mention the online service of the credit institution in question, which makes it possible to top up your card using non-cash transfers.
As in the case of ATMs, the credit institution does not set any restrictions on the maximum amount of replenishment of the card using the online service.
To use the online service to top up your card, as well as carry out other operations, you will need to create your own account.
Clients of the credit institution in question have access to a version of the online service designed for mobile devices. You can install this application on your smartphone and manage your card account remotely.
Source: //WomanForex.ru/banki/sberbank/skolko-deneg-mozhno-polozhit-na-kartu-sberbanka.html