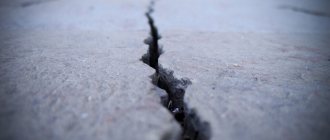
The floor is the foundation of any room. Therefore, its leveling is one of the most important stages of repair, requiring a responsible approach and certain skills. Nowadays, the basis of the floor in a living room, office or garage is predominantly concrete or concrete slabs. Therefore, it is important to know and understand how to level a concrete floor. Based on what it will be used for, several types of coating are laid on top of it. The most common are linoleum, parquet, laminate, ceramic or PVC tiles.
The quality and durability of the flooring largely depend on the surface of the concrete base. And if the height differences are significant, then problems in the future cannot be avoided. Many people prefer to carry out repairs themselves, so you should understand how and with what to level the floor with your own hands, without paying for the work of specialists.
Main difficulties
The biggest problems can be caused by laminate and tiles. The first is quite capricious: a difference of 5 mm often leads to damage to the locks and failure of this type of relatively expensive coating. Relatively smooth concrete floors under laminate are not necessarily leveled, minimizing differences with the help of a soft substrate. In the future, this often leads to divergence of the laminate joints, and if even a small amount of moisture gets in, it causes it to bulge.
This material answers the question of how to level a concrete floor for various types of coatings, which will help avoid problems with their installation and extend their service life.
Leveling the concrete screed
In order to get an idea of the methods of working with concrete, this article will take a detailed look at the question of how to level a concrete floor and propose the most common ways to do this work.
In addition, detailed instructions on the use of various leveling technologies and methods of processing hardened concrete screed will be presented here.
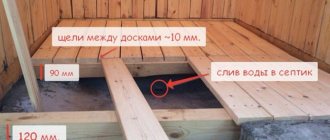
Laying waterproofing under a dry screed.
Dry screed
This method is the simplest, does not require the use of special equipment and large labor costs, therefore it has become widespread when arranging a finished floor with your own hands in residential and commercial premises.
This technology completely eliminates the use of water during operation, so it is often used in cases of finished flooring made of laminate and other wood-fiber materials.
- After complete hardening and drying, thoroughly clean the surface of the monolithic slab from construction debris and dust.
- Lay waterproofing made of thick construction polyethylene film on the prepared slab, wrapping its edges onto the walls to a height of at least 100 mm.
- If necessary, electrical or plumbing communications must be laid under the waterproofing . To penetrate walls and floors, you can use diamond drilling of holes in concrete using special tools.
- Pour dry granular leveling mixture over the entire floor surface and spread in an even layer 50-80 mm thick.
- Check compliance with the horizon using a long building level and compact using a manual tamper or vibrator..
After compacting the granular cushion, a substrate is laid on the surface, on which the finishing floor covering is mounted.
The photo shows the installation of a finished floor on a dry screed.
Note! The positive features of this method also include good thermal insulation, which is provided by the porous structure of the components of the dry granular mixture.
Cement-sand mortar
This method is classic and, due to the high strength of the finished coating, can be used both in residential and commercial or industrial premises.
It can also be recommended to those who are interested in how to level a concrete floor in a garage after pouring a monolithic slab.
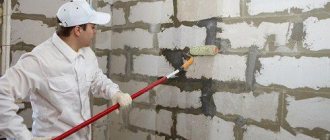
- Before performing work, clean the surface from construction debris and dust, and then cover it with one layer of penetrating primer.
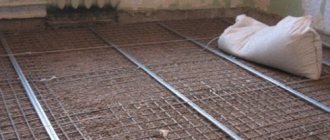
- Using a gypsum solution using a laser or water level, fix the beacon slats with a distance between them of at least 1000 mm and leave until the fixing solution dries completely.
- Prepare a cement-sand mortar in a 1:3 ratio of not very thick consistency and start pouring from the corner farthest from the entrance.
Installation of beacons and laying cement-sand mortar.
- Pour the solution into the space between the two beacons and, moving the rule along the beacons, distribute it evenly throughout the area.
- Thus, step by step you need to fill the entire floor area. If possible, one room should be leveled in one working day.
After the solution has hardened to the point where you can stand on it, you need to carefully remove all the beacons from the finished floor, and wipe the resulting cracks with fresh solution.
Due to the low cost of materials and work, this method has the most favorable price/quality ratio.
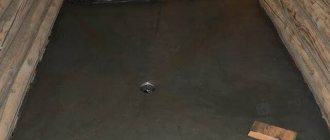
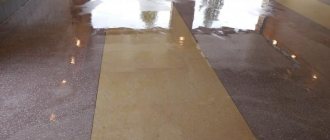
The final result of the work.
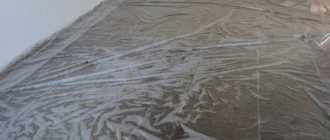
Advice! To prevent cracking of the leveling screed after pouring, it is recommended to cover the floor surface with plastic film and periodically moisten it for one week.
Self-leveling mixtures
The floor leveling composition is a dry, fine mixture of binder and filler, which must be diluted with water immediately before use and thoroughly mixed using a construction mixer or an attachment to an electric drill.
The finished mixture spreads in a thin layer over the floor, and after drying it forms a smooth, uniform surface of high quality, suitable for finishing a finished floor using all types of household floor coverings.
- This method is suitable for relatively flat floors, so if there are significant unevennesses, they must be eliminated in advance. To remove protrusions or sagging, cutting reinforced concrete with diamond wheels can be used, and deep depressions and cracks must be rubbed with cement-sand mortar.
- Carefully remove all dust and construction debris, and then saturate the surface with a penetrating primer.
- In a clean container, dilute the required amount of dry mixture in strict accordance with the instructions indicated on the package.
- Distribute the finished solution over the entire floor area and allow it to spread independently over the entire surface, then leave until completely hardened.
After pouring, such a coating hardens within half an hour, however, any work in the room can be carried out no earlier than after 3 days.
Pouring self-leveling mixture.
Advice! This floor preparation is only suitable for subsequent laying of the finishing coating. The hardened surface cannot be painted or used as an independent finishing floor.
Preparing a concrete floor for laminate
There are several ways to do this.
- The first, the most expensive, but at the same time the most reliable, is the beacon screed. After it is carried out, the result may be unsatisfactory, and there may be a need for additional use of leveling compound. But for an old, damaged floor with large differences, this is still the best possible option.
- The second option is a leveling mixture for the floor (also a leveling compound). The method is suitable for relatively flat floors with screed in fairly good condition. The mixture is expensive, so using it to increase the thickness of the coating is not the best option. Using this method, you can level the floor without using beacons. There is also no need for subsequent grinding, since the mass spreads evenly and creates a smooth surface.
- The last, third, method is to use plywood or chipboard. The best way to level the floor is up to you to decide, based on your financial capabilities and the intended purpose of the room.
Sometimes the owner does not want to dismantle the existing wooden floor before screeding. In this case, the floor is leveled using reinforcement, since without reinforcement the screed will not be able to fully perform its functions over a long period of time. Here the best option would be the last method, based on the use of plywood.
Leveling the floor using a self-leveling mixture does not require much experience or special skills - even a beginner can do it. The mixture can be purchased at any hardware store, where it is sold in finished form. If you follow the instructions, you will get a solution that, when spread, forms a perfectly flat surface. You can lay the laminate after 7-8 days. If repairs need to be carried out as soon as possible, then the best option would be plywood flooring or dry screed.
Self-leveling mixture
Leveling the floor with a self-leveling mixture is quite common. These compounds are designed to level the surface of sand and concrete. Working with the mixture is not at all difficult: you need to add ordinary water to the powder and mix the resulting solution thoroughly. Separately, it is worth saying that it is necessary to follow the proportions prescribed in the instructions.
The leveling mixture is poured onto the floor surface. The cracks are first widened using a chisel, so that the solution will accurately penetrate inside and cover the unevenness. Do not forget that the mixture perfectly levels the floor, but it is not capable of spreading on its own. Therefore, you need to distribute the mixture over the floor yourself, using special tools (a roller with needles, a spatula, and others).
How to level a floor under linoleum
Linoleum is known for its unpretentiousness, elasticity and ability to adapt to uneven surfaces, but without hiding them. Such a floor covered with linoleum does not have an attractive appearance. In this case, the joints of the coating will also be uneven. Therefore, the floor under linoleum must be leveled.
In the case where the differences are small, the floor, as already noted, is leveled in three ways. The choice of a specific technique depends on free time and funds. For example, not everyone is ready to wait from a week to two when using a self-leveling mixture or about three weeks when using a concrete screed. Laying linoleum prematurely is fraught with danger, since it does not allow moisture to pass through, and the screed will not be completely dry by this time, and problems will inevitably appear.
How to level a concrete floor in a short time? If this concerns floors in residential, frequently used premises, then the best option would be a dry screed using dry backfill and gypsum fiber sheets.
Self-leveling floor device
This is the fastest and easiest to implement, but far from the cheapest way to level the floor. To level concrete surfaces, special self-leveling mixtures are used. This mixture can simply be poured onto a concrete base, and thanks to its specific properties, it will spread in a thin layer over the surface, filling all the unevenness.
When leveling the surface using this method, you need to acquire the following tools:
- vacuum cleaner:
- foam roller;
- needle roller;
- paint shoes.
As with leveling the floor according to beacons, you first need to clean its surface. After cleaning is completed, the concrete surface is treated with a special primer for self-leveling floors. After priming, you can begin diluting the self-leveling mixture, strictly following the instructions printed on its packaging.
After pouring a self-leveling solution onto the floor, you need to walk over it in different directions with a needle roller to remove any air bubbles in the diluted mixture. When working with a roller, you need to wear special studded shoes - paint shoes, and the needles in the roller should be longer than the height of the self-leveling floor in its deepest place.
This type of floor dries in just a few hours, after which further repairs can begin. This drying speed is explained both by the specific composition of the mixture and the thickness of the filling layer, which does not exceed 3-4 mm.
Despite the speed and simplicity, this method is still not ideal.
It is not suitable if the difference in height of the surface to be leveled is more than 3 mm.
It is also poorly suited for pouring floors over large areas, since the self-leveling mixture sets quickly, and there is simply not enough time to properly treat the poured surface with a roller.
Preparing the floor for plywood
Laying plywood is one of the most common ways to level a concrete floor. There are two methods for this: the first is using lags, the second excludes their use.
The first method is suitable for rooms where differences are no more than 15 mm, and an increase in floor height is extremely undesirable. The plywood sheet is glued using a special adhesive solution, after which the dowel is fixed with nails. The same procedure, but using chipboard, is no different. This method is only suitable if the screed is smooth and strong, and the laying is carried out on the concrete itself.
If differences exceed 15 mm, or if it is necessary to “raise” the floor, it is leveled with plywood on joists.
How to level a floor under tiles
Basically, ceramic tiles are laid in rooms with constant high humidity, in particular in the bathroom, bathroom or kitchen. This type of flooring is a durable, strong and attractive material that provides a high level of waterproofing when used correctly. Tiles are also often used on balconies, where their unpretentiousness and hygiene help maintain the original appearance of the interior for many years. Another advantage of ceramic tiles is their resistance to mechanical damage. Thus, it will extend the period of operation of the base – the concrete floor.
How to level a concrete floor under tiles correctly? In this case, you simply cannot do without a full-fledged concrete screed. Before laying it, it is necessary to carry out high-quality waterproofing of the surface, and the laying of the tiles can only be done after the screed has completely hardened. This may take three weeks.
Before laying the tiles, it is important to eliminate all unevenness of the concrete floor, since it does not allow even minor differences in height. You can fully use the finished floor covering and grout the seams only after the adhesive has completely set.
How to make self-leveling outdoor floors with your own hands. and photo
Is it possible to use self-leveling floors outdoors? Floor covering is the most pressing issue during construction, especially when it comes to self-leveling outdoor floors - first of all, you need to take into account the special conditions in which the floor covering finds itself - from high temperatures and sunlight to high humidity. Also, we must not forget about the characteristic properties of self-leveling floors.
How to choose the best polymer floors for outdoors? Where can I find frost-resistant self-leveling flooring? Can self-leveling floors be used outdoors? How not to make a mistake with the chosen material?
Is it possible to buy high-quality coating at a low price, and if so, how to choose it? And is it possible to follow the installation work or even carry it out yourself?
Let's answer these questions together in our article.
What is self-leveling floor
Self-leveling (or self-leveling) floors are an invention of the 1970s. Their appearance in the market created a sensation due to their special qualities that stand out from the competition.
And this coating still retains its popularity: as a rule, it is used both in the construction of garages, stadiums, car parks, roadways, and for ordinary street floors - for example, paths in the garden or terrace - any places where high mechanical stress occurs. load on the surface or it is subject to wear due to temperature changes, rain, etc.
What makes self-leveling floors so convenient and beneficial for construction?
- minimum effort to create a smooth and even surface;
- rapid setting of the solution;
- frost resistance and resistance to temperature changes;
- waterproof;
- anti-icing rough surface;
- high strength and durability;
- resistance to high loads;
On the modern building materials market, you can purchase three types of self-leveling floors: polymer-based, cement-based and synthetic-based.
Cement compositions and their features
If you need a quick-hardening and frost-resistant floor for the street, you can safely choose cement compounds.
They share a number of remarkable properties:
- affordable price;
- ease of application both by hand and with special tools;
- elasticity and lack of cracking;
- serious strength, resistance to temperature changes (from -50 to +70 oC)
- as well as fast setting (which is extremely beneficial when the weather changes quickly and the coating needs to be applied urgently).
At the same time, there are a number of disadvantages: poor resistance to chemicals, as well as the high complexity of repairing individual sections of the coating.
Therefore, manufacturers of self-leveling mixtures recommend additionally creating a protective coating for such a floor, either using topping or polymer-cement mixtures.
Topping is the strengthening of the floor covering using various additives to cement such as dyes, plasticizers and other substances that increase the strength of the floor, its resistance to fluctuating temperatures and impact resistance.
As a rule, special mixtures for topping are produced in 25 kg bags and are consumed on average 3-9 kg per 1 m2. At the same time, replacing it will require a lot of effort, because... There are seams inside this reinforcement.
Dry polymer-cement mixtures can also be used in the cement composition, imparting new properties to the material:
- almost completely waterproof,
- high elasticity,
- resistance to chemicals and enormous strength.
But, as a rule, they cost much more than their competitors.
As a result, you get an impact-resistant floor that is resistant to any temperature changes. In addition, cement coating can also be used for puttying, leveling the surface for tiles, painting and other types of finishing for outdoor areas or interior spaces.
Selection of self-leveling coating
The main brands of cement self-leveling coating on the Russian market include: Ceresit CN83 and CN76, ARDEX K-301, Duraflor Terta, Bergauf, etc. However, when choosing, you need to focus on the properties of the mixture themselves.
How to choose a good cement mixture?
The buyer must pay attention to the following characteristics: the permissible layer thickness must be between 6 and 10 cm, and the compressive load must be at least 200 kg/cm2 (or 20 MPa).
Also, the packaging of the composition must indicate frost resistance, indicated by the letter F with a freeze-thaw coefficient. The higher this coefficient, the greater the material’s resistance to temperatures.
Polymer self-leveling coatings
When the reinforcement of the top layer is not enough, an additional polymer coating is applied, which not only gives the floor durability and strength, but also allows it to be filled with aesthetics.
Initially, polymer self-leveling coatings were created for industrial facilities, where chemicals were constantly exposed to the floor, and the mechanical load reached enormous values.
However, today everyone can independently make an external self-leveling floor with a polymer composition.
There are 4 types of polymer coatings:
- methyl methacrylic (MMA);
- polyurethane;
- polyurethane-cement;
- acrylic-cement.
Polyurethane floors are created on the basis of two-component polymers, which increase the ultimate strength of the coating, its water and wear resistance, resistance to abrasion, and resistance to extreme temperatures.
In addition, they are easy to install: the fluidity of the composition allows you to process concrete even with small cracks and porosity.
At the same time, polyurethane floors have a number of disadvantages: they take a long time to harden (up to 5 days), difficult dismantling and the inability to repair.
In addition, it is advisable to place this type of coating under a canopy to protect the surface from direct sunlight, due to which it gradually turns yellow.
Methyl methacrylic coating is created on a polymer base with the addition of acrylic resins and various fillers, thanks to which it is able to withstand temperature changes.
In addition, the flexibility and elasticity of this type of flooring allows them to withstand heavy loads.
They are also resistant to direct sunlight, humidity, various chemicals and salts, and, among other things, have antifungal properties. They harden quickly - within two hours - and are airtight.
In addition to these advantages, you also need to indicate the special aesthetic character of this coating - thanks to its special composition, it can take on a variety of colors.
Unfortunately, this type of coating also has its disadvantages:
- toxicity during application,
- the difficulty of creating a perfectly smooth coating due to the high speed of setting of the mixture.
- This also includes high cost.
Acrylic cement floors
Initially, this type of coating was created for food industry enterprises, so its properties include resistance to almost all types of aggressive influences: abrasion, fats, chemicals, moisture. In addition, it is extremely frost-resistant (from -60 to +120 °C).
In addition, this floor has an anti-slip structure, making it extremely easy to clean.
The disadvantages of this coating include the particular complexity of installation, as well as the high price.
Polyurethane-cement floors
They are the most stable, durable and long-lasting coatings that can withstand any influence of the external environment - that’s why they are laid in places with high traffic.
They are resistant to temperature changes (from -40 to +150 °C) and have an anti-slip surface (which is why they are laid on slopes). They also have excellent hygiene and excellent fire resistance.
The main disadvantage of this coating is its extremely high price.
Coating installation technology
When covering the floor, you must follow a certain technology for working with a cement base.
It is better to carry out work at temperatures from +50 to +30 °C with air humidity from 40 to 80% (measured with a moisture meter).
Preparing the garage floor
The floor in garages is usually concrete, as it is durable and can withstand heavy loads during its use, and also ensures sufficient dryness and cleanliness.
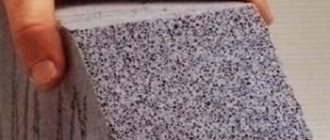
How to level the floor in a garage while making it as strong as possible? No additional coatings are used here. A known problem with concrete floors is dusting. It is important to understand how to deal with it. To eliminate it, special compounds, also called toppings, are used.
Using plywood
One of the proven ways to level the floor in an apartment is the plywood arrangement system. There are several plywood leveling systems available:
- gluing with plywood;
- leveling with adjustable plywood;
- installation using lag.
“Gluing” involves covering a concrete base with plywood by gluing them together. Since the thickness of the layer is small, in order to ensure the strength of the coating, the sheet on the floor is reinforced with any dowels or anchor bolts. The system of using wooden logs to level the floor, which are covered with plywood and installed strictly at the required level, is quite common. Fastening elements are standard self-tapping screws. The system of “covering” the joists with plywood is recommended for those who are deciding how best to level the floor, with a crooked old foundation, or if it is necessary to make the floor “from scratch.”
Leveling the surface with adjustable plywood is considered a new method. With its help, you can quickly and correctly level the floors in the house. The floor is covered with plywood (sheets), and holes are made in the floor using prepared holes in the material. The sheets are removed, anchor bolts with nuts and washers are inserted into the floor covering. After final installation and adjustment, actions are expected to be taken with the plywood - smoothing the sheets and strengthening them with nuts on the floor. All remaining metal rods are removed with a grinder. The thickness of the layer is equal to two sheets of plywood. The first sheet is attached to the second plywood using the above-mentioned gluing method. This system allows you to independently level the floor in your apartment without the use of wooden joists.
When working with plywood, it is worth considering that the material does not tolerate moisture well. In order to avoid unnecessary problems, it is necessary to ensure good waterproofing of the floor in the house in advance.
Dust-removing impregnations for concrete floors
When it is not planned to lay any coating on the concrete, it should be dust-free. In general, dust is an indicator of poor quality coating, which is also destroyed. There are many reasons for this, starting with poor quality work and ending with a long period of operation.
A solution to this problem has long been found - the use of special strengthening impregnations. They increase its wear resistance and strength, thereby reducing dust formation.
There are two main types of impregnations: organic and inorganic. The latter react with concrete, forming new substances that strengthen the surface of the coating.
Organic impregnations act a little differently - they fill the pores. This method is the most effective, so it is widely used in the production of industrial floors. Organic substances make the coating unpretentious to the weather, durable, and resistant to harsh operating conditions. Organic impregnations are also used to treat walls and ceilings.
How to level a concrete floor on the street
Is it possible to use self-leveling floors outdoors? Floor covering is the most pressing issue during construction, especially when it comes to self-leveling outdoor floors - first of all, you need to take into account the special conditions in which the floor covering finds itself - from high temperatures and sunlight to high humidity. Also, we must not forget about the characteristic properties of self-leveling floors.
How to choose the best polymer floors for outdoors? Where can I find frost-resistant self-leveling flooring? Can self-leveling floors be used outdoors? How not to make a mistake with the chosen material?
Is it possible to buy high-quality coating at a low price, and if so, how to choose it? And is it possible to follow the installation work or even carry it out yourself?
Let's answer these questions together in our article.