Types and brief characteristics of mixtures
We will not consider specific brands and manufacturers; we will focus only on the materials of manufacture. Before specifying the types of mixtures, one more question needs to be clarified. Unprofessional builders often do not understand the difference between some compounds with similar names, which causes quite unpleasant consequences. All mixtures are divided into several categories.
Floor leveling mixtures have several types
- Leveling. The solutions have a rather viscous consistency, do not level well on their own, and require a little help with a wide metal spatula or a trowel. It is difficult to achieve ideal surface evenness; the difference in height can exceed 2–3 mm per linear meter. They are relatively inexpensive, and therefore are recommended for use in large rooms and only under hard finishing coatings.
- Self-leveling. Expensive materials have low viscosity, which allows them, due to the force of attraction, to be poured strictly in a horizontal plane. Almost no manual labor is required, minor work is performed to remove air bubbles. The thickness is small, no more than 10 mm. They harden quite quickly and can be made from various components.
- Quick drying. The poured mixture hardens after three hours at a thickness of 10 mm. You can continue work on installing floor coverings after 24 hours. Mixtures are used when it is necessary to reduce the time of construction work.
- Basic. Used for leveling substrates under complex multi-layer coatings. Floor installation technology provides additional ways to bring the base to the required parameters.
- Finishers. They have a perfectly flat and smooth surface and can be used as finishing coatings.
The choice of mixture is influenced by the quality of the rough base
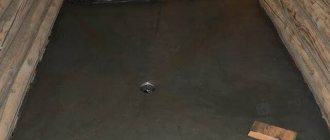
Basic mixture for floor screed B-601
Depending on the material used, mixtures are divided into several types.
Table. Types of mixtures for leveling floors.
| Type of self-leveling mixture | Technical parameters and brief performance characteristics |
| Plaster | Gypsum has low mechanical strength and high hygroscopicity. In this regard, such mixtures are used only for lightly loaded substrates; their use with some coatings is strictly prohibited. In terms of cost, the cheapest self-leveling mixtures. |
| Cement | Such compositions are considered universal and have no restrictions. The recommended thickness is no more than 50 mm; if it is necessary to increase the strength, the screed is reinforced with plastic mesh. |
Self-leveling gypsum mixture KNAUF
Self-leveling floor mixture
Classification of self-leveling mixtures
There are two common types of self-leveling floors in the construction market: cement and gypsum.
Cement mixtures
They are used for leveling floors in premises of any purpose.
Attention! If it is necessary to level the floor of a wet room, then use a cement-based mixture.
Such leveling mixtures are more expensive than gypsum ones. They are used to make screeds up to 2 mm thick. To increase the drying speed, plasticity and create a durable and frost-resistant layer, plasticizers, for example: acrylic, are added to the cement mixture.
Pouring screed when laying floor heating pipes
Gypsum self-leveling floors
They create a durable coating with good thermal insulation, but they cannot be used when pouring a floor in a damp room, since if the humidity increases, the gypsum base loses its strength. The solution contains cement, but the base of the mixture is gypsum.
Used to level floors under laminate or parquet. The gypsum coating is made in a thicker layer than cement, due to which floors with large differences in height are leveled.
If a gypsum screed is installed in dry areas, and a cement screed in wet areas, then a line of demarcation between different types of screeds will appear. At the junction of different solutions, a damper tape is laid, since the coefficients of thermal expansion of cement and gypsum are different. This can lead to destruction of the screed in the area where different types of fill are connected. The tape is selected 0.8 - 1 cm wider than the thickness of the screed.
Laying damper tape
There are special self-leveling mixtures that are used in rooms with special working conditions. The specific properties of the screed are given by the introduction of special additives and plasticizers into the mixture. Such compositions include:
- Epoxy mixtures used to install floor screeds with high mechanical and chemical strength and rigidity. The layer is waterproof and withstands sudden changes in temperature. Of these, screeds are used in car wash workshops, in the premises of pharmaceutical, chemical and food enterprises.
- Polyurethane compounds create durable and elastic coatings. Used for installation of floors in offices, sales areas, warehouses, etc.
- Epoxy-polyurethane self-leveling floors are used in rooms with high mechanical load, for example: for floor coverings in the halls of bus and railway stations, subways, etc.
The industry produces mixtures intended for rough (basic) leveling and finishing.
Rough leveling eliminates large defects. In this case, a thick layer of solution is poured. Sufficient strength of the leveling rough screed is achieved due to a thick layer of fill.
The finishing mixture is designed to create a strong and smooth surface without noticeably raising the floor level. Made up to 5 mm thick. Most often, the finishing mortar is poured over a screed made from a rough leveling compound or a cement-sand screed.
Application
When using self-leveling floor screed technology, the thickness of its layer for a warm water floor or for any other is usually determined by the nature of the work being carried out. The leveling compound can be used for the following purposes:
- to form a thin layer of screed on a concrete base, where the main tasks are eliminating defects and irregularities and preparing the surface for laying the finishing coating. In such cases, the layer thickness usually does not exceed 3 cm;
- for the manufacture of “floating screed”, when the solution is poured over a layer of rolled or film waterproofing. This method is used when there is a base whose condition does not allow pouring the mixture directly onto it (for example, a concrete base is impregnated with oils or petroleum products);
- Another option is to build a screed on a wooden surface. In such cases, the thickness of the solution layer can be from 3 to 6 cm;
- pouring screed over a layer of thermal insulation (for example, penoplex) when it is necessary to insulate the floor. Here, as in the previous case, the layer thickness varies from 3 to 6 cm, and sometimes up to 10 cm;
- self-leveling mixture is a suitable option for “warm floors”, both water and electric. The use of the composition allows you to hide the elements of the system, while obtaining a flat surface;
- the thickness of the layer in this case is determined by the diameter of the heating device, and should be at least 3.5 cm above its upper edge;
- in this case, it is desirable that the total thickness of the screed does not exceed 6 cm, since a thicker layer will cause excessive consumption of coolants.
Advantages of ready-made mixtures
The quality of floor coverings is influenced not only by the material they are made of, but also by the strength of the base. It should be as smooth as possible and withstand all loads without problems, and not change its linear dimensions during temperature fluctuations. Modern self-leveling mixtures fully meet the most stringent consumer requirements.
Self-leveling mixtures have a number of advantages
The advantages of the material include important characteristics.
- Great mechanical strength. This property applies only to cement-based mixtures; gypsum has worse parameters. But each floor covering has its own individual requirements; some are satisfied with the characteristics of gypsum.
- Manufacturability. Working with such materials is much easier than making traditional screeds using semi-dry cement-sand mortars for lighthouses.
- Minimum shrinkage parameters. When hardened, the material almost does not lose its original horizontal characteristics, does not sag, does not swell, or cracks.
- High adhesion values. If you fully follow the manufacturer's recommendations, the likelihood of detachment is almost eliminated. Due to such properties, it is possible to significantly reduce the thickness of the layer, and this is a significant saving in expensive compounds.
For high-quality floor leveling, it is necessary to strictly adhere to the workflow technology.
The only drawback is the relatively high price. But professionals know the secrets to reducing the estimated cost of floor repairs; savings can reach significant amounts.
How to level the floor yourself with a self-leveling mixture
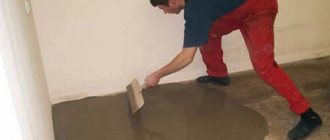
Leveling the floor yourself with traditional compounds is quite difficult, but anyone can cope with self-leveling mixtures. The main thing is to properly dilute the composition and step by step perform all the steps associated with pouring such a screed.
Before you start pouring, you should first thoroughly clean the floor surface, remove the old coated
Technology for floor leveling with self-leveling self-leveling mixtures:
- At the first stage, the floor is prepared. All debris and dust are removed from it, large holes are filled with cement mortar, and the surface is primed. The primer is necessary so that the filler leveler spreads better and adheres to the base.
- At the second stage, you need to knead the mixture. The proportions of the composition must be strictly observed; they are usually indicated by the manufacturer on the packaging. To mix the correct solution, you need to pour the required amount of mixture into the already poured water. Only properly prepared liquid screed perfectly levels floors.
- After the mixture is mixed, it can be poured onto the base. In this case, the screed should not be hot; the optimal temperature for such a product is 25 degrees. To make a level floor, it is necessary to apply markings to the walls, to the level of which the leveling mixture should reach. The leveler layer should not be thinner than 0.5 cm. It is more convenient to pour the mixture in strips, and it is important to pour the second strip before the first hardens. To remove unnecessary air bubbles, you must use a needle roller.
Related article: How to quickly clean out your clothes closet
To ensure high-quality floor leveling, you must strictly follow all the manufacturer’s recommendations. Deviations from the norm when mixing the mixture can give a completely unpredictable result.
Pay attention to the self-leveling floor “Prospectors”. This manufacturer is recommended by many professionals.
It is also important to understand that although the self-leveling mixture can spread over the base on its own, it needs a little help with a special needle roller. Such work will not only ensure a more even distribution of the composition, but will also remove unnecessary air bubbles.
There is practically no shrinkage of these mixtures. Therefore, you can be sure that the layer poured for you will not change its thickness.
Product cost
When carrying out such a procedure as screeding a floor with a self-leveling mixture, the price of the composition plays a significant role.
Below are prices for packaged goods, where the bag weight is usually 25 kg.
- cement mixture CERESIT CN80 – 240 rubles;
- cement mixture VOLMA Nevelir Express - 280 rubles;
- cement self-leveling floor UnisGorizont – 264 rubles;
- gypsum leveler Ecopol (weight 30 kg) – 370 rubles;
- gypsum mixture DELUXE Litopol UN – 310 rub.
Most common mistakes
Self-leveling mixtures, when used correctly, provide excellent preparation of floor surfaces. We will list a few of the most common mistakes; this knowledge will help you avoid annoying mistakes.
- Wrong choice of mixture.
Some craftsmen inattentively read or misunderstand the manufacturer's instructions. You need to know that there are no universal materials for all types of coatings; manufacturers produce a wide range of products, each with its own specific application. It is strictly not recommended to use gypsum-based mixtures under piece parquet or linoleum. A wide range allows you to choose a self-leveling mixture for any type of coating and base - Negligence in preparing the foundation.
Grease stains, dust, paint residues, unused putties or cement-sand mortars can cause the mixture to peel off. Especially often, cement laitance that appears after pouring foundations with liquid concrete is not removed from the surface, and it has very low adhesion values. Surface preparation is important - Applying the mixture without primer.
Unfortunately, such an elementary mistake occurs quite often. It must be remembered that the primer performs several functions: it increases adhesion, binds dust and reduces the rate of moisture absorption. The leveling mixture is thin; if water is quickly removed, chemical reactions cannot occur under favorable conditions. As a result, there is a sharp decrease in physical strength indicators. Primer of the base is a must when leveling the floor - Work alone.
The technology for working with mixtures provides for quick coverage of the entire area. The master should work with the floor, and his assistant should prepare a new portion of the mixture as it is used. Otherwise, the solution will lose its fluidity, the floor will not be leveled properly, and a sharp boundary will remain between the old and new composition. With a large amount of work, you can’t do without an assistant - Topcoats are not taken into account.
Not only the magnitude, but also the nature of the forces on the surface largely depends on them. For example, glued boards evenly distribute point loads over a large area, but linoleum does not have this property. One more nuance. Ceramic tiles are laid on cement adhesive, and it only requires a base of the same material. When choosing a leveling mixture, you need to take into account the type of finishing coating - There are no technological breaks between different operations.
Many people believe that if the surface is hard, work can continue. This is a big mistake; the next stage of installing coatings can only begin after the mixture has completely hardened. Finishing work can only begin after the base has completely dried. - Conditions have not been created for the normal course of solidification processes.
The rooms have drafts, high temperatures, and some areas are heated by the sun's rays. When drying the floor, it is necessary to exclude drafts and uneven heating of the surface
Always follow professional recommendations; there is no need to invent new technologies. Scientists worked on the development of each material for a long period of time, conducting various laboratory tests with changing conditions and technologies. Recommendations are written only after a thorough study of the issue.
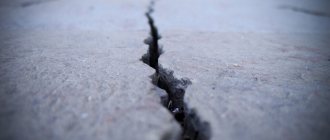
Possible defects in floor leveling due to technology violations
Deep penetration primer
READ MORE: Attaching a toilet to the floor on tiles, how to fix it correctly
Self-leveling screed technology
Due to the short life of the self-leveling floor solution, the preparation of the base must be completely completed before preparing the mixture. The volume was pre-calculated, bags of dry mixture were prepared in the required quantity and opened in the adjacent room.
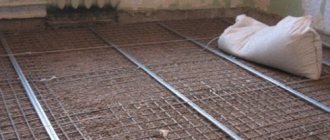
If necessary, insulation, reinforcing mesh and the contours of a water-heated floor are installed. One room is filled at one time; the needle roller and paint pads must be prepared in advance.
Preparatory work
In order for self-leveling mixtures to have the resource declared by the manufacturer, it is necessary to prepare the base and determine the thickness of the layer. To do this, you must perform several operations in strict sequence:
- removal of dirt, oil stains, large bumps, solution residues;
- sealing cracks, removing dust, impregnating with a primer (usually Concrete Contact in two steps);
- tapping the horizontal level to find the top point;
Finding the top point of the tie.
- pasting the perimeter of the walls with damper tape;
Damper layer around the perimeter.
- fastening strips or galvanized profiles in doorways outside the damper tape;
- installation of benchmark beacons in the form of a tripod with a screw-in pin and a support plate on top of it.
Reference beacon for self-leveling floor.
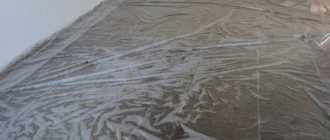
To screed a self-leveling floor on a plank subfloor, lining paper is spread on the surface with a strip overlap of at least 8 cm.
Backing paper on a plank subfloor.
The main problem during repair/redevelopment is the presence of partitions or false panels made of gypsum plasterboard:
- on the one hand, they are prohibited from being supported by ties;
- on the other hand, drywall loses strength when absorbing moisture, which is inevitably present in rooms with wet processes.
The frame of the partition from the profile is assembled before making the screed.
Therefore, it is recommended to build a frame from a galvanized profile for the false panel or partition as a whole. Sheathe it only in the lower level with gypsum board strips 20–30 cm high, install the remaining part of the drywall after the screed has completely dried.
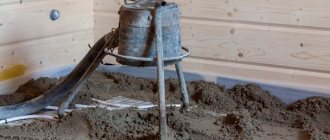
Preparing the mixture
To avoid mistakes in making self-leveling floors yourself, the self-leveling mixture has instructions for use on the packaging. It is recommended to use large containers, inside of which a bag of self-leveling floor will fit, taking into account the required amount of water in its entirety.
After adding the mixture to the water, initial mixing and settling (usually 5 - 15 minutes), the self-leveling floor is stirred again with a mixer.
Attention: If the volume of water is indicated incorrectly (found in little-known brands), it is necessary to calculate the proportions experimentally, ensuring a spreadability of 1:3. In this case, the solution from the cap of a 1.5 liter bottle poured onto glass should be three times the corresponding container size.
Surface application
Begin pouring the self-leveling mixture prepared according to the manufacturer’s instructions at the corner farthest from the door. Despite the fact that the solution spreads perfectly under the influence of gravitational forces to a horizontal level, it is necessary to additionally level the thickness of the layer with a squeegee, spatula or rule.
Distribution of the mixture over the base.
Since the viability of the mixture is quite low, you should not delay applying it to the surface. Benchmark beacons are transferred to new areas after preliminary leveling of the solution, so they do not need to be purchased in large quantities.
What are the advantages of such mixtures?
Floor leveler "Vetonit 5700"
Characteristics of the floor leveler "Vetonit 5700"
The advantages of such compositions include:
- excellent mechanical strength;
- no risk of cracks;
- low abrasion;
- ease of filling;
- high drying speed;
- long service life;
- high adhesion;
- the fact that substances harmful to health are not released into the air.
Stages of using self-leveling mixtures
When the poured mixture dries and the floor covering is laid, there is no need for additional maintenance of the base. If the subfloor is properly prepared and the filling is done in accordance with the technology, then repairs to the floor will not be required for many years.
After the self-leveling layer has dried and the floor covering has been laid, no additional maintenance is required
The advantages of using this technology are its following features:
- simple procedure for preparing and using the solution. Before starting work, you just need to mix the composition with the required amount of water;
- fast drying time of the solution. They are usually indicated in the instructions supplied with the material;
- a large selection of different types of compositions. The building materials market offers products from both domestic and foreign manufacturers;
- the liquid solution fills all the unevenness and differences, forming a smooth surface;
- using the mixture requires minimal preparation. Such a screed does not require reinforcement.
Flaws:
- a thin-layer screed 5-20 mm thick forms an insufficiently strong floor;
- Screed made from a self-leveling mixture has low sound and heat insulation characteristics.
Step-by-step instructions for applying the mixture
The difference in height of the base is up to 10 mm, old ceramic tiles are installed on the floor. The apartment is in Khrushchev, the tiles were laid very firmly at the construction plant, it is difficult to knock them down with a hammer drill. In this regard, it was decided to level the surface with a self-leveling mixture without dismantling the old coating.
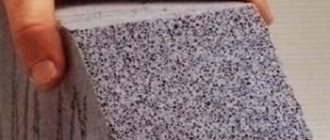
Cement-based finishing mixture
To carry out the work, you need to prepare a special mixer or an ordinary drill with an attachment, a wide spatula, a needle roller, a container for the solution (it is recommended to have a large plastic container for one batch at once for the entire area of the room). The zero point is found using a bubble level, the floor is primed with a roller and brushes. We have already mentioned above how important primer is; be sure to carry out this operation.
Tools and kneading container
Due to the fact that the floor in the bathroom is higher than the floor in the corridor, the leveling should be made as thin as possible; at the highest point the thickness will be approximately one millimeter. Leveling the plane in the traditional way using beacons requires not only serious construction experience, but also a lot of time; it is much easier and faster to solve problems with the help of a self-leveling mixture.
Leveling will be done on ceramic tiles
Step 1. Determine the required amount of material. This is done in several stages.
- Find the highest point of the floor in the room; in our case, it is located at the threshold. Measure the difference in relation to the lowest point, our difference is 10 mm. Such a large difference indicates the extremely poor quality of construction work. For indoors, the average layer of the mixture will be 5 mm.
- On the bag there is a table of technical characteristics, including the consumption of this material per square meter with a filling thickness of 1 mm. In our case, this parameter must be multiplied by five.
- Determine the area of the room in square meters and multiply this value by the material consumption for a thickness of five millimeters.
First you need to determine the height of the differences and the average thickness of the fill layer
The information on the packaging will help you determine the total consumption of the mixture.
Step 2. If there are doubts about the strength of adhesion, and the surface of the ceramic tiles is quite smooth, then use a grinder with a diamond blade to cut lines; there should be a grid on the floor with a pitch of approximately 5–10 cm or strips. They can only be done on the smoothest areas; the work is very dusty and noisy, keep this in mind.
To enhance adhesion strength, you can make notches with a grinder
Step 3: Prepare the base. Use a metal spatula to remove any remaining building materials and vacuum the floor. Seal any cracks in the walls around the entire perimeter of the room.
All cracks along the perimeter of the floor must be carefully sealed.
Step 4. Prime the floor, use a deep penetration primer, it has improved performance characteristics. Carefully read the manufacturer's instructions before purchasing a primer; not all of them are universal; you must be careful in the selection process.
The next step is applying primer
Side made of plasterboard and polyurethane foam
Work with a roller, or use a brush in hard-to-reach places. If in some areas the primer is absorbed too quickly, then you need to do two layers - it takes a little time, but the quality increases noticeably.
Step 5. Prepare the working mixture, read the instructions carefully. The amount of solution depends on the size of the room.
When kneading, it is important to follow the proportions specified by the manufacturer.
Do not allow bubbles to appear; removing them takes quite a long time. In addition, there is a high probability that some voids will remain, and this negatively affects the quality. It's better to stir a few minutes longer than to fix problems later and risk quality.
Mix only with a mixer, not by hand.
Water is always poured into the container first, and only then the dry ingredient is gradually added. If the amount of water is slightly more than normal, then the viscosity decreases and the floor is better leveled. But it takes longer to harden and the strength of the base decreases. The decision must be made on site, taking into account the finishing material, maximum loads, time, etc.
The mixture should be homogeneous, with a minimum number of bubbles
Step 6: Start pouring the mixture from the farthest corner of the bathroom. The height of the jet is no more than 20 cm; too high a pouring speed creates bubbles, and this has negative consequences. Try to roughly adjust the thickness of the poured solution by eye, taking into account the difference in height of the base.
Filling begins from the corner farthest from the door
Experienced craftsmen use hammer drills to level the mixture on concrete bases. Place the tip of the chisel on the plate and turn on the tool - vibration appears, which greatly helps the leveling process. But you can’t do this for a long time; the composition can stratify into different fractions, which will worsen its performance.
A spatula is used to distribute the solution over the floor
At the final stage, the entire surface must be rolled with a needle roller.
You can continue work on installing floor coverings only after the self-leveling mixture has completely hardened. The specific time depends on the brand of material and is indicated in the manufacturer's instructions.
Construction mixer
To effectively use the selected mixture, you need to properly prepare the base, mix and pour the resulting composition. You need to act carefully, because even experienced craftsmen sometimes make mistakes. Therefore, follow the step-by-step instructions below.
What is self-leveling floor
Step 1. Dust and debris are removed from the base, all large cracks are sealed. The condition of the floor is assessed. If a large tubercle is found on it, it can be removed using a hammer drill or chisel. This is simpler and cheaper than increasing the thickness of the filling layer.
Construction waste removal
A laser level will help determine the size of the unevenness, but this can be done faster and more accurately using a long bubble level. When using a laser device in many places in the room, you will have to take measurements with a tape measure, and you will need to determine the highest point (at least by eye) and measure it. The minimum thickness of the self-leveling floor will depend on this indicator.
Using a laser level, floor unevenness is determined
If you are using a bubble level, just look at the gaps between the bottom of it and the floor, laying the device along the walls and diagonally. Everything will take just a few moments.
READ MORE: DIY furniture at home, 95 DIY photos. Beautiful interiors and design
Step 2. Calculate how much mixture is needed, buy it, check if all the necessary equipment is available.
Beginners are advised to purchase DIY materials
Don't forget to make a reserve of the mixture (about 10%). After all, it will not be possible to calculate the volume of work extremely accurately, and during the pouring, unforeseen expenses may arise.
Checking the foundation for strength
Lines should not have fringe
Step 3. The floor is treated with a primer. It is recommended to check the quality of the primer mixture first. You need to work carefully, without missing anything.
Applying primer
Step 4. Next, damper tape is glued around the perimeter of the room, which is necessary to dampen changes in linear dimensions that occur during temperature changes.
Damper tape is installed along the edges of the walls
Step 5. Prepare the composition of the self-leveling floor. It is important to strictly follow the manufacturer's instructions without making any changes, otherwise the result will be disastrous.
The packaging must contain detailed instructions for use
Mixing components
It is recommended to work in a respirator, since mixing dry components will generate a lot of dust.
Rules for mixing the mixture
Re-stirring
Step 6. Filling begins from the far corner of the room. The composition needs to be “helped” with a squeegee, and then with a special needle roller. The latter is necessary not only for leveling, but also for removing air bubbles. It is important that the length of the spikes on the roller is at least 10-30 mm greater than the thickness of the layer. Do not move the roller too quickly, otherwise new bubbles may appear; slow movements will not ensure the elimination of old ones.
Floor pouring begins
The mixture is rolled with a needle roller
This type of roller cannot be used
Filling a self-leveling floor with your own hands
At the initial stage, it is necessary to carefully prepare the base for pouring, which is first cleared of dust, debris and old coating down to the concrete, and then primed 1-2 times with a deep penetration primer. Only after the base surface has completely dried can you begin to fill the self-leveling floor with your own hands.
To work, it is enough to have the following tools and devices at hand:
- bucket for preparing the mixture;
- a special mixer or drill with a mixing attachment;
- wide spatula and spiked roller for leveling.
Immediately before starting work, a leveling solution is prepared. When choosing a mixture with a cement or gypsum base, you must be guided by both the characteristics of the room and the manufacturer’s instructions. Typically, 6-7 liters of warm water are taken per 25 kilograms of dry material (this is one bag), unless the instructions indicate a different ratio. First, water is poured into the container, and then a self-leveling mixture is added, which is then thoroughly mixed with a mixer or drill with an attachment. The thickened mixture is used immediately, no water is added to it!
The finished mixture is poured in portions over the prepared surface, so that each next one is next to the previous one. The surface is then rolled with a needle roller to level it and remove air bubbles. After the entire floor surface has been poured and rolled, it is left until completely dry (2-3 days), preventing the penetration of people, animals, insects and debris.
The first is a rough screed with a self-leveling mixture, which is done along beacons or using a level. This primary screed will already be sufficient as a basis for other floor coverings: carpet, laminate, parquet or ceramic tiles. A finishing layer of a self-leveling mixture can also be applied to a rough screed, which can be considered an independent floor covering. It can subsequently be painted or varnished.
Since the work being carried out requires speed due to the fast-thickening mixture, it is advisable to do the self-leveling floor with your own hands together with a partner. This will improve the quality of work and productivity. If the above material is not enough to understand any of the nuances of the technology, we recommend that you watch a self-leveling floor with your own hands video . Good luck with your renovation!
Pouring the floor
Before pouring the screed, the floor must be cleared of debris, after which it is recommended to treat the surface with a primer.
Pouring the floor
Next, you can proceed to the installation procedure:
- first you need to apply marks around the perimeter of the room, which will help you navigate in observing the maximum level when pouring the solution;
- the mixture is diluted with water in a previously prepared container in accordance with the proportions indicated on the package. To do this, pour the composition into water while stirring with a mixer;
- the finished liquid is poured onto the floor surface;
- The poured mixture must be leveled with a needle roller. This will ensure the release of air from the thickness of the solution, due to which it will harden faster.
READ MORE: Do-it-yourself flooring in the house, step-by-step guide
The advisability of using a self-leveling mixture is a controversial issue. On the one hand, there is simplified installation and a reduction in work completion time, and on the other hand, the high cost of the material.
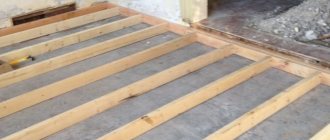
Sometimes even wooden floors that have minor defects are leveled using special mixtures (provided the coating is sufficiently durable, of course). In this case, before starting pouring, you need to dismantle the baseboards, remove the old paint, and hammer in any protruding nails. Where there were baseboards, you need to lay small planks that will protect the gaps between the walls and the floor from getting the leveling mixture. It is also important that all cracks and joints are sealed with wood putty. Then the boards are primed and covered with waterproofing material.
Preparing the base for pouring.
Quality of self-leveling floor
largely depends on careful surface preparation. The main preparation criteria are that the surface must be perfectly clean, dry and durable. It is necessary to eliminate deep flaws, chips and other construction defects using putty, and thoroughly clean the floor of debris and dust. To ensure reliable adhesion between the floor and the base of the filling mixture, the surface is treated with a special primer.
Self-leveling floor
tends to change in volume upon drying. Therefore, you should avoid sticking the filling mixture to the walls. To do this, a special edge tape is glued along the perimeter of the room to the bottom of the wall. This prevents the screed base from cracking when drying.
To prepare the bulk mixture
All components are poured into a clean container and filled with the specified amount of water. Using a special mixer, which can be used as a drill with a special attachment, mixing is carried out until a homogeneous solution of the required creamy consistency is obtained.
About preparing a wooden floor for pouring
If you are going to do the floor screed yourself, you should start by preparing the base. In particular, before laying the floor covering, you should thoroughly clean the base of the floor, and then thoroughly check its smoothness, horizontality, integrity and strength. If any of these characteristics are not ideal, your foundation needs improvement.
Cleaning from dust and small debris
It is especially important that all holes and crevices are cleared of dust and small debris. Then they are sealed using cement-sand mortar. If there are cracks in the floor, they should be opened with a grinder, cuts made perpendicularly, dust removed, staples laid and sealed with cement. Absolutely all protruding irregularities must be removed and leveled.
The self-leveling floor is quite unpretentious in terms of the quality of the base. But there is an exception - the moisture content of the base. Water vapor that passes through the fill destroys the polymer films. As a result, the coating may begin to crumble. Therefore, it is very important to create reliable waterproofing before filling. Preparing the base includes the following steps:
- Sealing cracks;
- Primer;
- Waterproofing;
- Thermal insulation and mesh laying;
Small cracks can be repaired in the usual way.
Sealing cracks
You can learn how to repair such cracks in any construction video. If the cracks are too large, you should first check to see if the coating is completely destroyed. If such a process occurs, then leveling is not worth the effort, because the house is in disrepair. If there is no destruction, then when sealing cracks, perpendicular cuts are created to them. With their help, technological seams are made that can reduce the load. Waterproofing will be necessary in all cases.
Waterproofing
The self-leveling floor should breathe only around the perimeter. So you will need any special material, for example, waterproofing. Before you start laying down the film, you need to tape off the corners. They are covered with polystyrene foam tape.
If you decide to create a self-leveling floor on a wooden surface, then first you should check the surface for play. To do this, you can use a homemade plumb line. The device must be placed in the center of the room. The nose of the load should almost reach the floor. After this, you need to walk around the room and track the deviations of the load. The size of the game can be defined as the height of the suspension in relation to the width or length of the room.
If the deviation is greater, then the flooring needs to be removed, rather than laying a new one in its place. If the flooring is stable and of high quality, then you need to seal the cracks. This can be done using wood putty. After this, you will need to carry out waterproofing.
Choosing a self-leveling floor
At the initial stage, an individual developer needs to decide on the terminology:
- in the regulatory documentation of a joint venture, a screed is the layer under the floor covering;
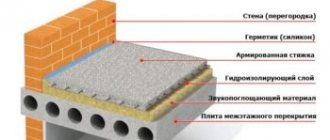
- it is necessary for making slopes (bathhouse, shower), masking engineering systems (electrics, underfloor heating pipes, hot water supply, hot water supply, heating or sewerage), insulation and sound insulation, leveling floor slabs or providing rigidity over a wooden subfloor;
- A self-leveling screed is made only from a self-leveling floor with gypsum or cement binder.
Budget gypsum self-leveling mixture.
Self-leveling self-leveling floors are chosen by individual developers because of the ease of making screeds (no need for beacons, drying time is much less than that of concrete).
To ensure that a self-leveling screed with your own hands lasts longer, when choosing a self-leveling floor, you should be guided by the table below:
| Type of self-leveling floor | Purpose | Room humidity | Peculiarities | Base material |
| plaster | house, apartment | dry | quick-drying | concrete |
| cement-gypsum | house, apartment, balcony, bathhouse | dry | rough surface | concrete, wood flooring |
| polyurethane-cement | street, house, apartment, garage | with any humidity | rough surface | concrete, wood flooring |
| acrylic-cement | Street, house, flat | with any humidity | rough surface | concrete, wood flooring |
Unlike concrete screeds, a structure made from self-leveling mixtures can be brought to zero and not be reinforced.
Tools for applying screed
Necessary tools
In order to level the floor with a self-leveling mixture, you will need the following tools:
- Cement mixture;
- Primer;
- Container for mixing the solution;
- Needle roller;
- Drill.
- dry mixture;
- primer;
- containers for mixing the solution;
- drill;
- needle roller.
Tools for work
If the self-leveling floor is installed on an epoxy base, then you should not use dry mixtures, but polymer materials specially designed for this. As a rule, problems with choosing the right components do not arise, since the modern market offers a huge number of such substances - they are presented in a wide price range.
A self-leveling screed is used for final leveling of the subfloor. Their thickness is usually from
0,2
before
1 cm
.
This type of screed is also suitable for other purposes, for example, to hide the conductors of a heated floor.
Primer and beacons
To ensure better adhesion of materials, the floor surface must be primed. By the way, this also increases waterproofing. The primer must be allowed to dry thoroughly. Reinforcing mesh will help strengthen weak surfaces, but in this case you will have to make a thicker layer so that it is completely covered.
The primer will provide better adhesion
Beacons will be needed here - they will allow you to control the horizontalness of the finished floor. Moreover, wooden beacons cannot be used, since wood tends to absorb moisture and become deformed. It’s better to buy lighthouse slats or use available materials - metal pipes or profiles.
Special beacons made of metal profiles
How to install beacons correctly:
- find the highest point of the floor;
- mark the point with a beacon;
- using a laser level, water level or ruler level, set the beacons to the same level, maintaining a distance of about one and a half meters from each other;
- secure with mortar;
- make markings on the walls.
Which self-leveling floor is better, gypsum or cement?
The self-leveling mixture consists of a large number of different substances that give it plasticity and the ability to spread quickly and evenly. However, the main elements in such solutions can be only two substances, namely: gypsum or cement.
Both gypsum and cement floors are characterized by good qualities
Many people are concerned about the question: “Which is better, cement or gypsum composition?” There is no definite answer! Each remedy is good in its own way and is used in a specific case.
Gypsum mixture is used when it is necessary to pour a sufficiently large layer of screed. The height of such a fill can reach 10 cm. Gypsum is an environmentally friendly and harmless material that will provide additional insulation to the room. The gypsum composition is a particularly good neighbor for wooden coverings, for example, parquet or tongue and groove boards. With this symbiosis, gypsum will prevent the floor finish from cracking and rotting. In the event of a sudden increase in humidity, the screed will absorb water from the wood and, if necessary, return it back.
Related article: What is more convenient in the bathroom: a hygienic shower or a bidet?
For rooms with high levels of humidity, such as a bathroom or kitchen, gypsum self-leveling screed should not be used. A more unassuming cement would be appropriate here. The layer of such a mixture can reach from 5-30 cm (depending on the curvature of the floor). The cement leveler also contains sand and fine-grained expanded clay.
There is also a polyurethane self-leveling floor, but it is used not for leveling the base, but for finishing it.
Both types of floor leveling compounds are good in their own way. Gypsum composition is more often used in European countries, and concrete is a favorite in the Russian construction market.
Rules for preparing the leveling mixture
Preparing the solution is the most critical procedure. On our website you can find many videos with cooking instructions. But some of them may not cover important nuances.
Preparation of the solution
Temperature. The operating temperature range is from 15 to 30 degrees. If you make a self-leveling floor in the cold, it will turn out fragile. Pouring in hot weather is much worse. Mixtures are temperature sensitive.
Best before date. The shelf life of ready-made cement mixtures is from 6 months to a year. Do not use expired mixtures. Ultimately, all this will affect the quality of the floor.
Water. The instructions specify a certain amount of water for kneading, and some allowance is made. And this permission is not made just like that. If conditions are favorable, then using this tolerance you can control the fluidity of the solution. If the temperature in the room is within the permissible limits, then the mixture is adjusted according to temperature using tolerances. In cold weather you should use a minimum of water. In the heat it’s the other way around.
Sand. Cement-sand mixtures are not stored, so you will need to buy sand separately. The instructions will tell you exactly what type of sand you will need. The requirements must be strictly followed. If there are no clear instructions, choose river sand.
Kneading process. The solution must be mixed in portions per bag or half a bag. Initially, water is poured into the vessel and only then the cement composition is poured. Kneading is done with a drill at low speeds - 100-300 rpm. The nozzle should be moved in a circle up and down. It is better not to touch the walls and bottom. Mix the solution for about 4 minutes. Afterwards the solution will have to mature. This will take another 4 minutes.
- The temperature in the room during preparation and pouring of the composition should be no less than 10 and no more than 25 degrees.
- As for the temperature of the water used for mixing, it should be at least 10 degrees.
- The optimal air humidity for work is no more than 80%.
- It is also important to close all doors and windows in the room to prevent drafts.
- Finally, until the self-leveling floor is completely dry, heating radiators cannot be turned on.
Preparing and pouring leveler
Pouring the leveling mixture