Recently, wooden paths have become very popular. This is due to the availability of building materials and the ease of erection of such structures. Using wood as a base makes it possible to create paths of different shapes and configurations. However, this material has its advantages and disadvantages. Therefore, it is necessary to build wooden paths at the dacha, strictly adhering to the recommendations.
Wooden garden paths - pros and cons
If you are considering wood as the main material for creating a wooden walkway, then you should learn about its advantages and disadvantages.
Pros:
- Wood is an environmentally friendly building material. Therefore, if security is important to you, then you should definitely choose this option.
- However, a beautiful visual appearance is also a clear advantage of garden paths made of wood. The natural texture goes well with almost all styles. A large number of species, shades and the uniqueness of each cut will provide a unique design.
- Ease and simplicity of laying the path. Paths from boards can be erected without a deep foundation, preparation of mortar and other complex processes.
- Wooden paths are easy to maintain.
- Wood is the most affordable building material in terms of cost; in addition, at the dacha you can find sawn trunks, old boards, and trimmings from previous construction work.
Minuses:
- The main problem with wood is that when it comes into contact with the ground, it quickly collapses, rots, and is inferior in service life to other materials. However, this can be easily corrected using various wood treatment products.
- Wood is also flammable - you need to remember this and be careful.
- After rain, wooden paths become slippery, so you need to move along them carefully.
There are many more advantages than disadvantages, which is perhaps why summer residents prefer to make paths from wood.
How to make a wooden garden path with your own hands?
Like any work, laying a garden path in a country house from the same wood requires a certain stage, even technology. The following stages can be distinguished:
Preparation for installation
First, you need to mark the future path using stakes, rope and a regular tape measure, so that in the future you do not fall behind the schedule. In this way, you can immediately outline the area where the garden path at the dacha will pass, and at the same time determine what additional work will be required. For example, on the “route” of a path, there is a tree, a stone boulder, or anything else. You need to get rid of this or beat it somehow, think over some design solution.
Then you need to prepare the soil: remove the top layer of turf and dig a trench if you are going to dig the wood deep into the ground. Often 10-20 cm is enough. Now you can start lining the bottom of the trench with waterproofing film or roofing felt and laying drainage. Gravel, crushed stone or a mixture of them and sand can be used as a drainage cushion.
Material
First, prepare a “pillow”; you have already determined what material you will need; now it is advisable to decide what kind of wood you will use, what texture, and so on. Do not forget that the wood will have to be further processed, for example, trimmed, stained or treated, especially if there is a high level of groundwater.
Read on topic: Road construction in Germany
Technology
In this section, everything is limited solely by your imagination and the type of material chosen; on the Internet there are indeed many different solutions for laying the same saw cuts, beams, logs or ordinary boards, some of which are given in our article.
At the final stage, the wood is laid in accordance with your design idea and compacted. The gaps and gaps are then filled with gravel, crushed stone or sand. Your garden path is ready. More “complex” projects with lighting from below and a frame under a wooden flooring are carried out according to the same algorithm, but before laying the wooden flooring, the wiring and lighting system are “hidden” in the frame.
Tip: it’s best to tamp with a mallet. A hammer is suitable for these purposes, as it can cause damage and cracks to the wood itself, which will spoil the aesthetic appearance.
Types of garden paths made of wood with your own hands
Path made from pallets
Wood is considered multifunctional, so it can be used in different variations. Craftsmen value this material, first of all, for its environmental friendliness and low cost. So, there are the following types of wooden paths:
- wooden sidewalk;
- pallet construction;
- terrace type parquet (decking);
- path made from sawn logs;
- construction from sawed beams;
- path made of wood shavings;
- log and gravel construction;
- path made of boards.
You can choose any option from the list that suits your garden plot in terms of design and complexity of creation for you. All paths can be made with your own hands in a day or even less.
LiveInternetLiveInternet
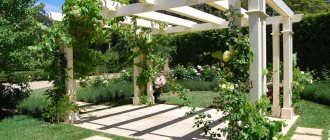
Garden paths made of wood create a harmonious transition from areas near the house with a harder and more reliable surface to the beautiful lawns of the garden itself. In addition, such paths are used in areas that cannot or are undesirable to be paved - areas under trees, areas with complex differences between the house and the garden, on hillsides.
How practical wooden paths will be for your garden depends on the climate and the price of wood in your region. If the area is forested and the price of wood is affordable, then you have the opportunity to create a surprisingly harmonious design connecting the main building and the garden area.
If you want your paths to last, consider your climate when planning and choosing the surface.
For garden paths made of wood, the sharply continental climate of Siberia is ideal - with hot summers and cold winters. For the European part of the country with warm winters and humid summers, wooden paths are less practical - the wood rots faster and on rainy days the surface of the path becomes slippery. Wooden sleepers are often used for wooden garden paths. For such paving, we recommend that you take only new sleepers - they have already been properly processed and, if properly laid on a sand bed in combination with crushed stone, will serve you faithfully for a long time.
Using used wooden sleepers, despite all the attractiveness of saving on price, threatens you with unpleasant troubles. On hot days, old sleepers release toxic residues of lubricants, which pollute the soil, stick to shoes and emit a rather pungent odor.
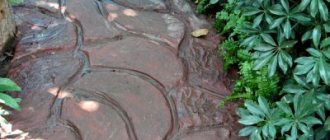
When choosing wood for garden paths, choose coniferous species that must be treated with protective coatings. To fasten boards together into panels, it is better to use galvanized nails than modern screws. Garden paths made from wooden saw cuts always attract our attention. This “rural pavement” is made from sawed logs of different diameters and laid like a regular pavement on a sand cushion made in a recess for the path lined with geofabric to protect against weeds; logs of wood are placed vertically on the cushion, trying to keep the seams between them to a minimum; the seams are filled with wet sand or small gravel in several stages.
Beautiful combinations of different types of walkway surfaces add personality and style to your space. The possibilities for imagination are simply endless. You can use wood in combination with natural stone slabs, or combine saw cuts with concrete or paving slabs.
When laying combined garden paths, it is necessary to take into account the different densities of materials, the different thicknesses of wooden blocks and paving slabs. For such paths, it is necessary to select soil along the entire length to the same depth and make a cushion of gravel and sand for different materials of different thicknesses.
Preparation of boards and necessary tools
Boards for garden paths are made from wood in the same way as saw cuts, treated with an antiseptic or hot drying oil. At the end, after the work has been done, they can be treated with varnish or a coloring agent - for decoration and more. protection. The boards must be cut into equal pieces. To work with wood, you need to prepare the following tools:
- plane;
- Bulgarian;
- nails or self-tapping screws;
- construction level;
- drill;
- screwdriver;
- hacksaw.
Important! It is not a fact that you will have to use all the devices on the list, this is just a general list of the necessary tools for the job.
Technology for constructing paths and platforms made of wood
More information about the construction of wooden paths and platforms:
- Path markings. Using a tape measure and string with pegs, mark the trajectory (the width can be chosen arbitrarily, for example, 0.5-1 m).
- Preparing the base (on the marked strip it is necessary to remove the top part of the turf). The depth of the recess depends on the chosen building material for the path. (20-40 centimeters will be enough for you).
- Installing a cushion of sand and gravel (cover the bottom of the pit with a layer of rolled moisture insulation or a simple film. Pour sand or gravel on top of this, these additives will serve as the basis for laying and will act as drainage.
- Next, comes the installation of the curb (if the plan includes sides, then they are mounted along the edge of the trench).
- Laying road material (boards, bars, panels, sections) Everything must be cut in advance (by choosing the appropriate length) and processed: the surface of the boards and bars can be processed with an electric planer. Then it is necessary to cover it with drying oil and treat it with bitumen.
- The material is laid out on the pillow taking into account the selected location. The distance between the boards and bars is selected within 5-8 cm.
- The laid lumber must be leveled (compacted), for this you will need to take a mallet.
- The space between the material (gaps) must be filled with pebbles or gravel.
Subtleties of installing wooden paths
Before you make a garden path out of wood, you need to decide what kind of structure you want to assemble. The most common material now is wooden logs, laid vertically with the cut up. But sometimes you can find garden paths made of boards; the installation instructions here are a little simpler, although first things first.
Board borders.
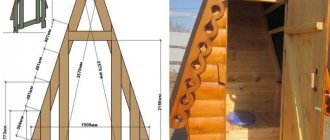
Ring flooring
Flooring made from rings or wooden blocks is particularly beautiful, because the pattern on each ring is unique and such a covering lasts much longer than ordinary boards. This material for garden paths is also attractive because old, fallen trees can be found in the nearest planting, so the price of such a design will be minimal.
Experts recommend using deciduous wood for these purposes; oak, of course, is best, but larch or aspen are not much inferior to it. Conifers are considered less strong and, despite the abundance of resin, quickly deteriorate.
Preparing the pit.
The height of the ring ranges from 100 to 250 mm. Rings that are too thin, especially those made from a large diameter barrel, can quickly break. Since a lot of material is needed, it is better to use a gasoline or electric saw for cutting. It is advisable to remove the bark from the trunk, since it can contain many pests, and it will become an obstacle to the impregnating protective composition.
To save time, we recommend that you immediately begin treating the rings with a protective solution. As a rule, drying oil or waste machine oil is used for this. The substance should be heated to a boil and the workpiece should be immersed in it for a couple of minutes, after which the workpiece should dry.
There is another way of processing. Cold drying oil is applied to the workpiece twice. After the tree has dried, its lower part, located in the ground, is dipped into boiling bitumen and dried. Bitumen film will more reliably protect against rotting and pests.
Filling gaps with concrete.
Advice: if you want to artificially age the material, then there is a simple folk method for this. The tree must be coated with copper sulfate.
While the material is drying, you can build a foundation pit for installation. The excavation depth varies depending on the height of the rings. Keep in mind that the flooring should rise 2–3 cm above the ground, otherwise it will gradually silt up. The size of the drainage pad under the posts is made around 100 mm.
When the pit is ready, the bottom should be well compacted and covered with geotextile; technical polyethylene is also suitable for bedding. If there is clay below, then you can do without litter, you will just need to compact it well.
Cuts of different diameters.
To prevent the wood from deteriorating less, a drainage layer of 100 mm of sand or gravel is laid and compacted. While you are doing the preparatory work, the protective layer on the wood will dry and you can begin installation.
To ensure that the installation is as dense as possible, immediately prepare cuts of different diameters. Natural gaps between the workpieces are filled with sand or sawdust. To seal the gaps, the surface of the track must be periodically moistened.
Board on a drainage pad.
Important: it is advisable to completely eliminate direct contact of wood with the ground. Experts recommend installing curbs to protect the flooring from the sides and prevent the drainage layer from being washed out.
Using the board
Garden paths made of boards are a little easier to install. The preparation of wood and pit is carried out in the manner described above. The material itself is a rectangular beam with dimensions of 150x250 mm.
Such blocks are laid directly on the drainage and the cracks are filled with sand. The gap between the blocks must be at least 5 mm so that they do not crack in the winter cold.
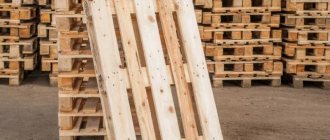
Often, owners take a simpler route, using wood from pallets. It is also treated with a protective solution, but the length of the board on a pallet is 1 m and it is better to cut it in half. Timber from the same pallets is laid as guides on both sides. The entire structure is installed on a gravel bed and, if possible, waterproofed.
Garden parquet flooring.
Advice: the industry currently produces so-called garden parquet. Of course, it cannot be called 100% natural due to deep impregnation with polymer varnishes, but it has a decent appearance and lasts a long time. It is laid according to the same pattern as the circles.
In the video in this article you can see the intricacies of installation.
Caring for wooden paths
Any path needs to be looked after, let alone wooden paths. The saw cuts and boards will have to be cleaned with a metal scraper and treated with an antiseptic. It is very good if you leave a few bars or boards for the future for later replacement of unusable elements.
Paths in the garden made of wood, made by yourself, look beautiful and help to properly organize the space. You can also happily walk on them barefoot. With proper care, they will last you quite a long time.