Nests for laying hens, built with your own hands from wood. To do this, adhere to the following rules:
- place nests in the shade as far as possible from sunlight;
- choose a dry and warm place;
- To ensure that the flooring is ventilated and the nest remains dry, take care of ventilation or make the bottom of the nest mesh;
- on the ground or at the entrance to the chicken coop it is always colder and more humid - there the bird can easily catch a cold and because of this become less active, so place the nests higher and away from the entrance;
- do not attach the nests directly to the wall: in winter this is uncomfortable for chickens, in addition, this arrangement significantly reduces the service life of the entire structure;
- When making nests for chickens with your own hands, make sure that there are no long nails or chips in the structure, which could cause injury to the bird;
- the number of nests depends on the number of birds: there should be 1 place for every 5 chickens.
When setting up a poultry house, it is important to create optimal living conditions for the birds.
Main types of nests for laying hens
Are you not ready to delve into the intricacies of how to make nests for laying hens? Buy a ready-made version or build a nest from improvised materials. Plastic and wooden boxes, old baskets and cardboard boxes are suitable for this purpose. The main thing is to choose a shaded, secluded place.
If you decide to build a full-fledged nest yourself, first of all decide on the type of structure.
There are two main types of nests for chickens:
- Drawer-shaped design. The design of such a nest is extremely simple and makes it possible to make a whole series of cells for all birds. In addition, it will not be difficult to accustom a chicken to such a nest: to get it used to laying there, it is enough to lock the bird inside for a long time.
- Nest for chickens with an egg collector. This type of nest involves different designs, but the principle is the same for all: the eggs almost immediately fall into a tray specially designed for this purpose and the chicken almost never touches them. This option is especially relevant for large farms, when the number of chickens is high.
An example of homemade nests for chickens with original decor.
Types of nests and their features
Different types of nests differ in design features, manufacturing method and certain advantages. To choose the best option, you should familiarize yourself with all offers. The following varieties exist:
- Perches in boxes. The chicken houses look like a box with an entrance opening. A space is created inside for birds to retire and lay eggs. By installing such a structure, it is easy to train chickens to lay eggs in nests by closing them inside for a while.
- Nests made from scrap materials. This option is suitable for novice poultry farmers who have not had time to properly equip the chicken coop. This is also the optimal solution for small numbers and temporary breeding of birds. The main requirement is that all available materials must be intact and clean.
- Nests with egg collector. Eggs are collected from special trays, and laying hens interact with the eggs for a short amount of time. When making it yourself, a funnel-shaped hole is made in the central part of the perch.
See also
10 best methods for determining the sex of a chicken yourselfRead
Do-it-yourself nests for laying hens: photos, dimensions, calculation of parameters
One of the most important factors affecting bird comfort is the size of the laying hen nest. It is important to understand that you cannot train a hen to lay eggs in a nest if she is uncomfortable sitting in it.
First of all, the size of the nest for chickens depends on the breed of bird.
Table of correspondence between bird breed and nest size for chickens:
| Bird breed | Socket width, cm | Nest depth, cm | Nest height, cm |
| Laying hen | 25 | 35 | 35 |
| Meat-egg chicken | 30 | 40 | 45 |
Regardless of the breed of bird, the height of the threshold must be at least 5 cm. Also, make sure that there is a special take-off shelf in front of the entrance. Place it at a distance of at least 10 cm from the entrance. The section of the shelf should be 5x2 cm.
If possible, the slope of the roof should be 45° - this will eliminate the desire of birds to sit on top.
Place nests before introducing chickens into the house: this will give them the opportunity to get used to new shelters and get comfortable. Therefore, include drinking bowls in your nest plan in advance, as well as hand-built perches for laying hens: the drawings will help you not to forget anything important and place all objects in the optimal way.
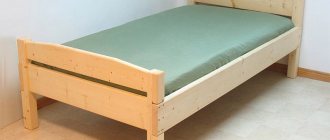
Nests for laying hens made of wood and plastic containers.
Note! The simplest version of a nest for chickens is a “booth” made from a plastic box for vegetables and plywood sheets. However, it is better to equip more complex nests, since this design turns out to be unnecessarily bulky, and most importantly - not very comfortable, and in winter - even dangerous to the health of the birds.
Dimensions and drawings of nests
First of all, a drawing is made, indicating the dimensions. Some of the indicators depend on which direction the laying hen breed belongs. Below is a table of nest sizes for laying hens.
| Breed | Width, mm | Depth, mm | Height, mm |
| Egg-oriented | 250 | 350 | 350 |
| Meat and egg orientation | 300 | 400 | 450 |
The threshold is made with a height of 50 mm. A perch is mounted in front of the entrance hole, maintaining a distance of 100 mm. Its cross-section is 50 by 20 mm.
To prevent birds from spending the night on the roofs of structures, they are made at an angle of 45˚C. Ready-made structures are installed before the birds move in. This way they will get used to it faster. Therefore, when creating a floor plan, take into account the placement of all necessary fixtures, perches, etc.
To build the simplest structures, fruit and vegetable boxes, plywood, sheet wood, and OSB are used. However, it is recommended to install complex structures that take up less space.
How to make nests for laying hens: box-shaped design
A little effort on your part and the birds will have a real home where they can feel comfortable, which means they will please you with activity and a lot of eggs.
To make a structure in the form of boxes, you will need the following materials and tools:
- boards, plywood;
- sandpaper;
- fasteners;
- beam;
- screwdriver;
- hammer;
- jigsaw
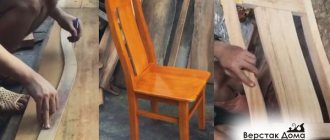
The process of building a poultry house with your own hands, arranging nests and perches.
Making nests in the form of boxes
Nests in the form of boxes
The simplest nest can be easily made from vegetable storage boxes and a sheet of plywood. A screen is made from plywood, and the boxes are filled with filler.
These models are inconvenient because in most cases they are installed on the floor, and this can lead to hypothermia of the chickens. And a lot of space in the chicken coop will be used. And chickens need space.
The most convenient and aesthetically pleasing is the structure made of boards. Such a device can be made single-tier, two-tier, three-tier.
For the best result, you must first draw a drawing: it will help you avoid making mistakes when choosing the required material and the number of components.
If you are building a house with several tiers, you need to think about stairs along which the birds could climb into the house and a shelf near the house so that the hen could fly up onto it. Such a shelf should be located 10 cm from the entrance.
To make such a house, you need the following materials and tools:
- plywood, boards, slabs;
- bars;
- fasteners (nails, screws);
- hacksaw;
- hammer:
- screwdriver
Such a structure is made in the form of individual chambers or entire segments. Materials must be treated with sandpaper. All sharp edges must be sanded down with a grinding machine so that the chicken does not get hurt.
Such a structure is carried out in the form of individual chambers or entire segments
The resulting tiers are connected into a multi-tiered box. To make the structure stronger, it is necessary to strengthen it in the corners and on the inside with timber.
The entrance inside is left by:
- open;
- covered with a curtain made of various materials (chickens love to hide clutches of eggs).
The first “floor” of the chicken house should be placed at a level of 30-35 centimeters from the floor, so that it is warm in the winter. Ladders are made of poles with nailed crossbars.
Making a nest with an egg collector
There are many designs of this type. All designs work on the same principle: eggs are rolled into a special container, contact with the chicken is minimal.
Making nests with an egg collector is more difficult. The most important thing is to understand how to make such a design. In this case, it is assumed that the eggs are rolled out; the hen will not have the opportunity to peck them.
You can make such houses:
- with double bottom;
- with egg container.
Double bottom nest
To make such a house you need the same materials as in the previous example. It is necessary to add cutting objects to the materials: a knife, scissors and the material that will need to be covered with the pallet: rubber, foam rubber, felt.
Be sure to read:
How to disinfect a chicken coop at home: treatment and means
Installation features:
- The structure is made as in the first option.
- The bottom should be made with a slope of 5-10 degrees. The distance from the end of the bottom to the wall should be enough for the egg to pass freely.
- The walls and bottom of the pallet must be covered with upholstery material.
- The width of the pallet should be made 12-15 cm larger than the nest: the distance will make it possible to collect products from the outside.
Nest with retractable container
Nest with a retractable container
There is another option for making such a house. The opening into which the eggs fall is made in the center of the nest. And the eggs will roll out into a retractable container.
How to do:
- The structure is built on the principle of a doghouse. The dimensions need to be made slightly larger - 55x35x35 cm.
- Take a sheet of plywood and suitable boards. Two parts are cut out to make a floor measuring 35x15 centimeters. The floor is constructed in such a way that there is a slope on both sides towards the center of the nest, and a space is formed between the floorboards; the width of the gap should be 10 cm.
- The back part of the floor is attached to the wall, and the front part is mounted on a crossbar, which acts as a partition.
- A retractable tray is made. It will be located under the inclined floor of this structure. The length of the tray must be greater than the length of the nest.
- The container is lined with soft fabric, rubber, felt, and the reverse side of linoleum. This is done to preserve the eggs. The sloping bottom is covered with a thin layer of soft fabric.
Nest with container - second option
To make such a structure, you need to prepare the same materials as in the previous version.
Sequencing:
- First, assemble a box with a sloping bottom (angle of inclination approximately 10 degrees). The tilt can be directed in any direction: forward, backward, sideways. The slope located at the back of the cage implies the ability to approach from the back of the cage to collect eggs.
- On the side that is lower, install a container upholstered with material. Set it so that between the wall of the container and the floor there is a distance through which the egg could easily roll.
- A lid is placed on top of the container and thus hides the egg from the chicken.
How to make nests for laying hens with your own hands: drawings and procedures
Creating a comfortable nest for laying hens is not difficult. Follow the instructions and everything will work out even without much experience in building such structures:
- If you use boards for construction, sand them thoroughly using sandpaper.
- Next you need to cut out the blanks. It is important to make accurate calculations of the parameters of the parts you need. First of all, count the required number of cells. Then multiply the resulting number by the width of one cell - it should be at least 25 cm. The height of the box is calculated using the same formula. If there are a lot of birds on your farm, make several floors.
- Pin the cut pieces together.
- To give the structure strength, fasten timber on the inside of the resulting box at the corners.
- The entrance can be left open. Or cut round holes corresponding to the number of places for laying hens and line the box.
- Make a threshold. To do this, take a 10 cm wide strip and fasten it from below along the entire length of the structure divided into cells.
- Step back 10 cm from the entrance to the nest and secure the take-off platform.
- If you have a structure with several tiers, make stairs. There should be one staircase for each tier.
Diagram with installation dimensions of nests for poultry (dimensions for chickens are indicated in brackets).
Note! If the structure has a horizontal roof, coat the surface with stizol to prevent damage from bird droppings.
How to do it yourself
When making and arranging bird nests, it is necessary to take into account the features of various types of structures. The final result is influenced by the following factors:
- location;
- materials used in production;
- herd size;
- direction of breeding.
When making your own chicken nest, you should think about the convenience of both the laying hen and the poultry farmer.
When making nests, the breed of birds should be taken into account: for standard laying hens, nests with parameters of 25x35x35 cm are suitable, and for meat and egg breeds, structures of at least 30x40x45 cm will be required.
Boxes and wicker perch made of wicker
The simplest nest option is for egg breeds of chickens, but the Redbro and Ayam Tsemani breeds are also suitable. Structures that resemble a box from the inside are easy to build yourself. The manufacturing process does not require special knowledge and does not take much time and effort. However, some features should be taken into account. Making it yourself will cost much less than buying a finished product.
Dimensions by centimeters
This type of nest is usually located in the form of a “tenement house”. To calculate the size of the entire structure, you should take into account the number of birds that will use it. There should be no more than 5 birds per nest. The structure can be either separate or multi-tiered. With the second option, it is necessary to bring a ladder to each tier for the convenience of the birds.
Materials
To build nests in the form of boxes you will need the following building materials:
- pieces of plywood and timber;
- fastening elements (nails, screws, self-tapping screws);
- jigsaw;
- hammer;
- screwdriver;
- sandpaper or file;
- saw (manual or electric).
Fastening materials should be no longer than the thickness of the wooden elements, otherwise their protruding ends may harm the bird.
Step-by-step instructions: drawing of how to arrange a nest, calculation of the slope
- Carry out careful calculations of the parameters of the future design in accordance with the number of birds. After this, make a detailed drawing.
- Carefully process all wooden elements with sandpaper or a file to eliminate roughness and sharp ends.
- Cut out all the details of the future curia building in accordance with the drawing. Reprocess if necessary.
- Connect all the elements together and secure the timber at the inner corners. This will give the box rigidity.
- Arrange an entrance to the nest with a small threshold at the bottom of the structure, about 10 cm high. The entrance can be in the form of an open front side of the box, or a small cut hole in one of the walls.
- At a distance of 10 cm from the entrance, secure a horizontal rail. It will serve as a landing platform for birds.
This article will tell you how to make a perch for chickens.
The finished structure must be thoroughly checked for the presence of sharp parts, protruding elements of fastening materials or roughness. All this can harm laying hens.
With egg collector or egg receptacle
This type of nest is especially relevant for farms with large numbers of birds, or owners who breed birds to obtain a large number of eggs. The design allows you to quickly and painlessly collect products at a time convenient for the owner. At the same time, chickens have almost no contact with eggs, so they cannot harm them.
Find out why chickens don't lay eggs at this link.
A distinctive feature of this design is the slight slope of the floor. Thanks to this, the eggs roll into a special compartment of the nest.
Correct sizes
The main parameters do not differ from standard sockets. Except for the sloped floor. The best option is a tilt angle of 10 degrees. With this device, the products will roll into the collection compartment, but will not be damaged. In structures with a large number of tiers and sections, the angle of inclination of the floor can be 40 degrees.
Materials needed
To make your own nest with an egg collector you will need:
- any wood material (optimally plywood);
- fastening elements (nails, self-tapping screws, screws);
- sandpaper;
- hammer;
- screwdriver;
- jigsaw;
- scissors.
In addition, a design of this type requires a special soft material for upholstering the egg collection compartment. For these purposes, you can use felt, linoleum (wrong side up), or any soft fabric.
A nest with an egg collector can be equipped in two ways - with a double bottom or a special container.
Step-by-step instruction
- Calculate the required dimensions of the structure and draw a drawing in accordance with them.
- Cut out elements from wooden materials according to the drawing - side walls, bottom and roof.
- Thoroughly clean all parts with sandpaper or a file.
- The bottom of the structure should be secured at a slope relative to the rear wall of the nest. In this case, there should be enough space between the wall and the bottom of the floor for the egg to pass through.
- The key feature of such a nest is the tray into which the eggs will roll. It must be made 10 cm longer than the main building, the bottom must be covered with soft material and a small plank must be attached to the front.
- The pallet is attached at the same angle as the floor of the main structure. This will allow the eggs to roll into the lower compartments without being damaged.
The structure with a container for collecting eggs is made in the same way. The only difference is that instead of a gap between the wall and the bottom, you need to make a hole in the bottom of the container, the diameter of which will be slightly larger than the size of a chicken egg.
Nest option for laying hens to prevent eggs from being pecked: double bottom design
If you are busy during the day and cannot constantly monitor the chickens, you can make a more complex version of the nest. There are two types of structures that include an egg collector:
- double bottom design;
- with egg container.
To build a double bottom nest you will need the following materials and tools:
- thin plywood boards;
- fasteners;
- material suitable for pallet upholstery;
- sandpaper;
One of the options for a nest for laying hens with a mesh floor and an egg collector.
- screwdriver;
- hacksaw;
- hammer;
- knife;
- scissors.
Basic rules for building a nest with your own hands:
- do not take long nails: those sticking out from the outside can easily injure birds;
- after constructing the nest, carefully inspect it for nicks, chips, and make sure the strength of the structure in order to protect the birds from injury;
- To ensure the comfort of the birds, lay sawdust, straw or hay on the floor. Regularly change the filling and clean the nest from droppings;
- In order for chickens to feel comfortable, the microclimate is of great importance. Place nests in a dry place, protected from drafts.
The egg receptacle will allow you to keep the eggs intact, which is especially important with a high number of chickens.
Instructions on how to make a nest for laying hens with an egg collector with your own hands (photos, dimensions and drawings are easy to find on the Internet):
- Make a design based on the principle of a doghouse. Pay special attention to the bottom: in this version of the nest it should have a slight (about 5°) slope towards the rear wall of the structure. Leave a gap the size of the egg between the wall and the bottom.
- Make a pallet. For upholstery, choose a soft, non-slip material: fabric, felt, the back of linoleum, rubber. The length of the tray should be 10 cm greater than the depth of the nest - this is necessary to ensure easy access to eggs from the outside.
- Attach a bar to keep the eggs from falling.
- Attach the tray to the main part of the nest, maintaining a slope of 5°. This will cause the egg to roll off and end up in the bottom tray, where it will remain safe until you pick it up.
Note! The floor in such a nest should be made of mesh. This solution helps to ventilate the flooring. A good material for making a floor is wire: weave it, leaving gaps of 4x5 mm, and place the bedding material on top.
The design of chicken nests with a double bottom is convenient and practical.
Step-by-step instructions for building nests for laying hens
Nest made from scrap materials
If you need to equip a chicken coop in the shortest possible time, “houses” for laying hens can be put together from any available materials: boxes, boxes, buckets or any other containers (some poultry farmers even use cut tires and old furniture with compartments or shelves). The main condition for choosing containers is that they must be spacious enough for the laying hens to be comfortable, and the surface must not have defects, chips or signs of rot. The containers are installed in the chicken coop, filled with sawdust or hay and covered with curtains. Typically, such structures are temporary and are used until permanent and more durable ones are made.
One of the options for nests using improvised means
Regular nest
Arranging the most ordinary nest from boards, plywood or OSB boards will not require special knowledge, a lot of time or labor. The structures can be either separate or multi-tiered - in the second case, a small ladder should be connected to each tier. In addition to lumber, to build the structure you will need the following materials and tools:
Multi-tiered design for nests made of plywood and OSB boards
- fastening elements (nails, screws, self-tapping screws);
- sandpaper or file;
- beam;
- screwdriver;
- hammer;
- saw (manual or electric).
Important: to build nests, you cannot use fasteners whose length exceeds the thickness of the lumber, since its ends can injure the hens.
Step 1. Carefully calculate the parameters of future nests, calculate the number of cells and make drawings.
First of all, you need to make a drawing
Step 2. Sand the lumber well with sandpaper and a file to remove all sharp corners and roughness.
Processing wood with sandpaper
Step 3. Cut out the design parts and process them again if necessary.
Cut out the parts to the required size
Step 4. Fasten the parts together, and in order to give the resulting box rigidity, secure the timber at the inner corners.
We fasten the parts together
Step 5. Provide an entrance to the nest: you can simply leave the front side open, or nail it down and cut a small hole. At the bottom of the structures there should be a small threshold about 10 cm high.
A threshold is attached to the bottom of the structure
Step 6. Step back 10 cm from the entrance to the box, and then attach a horizontal rail there, which will serve as a take-off platform for the birds.
The horizontal rail will serve as a take-off platform for birds
After making the nests, they should be carefully checked for sharp corners, protruding nail ends or roughness.
Nest with egg collector
A nest equipped with a container for collecting eggs is a special design that will make it much easier for the owner to collect eggs; it can be equipped in two ways: with a double bottom or a special container.
Nest with egg collector in the form of a container
In addition to lumber, fasteners and tools (the list is listed above), to build such a nest you will need a soft, non-slip material for upholstering the second bottom: it can be felt, linoleum, which is nailed with the wrong side up, or any soft fabric. The work algorithm in this case is as follows.
Nest with double bottom egg collector
Step 1. As a template for constructing a nest, you can take the previous structure or an ordinary dog house. You should make a drawing in advance according to which to cut out the parts, and then clean them well with a file and emery.
Step 2. The bottom of the nest must be attached at a slope of about 5 degrees in relation to the back wall, and between its surface and the bottom there should be a gap into which the egg can easily pass.
Step 3. The main feature of such a nest is the presence of a tray where the eggs will fall (it should be about 10 cm longer than the main structure). The pallet should be upholstered with the selected material and a small strip should be attached to the front.
Step 4. Strengthen the pan in the same way as the bottom of the nest - at a slope of 5 degrees, so that the egg laid by the chicken rolls along the bottom and falls into the pan.
A nest with a container for eggs is made in a similar way, only instead of a gap between the back wall and the bottom, in the lower part of the container you need to cut a hole, the diameter of which is slightly larger than the diameter of a chicken egg.
Video - Nest with egg collector
Frame nest
The frame structure is strong and durable, and its construction will require the same materials as for a regular wooden nest. The algorithm for performing the work in this case looks like this: first, a frame is knocked together from bars, which is sheathed with plywood. The egg collector is installed at will.
Frame nest
Metal socket
Making a nest from iron will require a little more labor and expense than making a wooden one, but it will last for many years. To complete the work you will need the following tools and materials:
- Cink Steel;
- metal pipes (section 3-5 cm);
- metal mesh or wire;
- grinder for metal;
- electric drill;
- screws.
Metal nest with egg collector
Step 1. Draw drawings, make markings on sheets of steel, cut out structural elements.
Step 2. Cut the bottom of the nest from the mesh, the second option is wire, from which you need to weave the corresponding part.
Step 3. Fasten the parts in the following sequence: first the walls and bottom (at an angle of 10 degrees), then fasten the roof.
Step 4. A container for assembling eggs is installed in front, which is cut from sheets of steel and sheathed with soft material.
"Family" nest
The peculiarity of this design is that it is designed for several chickens - from 2 to 5. The area of the nest can be any, but there must be at least 100 cm2 per laying hen. It must have an egg collector, a shelf for collecting litter, a drinking bowl and a feeder. To make such a “dwelling” you will need the following materials and tools:
"Family" nest
- sheets of tin;
- wooden blocks 4x4 cm or metal profile;
- metal grid;
- nails or rivets (if a profile is used to build the nest);
- hacksaw;
- hammer;
- pliers;
- latches for doors, wheels for legs if desired;
- suitable sized feeders and drinkers.
If appropriate feeders and drinkers are not found, they will need to be made in advance from sheets of tin. The procedure for making a “family” nest is as follows.
The feeder can be made from sheets of tin
Step 1. According to the drawn drawings, assemble the frame of the structure. For greater strength, you need to make additional stiffening ribs along the walls and bottom, and the legs, if desired, can be equipped with wheels, which will make cleaning and moving the nest easier.
Step 2. Attach the bottom and tray in the same way as described in the instructions for making nests with egg collectors - the bottom is at an angle of about 10 degrees, the tray is at the bottom.
Step 3. It is better to make partitions between cells from mesh (the use of solid material is not recommended, as it does not provide sufficient ventilation). The mesh is attached using rivets and pliers.
Step 4. Drinkers and feeders are attached to the front of the nests, after which the doors are installed. They are made of mesh with large cells so that the inhabitants have unhindered access to food and water, and then are equipped with latches.
How to make a nest with an egg container
To make a wooden nest with an egg collector, you will need the following materials and tools:
- hacksaw;
- nails;
- hammer;
- soft material;
- Chipboard and plywood;
- egg container.
The work order is as follows:
- Build a box, fasten the side walls, secure the bottom at an angle of 10°, make a roof.
- Cut an entry hole and cover the front of the nest.
- On the bottom back wall, cut a hole slightly larger than a chicken egg.
- Place a container with soft material under the bottom. Now, when the eggs roll off and fall into the pan, they will be reliably protected from damage.
Provide that, given the sloping bottom, there is always a minimum amount of flooring in the nest, otherwise it may become an obstacle and make it difficult for the eggs to roll into the tray.
After you have built nests and perches for chickens with your own hands, you can move on to an equally important aspect of arranging a chicken coop - perches for birds.
Do-it-yourself perches for laying hens: photos, sizes, construction tips
Any owner knows that all chickens prefer to rest and sleep on the roost. This crossbar can be round or square in cross-section and belong to one of many types. The appropriate type should be selected based on the available space and the number of birds on the farm.
Arranging a perch is one of the most important stages in building a poultry house.
Types of chicken roosts
Perches designed for chickens come in different designs:
- perches located at different levels. This option is relevant when there are a lot of chickens on the farm, and the area of the chicken coop is small. The main disadvantage of this design is that in such a chicken coop the birds will constantly quarrel over a higher place, and the chickens sitting on top will stain those located below them with droppings;
- several crossbars fixed at the same level on the wall or along the perimeter of the poultry house. An ideal option for laying hens, allowing them to choose the most comfortable position without disturbing other birds;
- perches that are fixed to vertical posts. Bird-friendly design that is easy to construct. The best option for those who want to construct a roost for chickens with their own hands;
- table equipped with crossbars. This design is convenient for its mobility. The table is easy to carry, convenient to disinfect and clean;
- box with perches. It is also distinguished by its mobility - if necessary, it can be easily moved from place to place. The main disadvantage of this solution is the small number of places to place birds. Thus, this option is relevant only for a small farm.
Note! Understanding how to make perches for chickens is not at all difficult, as is making this element of the chicken coop yourself. In this case, you can be sure that the perch meets all your needs and the characteristics of your farm.
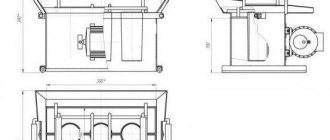
Scheme of arranging a chicken coop with optimal dimensions for the location of perches and nests.
Number in the coop
The number of nests is determined taking into account the size of the adult population. For 5 individuals, one nest is required, equipped according to a few rules:
- Choose small nails. If the hardware protrudes from the reverse side, the chickens may get injured.
- Having assembled the structure together, it is inspected. Remove nicks and chips.
- The floor of the nest is covered with clean sawdust.
The main rule is that nests for chicken coops must be safe.
How to make a roost for chickens yourself: a detailed algorithm of actions
Step-by-step instructions for creating a perch for laying hens:
- Prepare a plane, nails, hammer, sandpaper and wooden blocks. The cross-section of the beams should be 40x60 cm.
- Calculate the size of the perch based on the number of chickens in your household and considerations for their comfortable placement. For example, 10 egg-laying hens require 2.4 m of crossbar. The optimal solution would be to divide the perch into 2 parts - 2 crossbars (each length is 1.2 m).
- Take 2 planks for support. Their length should be 0.6 m. Install them on opposite walls at a height of 0.9 m from the floor and a distance of 0.3 cm from the wall on which you plan to place the perch.
- Take the timber from which you will make the crossbar. Treat it so that there are no burrs or chips left on the surface. Cut off sharp edges with a plane, and use sandpaper for sanding.
- Nail the ends of the crossbar to the support strips at a distance of 30 cm from the wall.
- Retreat the same amount. Drive in the second crossbar.
- Step back 0.4 m from the floor. Nail the bars to the side walls.
- Attach several boards to the blocks - they will serve as the basis for the pallet.
- Install a tray to catch the droppings. For its manufacture, you can use sheet metal. A regular wooden shield is also suitable for these purposes.
- Make a staircase from the remaining blocks.
By building a chicken coop with your own hands, you get a structure that is ideally suited to the conditions of your farm.
Where is the best place to place a roost for chickens?
The perch should be located away from the door - this way you will protect the birds from drafts and, as a result, possible health problems. Choose the warmest place in the room. You also need to have plenty of light, so placing the perch near a window is a good idea. It is convenient when there is a shield under the perch into which droppings fall. This makes cleaning the chicken coop more comfortable. To make droppings less sticky to the boards, sprinkle the tray with sawdust or sand. When making a pallet, ensure that it can be easily disassembled - this will make caring for the poultry house as simple as possible.
How to build a winter chicken coop: (read more)
Place the perch at a height of at least 0.6 m and no more than 1 m from the floor. The cross-section of the crossbar used for perching should be 5-7 cm. The calculation is based on half the length of the open chicken foot, measured from the beginning of the middle finger to the end of the thumb. In order not to lose balance, the chicken needs to tightly clasp the crossbar with its paws. Make sure that each bird has at least 18 cm on the perch if the chicken is an egg breed, and at least 25 cm for birds of the meat and egg breed. Building a nest and perch for chickens with your own hands is not that difficult. Independent choice of device, materials, sizes and other parameters will allow you to get a design that is ideally suited to the conditions of your farm.
What size should the nests be?
The size of the nest is chosen depending on the breed of chickens. The bird must have enough space, otherwise it may never learn to fly inside.
For example, for a laying hen, a nest 25 cm wide and 35 cm deep and high is sufficient, while for a meat and egg breed the dimensions increase by an average of 5 cm.
The threshold of the nest is not made lower than 50 cm. It is necessary to place a shelf in front of it for take-off. It is made from a strip with a cross section of 50*20 mm, and placed at a distance of 10 cm from the entrance.
Standard sizes of chicken nest
The upper tier of the nests must have a pitched roof at an angle of 45 degrees, which will prevent the bird from flying onto it and sitting there. The nests must be installed before the chickens are released into the house so that they do not have to get used to the room again.
Before construction, a drawing must be developed on which the position of nests and drinking bowls with perches must be indicated.
Photos of nests