Sometimes it is quite problematic to choose suitable shelves for the kitchen. Although this piece of furniture is simply necessary in order to functionally equip the space of the working and dining area. The problem of choice may arise due to the fact that there is a huge variety of models made from different materials. The situation becomes more complicated if the room is decorated in a certain style.
Variety of shelves for the kitchen
What are the shelves made of?
Kitchen shelves are made from 5 types of materials that correspond to the functional features of the room:
- metal;
- glass;
- chipboard;
- plastic;
- tree.
Shelves made of plastic in the interior of premises, especially kitchens, are used extremely rarely, since the material makes the design tasteless and “cheap”.
Kitchen shelves made of glass and metal
Metal is an excellent solution when it comes to choosing a durable, comfortable and elegant kitchen shelf. This material is easy to care for and is not afraid of any impact. A metal body of any configuration will fit seamlessly into the design of the room, complementing kitchen sets or other pieces of furniture.
Metal shelf
Glass structures look no less impressive, but there are a number of problems due to which not many housewives choose such furniture. Products of this type are usually very heavy, fragile, and require special and constant care. Additionally, you will have to choose a suitable place to place this structure.
Glass shelf for the kitchen
Simple kitchen shelf made of chipboard
The most accessible and cheapest option is chipboard. Naturally, the service life of such material is limited. The thing does not look very elegant, but at the same time it perfectly performs its direct function - it creates additional space for storing things.
Simple chipboard shelves
To make chipboard shelves more attractive, this material is often combined with glass or metal.
Wooden kitchen shelves: classic option
Wood is considered an environmentally friendly material. In addition, the carved base and unusual shape geometry fit into any interior design. But a wooden frame for a kitchen shelf is not always the best choice; it is especially not recommended to hang such structures in places where moisture, steam, or high temperatures are concentrated.
Wooden structures
It is not advisable to place flowers on such products. Wood can become deformed and swell due to changes in temperature and humidity. The integrity of the finishing layer is often compromised. If you choose a suitable place for placement, then such problems will not arise, and the appearance of the kitchen with open upper shelves will instantly transform.
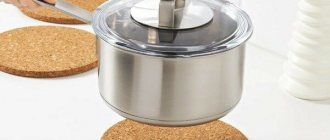
Wooden spice rack
Making a wooden spice rack like this with your own hands is quite simple . All you need is one laminated board and a metal hanger handle.
Necessary:
- Cut all the parts to size and then glue them into one design.
- To ensure that the joints stick well, clamp the glued parts with clamps and leave overnight.
- Mark the location for attaching the handle to the base.
- Drill holes through the base with a drill.
- Install the handle.
This is how you can make a nice spice rack in a day, which will undoubtedly decorate the interior of any kitchen. By the way, such a shelf can also be used for other rooms, such as a bathroom.
Currently reading: Bed under the ceiling
Shelf of cans
Also , using clamps, you can make such an interesting shelf from cans . It would seem that the idea is not very original, but where have you seen similar products? The shelf is very simple and functional, suitable for flowers, kitchen items and more.
All you need is a strong board, clamps and cans. Bring the board into the appropriate form, stain it, varnish it, and you can see how to secure the jars in the step-by-step photos. The main tool you will need is an electric drill, because you will need to first make holes in the clamps and in the board, and then just tighten the cans with clamps and the shelf is ready. You can grow flowers and store all sorts of little things.
How to make a shelf out of boxes - without nails
This may be the simplest garden kitchen shelf you've ever made . So, you need to find five boxes and a can of paint. Then take a brush and paint the container in the color that best suits your interior. When the paint dries, that's it, the shelf is ready.
You just have to decide how to put them. If there are small children in the house, the structure, of course, must be connected with bolts or screws, or even better, attached to the wall, this will be more reliable and safer. But if there are no children, then there is no need to fasten them; the boxes are strong enough. And the main advantage is that you can change the shape of the structure every day. Imagine, every day you have a new shelf and no nails
So, for example, today you have a pyramid, and tomorrow a ladder, depending on your mood.
Folded into a durable design, it is very convenient to store shoes. For variety, you can take one box and put whatever you want.
Structural types of shelves
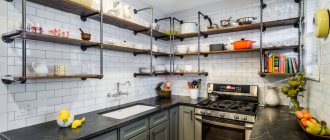
As for the structural types of shelves, this is a completely separate category of characteristics. Conventionally, designs of this type can be divided into 2 large groups: open shelves in the kitchen and closed ones.
But there are other design features that significantly expand the range:
- A corner shelf for the kitchen is an ideal solution for a room with a small area. Thanks to its design, the product “fills” the corner with “useful” space.
- Asymmetrical - suitable for large areas. A labyrinth of straight, intersecting and inclined planes for storing small items can be an excellent design solution.
- Console ones will visually “open up” the space, since they usually have a vertical floating structure.
Additional features of design types may include the following nuances:
- fastening type (closed/open);
- the presence of retractable structures (drawers/doors with vertical lift);
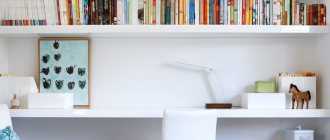
- presence of lighting (backlight). For example, a shelf above the dining table in the kitchen, the photo of which can be seen below, is not only a functional storage surface, but also a beautiful accessory.
Multi-tiered structure for the kitchen
Based on all the possible options, you need to take into account a lot of factors before choosing a suitable and functional wall-mounted structure.
DIY bottle rack
The original bottle rack in the kitchen is mainly a decorative part of the interior design, but it undoubtedly also has practical benefits. I don’t know why, but for some reason such products in the store are very expensive, apparently they are equated with luxury items. Although making a bottle rack with your own hands is as easy as shelling pears . There are a lot of options, one of them you see in this photo. Below is a master class with step-by-step photographs on how to make this stand.
Currently reading: Transformable furniture
Universal shelf step by step
This small universal simple shelf is suitable not only for the kitchen . Living room, hallway, bathroom - it will be at home in any of these rooms. The shelf can be made from any type of wood and in the sizes that suit you. With the help of step-by-step photographs, the work will take about two hours, well, another half hour to hang it on the wall.
Versatile shelf with functional design
Using half a sheet of plywood, some pine dowels and knobs, you can easily make this creative, versatile shelf with a functional design . The simple design allows you to install shelves and handles in a variety of configurations to create the perfect shelf for any room. The main advantage is that the height between the shelves can be adjusted independently, and you can also place hooks and hangers in the order that suits you. In addition, the original design looks unusual and attractive.
Here's what we need.
- Plywood sheet 19mm thick;
- Boards for shelves, thickness at your discretion;
- For the ends of the plywood there is a PVC edge;
- Wooden dowel 2.5cm
- Wood glue
- Screws, bolts, nuts
- The main tools are a circular saw and a drill.
The main stages of work: marking, you can choose the distances between the holes yourself, in this case 10 cm horizontally and 12.5 cm vertically, a total of 144 holes are needed for this stand.
Then we drill holes, protect the surface, and cover the ends of the plywood with tape using a hot iron. We install the mounting strips and fasten the stand to the wall. This original idea allows you to use the stand in any room - bathroom, hallway, kitchen, nursery. You can make the stand itself the size you need, as well as the number of holes or the distance between them. Here are some examples of using shelves in different rooms.
What color to make, order shelves
Shelves for the kitchen should be chosen in a color so that they harmonize with the overall interior design and complement the kitchen set. But it is not necessary to choose a product of the same color as all pieces of furniture. An open design can be an excellent accent against the background of the overall picture.
On a dark surface, settled dust is immediately visible, so you will have to wipe it 2 times a day. This problem will not arise with light surfaces.
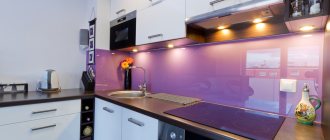
It is often better to choose light-colored designs for the kitchen. This will help visually expand the space, make the room brighter and more comfortable. It doesn't have to be pastel colors, white or beige. Shades of light green, yellow, blue, light purple will become relevant. If the kitchen concept is close to industrial style, then dark colors and shades are suitable.
Processing shelves and side walls of the product
I carefully sanded the surface of the boards and battens with a coarse sanding pad. Then I eliminated the unevenness on the surface. To get a perfect finish, I used a fine grit sanding pad.
St. Petersburg volunteers distributed flowers near the metro in honor of Valentine's Day
Al Capone's 100-year-old "moonshine distillery" found in the USA - photo
Which countries will compete for Russian tourists in the summer of 2021
The boards were treated with acetone. After 2 hours I started assembling the shelves.
The side walls were boards measuring 117 x 15 cm. I used 3 wooden rectangles as shelves. Their dimensions are 60 x 13 cm. The rectangle left aside became the lower part of the product. Its size is 60 x 15 cm.
What style to make, buy shelves for the wall
Among the mass of kitchen furniture styles, it is usually difficult to choose a suitable model. But you should always focus on the kitchen set. There are a lot of options in the Scandinavian style, Provence, hi-tech, modern. Accordingly, the shelves themselves are selected according to their characteristics.
Shelves in Provence style
Kitchens are especially often decorated in Provence style. It is characterized by light, discreet tones - beige, white, brown. Pastel shades are trendy. In addition to the peculiarities of blooming, naturalness in the choice of materials for furniture is encouraged.
In Provence, open shelving made of natural material is often used along with hanging shelves.
Usually, to furnish kitchens in the Provence style, the simplest designs with hidden fasteners are used. This principle creates the impression of a floating structure. The product itself is quite simple, without any decorative elements.
Shelves in Provence style
Using a more miniature design, but with carvings, you can decorate the corners of the room remote from the work area. Such decorative items are intended more for placing figurines, books, photos on them, but not dishes.
Decorative shelf in Provence style
Any option is very suitable for recreating a beautiful and at the same time simple interior style.
High-tech direction
More interesting in their design are the shelves that are used in high-tech style. This concept most often uses structures made of metal or glass (glass + metal). Wall space for storing dishes or small items is usually a whole work of art.
High-tech design product
The unusual appearance of the product does not limit its functionality. The unique appearance allows you to easily equip studio apartments and ordinary kitchens.
Small shelf for a rustic kitchen
Such shelves are more of a decorative nature, although you can also store kitchen utensils on them. The design of the product is the simplest - usually it is a frame with a longitudinal shelf made of wood. Small shelves in a rustic style usually contain painted plates, flower pots, photo frames or figurines.
Small rustic shelf
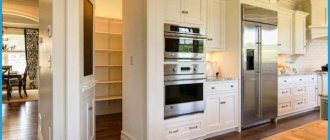
Making shelves from plasterboard
For the kitchen, you can also make plasterboard shelves with your own hands.
When designing a product, you need to take into account the expected load, placing useful things such as a TV or music speakers on a plasterboard structure. Shelves made of plasterboard on the frame must be reinforced with profiles from the inside. If you are planning exclusively decorative shelves, then a metal rack profile will suffice.
Before you make a shelf with your own hands from gypsum plasterboard, you need to make a drawing of it in full size. After drawing up the drawing and adjusting it in accordance with the dimensions of the kitchen, you can begin to calculate the materials.
Then the markings are made on the wall, the frame is made and the drywall is installed.
After you can secure all the drywall, begin to putty all surfaces (before this, all corner elements of the structure must be additionally fastened, and the ends must be outlined with a perforated corner).
The putty is applied in several layers. When it dries, the structure is rubbed with sandpaper, primed and painted. The result is neat decorative shelves on the wall that can be used to store kitchen utensils, a collection of porcelain or wine bottles.
Kitchen decoration - decorative shelves
Decorative shelves for the kitchen serve to create coziness, but this does not mean that useful things cannot be placed on them.
Often decorative shelves are a complex designed in the same style, where you can store serving dishes, vases and figurines.
Advice! Small shelves can be hung using beautiful ready-made mounts. Contrasting combinations look impressive - white shelves on colored consoles, rough wood on black brackets, etc.
Currently reading: Transformable furniture for sports
Decorative shelves can be fixed in the apron area instead of rails, placing here various useful things needed in the cooking process. But make sure that their finish is strong enough.
If you mount the structures on the wall near the dining area, you can decorate them with collections of wine bottles or charming Provençal porcelain.
Homemade bottle holders
Noble wine requires respectful attitude. And, if you consider yourself a true connoisseur of this drink, then you need such useful things as shelves for wine bottles.
The unique qualities of the bouquet will be preserved only if you can ensure proper storage of the wine. Therefore, shelves for wine bottles should be such that they allow containers to be stored horizontally. Indeed, in a vertical bottle, oxygen can enter the bottle through the cork.
Of course, you shouldn’t turn your kitchen into a wine cellar, but you can create a unique, signature option for storing your drink. Moreover, you can take a lot of design solutions as a basis.
Even in a small kitchen you can find a place to store wine bottles - for this, “honeycombs” are installed between wall cabinets and the ceiling, resulting in saving useful meters below.
Interesting ways to store wine bottles will also be: special wood or elements built into the cabinet. You can also make interesting things out of an ordinary shelf by dividing its internal space with partitions corresponding to the size of the bottles.
Master classes on making shelves with your own hands
You can make shelves for the kitchen on the wall yourself. But first you need to decide on the material. The best option is wood or chipboard. If you complicate the design, you can get a hanging cabinet - just attach the doors. Naturally, you need to design the product in a suitable style. Straight shelves along the entire wall are considered a universal design.
To work you need the following tools and materials:
- Beam and wooden board.
- Screwdriver.
- Sanding machine, sandpaper.
- Wood primer, varnish.
- Ruler, pencil.
- Jigsaw (saw).
For production, you can use other available materials - chipboard, remnants of wood or timber.
Algorithm for creating a floating shelf with your own hands:
- It is necessary to prepare a drawing that will accurately indicate the dimensions of all components and the general design of the parts.
- The next stage will be the manufacture of the main part of the structure - racks for holding horizontal parts (shelf surfaces). You need to prepare 8 pieces of a block with a length corresponding to the width of the board and 4 pieces of a block that will be equal to the length of the board.
- All parts must be sanded to remove chips and surface defects. Then the longer parts of the bar need to be divided into 4 equal parts. Using a screwdriver, attach small pieces of timber at the marked points.
- The finished structure must be coated with a layer of primer and varnished. Wait until completely dry.
- Attach the finished parts to the wall.
- The boards and the remaining 2 parts of the bars must also be primed and varnished. Wait until completely dry.
- The next step will be preparing the main surface. You need to make a hollow structure. A long piece of timber is attached along the edge of the board, and a second board is attached on top of the same beam.
- Then the hollow part is put on the one that is already attached to the wall.
Making a shelf
This is a real project that even a person far from working with wood can implement. The result is a floating structure with hidden fasteners.
Preparing the side parts of the product
Inexpensive lumber is needed to create decorative shelves. I used boards I found in our shed. I needed to determine what size the decorative shelves should be. The dimensions had to correspond to the objects on them.
The police told how to identify scammers and not lose capital
Taste is not primarily about receptors: a study on smell and associations
How much did Valentine's Day cost Russians: survey results
I needed furniture to store cutting boards and large plates. To make the larger shelves, I took some boards from the barn. The size of one of them is 152 x 31 cm.
Using a hacksaw and a construction tape, I cut a rectangle 117 cm long from this board. The width of a piece of wood is 31 cm. Then I cut this rectangle into 2 equal parts. I received two side parts of the shelf measuring 117 x 15 cm. Actual dimensions may differ from the figures I indicated by 5-6 mm.
Features of the use of wall shelves
A kitchen with open shelves always looks elegant, stylish and cozy. But there are several nuances regarding the operation of this piece of furniture:
- You can put a lot of dishes on the shelves, but you shouldn’t load them too much. The fasteners may fail and all the utensils will fall to the floor.
- The dishes should “confidently” stand in their places. You need to constantly wipe the surfaces to remove dust, fingerprints, and streaks.
- You can create a functional decor for any design - attach hooks and holders for paper towels to the base of the body.
In any case, wall shelves in the kitchen themselves perform many functions - they are a place to store dishes, kitchen utensils, and can become an excellent decor.
There are many designs of kitchen shelves, each of which has an original design and unique decor. The product must be selected based on the style of the interior. In some cases, you can make a piece of furniture yourself.
Product assembly
I applied glue to the edges of the first shelf and joined the board to the sides.
A steel clamp was used as a barrier. This tool prevented the boards from slipping out during installation.
I repeated the action 3 more times. The size of the gaps between the boards depended on the size of the items that would be stored on the shelves.
A married couple rode a python on the hood of their car: photo
“Someone also likes me”: Sobchak responded to people who criticize her appearance
I make my own refreshing spray for furniture: a simple recipe with rosemary and orange
It is worth noting that this characteristic is individual for each specific case. The height of my first shelf is 40 cm, the second is 32 cm. This is a place to store large plates. The height of the third shelf is 25 cm, the fourth - 20 cm. This is a place to store coffee service and small plates.
I finished the job of installing the shelves to the desired height. Then I applied glue to the ends of the slats and attached the wooden strips to the product as shown in the photo.
They are needed to prevent plates from falling off the shelves.
Our photo gallery:
Original do-it-yourself shelves, how to make book shelves, hanging shelves, kitchen shelves 90 photo video
Shelves are often used not only to complement and decorate the overall interior of the room, but also for a clearer and more expedient organization of space. Thanks to their use, the apartment owner has the opportunity to conveniently arrange a huge number of small things that would simply get lost in closets.
Today, there are a lot of different models on the market that are made of different materials. They also differ in design.
You can choose not only products with classic designs, but also ultra-modern designs.
But more and more often people prefer to make such interior details themselves. Wondering how to make a shelf with their own hands, they re-read a lot of literature and look through many catalogs.
However, this does not mean that making a shelf yourself is difficult and is beyond the capabilities of a person who does not have special skills. No, that's not true at all.
In this case, familiarization with the literature is necessary in order to create a product with a beautiful design that will fit into the overall interior. Let's take a closer look at what kind of shelves there are.
The most popular and widely known subtype of shelves is the classic shelf. This is due to the fact that it is quite easy to install, and the appearance, thanks to its simplicity, seems refined and sophisticated.
Both open and closed shelves are used successfully. Closed products are most often used for decoration and installation in rooms decorated in more modern styles. Glass and sometimes plastic are used to construct them.
Open structures can be used both in modernly decorated houses and in apartments with a classic design. Over the past few years, this particular type of shelf has gained enormous popularity and is therefore gradually replacing the classic options.
In small rooms, you can often see corner shelves that have a special method of fastening. They are mounted on adjacent walls that are adjacent to each other. They are most often used in bathrooms, kitchens and utility rooms.
They are installed using cables and vertical posts, and attached directly to the ceiling. This mount looks quite unusual and original.
Floor structures are most often used in hallways. After all, hand-made floor shelves for shoes not only look beautiful, but also help you organize the space of a small hallway. At the same time, making them is quite simple.
To create the claimed product, you should purchase or prepare some tools and materials in advance. As connecting elements, you can use whatever suits you best. But the most popular are ordinary screws, brackets and dowels.
For example, let's take a photo of the shelves with our own hands, which is presented below. It shows a product with the following parameters: width 250 mm, height 300 mm, length 1100 mm. For convenience, the manufacturing process will be divided into stages.
This marking is optimal because the side walls will be located between the two parts.
At the third stage, you can begin processing the resulting workpieces. The resulting sections should be coated with a special protective varnish or stain, having previously sanded them.
If you only plan to paint the shelf, you can get by with treating it with a regular antiseptic primer. This way you will not only increase the service life, but also achieve a more uniform distribution of paint.
At the fourth stage of making a wooden shelf with your own hands, you begin to directly assemble it. The bottom board should be laid on a flat surface. Step back 8 mm from the ends of the workpiece and draw two lines parallel to the cuts.
After this, you should install the side blanks on the lower section of the board and secure them. Once you are done with attaching the side panels, proceed to install the top panel and secure it.
At the fifth stage, you should attach the brackets to the ends of the side panels, and make several holes in the wall for the dowels. After this, screw in the screws so that they protrude by 5 mm. And now your shelf is ready.