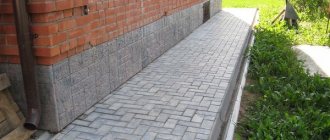
Sheathing a house with basement siding Sheathing a house with basement siding is very common. The quality of this material cannot be underestimated. Its price is not high, but with high-quality installation it can be excellent protection for the room.
Today we will tell you how to decorate the basement of a house with siding. Before starting work, you should watch the video in this article and photos.
Then you will understand what needs to be done and decide on the tedious configuration.
FINISHING THE FOUNDATION WITH SIDING
The ideal material for covering the foundation of a house in terms of price and service life is siding.
Scheme of covering the foundation of a house with basement siding
Anyone who is familiar with the simplest construction tools can sheathe the foundation of a house with their own hands. Siding is the best alternative to plaster and is not inferior in service life to cladding with natural stone and decorative brick. Basement siding is made of PVC panels of increased thickness and strength.
The decorative surface of foundation siding is varied in structural pattern; it allows you to imitate finishing materials such as stone, brick, ceramic tiles, wooden boards and shingles. The size of a standard plinth siding panel is 1165 mm long, 447 mm wide and 20 mm thick.
Maintaining basement siding is not burdensome; it will not need repairs at all for at least the next 20 years. The panels can be washed with a cleaning agent and rinsed off with a hose. In addition, the advantages of basement siding include:
- excellent compatibility with other finishing materials;
- endurance to temperature changes from -45 to +55 °C;
- resistance to fungi and mold.
- Diagram of siding elements for cladding a house.
To make the process of installing a foundation with basement siding quick and easy, you need to select the material and prepare the necessary tools:
- UD profile 5x3 cm;
- perforator;
- tape measure and construction pencil;
- level;
- dowel-nails;
- scissors for cutting metal;
- self-tapping screws;
- Bulgarian;
- hammer;
- screwdriver
Siding panels have locking connections, with the help of which the cladding is firmly fixed to adjacent elements. In order to sheathe the foundation with high quality, you need to assemble a metal supporting frame from a UD profile with your own hands, and accurately align it vertically and horizontally. The pitch of the frame posts should correspond to the width of the panel, that is, be about 44 cm.
Then you need to install the corner elements and the starting profile, after which you can proceed to the installation of the plinth cladding. Installation begins from the corner and proceeds from left to right, gradually increasing the height of the cladding.
Presentation of material
Visually, siding for covering the base can look like natural stone, multi-colored brick, or resemble different types of wood. To ensure that your image matches the next one perfectly, you should use a prepared cast. Before applying your image to the siding, you should match it to the pattern shown on the siding. When doing the work yourself, paint the panels using natural colors.
To give the house an original appearance, craftsmen advise covering not only the foundation, but also the entire house with siding. To do this, one should not forget about the competent distribution of accents. For example: the foundation can be made with images of stone or brick, and the facade in an ethnic style. Although the markings of some materials are similar, you should learn to distinguish between panels for walls and foundations. Vinyl panels are one and a half millimeters thick and are designed for wall cladding. And for foundation products the dimensions exceed this figure. And they are equal to three millimeters.
The material for finishing the basement floor must meet the following points:
- Increased strength. Must withstand heavy environmental loads
- UV resistance. For this purpose, special components are added to the resin during manufacturing.
- The material must first meet all established standards and must be approved for use.
If the material maintains all of the above properties, then it becomes resistant to mechanical stress. Installing a foundation with siding is inexpensive and simple. Manufacturers provide a guarantee for covering the foundation with siding. Its service life is more than fifty years. You can install siding yourself. It does not require special care; just wipe them with a damp soapy solution using a sponge or cloth.
Due to the light weight of the material, the panels do not put pressure on the base, and any type of insulation can be safely installed under them. Why do it yourself? A square meter of finished finishing is three and a half kilograms. To visually explain the difference to you, let’s imagine an artificial stone, its weight is thirty-five kilograms, and the brick for cladding will be one hundred and ninety kilograms. This example shows a big difference, so panel siding is an advantage.
INSTALLATION FEATURES
Siding installation diagram
Finishing the foundation of a house with basement siding with your own hands has its own characteristics:
- Finishing with siding panels provides exclusively vertical cladding of the plane. If there is a protruding element, then the upper horizontal plane of the base should not be sheathed with siding.
- The panels are installed from left to right.
- At the joints of the panels with each other and with various additional elements, it is necessary to leave a gap that allows for thermal expansion.
- The siding must be fastened in such a way that possible deformations caused by changes in the geometric dimensions of the panels due to temperature changes can be compensated. For this purpose, backlashes are made. Finishing with siding is done with your own hands on a flat wall surface over sheathing or lined with plywood. Fasteners must penetrate more than 11 mm into the base.
- It is recommended to use breathable materials that match the color, but not foil, as insulation under basement siding.
- Fasteners are installed in the panel in the center. In this case, you should not drive the fastener all the way in; leave a gap of 1-1.5 mm in the mounting part of the panel.
To calculate the required number of basement siding panels, you need to divide the width of the wall by the length of 1 panel, so calculate each wall and summarize the results. The height of the base is usually enough for 1 panel, but if the base is high, then the previously calculated amount, depending on the height, must be multiplied by 1.5-2 times.
STAGED INSTALLATION OF BASE SIDING
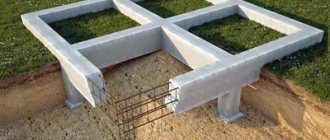
Before you begin finishing the basement siding with your own hands, you must first prepare the foundations. As already mentioned, we begin work with the installation of the sheathing. For a pile foundation, installation of hanging sheathing from the facade and subsequent cladding are provided.
Installation diagram with the correct siding distance from the top of the plinth
To begin with, a mounting base is attached to the base on which the panels will be installed. This is the same supporting frame made of galvanized metal profile. The frame can also be made of wood, but the metal profile will be more durable compared to timber. The metal profile strips are sequentially attached to the base in a horizontal position.
If you use siding panels in one row in height to finish the plinth with your own hands, and take the siding width to be 46-48 cm, then the profile should be installed in 3 lines: at the base of the plinth, in the middle and at the level of the top of the mounting panel. The metal profile is attached to the base using dowels and self-tapping screws 7-10 cm long. Now you can fasten the additional elements and the siding panels themselves.
To the profile strip of the sheathing, which is attached to the base of the base, we attach the support starting strip strictly horizontally with self-tapping screws in increments of 30 cm. Additional elements - starting, finishing strips, corners, etc. A corner strip is installed on the corner of the building, trimmed if necessary, and attached to the sheathing also with self-tapping screws.
The allowance for the support corner strip must be at least 1 cm. The finishing strip is installed at the end of the cladding. It looks like a decorative strip on the fastening part. Let's start installing the plinth panels. We install the first panel into the groove of the starting strip with its lower part and slide it along the guide into the corner strip, leaving a gap. We fix the panel with self-tapping screws into the holes provided for fastening in the siding. Then we install the second panel, inserting the support bar and moving it close to the first one, securing it.
The entire base should be sheathed in the same way. If necessary, we cut the last siding element in a row to the required size and fasten it, only after that we install the corner strip. We cover the upper fastening edge of the row of siding panels with a finishing strip.
Lathing
Before you start creating the sheathing, you need to understand its features:
- Lathing is required to attach facing material to the surface of walls of any kind as a supporting structure;
- The slightest uneven places on the base, even visually imperceptible, can change the geometry of the structure. This will create many difficulties during subsequent work, and may even cause the need to repeat it;
- In addition to serving as a supporting structure, the lathing can be used for additional thermal insulation of the building;
- Insulating material is placed in the empty space between the sheathing beams. In addition, this design is used for free air circulation.
Before installing the sheathing under the siding, preparatory work must be done. First of all, remove the trim from door and window openings and remove all protruding elements from the walls.
If siding is attached to a wooden house, then you need to make sure the strength of the boards. If it is a brick wall, then there is a way to attach it to the wall without lathing. Loose and poorly secured products must be strengthened, and parts that have begun to deteriorate and old parts must be replaced with new ones.
Wooden sheathing
Wooden blocks will help reduce the cost of installing sheathing; for this, only dry material with a cross-section of 50x50 mm is used. The sheathing, made from raw timber, is not able to withstand the weight of the cladding and, as a result, warps. This can be prevented by drying the timber in advance by keeping it in a dry place protected from the sun for about a month.
- When choosing timber for sheathing, pay attention to its geometric parameters ; it is better to opt for the smoothest products. Material with irregularities or curves will complicate installation;
- The timber , like wooden walls, must be treated with an antiseptic . Assembly and fastening of the sheathing should only be done in dry weather;
- Fastening to the surface of a wooden wall is done using self-tapping screws; you do not need to purchase additional fasteners for them, and for installation on walls made of foam block or brick, you will need to purchase dowels;
- The distance between the beams is approximately 40–60 cm, depending on climatic conditions, the weight of the sheathing and decorative material;
Parts of the wooden sheathing are mounted directly to the wall surface, but additional spacers can be used in uneven areas. It is permissible to fasten with the help of hangers, as is done when fastening metal sheathing. If there are doubts that a wooden structure can withstand the weight of siding, then it is better to use a metal profile for cladding.
Metal sheathing
The frame for mounting decorative material must be able to withstand negative external factors and have high strength. To install metal sheathing, first of all, it is necessary to mark points on the surface for installing fasteners.
This needs to be done in this way - vertical lines are struck from the corners of the house at a distance of 20 cm, and the profile will be attached along them. Between them, a profile is mounted in parallel at 60 cm intervals; it is better to cut vertical lines from the bottom to the very top.
After this, the brackets are attached to which the profile is attached - it is necessary to install them on each line in increments of 80cm. The brackets are U-shaped, secured with self-tapping screws or dowels.
After this, the supporting profile is installed, first of all they are attached to the brackets, using a level, in the corners of the house. These 2 profiles must be installed very accurately - the uniformity and integrity of the entire plane of the facade depends on the quality of their installation.
Next, the profiles are mounted “touching” by pulling a thread between the corner elements - only in this way is an even cladding plane created.
After this comes the most difficult stage (the instructions for covering a house with siding most likely do not contain this information). It is necessary to create an even angle - to do this, connect 2 ud profiles together. They are reinforced with jumpers between the cd profiles; they need to be installed at a minimum interval of 60 cm. By equipping each corner of the house in this way, we will create a solid foundation for attaching the siding.
After this stage, frames for door and window slopes can be made. The method of their construction is the same as for external corners, only they use a ud-profile as a corner profile, mounting it around the perimeter of the frames. The top of the slopes is made last, tying its sides to the side parts of the slope.
The picture shows a diagram of the installation of metal siding.
ADDITIONAL RECOMMENDATIONS
Finishing the foundation of a house with basement siding requires compliance with certain points:
Scheme for finishing a pile foundation with basement siding: installation of sheathing hanging from the facade with subsequent cladding
- Secure each siding panel with at least 5 fasteners.
- The fasteners are installed exactly at an angle of 90 degrees relative to the wall surface.
- The panels are capable of shrinking and expanding due to temperature differences of up to 6 mm, which is very important to take into account when attaching siding elements.
- Installation of panels can be carried out at sub-zero air temperatures, but it should not be lower than 10°C.
- All siding elements should be kept at room temperature for 10 hours before installation.
- The starting strip should only be installed horizontally at a distance from the corner of more than 110 mm, so there will be no problems for installing corner elements. The attachment lines of the starting profile at all corners of the building must coincide.
- To visually separate the basement cladding from the facade of the house, it is necessary to use a finishing J-profile or border element.