Main features of loft style lighting
Particular importance in interior decor is given to the technological effectiveness of all lighting fixtures. They cannot look delicate or too decorative. The materials used for their manufacture imply geometric shapes and large expressive details.
Lighting for a room decorated in a loft style must be diffused. The main lamp will be a ceiling lamp: a chandelier or an imitation lamp in an industrial building. To support him, local lighting is randomly installed throughout the room. Small lamps repeat the details of the main one and are designed for enhanced illumination of individual areas and zones of the room.
In high rooms it is recommended to install lighting with adjustable height. This is not only convenient, but also creates an additional resemblance to an industrial interior. The lamps are hung on long pieces of wire so that they can be raised to the ceiling or lowered if brighter light is needed in the workplace.
Varieties of lamps for loft-style studio design may include the following types:
- ceiling suspended (on chains or cables);
- floor lamp type, made of appropriate materials;
- wall (sconces, movable);
- spot and LED in combination with thin tubes or on flexible stands, fixedly mounted above tables or in rotating housings.
The dimensions of the loft room (most often a studio is designed this way) allow you to combine different zones in it. Each of them can be highlighted with special lighting. While maintaining the general style of the lamps, they change the spectrum and power of the lighting fixtures: in the recreation area the light can be soft and with a warm spectrum, and in the work area (for example, above the kitchen table) it is better to hang bright lamps.
By implementing the proposed ideas for using lamps made by yourself, you can decorate a room in a loft style not only fashionably, but also conveniently.
Characteristic features of loft style lighting
Loft style interiors have been gaining popularity in recent years. It is important not only to choose finishes, furniture, and accessories that are suitable in texture and color, but also to create certain lighting . After all, a loft is characterized by an abundance of thematic light sources located around the perimeter of the room at different levels from the floor. This design move provides even large spaces with sufficient diffused light that is pleasant to the eye.
All kinds of chandeliers, lamps, floor lamps and sconces can be made from the following materials:
- wood;
- plain thick plastic;
- various metals;
- glass.
A distinctive feature of loft-style lighting fixtures is their unusual shape and combination of materials that are maximally different in structure.
Bathroom lamp
I wanted to give my friend a memorable gift for his birthday with his own hands. He loves the bathhouse, nature, wood. After some thought and inspection of his bathhouse, it was decided - a lamp. I don’t remember exactly the costs, since I had some in stock, but approximately 100x100 pine timber took ~400 rubles, lampshades, light bulbs, cable, etc. ~2000 rubles, wood oil, gas another ruble ~ 100, rope and other accessories rub. ~200. Total roughly 3000 rubles Three evenings of work and you get this chandelier or lamp Suspended on a chain from hooks screwed into the back Size 85*85 cm How to hang it I’ll add a photo
Show in full 1
KusochekLesa
6 days ago
Choice of material.
The lampshade is made from standard barbecue skewers, which are sold in hardware stores or relevant departments of supermarkets. Moreover, a large assortment is offered. That's why it's easy to find them. But if it is possible to whittle the skewers with your own hands, then this option is no worse, because the time spent on production is directly proportional to the purchase amount. Moreover, each option is good. So, to create a lampshade you will need:
- Skewers 19 cm – 5 pieces.
- 13 cm is also 5.
- 9 cm sticks – 10 units.
- 8 cm - 5.
- And 2.5 cm - again 5.
In addition, you should prepare a glue gun in advance, loading it with a rod, and paint the color in which the lamp shade will be painted. When the materials and tools are prepared, it’s time to start manufacturing. At this stage, the difficult is already behind us, and only pleasant creativity awaits ahead.
Step-by-step instructions for making it yourself.
The technology for creating a loft-style lampshade from barbecue skewers involves going through six simple stages. Namely:
Step 1
Assembly begins with thirteen centimeter skewers. The task is to connect them with a pentagon. Therefore, the sticks should be glued together with hot glue. Moreover, the joints are reinforced with a dense layer. Excess substances, no need to worry, are removed later. Although in some cases this adds interest to the element being designed. The hot gun is considered instant, but it takes time to dry.
Step 2
Now you will need ten sticks of nine centimeters each. They are connected into triangles, fastened at the top and at the base with a previously prepared pentagon.
Step 3
Now you need five pieces eight centimeters long. They connect the resulting vertices. Already at this stage of making a designer lampshade with your own hands, you get a rather interesting design in the form of a ring of broken geometric elements.
Step 4
Next, take the longest skewers. Namely nineteen centimeters. To continue working, the glued pentagonal structure is turned over one hundred and eighty degrees. The task is to attach the sticks to the upper base. They themselves will be connected in a small part. But if you want, you can make some kind of composition out of this, like a flower, or use the figure as a decorative element, fastening long skewers together to make something like a pyramid.
Step 5
But since the purpose of production is a lampshade for hanging in a loft style with your own hands, you need to come up with a mount. Therefore, the tops of long wooden barbecue sticks are connected in small sections. Here comes another pentagon, only a small one, whose area should correspond to the diameter of the light bulb socket.
Step 6
The resulting structure is painted in the desired color using acrylic paint in a spray can. After which it is left for two hours until completely dry. An interesting lampshade for a loft-style lamp made of wooden sticks is ready!
Conclusion.
A light bulb socket is carefully secured inside it, into which the lamp itself is then screwed. This lampshade combines favorably with similar designs. Made from plastic tubes or straws, ice cream sticks or wooden skewers of a different diameter. An option is to cover the outside of the lamp with colored translucent paper, fabric or lace. It will come out even more elegant. In the appropriate setting, any shape of the product will look original.
Chandelier lamp in loft style
The loft style (loft - English “attic”) appeared at the intersection of poverty and good taste - as its researchers say.
Well, I don’t mind - I personally connected it with my passion for using old things in unexpected ways [which I have talked about more than once: an arched fence from disused greenhouses, a flower garden on a slope from bed headboards, a console table from outdated furniture, a drunken gazebo from a former shower, a blue dream from an old stool...]. In this case, I will talk about making a chandelier lamp.
For us this is a lamp for the relaxation room in the bathhouse
Materials and tools
- Paint - for the ceiling
- Bakelite cartridge stand Oxion E27 inclined, black - 3 pcs.
- Metal cover - 3 pcs.
- Bolts, nuts, washers - three pairs each
- Electrical cable NYM 2x1.5 - approx. 0.5 m
- Electric screw clamp - for two pairs
- Electrical tape, white
- Grill rack for/for microwave oven
- Fastening (in our case it is a bracket from an Amig valve, black) - 3 pcs.
- Metal paint, black
- Self-tapping screw 16 mm - 6 pcs.
- Frosted electric light bulb - 3 pcs.
- Cordless screwdriver with attachments for screws and nuts
- Dielectric pliers for stripping wires
- Screwdriver-tester (line voltage indicator)
- Pencil
- Roulette
- Water-based paint brush
- Brush for alkyd enamels
Ads by
Work progress
Step 1. Carefully paint the ceiling in two steps: Step 2. Prepare suitable elements for the manufacture/design of the lamp:
As the base of the lamp we will use a grill grate from a microwave oven that has been scrapped. Shape - any (in our finished product - different...)
There were also such things - decorative Amig latches, black...
The only part you need is a brace
We will need three such brackets from decorative shutters [the shutters themselves are used in the manufacture of window shutters - we don’t waste anything!] Step 3. Painting the base of the lamp:
I used this paint
In my opinion, this one is also possible...
Since the fasteners were already black, they did not need to be painted.
Step 4. After the painted parts have completely dried, we proceed directly to the manufacture of the chandelier lamp itself:
- We mark on the base, dividing the circle into three parts, the location of the three “horns” of the future chandelier.
- We secure the stand-up chucks to the base using metal plates (which we found and bought at a hardware store at the same time as the black bakelite stand-up chucks) and pre-selected bolts, washers and nuts, using a screwdriver and a special nut socket.
Step 5. We begin making the electrical, most important, part of the lamp: we measure and cut three identical pieces of cable, stripping the ends with special pliers.
Steps 4 and 5 completed...
Step 6. We connect the cables in parallel using a screw clamp with the power wire going to the network (to neatly place the wires, we tie them with electrical tape).
Step 7. Screw in one light bulb and check the operation: It’s on! Step 8. We fix the lamp on the ceiling using brackets - to the place previously marked with a pencil:
This is what the ceiling mount looks like...
Step 9. Screw in the remaining light bulbs:
This is how the lamp looks from the back. The loft-style chandelier lamp is ready
Step 10. Wow!
DIY industrial style sconces
Industrial-style lighting is great for any space, from living rooms to basements and garages. Everything you need can be found in most hardware stores, and the manufacturing process will not take much time.
I've always liked the look of these lamps. I think lighting is a very important element that can transform any room. When I wanted to buy an industrial-style lamp, I went to a lot of stores, but never found anything worthwhile. Then I decided to make it myself. I've been guessing, so feel free to improve as you go - there are still a lot of gaps in my instructions.
If you like industrial style
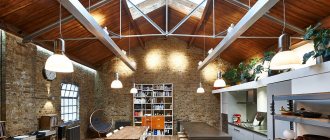
Industrial style is a direction in which everything that is hidden is shown. The walls are left unfinished, pipes and wires are not masked in any way, and rough materials predominate. This style is most often found in elevators and factory-type open spaces. In small rooms, the industrial style does not always look appropriate, since it visually makes the rooms smaller. However, individual elements: furniture, decorations and interior elements, made in this direction, can emphasize and dilute the usual design of the apartment. A lamp is far from the only way to do this. If you want to add something else to it, you can use leftover pipes, wood and flanges to create shelves.
Plants can’t do that! The predatory flycatcher is capable of creating a magnetic field
Russians were warned about weather anomalies in the next five days
No fast food and sugar! The Japanese diet will help you lose weight
Creative ideas for creating loft-style chandeliers
In order to make an individual design in an apartment, you need to take a responsible approach to the selection of all components.
Below you can see several ideas that will help you decide on choosing or creating a loft-style chandelier from scratch.
Making a stylish lamp in the loft style with your own hands
I would like to tell you step by step how to make a loft style lamp yourself. First, all the materials that we need to implement this piece of furniture:
- A piece of Oak 50mm thick.
- Retro wire 1.5-2 m. Section: 2x1.5mm
- Cable 50 cm. Section: 2x0.75mm
- Self-tapping screws - 4 pcs.
- Straight coupling cast iron DN 25 (1″) - 1 pc.
- Passing elbow cast iron DN 15 (1/2″) - 2 pcs.
- Futorka cast iron DN 25x15 (1″x1/2″) - 1 pc.
- Steel barrel DN 15 (1/2″) - 2 pcs.
- Extended steel squeegee DN 15 (1/2″) - 2 pcs.
- Straight coupling cast iron DN 15 (1/2″) - 2 pcs.
- Loft flange DN 15 (1/2″) - 1 pc.
- Cartridge e14 - 1 pc.
- ON-OFF switch - 1 pc.
- Cable terminals - 2 pcs.
- Heat shrink
- Fork
- Lamp
1. We connect two squares with a barrel and pass a 2x0.75 cable.
2. We twist the barrel on one side, and on the other side the elongated bend.
3. Measure the distance between centers. (105 + 63.5)/2=84.25 mm.
4. Cut two pieces of oak (or other material, I prefer valuable types of wood), without touching the natural edge with bark.
- First piece: 160x130x50
- Second piece: 140x55x35 (reduce the thickness of the board to 35 mm so that the fibers are parallel to each other)
5. I prefer to remove the bark and clean up the natural edge, it looks more natural and closer to nature), but you don’t have to worry about this topic and cut off an even piece.
6. Next, on a smaller piece, mark the distance between centers = 84.25 (you may have a different value, and accuracy to hundredths or even tenths is not important here).
7. On a larger piece, make marks for the mounting holes for the flange.
8. And also on the end part we make these marks for the holes for the switch and cable.
9. Accordingly, we drill holes with feather drills and clean them. The diameters of the holes are indicated in the photo.
!!! Strict only holes with a diameter of 20mm since they are for the switch. The rest do not need to maintain the specified size. +/- 5 mm.
10. Next, coat the wood with premium oil and hard wax, leave it for a few minutes and then use a dry rag to collect the remaining oil.
11. Next we will talk about a very important and interesting part, like cartridge integration. In my work, I make a special socket from textolite with a 1″ and an internal thread specifically for an E27 . For this I also need an E14 , but not the whole one, but only its inner part with the terminals. But to make this lamp yourself, you don’t need to bother so much. You just need to initially purchase a coupling with a 1 1/4″ and an E27 ; it can be screwed into it freely. The only reason I don't use this pattern is because the 1 1/4″ looks too bulky and the chuck doesn't screw all the way into it and sticks out. From an aesthetic point of view, in my opinion, this is not beautiful, but many manufacturers use just this option and don’t bother.
12. Next, we take the Futorka, cut off part of the thread and assemble it together with the coupling and cartridge. (when using Cartridge E27, you will still have to trim the foot, because it will twist two turns and stick out unsightly). In my case, everything looks like this:
13. Next, we continue to assemble the remaining part from the pipes and prepare for painting: cleaning from rust, degreasing.
14. Painting process:
- Primer 2 layers with an interval of 20 minutes.
- Black matte enamel 2 layers with an interval of 20 minutes.
- Matte varnish 2 layers with an interval of 20 minutes.
15. Assembly. We disassemble the painted metal part in the middle part and unscrew the cartridge. We insert the top wooden part, as shown in the photo, with the natural edge first.
16. And then we tighten the lower metal part using either a thread locker or cyanoacrylate glue, as in my case. We also tighten the coupling with the chuck and do not forget to thread the cable and watch carefully so that it does not slip away.
17. The next step is to install the terminal from the E14 socket (in my case), a drop of glue, stretch the cable, the terminal sits in place. We twist the light bulb to fix and set the glue.
18. Then we need to bite off a small piece of cable and crimp it with terminals on one side, and prepare the ends for soldering on the other side. I crimp the terminals and additionally secure them with soldering.
19. Next, don’t forget to thread the retro cable into the end hole with a diameter of 18 mm and proceed to soldering all the cables. Don’t forget to first prepare the heat shrink of the required size and put it on the wire. We solder as shown in the photo.
20. Preliminary check. (this switch has three outputs, the third is for supplying illumination, I do not use it since the switch is located behind the lamp. If necessary, it is possible to easily connect and backlight the switch)
21. Everything is great, you can move on to the finish line. We thread the wires for the switch into a hole with a diameter of 20 mm. We connect the switch. A drop of glue and fix the switch in the hole.
22. Fasten the upper part with four self-tapping screws.
23. Enjoy the beauty and warm light.
PS Video.
Master class No. 2: Loft chandelier made of pipes
Following modern lighting trends, you need to take into account the efficiency of not only energy-saving lamps, but also the chandeliers themselves. For example, from scrap materials, try making a simple, bright, ergonomic loft-style lamp from polymer water pipes by reading the following master class.
Materials and tools
- Ceiling rose;
- 12 splitters (lamp sockets);
- polymer pipes
- 12 small light bulbs;
- a can of gold paint (or any other);
- paper or newspapers.
Build process
Step 1.
- First, let's develop a model of the chandelier and connect all the splitters to each other.
- Only your imagination works here, but you can make a symmetrical chandelier, creating a tree-like structure , i.e. screw in the same number of cartridges (branches) on each side.
Step 2.
- Spread paper or newspapers to paint the future chandelier.
- We paint with a spray can on all sides. Leave to dry.
If necessary, after drying you can paint over it with a second layer. We paint the ceiling rosette from the front side.
Step 3.
After everything has dried, you can attach the chandelier to the ceiling. If its appearance suits you, then screw in the light bulbs and enjoy your creation!
Over time, you may want to change it - then you can make a different combination of branches and the chandelier will shine in a new way!
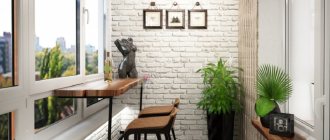
DIY loft style lamp. Step by step guide.
The design possibilities for lighting fixtures are almost endless, the key is to find what you like, suits the style of your apartment and stays within your budget. This article provides a step-by-step guide to creating your own lighting fixture designed to illuminate a loft-style bathroom. You can increase or decrease the size, change the number of lamps to suit the size of your room, but the end result will be this fabulous loft style lamp that you are sure to love.
Loft style lamp required materials:
- Pine board of the required length (our example is 80 centimeters for a three-lamp version)
- Bars (to create a recess for wiring)
- Three 1/2 flanges
- Three 1/2 threaded tubes
- Three 1/2 x 3/4 elbow fittings (one end is 1/2, the other is 3/4)
- Three cartridges
- Wires
- Four hex bolts (any color, will be painted as you go)
- Twelve self-tapping screws (any color)
- Three Edison light bulbs
- Rust-Oleum enamel with hammer effect
- Wood varnish (example uses Minwax dark walnut)
- Wood glue
Instructions:
- Apply glue to the bars and press them to the base using clamps. Make adjustments before gluing. Wipe off any excess glue that has squeezed out. Let the glue dry.
- Paint the bolts and screws. To do this, screw them into a small unnecessary board. For painting, use Rust-Oleum enamel with hammer effect. This color will match the details of your light fixture very closely. Let the paint dry completely.
- Lay out the pieces in the order in which they will be put together, but don't assemble them yet. Insert the cartridge into the 3/4 hole of the elbow fitting. For a stronger connection, use a small amount of super glue. Wait for the glue to dry completely - we waited 24 hours.
- Coat the front and sides of the lamp base with varnish. For a matte effect, immediately after applying the varnish, wipe the surface with a dry, clean cloth. Repeat until you achieve the desired effect.
- Using a drill of the required diameter, drill holes for the wires. Everything is ready to assemble the loft style lamp.
- Screw the flanges to the base. Center them with the drilled holes.
- We lay the wiring and assemble the structure. Use a parallel wiring diagram so that if one lamp goes out, the others will stay on.
- Hang and connect your loft-style lamp to the mains. Be extremely careful when drilling holes to avoid damaging the wires on the back panel. Use a building level to avoid misalignment.
- When you have connected the lamp to the mains, screw the Edison bulbs into the sockets.
- Turn on the switch and try out your new lamp. Isn't this a miracle?!
Congratulations! You have just made a loft-style lamp with your own hands. We really hope that this article will be useful to you.
We recommend watching:
Loft style in the interior. Key Features
DIY furniture made from pallets
A loft-style bar is an interesting project from Bar Makers.
Modern residential loft in a garage. Project for a bachelor.
Loft kitchen – design ideas, layout and decoration options.
Cozy loft-style townhouse in Melbourne.
Gray loft in the interior of an apartment in Kyiv.
Johnny Depp's loft in Los Angeles for $7.2 million
Stylish loft for an online store in Melbourne
Rent a loft in New York for just $1 per month
Materials and tools you will need
- 2 energy saving lamps.
- 2 stainless steel kitchen utensil drying racks from IKEA.
- 2 wooden boards measuring 10*10 cm. I used oak, but you can use other types of wood.
- 4 black steel flanges.
- 2 steel pipes with a diameter of 4 cm.
- 2 black steel pipes with a diameter of 6 cm.
- Black paint.
- Varnish.
- Transparent seal.
- Screws.
- Switch.
- Cord.
The following tools will need to be prepared:
“I’m writing an album, two-thirds ready”: Zemfira delighted fans with the news
People loved the way a woman decorated her home so much that she started a business
Jennifer Aniston returned to the set with a new hair color
- Drill.
- A circular saw.
- Step drill bit for drill.
- Regular drills.
- Dremel mini drill.
- Milling tool for processing wood and plastic.
- Measuring square Speed Square.
- The hand saw you will need to cut the pipe.
Manufacturing instructions
I started by making a simple dryer holder out of wood. I wanted to make sure they wouldn't budge when I drilled them. Making such a holder is very simple: you need to cut a piece of wood that is shaped like the outer diameter of the dryer.
You will also have to use a step drill to cut a hole in the bottom in which the socket for the future lamp will be located. I then used a Dremel mini drill to clean up the edges a bit. It won't look very nice, but it will look better once you give everything a coat of black paint and are done. So you don’t have to worry too much about this for now.
In the program “The Stars Aligned,” Skulkina told how she behaves outside the cameras
How did Konchalovsky's daughter manage to lose 30 kg? Maria's power system
A beautiful wicker basket made from old bags: it looks great in the interior
Mazda MX-81 Aria
Mazda MX-81 Aria is a futuristic concept car presented by Mazda at the Tokyo Motor Show in 1981.
The cars combined Italian style, made by the Bertone design studio and Japanese technology.
Features include steering wheels in the form of a belt, a dashboard in the form of a TV, front seats that can be rotated 90 degrees for a more comfortable fit, and an upper part of the body with a large degree of glazing. The cars were equipped with a 4-cylinder, 1.5-liter turbocharged gasoline engine producing 130 hp.
Show in full 10
Rogozhin81
22 days ago
Advantages and disadvantages
Now let's look at the positive aspects and disadvantages of assembling a lamp at home.
Minuses
- painting work - since the smell of aerosol paint will remain in the room for a long time, it is not worth doing this inside the living room, but dust may stick to the open area. Here you will have to find a compromise;
- time - you will have to spend more time on manufacturing than on choosing and purchasing a ready-made lamp, sconce or chandelier;
- Electrical knowledge is not a minus, but a necessity. Depending on the complexity of the design and the desired result, the electrical circuit connection diagrams may differ, and therefore, if you do not have experience, it is better to purchase a finished product.
pros
- made it yourself is an integral part;
- shapes and sizes - can be exactly what you need. Everything is limited only by your imagination and desire.
I hope you found this post useful and will help you in the building process.
Pallet bed with lighting
Main stages of manufacturing
Creating a lantern with a loft design consists of the following basic steps:
- Making holes for cartridges in the base.
- Fixing the base to the ceiling or wall.
- Connecting bent parts using adapters and O-rings.
- Installation of valves and other functional and decorative parts.
- Electrical supply to cartridges.
- Screwing in light bulbs.
- Installation of the lampshade.
It will be useful to read: Tips for lighting in the loft style.
Master classes on making chandeliers and lamps with your own hands
Instructions and master classes are suitable for making more complex products.
Using the proposed ideas, you can make decorative lamps for loft-style rooms according to your own drawings, changing the number of parts and the contours of the object.
Brass chandelier
To make a simple five-arm design you will need:
- 5 ceramic sockets and lamps with large bulbs (matte or transparent);
- 10 pieces of copper or brass thin tube (diameter about 1 cm): 5 pcs. short and 5 pcs. long;
- 1 fitting (for a chandelier, from an old product) and 5 corners for connecting sections;
- 1 long tube for the central element and suspension (the diameter may be equal to or slightly larger than that of the short sections);
- thin two-core cable;
- hook, pendant for chandelier.
The assembly of the product is attractive in its simplicity: pipeline parts with ready-made holes are used, and almost no additional processing is required.
You need to assemble the chandelier in the following sequence:
- Pass a piece of electrical cord into the long tube, the corner and the short piece. Attach the cartridge to one end. Collect the remaining horns.
- Connect all prepared parts to the central fitting, passing wires through its holes and securing the tubes.
- If a long pipe has a small diameter, it will be difficult to route a bundle of 5 cables through it. It is better to lower 1 installation electrical cord and twist it in the fitting body. The connection must be well insulated (with adhesive tape). Close the fitting, attach the axial pipe to the cover. At the upper end, install a pendant (ring, chain, etc.)
- Screw a chandelier hook into the ceiling and hang the product. Connect part of the power cord inside the chandelier with the network cable using a mounting strip or twist with insulation.
- Screw in the lamps and check the operation of the electrical part.
DIY loft chandeliers.
A design option for such a product could be bent sections of tubes used for horns. They will have less angular contours. The central tube can be selected so that the ends of 5 short pieces fit tightly into it. This will allow you to make a chandelier from a bunch of straight or curved arms with lamps at the end of each.
Lamp made from water pipes
Working with such material will require the ability to cut threads at the ends of parts, although you can get by using pipes with existing threads (from an old water supply).
To make the product you will need:
- connecting fittings for steel water pipes (angles, tees, etc.);
- sections of steel pipe of different diameters and lengths;
- electrical parts: lamps, wires, sockets, switch, etc.;
- gas key;
- hacksaw for metal, blades for cutting threads.
Before starting to manufacture the lamp, you need to make a rough drawing. It will help you select the pipes of the required length in advance. When making the product, it is worth considering that the lamp will be heavy.
Cut the parts to the required size and make threads at their ends.
Assembling the structure is reminiscent of playing with a construction set:
- using tees and angles, fasten sections into a pipeline of any configuration;
- as the bends increase, pass wires into the pipe (the diameter of the water supply allows you to use several thin 2-core cords at once);
- Lead the ends of the electrical wiring into the holes of fittings and tees, installing lamp sockets on them.
Depending on the design, the finished lamp can be hung from the ceiling or wall, made into a tabletop structure or a tall floor lamp for installation on the floor.
The chandelier can be painted to resemble brass or bronze, giving it a silver color. Black varnish on metal will also look beautiful. Old pipes are often covered in paint residue and rust. This can also look decorative in an appropriately decorated setting, but it is better to coat such pipes with a clear varnish.
As a switch, you can use a box with a switch or limit yourself to an inconspicuous button hidden among the pipes.
Industrial style chandelier
Lattice hoods are well suited for loft-style rooms. Having found such an element among scrap metal or picked it up in a hardware store, it is easy to make a decorative lamp with minimal time and materials.
For production you need:
- wire, socket and lamp;
- lattice casing of the desired shape.
The suspended product is assembled by securing the grille to a chuck with a clamping ring (purchase at an electrical equipment store). Attach the power cord to the socket.
Loft style chandelier with balls.
A version of a wall sconce with a similar grille can consist of several lighting elements. The connection is made parallel, routing the cables along the reverse side of the common base.
The ends of the wiring are brought out to the front side of the console, and ceramic sockets are attached to them.
You can replace the grill casing with simple items:
- nets and grates for dishwashers, railing systems in the kitchen;
- tableware (semicircular baskets and metal colanders);
- the body from an old faulty electric fireplace (you will get a narrow and rectangular lamp);
- reinforcing mesh of the required thickness (you will have to give it the desired shape);
- housing from the air filter of large vehicles (for example, from KAMAZ).
Light bulbs on the bar
There may be several options for such a device:
- From water pipes and connecting elements. Attach 2 pieces of pipe to the tee. Pass 2 pieces of wire into the rod, spreading them in different directions. The ends of the cable can be made to any length, let them hang freely from the rod. They are equipped with simple sockets and lamps (with or without a reflector).
- Made of metal or plastic rod. Attach 2 suspensions (chain, cord) to the ends of the rod. The base of the lamp is equipped with electrical equipment: the cord is laid, attached to pendants, and a cartridge is placed on the hanging ends. Complement with a laconic lampshade and lamp. Before hanging, select the position of the bar. It can be aligned horizontally or hung at an angle to the ceiling.
- Wall Light. Attach 2 brackets to the wall on which the hollow rod will rest. Drill several holes in it for mounting lamps. Perform hidden wiring along the wall, and disguise the outer end of the cable near the bracket. Inside the rod, place several electrical cords with a common outlet to the network cable into the drilled holes, and equip their ends with cartridges. You can decorate such a lamp by wrapping the cables around the rod.
Lamp made of plastic pipes
The use of plastic water and sewer pipes makes creating lamps even easier. The basic techniques for working with them are the same as when creating a metal product. Unlike steel pipes, plastic does not require threading: the fittings are attached using their own nuts and clamping rings. The tubes are easy to cut even with a sharp knife.
A special advantage of plastic is its lightness of construction and electrical insulating properties.
The plastic base can be used as a rod, and the thick pipe can be used as a lampshade or console for attaching cartridges. To do this, part of its surface is removed and cartridges are mounted in the cutout (for plastic ones, clamping rings are used). The lightweight structure can be hung on cords from the ceiling or mounted on the wall, on the bottom of a wall cabinet (for example, in the kitchen).
Thin sewer pipes are connected using assembly couplings, forming pipelines of any complexity. These elements are much thicker than water elements and will help create a massive type of lamp that imitates complex industrial equipment. The unusual shape of the flasks (for example, in the form of a flame) will complement the interior with a homemade lamp. Using paint with a metallic effect, it is easy to make the product resemble a brass or other pipe.
Tube for cord
You can let the cord hang freely from the wall - it will look quite nice. But since I'm a perfectionist, I used a pipe to hide the wire in it. All you need to do is cut a piece of the required size and paint it black.
An Italian social worker portrays society truthfully in her illustrations
What to expect if tea is accidentally spilled (on the floor, on a table or on a person)
Why do most Russians prefer apartments to hotels when traveling?
Then attach the lamp base to the bottom of the dryer. Attach a piece of metal pipe to the back side. Use a flange and screws to attach it to the surface of the wood.
If you want to paint your sconce, be sure to do it before you put everything together. It is best to use spray paint, which will spread evenly over the surface. You can wipe down the pipe of your industrial light with acetone (be sure to use gloves) and then spray with clear varnish to protect the surface. It is better to use a matte rather than glossy finish.
Thread the cord through the pipe and attach it to the tree. Then hang the sconce on the wall. In the evenings, when I turn it on, the light coming through the holes creates an absolutely stunning pattern on the walls.
Marble table with carved crocodile
I went to the St. Petersburg exhibition not long ago and saw an interesting table with a carved crocodile. They say it’s natural marble. I'm not an expert in this material, so I'll take your word for it. But of course it looks cool.
I took a video of what this table looks like:
There are no more similar posts. You might be interested in other posts by tags: