Pros and cons of homemade lanterns
A DIY bottle lamp has several advantages over purchased analogues:
- It's simply cheaper.
- Raw materials that need to be recycled are used and given a “second life”.
- Making a lamp is not as difficult as it seems. All you have to do is not deviate from the instructions.
- Your own design vision is realized, in all the details, instead of searching for the right lamp in stores.
The disadvantages are also not a revelation:
- Glass should be handled with extreme caution.
- Cutting yourself with plastic is also much easier than it seems.
- Any deviation from the manufacturing algorithm may result in the lamp simply not turning on.
LiveInternetLiveInternet
Quote from MonaLina's message
Read in full In your quotation book or community!
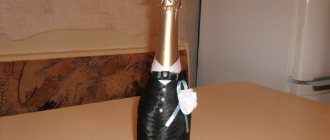
New Year's lamp made from a wine bottle
SOURCE
Decorating your home for the New Year is in your hands. Bright electric garlands and Christmas tree compositions will always give the room a festive look. I offer one more idea: how to make a small New Year’s floor lamp with your own hands. Or rather, I’ll tell you how I made such a New Year’s decoration - an interior item for myself, using the decoupage technique. Everyone liked my DIY New Year's craft.
I had a blue glass wine bottle.
I soaked it in water and washed off the paper labels. Then I wiped the outside of the bottle with nail polish remover. This is necessary to degrease the surface before decoupage.
I picked up a New Year's napkin with a picture of a snow-covered city and tore off a fragment of it so large that it would completely wrap around the bottle. I removed the bottom two white layers of the napkin (for decoupage you only need the layer with the image).
I primed the area for gluing the napkin with white acrylic paint.
Moreover, I tried to whiten the surface so that the white color was only under the houses.
To glue the napkin in a circle without folds, I used a special decoupage product. I turned a piece of napkin face down and sprayed the back with Maimeri decoupage spray adhesive. This spray adhesive creates a sticky surface on thin paper and allows you to consistently stick a napkin onto any surface without creases (and you can tear off and re-glue the napkin several times).
So, I applied a sticky napkin to the primed surface, positioning the design so that the whitened areas coincided with the light fragments of the napkin.
Gradually I wrapped the napkin around the bottle so that the edges met.
When the bottle was completely wrapped in a napkin, I carefully tore off the extra centimeter to align the edges.
Since the spray adhesive used gives only temporary fixation to the napkin, you need to start decoupage. I used acrylic varnish to secure the napkin to the bottle. In my case, the varnish acted as decoupage glue. He soaked the napkin and stuck it firmly to the bottle.
After the varnish had dried, I sanded the edges of the napkin with sandpaper (exactly in the place where the starry sky meets the neck of the bottle). Since the color of the glass almost completely matches the background of the napkin, I deliberately did not paint the entire bottle white. Therefore, in my decoupage it turned out that the napkin smoothly merged with the bottle.
To completely hide the transition from decoupage to glass, I painted the entire blue part with liquid stained glass paint (I accidentally found this color). It is actually transparent and did not obscure the glass. I recommend that if you don’t have stained glass paint, mix regular acrylic with a drying retardant (it will add a little transparency).
I “refreshed” some details in the fragment with the help of glitter: toys and a star on the Christmas tree, windows in the houses.
I painted the snow on the starry sky with a white acrylic outline.
At the very end of the work, I varnished the entire decoupage with acrylic varnish in several layers.
I made sure to dry each layer of varnish well. To make the last coat of polish shiny, I sprinkled manicure glitter into the polish.
I applied a thin layer of glitter polish. After drying, the entire bottle began to shine and sparkle, like a real New Year's accessory.
However, my bottle should turn into a real New Year's floor lamp. My husband used a DREMEL tool with a diamond drill to drill a hole in the bottom of the bottle (drilled at the junction of the napkin).
I prepared a New Year's electric garland with small light bulbs, which operates in several flashing modes.
When turned on, the garland has three colors of light bulbs.
The hole in the bottle is just the right diameter so that a garland can be inserted into it. I inserted 100 small garland bulbs into the hole, while the mode switching relay and plug remained outside.
We turn on the bottle, that is, a DIY New Year's floor lamp, into a power outlet. We set the desired blinking mode of the lights and celebrate the New Year with a very simple and original handmade product.
Maybe you can come up with some other uses for empty bottles, I’d be glad to hear about your experience. I hope that my idea will help someone decorate their interior before the holiday.
Types of bottle lamps
On the table
Most often, the bottle plays the role of a table lamp. This does not only mean a floor lamp with a lampshade. Sometimes the container itself is enough. If you place a garland, LED strip or something like that inside, you get a finished table lamp. The main difficulty in manufacturing is to properly make a hole for the wire.
Here the bottle serves as the basis for the lampshade.
On the floor
Plastic is usually used for floor lamps. This could be, for example, petals from a bottle forming a lampshade. In addition, fragments of plastic containers themselves can become the “legs” of a future lantern.
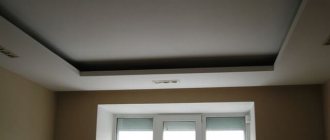
To the ceiling
A wine bottle chandelier is an original and stylish solution for any room design. Moreover, there can be not one container, but several. The main thing is to hang the lamp securely to minimize the risk of glass falling.
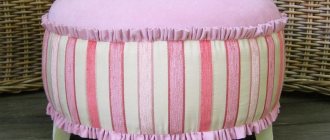
On the wall
It will be extremely difficult to make a complete sconce, so it is better to get by with a lampshade from an ordinary glass bottle. The traditional green color of glass works well. The lampshade is installed on a frame from an old sconce.
Outside
Beautiful lamps for the street.
Outdoor lamps made from bottles with your own hands, unlike store-bought counterparts, are more resistant to the sun and constant precipitation. A good life hack is to equip such a lamp not with a lamp socket, but with an LED flashlight. It will charge from the sun and turn on automatically when it gets dark.
Advice. It is better not to paint bottle lanterns for the street, and if you paint them, then use a material that is highly resistant to moisture and the sun.
How to make a chandelier (master class!)
The main lighting fixture of the house is the chandelier. You can make it from an ordinary glass bottle. The main thing is that it will be exclusive.
To create such beauty you will need:
- bottles (size and quantity depends on the preferences of the owners);
- protective equipment (goggles, mask and gloves);
- glass cutter and sandpaper;
- screwdriver and wire.
Necessary materials
Having the necessary tools and materials at hand, you can begin the actual production of the chandelier:
1. Soak the bottle in water . This will make it easy to remove labels and debris. After cleaning, the container must be thoroughly dried.
We wash bottles and remove labels
2. Make a cut of the bottle . The glass cutter is installed at the required level. Cutting is carried out slowly, which will allow you to get an even cut line. When working with a cutter, you must wear protective clothing only. If you don’t have the necessary tool at hand, cutting a glass bottle can easily be done with thread. The video below clearly demonstrates this.
We cut the bottle
3. Now the bottle is placed under the tap . Turn on the hot water and keep the workpiece under it. Hot water is alternated with cold. As a result of sudden temperature changes, the unnecessary piece will fall off exactly along the cut line.
Processing glass under water
4. The cut area is treated with sandpaper. The cut should be even and smooth.
Article on the topic: Birdhouse made of plastic bottles: MK (+40 photos)
Sand the edges with sandpaper
5. Use a screwdriver to disassemble the lamp. The wire must be carefully pulled out and passed through the neck, put the lamp back together and check its operation.
We stretch the wire through the bottle
6. All that remains is to decorate the lighting fixture. For this, ordinary wire is used. Starting from the neck, we wrap it around the bottle. Any material is used for this. This can be regular black or colored wire.
Decorating the bottle
The chandelier pendant is ready. All that remains is to install it. If desired, the product can be painted and given any design. The main thing is that it blends organically with the interior of the room.
Chandelier made from glass bottles is ready
A good solution would be to use glass stone. It should be taken into account that the light transmittance of the product will decrease slightly. Stones of various shades are used for decoration. You can combine several shades. The main thing is that the lamp looks organic.
Bottle decor with glass stones
The stones are attached to the glass using glue. The lamp can only be used after it has completely dried. This will take no more than a day. Complete drying of the glue will ensure reliable adhesion of the stone to the surface. It is better to use an adhesive composition that can withstand temperature changes.
Video: how to cut a glass bottle with thread
7 interesting lamps made from bottles: step-by-step instructions
Desktop
The diagram for making a table lamp from a glass bottle is as follows:
- Determine the place on the workpiece for the wire, mark it with adhesive tape or other adhesive material.
- Place the bottle lying down and make a hole with a diamond drill.
- After this, the container should be kept in water (preferably warm) to remove all remnants of the label and dirt.
- Carefully pull the wire through the hole to the neck, and then bring it to the cartridge.
- Securely attach the lampshade to the neck. That's it, the bottle table lamp is ready.
Loft style
There are many options for industrial-style bottle lamps. You can, for example, hang a rectangular frame divided into many sections, and in each of them place a bottle with a lamp inside, of the same color or different.
These same containers can be attached to the platform.
Another option is to install a bottle-shaped lampshade on the pipe structure. The main thing is that the same adapter is selected for its thread.
Chandelier
An original and stylish hanging chandelier from a wine bottle is not difficult to make - just follow the algorithm of actions.
- Soak the workpiece in water, remove fragments of labels, then wipe thoroughly dry.
- Use a glass cutter to make a cut line on the bottle. The cut is made transversely. The work must be carried out without haste, so as not to disturb the evenness of the line.
- In order for the unnecessary half to disappear, the workpiece should be placed under water and alternating hot and cold temperatures. The bottle will split clearly along the line.
- To give additional smoothness and evenness to the cut, its edges are treated with sandpaper.
- A wire is pulled into the neck and connected to the cartridge.
Lamps made from glass bottles for home and garden
Hello, dear readers and DIYers! Summer has come, and many of you prefer to relax in the fresh air at the dacha, or near your home. I noticed that the topic of various design solutions is quite interesting.
In this article, the author of the YouTube channel “1000 DIY's and Advice” will tell you about a simple way to make original lamps for the garden and home.
Materials. — Glass bottles — Gypsum, CT17 primer — Dyes for acrylic paint — Candles — Steel wire, chain — Stainless steel sheets — Thin copper wire — Adhesive tape, sandpaper — Foiled foam insulation 10 mm thick.
Tools used by the author. — Bottle cutter — Grinder, cleaning disc — Electronic caliper — Metal scissors, pliers, knife, ruler, scissors, wire cutters — Vise — Screwdriver — Sharpening machine. Manufacturing process. So, the main tool that the author will use is a bottle cutter. You can make a simple version of it yourself by reading this article “The simplest bottle cutter for glass containers.” Its machine version is presented here “Machine for cutting glass bottles with your own hands.”
The author cut the required number of glass bottles.
Now he will produce the first version of the lamp. It will be hanging and for a large candle. In order to secure it, you need to select a template. He found a steel pipe in the form of a suitable template.
Having secured the pipe in a vice, he winds several turns of steel wire around it. And the candle is perfectly fixed in it.
A thicker chain is immediately fixed to the wire; it is suitable for heavy pendants.
Next, you just need to pass the end of the chain through the neck of the bottle.
A hook is attached to the edge of the chain for hanging. That's all, you can hang it on a suitable branch or mount. Now the master will make a pendant for small candles. He will use stainless steel sheet as the bottom. Cuts a circle out of it according to the outer diameter of the bottle.
Burrs and sharp edges must be processed on a sharpening machine or with a file.
Marks four lines for pressing and cuts so that small strips 3-4 mm wide are obtained. Bends them inward in the form of small rings. He also makes two cuts for the bottle stops and bends them inward in the form of a strip.
That's all, you can light the candle and cover it with a bottle cap. An important point is that when a candle burns, the upper part of the bottle heats up quite strongly, while the middle and lower parts remain barely warm.
Now the master will make the second type of lamps, which is placed on a flat surface. To do this, you will need ordinary plaster and foil insulation 10 mm thick. Its surface, when folded inward with foil, is very reminiscent of the texture of tree bark.
Cuts a strip of insulation so that the width of the strip reaches the main part of the bottle, and there is an additional margin of 2-3 cm. Usually this is 16-18 cm. The neck of the bottle must be tightly plugged with newspaper or scraps of insulation. You can just stick some tape on it.
Wraps the insulation around the body of the bottle and trims it end to end.
Then wraps it tightly with tape. It's better to do this together.
Now the resulting cylinder of insulation is shifted towards the neck so that it is recessed by 3-4 cm. The joint between the insulation and the bottle is tightly sealed with tape.
To seal the surface, he coats all plaster surfaces with CT17 primer. It dries quite quickly, 1-2 hours.
He will use acrylic paint dyes as a finishing coat. He has a lot of them, and he decided not to even dilute them with paint.
After experimenting with various dyes and painting methods, these are the “logs” you get.
I cut out circles from a perforated steel sheet along the inner diameter of the bottles and inserted them into the bottom. You can also use steel mesh.
The last detail remains, the “thatched roof”. To make it, the craftsman stripped the insulation from a stranded copper wire and cut it into pieces of the same length.
In the future upper part, I pulled the bundles together with steel wire in two turns, and bit off the excess.
All that remains is to fluff up all the fibers and make something like a cone.
The most important thing is that such a “thatched” roof hardly heats up; it can be lifted even with your bare hand. This is the great result the author achieved.
The author's video can be found here.
Source
Become the author of the site, publish your own articles, descriptions of homemade products and pay for the text. Read more here.