Almost all suburban residents set up a summer kitchen on their property. It is much more convenient to cook food in it on hot days, and less dirt from the yard and garden is brought into the house. But in the autumn-winter period, this building can be comfortably used as a place for barbecue, cooking shish kebab on the grill and simply as a comfortable relaxation area.
Building a summer kitchen on the veranda at the dacha is not at all difficult if you have a little skill in the construction field. Thanks to the huge variety of modern building materials, you can build a frame building from timber and sandwich panels, a room from building blocks, bricks, and so on with your own hands.
Why do you need a summer kitchen at your dacha?
An outdoor kitchen under a canopy has been in great demand recently among owners of dachas and country houses. It allows you to get rid of extraneous odors from cooking in a residential building, from the rattling of dishes, high air temperatures with a stove or oven constantly working in the summer heat. In addition, it is much more convenient to prepare preserves for the winter without bringing dirt from the garden into the house.
Attention : a house with a summer kitchen is the dream of any country housewife. With the right approach to its arrangement, you can organize a comfortable place for cooking and eating.
By variety, these rooms are:
- open _ They are located in the fresh air, usually have a canopy, but do not have walls (or have one or two walls);
- closed. They are a separate room with communications, household appliances, and furniture. This is a complete and functional place for preparing and eating food at any time of the year.
When choosing to build a kitchen (open or closed), it is important to consider the following:
- purpose of the premises;
- dimensions;
- financial opportunities;
- placement on the site.
How to make a canopy from corrugated sheets with your own hands
In order to build a canopy from corrugated sheets with your own hands, you need to make mandatory calculations, as well as have a set of tools that allows you to quickly carry out the necessary actions.
Assembling a wooden frame for a canopy made of corrugated sheets
In this case, it is necessary to show maximum attention and remember that the shed is used by the owners of a private house for safe storage of a car or household equipment in cases where it is not possible to create a full-fledged shed or garage.
It should be remembered that there are certain standards for the height of such a structure, since not only, for example, a car, but also a person must fit under it. That is why, when making calculations, it is important to take into account that the height should be in the range from 2.1 to 2.3 meters, but not higher, because if it is exceeded, then snow or rain will freely fall under the canopy.
Tools needed to carry out work on creating a canopy
Without tools it is impossible to carry out construction and installation work.
It is also very important to strictly adhere to safety standards and construction recommendations set out in the drawings and instructions if independent actions are planned to create a house shed.
You must have the following tools:
- level;
- hammer;
- roulette;
- screwdriver;
- grinder;
- drill.
In addition, the work will require wrenches of different diameters, so it is more advisable to use a set of different screwdrivers, bolts and self-tapping screws. It is also necessary to take care of welding, since it will be actively used in creating the canopy. It is also important to have construction angles available for fastening the sheets together.
Advantages and disadvantages of an open summer kitchen
An open-type building is a platform with one or two walls. In it, the windows and doors remain open, but a roof or canopy must be built. Here you can place a barbecue, barbecues, grill.
The main advantages of building an open kitchen include:
- short construction time;
- low cost of construction;
- the opportunity to create a practical and functional outdoor cooking space.
As for the disadvantages, you can add to them:
- the ability to use the kitchen only in the warm season;
- the need to remove furniture, household appliances and other things with the onset of the first frosts;
- impossibility of using the premises in bad weather conditions.
Advantages and disadvantages of an enclosed kitchen
An enclosed kitchen is a full-fledged room in which it is convenient to cook and eat food, regardless of weather conditions and time of year. This is a small summer house, in which, in addition to the kitchen, many people make one or two rooms for guests. Often closed summer houses are equipped with a terrace or open veranda, where in warm and sunny weather you can have lunch or dinner while enjoying the fresh air.
As for the advantages of building an enclosed summer house, these include:
- the ability to build a functional and practical room;
- the ability to equip a comfortable kitchen with a separate room for guests;
- Possibility of use at any time of the year.
But you have to add to its disadvantages:
- high construction costs;
- long construction times (compared to an open site);
- the need to heat the room in winter. Consequently, you will have to pay more for utilities.
Which option is better to choose?
Each owner of a country house decides for himself whether to build an open or closed kitchen. At the same time, you should start from your financial capabilities. If there are no problems with this, you can build a functional building in which it will be convenient to prepare delicious dishes all year round. If you don’t have a lot of money, it’s better to use the second option and build a small and inexpensive open-type building.
Also, when choosing the type of kitchen, you should take into account the overall dimensions of the garden plot. If it is large, then you can think about building a separate summer house with all the amenities. If there is already little space on the site, then it is better to select a patio area with a canopy that will not clutter up the free space.
What is better than a barbecue or grill in a summer kitchen?
To cook food outdoors, many people use a barbecue or grill rather than a hob. Each individual option has its own advantages. In order to cook fish soup or porridge in nature, it is enough to install a small fireplace on a tripod. And to fry meat or fish, you should get a barbecue. It can be either stationary or mobile. If we are talking about a stationary device, it is constructed along with the building and requires a competent approach. Together with it, it is necessary to make a hood and properly install the chimney.
The appetizing meat is also great when grilled. In principle, it will taste no different from kebab cooked on the grill. The only thing is that with a grill you can dry vegetables and fruits and cook mushrooms on the grill. As you can see, barbecue and grill are practically the same thing. The only thing is that the grill is more functional. Because you can not only fry meat and fish and bake vegetables in it, but also smoke fish or meat under the lid.
Why corrugated sheets?
Among modern materials, corrugated sheeting is noticeably more popular than others offered on the market. A canopy made of metal profiles can be heavy, while a wooden canopy will quickly become unusable if you do not take sufficient care of the structure.
Corrugated sheeting is able to withstand all the vagaries of nature and remain attractive in appearance and capable of performing its immediate functions. That is why the choice of corrugated sheeting is the optimal solution for those who value durability, quality, ideal external characteristics and the cost of the material.
How to use the canopy
Since galvanized steel is a universal material, a canopy made from corrugated sheets will be an ideal option for use in many cases.
Variant of canopy design made from corrugated sheets
The most popular applications are:
- Protective car canopy;
- Canopy over the porch;
- Canopy over the gazebo;
- Grill canopy;
- Protection of outbuildings.
Profiled sheets provide an increased level of reliability, which makes this material one of the most popular.
Modern types of canopies
Sheds attached to a house or free-standing structures can be made either according to an established plan or according to an individual project, the drawings of which the construction team will review without fail before starting work. Despite the variety of options, the most popular remain the lean-to canopy made from corrugated sheets and all variations with this design.
It is as simple as possible to manufacture, so it saves time and money. In addition, it can be located either close to the house or be a separate structure from other buildings.
Gable canopy made of corrugated sheets and corners
It is noteworthy that anyone can make a canopy from corrugated sheets with their own hands, even without a specialized education, since noteworthy drawings are presented on the Internet.
Another option for a canopy is a gable one. It is most in demand when it is necessary to protect a large area from precipitation or wind - from 10 m² or more. In this case, independent construction will be difficult, since it will be necessary to strengthen the supporting structures in order to distribute the load as evenly as possible over the entire surface. It will be necessary to use special metal profiles, preferably with stiffeners, to avoid sagging or collapse of the structure.
An arch-shaped canopy is also popular among those who like to decorate their suburban area with non-standard designs. Such a canopy should be produced exclusively by specialists, since the structure and elements are considered the most complex and require certain experience and knowledge in the field of construction to carry out construction work.
The main stages of building a summer kitchen under a canopy
As for the construction of an open summer kitchen, it consists of the following stages:
- A site for the foundation is being constructed. To begin with, the area is cleared of debris and then a columnar foundation is constructed. To do this, 8 holes are dug, the bottom of which is filled with sand and crushed stone. Next, the reinforcement is laid in them, the pillars are installed in a vertical position and the solution is poured. After the concrete has hardened, waterproofing work is carried out.
- Next, the frame is erected. To do this, the lower frame is laid from timber, vertical supports are installed and the top frame is arranged. Several walls are sheathed with lumber (lining, OSB boards).
- Afterwards you can begin arranging the roof. The ideal option would be to install a hipped roof.
- Then the floor is laid. In this case, the boards are laid on logs, sanded and coated with paints and varnishes.
- The final stage is the arrangement of the interior.
Create a project
After you have decided on the material, you need to make a sketch of the construction. It is necessary to take into account the location, dimensions and appearance of the structure.
Note!
Do-it-yourself vegetable garden: new interesting garden crafts for the street at your summer cottage (photo/video review)
DIY ceiling installation: step-by-step description of how to make a ceiling. Review of modern structures and ideas for their design (105 photos)
Do-it-yourself garage doors - a detailed description of the construction of various types of garage doors (120 photos)
- Take measurements near the house, above the door. In these places the canopy will be adjacent to the building.
- When making a structure for a car, you need to take into account the location of the supports so that the entry/exit is consolidated.
- The design for the recreation area must take into account the height of the grill, barbecue, that is, adhere to fire safety rules.
- Materials that can withstand high humidity are used above the pool, taking into account the size of the reservoir.
The roof can also be of different configurations: straight, sloped, single or double slope, complex.
To ensure the stability of the device and hold its shape without deformation, it is necessary to make a calculation that takes into account the speed, direction of the wind, and the amount of snow.
It is important to know that the pitched part of the roof should be installed on the leeward side. The canopy drawings must be clear, taking into account all the nuances.
The main stages of constructing a closed kitchen
When constructing a closed premises, it is important in advance:
- Make a plan - a project.
- Mark the area.
- Build a frame.
- Arrange the roof.
- Carry out decorative finishing work and decorate the facade.
Once the drawing and construction documents are ready, you can begin laying out the foundation. If the building is not heavy in weight, it is enough to make a simple foundation (columnar), and if it is heavy, it is necessary to make a capital foundation (strip).
Calculation of strip foundation
The process of arranging the foundation itself is as follows:
- A pit is dug, 50 cm deep.
- A cushion of sand and crushed stone is laid, watered and compacted.
- Waterproofing is being installed.
- The pillars are installed and concreted.
The next stage is the forcing of the walls; if we are talking about a wooden structure, a frame is constructed from timber with a cross-section of 150 by 150 mm. The timber is installed around the entire perimeter and strapping is carried out. Next, the frame is strengthened with metal corners and the building is sheathed with the selected material (siding - panels, polycarbonate, wood).
Preparation
First you need to choose the type of foundation that is installed taking into account the terrain.
Note!
Insulate the foundation with your own hands - a step-by-step description of the use of the best materials and technologies (90 photos)
- Do-it-yourself pergola on a summer cottage: step-by-step instructions with photos and descriptions
Laying laminate flooring with your own hands: a detailed description of how to lay laminate flooring. Laminate calculation, step-by-step description and installation secrets (105 photos and videos)
It is necessary to install piles on slopes; for flat areas, a strip version is suitable. The number of supports depends on the weight of the structure. For a strong construction you need a strong foundation.
In the places where the supports will be, pegs are first buried; only after marking can the pillars be dug in, filled with concrete, and secured with staples.
For structures with a pitched roof, the columns located behind are 30 cm longer than the front ones. The flatness of the surface is measured by the building level.
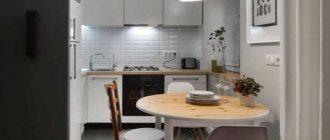
Interior design of a summer kitchen
It is best to think through the interior arrangement at the stage of building a summer house. The main thing is that it fits harmoniously into the landscape design and becomes its main decoration. Also, when designing such a building, it is worth considering that water, gas, and light will be supplied to the room.
Interior decoration is a fun and enjoyable activity. Here it’s worth thinking through everything down to the smallest detail, starting from the stylistic direction, choosing the color scheme, arranging furniture, hanging curtains and arranging decorative elements. First of all, you should start not so much from the attractive appearance of the room, but from its practicality and functionality.
If we are talking about open areas located in the yard, then plastic or wicker furniture that is practical and resistant to negative factors is chosen for them. Placing a fireplace will allow you to warm up by the fire on cool summer evenings. In addition, it can be made in a barbecue, barbecue or grill, where you will cook delicious and appetizing kebabs on the weekends.
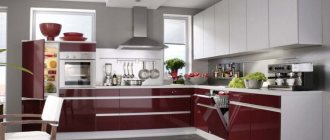
If the decision was made to build an enclosed summer house, the same finishing materials and items are chosen for it as for a residential building. The furniture can be arranged upholstered and comfortable, the walls are finished with porcelain stoneware, PVC panels, and moisture-resistant wallpaper. You can lay laminate, linoleum, or tiles on the floor.
When arranging the interior space in the kitchen (it doesn’t matter whether it is open or closed), special attention is paid to a properly placed sink, work surfaces, and stove. It is important here that the housewife can prepare food comfortably without running many times from one side of the building to the other.
Attention: when arranging a resting place, it is important to take into account that it should be located at a distance of at least 2 meters from the grill or barbecue.
In conclusion, it is worth noting that a kitchen on the veranda is a convenient solution. With it you can conveniently prepare delicious and appetizing dishes in the fresh air. But for this it is necessary to create all the necessary conditions: build a canopy, arrange household appliances, furniture. With the right approach to the construction of a summer house, it will be possible to comfortably spend leisure time with friends and relatives, relaxing in the fresh air.