Homemade machines and devices for the home workshop
Before selecting a set of homemade machines and accessories for the garage, it is necessary to create optimal working conditions. In this case, the size of the room must be at least 6 square meters. m. You can attach an additional room to the garage or to the house. It is important to decide what types of work you will carry out, as well as make a list of equipment and necessary tools.
A compact workshop can be set up in a garage
It is most convenient to organize storage of some types of tools on the wall. This will save space. It is also convenient to use racks and shelves. To save useful space, it is worth making universal devices that combine several functions. The table should be equipped with drawers, and also used as a carpentry workbench.
Ergonomic design of the desktop allows you to place the maximum number of items
When choosing homemade machines and devices for your home workshop, you can select different types of mini equipment. For working with metals, the following options are used:
- grinding equipment is used for processing metal surfaces: grinding, polishing and sharpening. Its manufacture requires a minimum number of components and parts. The equipment includes sharpening stones and an electric motor. For the stability of the device, mounting elements are used;
Grinding equipment option
- A milling machine is used to drill holes. In the manufacture of such a lifting mechanism design, a steering rack is used. In addition, you can install an angle milling machine.
Professional version of this design
For wood processing, various homemade tools and do-it-yourself devices are used. The most commonly used types are cutting, turning and grinding. With their help, you can perform all types of work at home. The following equipment is used for wood processing:
- cutting machines . The simplest device is an electric or chainsaw. Such units can be disk, belt, or chainsaw sawmills. When making homemade equipment, it is worth considering the diameter of the disk, as well as the width of the cutting part;
Simple cutting equipment
- grinding device. The simplest option is made from a stable table, a vertical grinding shaft and an electric motor. An abrasive belt is used to process the ends of wood blanks.
Grinding device
Related article:
Woodworking machines for the home workshop. Specialized equipment with an electric drive greatly simplifies the processing of wood blanks. But acquiring it involves significant investments. To successfully solve this problem, you should carefully study the materials in this article.
DIY tool shelves: popular designs and manufacturing
It is worth noting the following options for storing tools:
- racks;
- hanging shelves;
- wall structures;
- shelves in the form of shields on which small tools can be mounted.
Unusual shelves for storing tools
You can make a panel shelf for a tool with your own hands like this:
- cut out a shield from plywood and mark the places where the shelves will be installed;
- make shelves with side walls, the length of which should correspond to the length of the shield;
- the shelves are fixed to the panel using self-tapping screws;
- hooks are mounted, which are equipped with a special thread;
- The brackets are being installed on the back side of the shield.
This way you can make a simple panel structure, which will allow you to put your workshop in perfect order.
For your information! Panel shelves are functional. You can attach hooks or special holders to them. An additional lamp can be hung above such a structure. In this case, you can use a small light bulb.
Homemade beds
The basis of any machine (whether factory-made or home-made) is the bed on which it is located.
When they assemble homemade wooden machines with their own hands or metal machines, then of course they immediately make a frame for them.
But sometimes the basis of the machine is some kind of factory tool (grinder, electric plane, drill, etc.) - then only the bed itself needs to be made.
When making machines from wood with your own hands, the frames for them can also be made from appropriate (inexpensive) materials: do-it-yourself plywood or wood.
In this case, it is not advisable to waste metal. Yes, even for metal machines the frame can be made of wood. Here's an example: a homemade stand for a drilling machine.
But, for example, for a manual band saw it is better to make a frame made of metal - it will be more stable and reliable. This is exactly what you need when working with such a tool.
Many craftsmen prefer to make machines from wood with their own hands, because they end up being inexpensive and lightweight. And it’s easier to make frames for them.
One such option is a lightweight plywood frame for installing an electric planer. The result is a very convenient DIY wood cutting machine.
Designing a carpentry workbench with your own hands: drawings, video
Let's start learning about useful DIY household gadgets from the workbench. This useful unit comes in the following varieties: stationary, mobile and folding.
The diagram shows the main elements of such a workbench
Remember that a do-it-yourself folding workbench drawing should contain the following details:
- a working surface, to create which you will need a board at least 6 cm thick. In this case, hornbeam, beech or oak are used. You can use boards painted with drying oil;
Special drawings will be required to carry out the work.
- a vice structure is mounted on the top cover;
- The supporting legs of the workbench are made of pine and linden. Longitudinal connecting beams are placed between them to ensure stability of the entire structure;
- Shelves for tools are mounted under the workbench.
The diagram shows how to correctly assemble such equipment
You can watch how to make a simple workbench in this video:
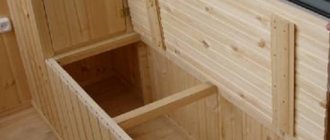
Technology and drawings of a do-it-yourself carpentry workbench: simple design
To make such a device, you will need drawings with the dimensions of the carpentry workbench.
In this photo you can see how the folding structure is made
Let's look at how to build such a device:
- To make the lid you will need thick boards. The dimensions of the shield should be 0.7 * 2 meters. Long nails are used for fastening;
- the roof is finished using timber;
- depending on the dimensions of the carpentry workbench, vertical supports are used;
- The height of the working surface of do-it-yourself carpentry workshop tools is determined. Markings for the beams are applied on the ground where these elements are buried;
- The workbench cover is being installed. The support bars are attached in pairs. In this case, long self-tapping screws are used.
Homemade design option
Features of creating and designing a wooden workbench with your own hands
You can buy a wooden workbench or make one yourself. Additionally, the structure can be equipped with drawers. So, let's look at the manufacturing technology:
- vertical supports are fixed using horizontal jumpers. They make grooves for connecting fittings. In this case, a chisel and a hammer can be used;
- When the jumpers are installed at the required level, holes are made in the bars on the support. Then the bolt is mounted, after which the elements are tightened;
- horizontal jumpers are installed two pieces on each side. Parts under the countertop will be required for installation above the work surface;
- bolts are used to secure the work surface. Holes for fastening elements are drilled on the tabletop. The bolts are mounted so that the bolts are recessed.
Wood construction drawings
You can easily make a belt sander at home. In this case, you will need an emery cloth and a sanding belt. Its sticker is applied end-to-end. To strengthen the seam, it is necessary to place dense material under the bottom. In this case, you should not use low-quality glue.
Ready frame for the table
The diameter of the tape shaft should be several mm wider in the center than at the edge. To prevent the tape from slipping, it is necessary to wind it with thin rubber. For the manufacture of grinding devices, you can select designs such as planetary, cylindrical grinding and surface grinding.
Technology for making a carpenter's vice for a workbench with your own hands
For workbenches, you often make a vice with your own hands at home. The video allows you to see this process:
To make such a design you will need special studs. To work, you will need a screw pin with a thread. You also need to prepare a couple of boards. One element will be fixed, and the second will move. When manufacturing, it is necessary to use drawings of a vice with your own hands. In each of the boards it is necessary to make holes for pins, which are connected with nails. Then screws and nuts with washers are inserted into them. When constructing a homemade vice with your own hands, you should use instructions and ready-made diagrams.
Carpenter's vice design
Helpful information! If you make the pins movable, you can make workpieces of various sizes.
How to make a metal workbench with your own hands?
To carry out plumbing work you will need a metal workbench. Its standard size is: length 1.8-2.1 m, width – 0.7-0.8 m, height – 0.9-1.2 m. Manufacturing includes the following steps:
- Assembling the workbench frame with imparting longitudinal rigidity.
- Assembling and securing 2 cabinets in the form of a frame covered with a metal sheet.
- Installation of the working surface - a wooden board covered with a metal sheet on top.
- Installation of a tool rack, which is attached to the back of the workbench and further strengthens it.
In manufacturing it is recommended to use the following material:
- rack beams - profile pipe with a wall of at least 2 mm, size 4x6 cm. Needed - 4 pcs.;
- beams measuring 5x4 cm for horizontal linking of posts, providing longitudinal rigidity. Quantity – 3 pcs.;
- profiled pipe (9 pcs) for making a frame for cabinets measuring about 4x3 cm with a wall thickness of at least 1 mm;
- a 5x5 cm corner for vertical rack posts with a height of 1.5-2 m. For horizontal linking, you can use a 4x4 cm corner;
- board for the tabletop with a thickness of at least 5 cm;
- metal sheet for the working surface with a thickness of at least 6-8 mm.
Making a metal bench with your own hands: drawings
If you often work with metals, the best solution would be to create a metal workbench with your own hands. Wood material is not suitable for such purposes, since it will often be damaged when processing metal products.
Universal metal option
It is worth noting the following elements of such a device:
- horizontal jumpers are used to ensure longitudinal rigidity;
- Small rack beams are made from profiled pipes. They are used to assemble the frame part of pipes. In the corner zone there are welded spacers, which are made of steel strips;
- for rack beams, profile pipes with a wall thickness of 3-4 mm are used;
- corner No. 50 is necessary for the racks on which the tools are mounted.
To create high-quality seams, it is necessary to use a carbon dioxide semi-automatic machine, as well as a pulse-type welding machine.
Assembly of a universal device begins with the frame. To do this, long and short beams are welded. To prevent them from twisting together, follow these steps:
- place the elements on a flat surface;
- in areas where connecting points are located, it is required that the beams are joined using spot welding;
- in this case, welds are made on one side of the frame and then on the other.
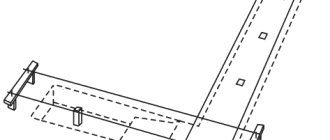
The diagram shows the frame of the metalworking machine, as well as its full view
After this, the rear beam and vertical posts are mounted. It is important to check how evenly they are located in relation to each other. If there are any deviations, they can be bent using a hammer. When the frame is ready, special corners are attached to it to strengthen the structure. The tabletop is made of wooden boards, which are impregnated with a fire-resistant liquid. A steel sheet is placed on top. A plywood shield is attached to the vertical rack parts. The same material is used for lining the cabinet.
Table 1. Making a metal bench with your own hands
| Image | Installation stages |
| A carbon dioxide semi-automatic machine is used for welding the structure. | |
| Creating a structure frame. For welding, all parts must be laid out on a flat surface. At first, the joining joints are simply tacked together, and then all the seams are welded. The rear pillars and beam are welded to the frame. | |
| After welding all the stiffening elements, the following frame is obtained. | |
| Then a reinforcing angle is attached to the frame to secure the tabletop. Before installation, the boards must be treated with a special fire-resistant compound. A sheet of metal is attached to the top. | |
| The side walls are finished with plywood panels, and wooden boxes are placed in the right cabinet. To protect the base, the surfaces are coated with various paints and varnishes. First, the primer is distributed, and then a special enamel is used. |
How to use for home workshop?
Each owner chooses the equipment of his own workshop himself. It depends on the characteristics of the hobby , i.e. type of work and area of the premises. The minimum area of a home workshop in which it makes sense to place equipment is 3-4 m² .
It can be located in a small room or on the balcony of an apartment, a separate building on its own site or in a garage. The ideal option is a secluded room where you can make noise without disturbing other people.
According to its purpose, a home workshop can be universal , i.e. to carry out any work that unexpectedly arises in everyday life, or have a specific direction related to the hobby of the master. Most often, workshops are equipped for working with wood, i.e. for carpentry work . Quite often there is a need for metal processing ( metalwork ) and car repairs .
In general, setting up a home workshop includes the following elements:
- structures for storing tools and materials (racks, shelves, cabinets);
- equipment for work (workbenches, work tables);
- machines for processing materials;
- devices for mechanizing work, facilitating labor, preparing tools, etc.
The equipment must be placed so that there is easy access , safety precautions and fire safety standards , and minimal comfort is ensured.
Do-it-yourself knife sharpening device: drawings and nuances
To make a sharpener from a washing machine engine with your own hands, you can take parts from old Soviet appliances. To build a sharpening machine you will need the following parts:
- tube for turning flanges;
- grindstone;
- special nuts;
- steel elements for the construction of protective casings;
- cable cord;
- launching device;
- a block of wood or a metal corner.
Homemade unit for sharpening knives
The flange section must match the dimensions of the bushing. A sharpening stone will also be placed on this element. This part will also have a special thread. In this case, the flange is pressed onto the motor shaft. Fastening is carried out by welding or bolting.
The working winding is fixed to the cable. Moreover, it has a resistance of 12 ohms, which can be calculated using a multimeter. A frame is also made, for which a metal corner is taken.
How to sharpen a drill for metal: do-it-yourself device
You can make a simple metal drill sharpening machine from ordinary tools. An abrasive block is suitable for this.
At home you can use the following equipment:
- You can use an electric sharpener to sharpen the drill. In this case, sharpening is performed from the edge. When using a sharpener, you need to pay attention to the sharpening angle and the fixation of the drill on the axis of rotation. Excess metal should be removed gradually. Finally, the edges are shaped into a cone;
- A grinder is used as a do-it-yourself sharpening machine. For sharpening, the cutting tool is secured in a vice. To do this, the mounting angle is selected, and the disk is mounted.
Types of drill sharpening devices
It is worth considering that the grinder is mounted on a flat surface. In this case, the disk should be located downwards. If the grinding device is not secured securely, it can damage the drill. Sharpening with a grinder can only be done for products with a small diameter. It is not possible to finish using a grinding device. The edge of the shield is used to support the cutting tool.
You can also use a drill attachment, which should be equipped with a grinding disc with sandpaper. To grind elements with a drill, you need to find two flat surfaces.
Drilling machine for home workshop
You can make a drilling machine attachment from a drill with your own hands. The drawings will help you understand the design. For such a design you will need the following elements:
- base or frame;
- rotation device;
- mechanism for ensuring supply;
- stand for fastening the door.
Installation of the machine in the workshop
Here are the main steps in making a homemade drilling machine with your own hands:
- Chipboard is used for racks. In this case, you need to choose a thickness of at least 20 mm;
- To maintain the accuracy of the drill machine, it is necessary to use guides. In this case, you can use steel strips;
- For the pads, steel clamps are used.
To make a drilling machine you will need a rotary tool feed mechanism. The design uses springs and a lever. There are various tools for sharpening drills.
Assembling a drilling machine with your own hands: drawings with dimensions
The design will also require the manufacture of a homemade vice for a drilling machine. The simplest device can be assembled from a drill, without a steering rack. To minimize vibration processes, it is necessary to build a more massive table. The stand and table are connected at right angles. In this case, the drill can be attached using clamps. A vice is mounted on the table surface.
Complex drawing of a drilling machine
Rules for operating a wood jointer
A homemade jointing machine will help when repairing furniture and apartments. When using it, the following rules should be observed:
- The jointer is adjusted in such a way that the maximum errors are ensured - vertically (perpendicular) - no more than 0.11 mm for every 1 cm; in plane - no more than 0.16 mm for every 1 m.
- When processing workpieces smaller than 3.5x35 cm, pushers should be used to hold them.
- Wear of the cutting element is indicated by scorching and moss on the surface of the part.
- An uneven surface after machining indicates an inaccurate positioning of the cutting edges.
Designing a press for a garage with your own hands
The design of a homemade garage press is intended for straightening, pressing, bending sheet materials and for compression. Devices for plumbing work are characterized by a compact and simple design. The forces from such a press can vary between 5-100 tons. For garage work, 10-20 tons is quite enough. To make a similar design, a manual drive is used. The hydraulic device contains two chambers with pistons.
Homemade design
Do-it-yourself press from a jack drawings
You can see how to make a simple device on a special video of a press made from a jack with your own hands:
A simple option is a hydraulic one, which can be constructed from a bottle jack. An important element is the frame, inside of which the jack is placed. The platform is used as a reliable base. The upper surface is used to support the elements being processed. The table should move freely up and down on the frame. In this case, rigid springs are attached to the base on one side, and to the working surface on the other.
Using a jack
Here is a simple assembly diagram:
- the necessary elements are cut out according to the drawings;
- The base is mounted by welding. In this case, the steel structure should resemble the letter P;
- a mobile table is made from a pipe and channel;
- Finally, the springs are fixed.