When building a house with our company, the design is free of charge!
| from 3400 rub/m.p. | |
| Monolithic foundation (slab) | from 4200rub/m2 |
| Pile-screw foundation | from 3200rub/piece |
| Columnar foundation | from 3800rub/piece |
Installation of vapor barrier
Installation of insulation in 1 layer 60 RUR/m2 Metal tiles from 280 RUR/m2 Flexible tiles (bitumen) from 300 RUR/m2 Corrugated sheets (Euro slate) from 200 RUR/m2 Natural tiles from 400 RUR/m2 Seam roofing from 350 RUR/m2 Corrugated sheets 250 RUR/m2 Drainage system from 35 0ru/m.p."Heated floor" device
| from 450rub/m2 | |
| Treating the screed with a primer (moisture protection, dust removal) | from 30rub/m2 |
| Floor joist installation | from 180rub/m2 |
| Leveling and strengthening the floor beams to the level (if they were installed previously) | from 80rub/m2 |
| Installation of subfloors from edged boards | from 100rub/m2 |
| Installation of vapor barrier | from 50rub/m2 |
| Insulation (per 1 layer 50 mm) | from 50rub/m2 |
| Laying floor boards | from 300rub/m2 |
Installation of internal electrical panel
| from 3800rub/piece | |
| Plywood sheathing, OSB | from 260rub/m2 |
| Installing an electrical kit inside the bathhouse | from 7000rub |
Preparation for construction ↑
Before starting construction of even a small structure, several important issues must be resolved.
- Choose a place to build.
- Draw up a clear plan for the location of the building.
- Select a project for construction.
- Make an estimate.
- Purchase materials for construction.
Legislative norms for the construction of buildings and structures on a garden plot
Sanitary and hygienic standards for the construction of auxiliary premises on a garden plot ↑
When choosing a location for a shed, you must take into account the sanitary standards established by the legislation of the Russian Federation. There is no need to register such buildings, but it is necessary to maintain the required distances between objects. Remember that the purpose of a barn can be different, and if a toilet has one distance from a residential building, then a poultry house and an ordinary barn have a completely different distance. Don’t run into trouble with your neighbors, because if you violate the conditions for placing the building, you will receive a demolition order and an administrative fine.
Important! The auxiliary premises must be located only within the boundaries of the site located on your property. If a building extends beyond the boundaries of your land, then completely different laws affect its construction.
Approximate site plan
Design of the structure ↑
The layout plan and marking of the building are necessary for further construction of the foundation. There is no need to build a barn, especially a permanent one, in a lowland, on flooded areas, or on a crumbling slope. In these cases, you can wait for the premature destruction of your works.
The construction project is selected based on the purposes of the construction. You can build a small wooden shed for gardening tools, a wooden poultry house, a sawmill, or a solid stone outbuilding with a toilet and shower. If you don't know how to draw designs, you can choose a shed plan at the end of the article.
Project of a barn with a cellar
Customer reviews on construction costs ↑
Drawing up an estimate for construction cannot be ignored. Many readers ask questions about how much a particular type of shed should cost. Prices for materials and construction vary greatly in all regions of our country, and it is impossible to answer this question unequivocally. But we can definitely say that the services of workers, even the most poorly qualified, will account for at least a third of the total amount.
Customer reviews for the construction of a wooden outbuilding 3x6 meters indicate a price of at least 30 thousand just for the work of the builders! Of course, building a shed yourself is much more profitable. Some people build from scrap materials and old boards, while others buy tar blocks or sand-lime bricks, make a slab foundation, and even design a cellar. Any construction requires a serious approach when calculating the cost of materials, otherwise you risk getting into long-term construction due to lack of funds.
Building a frame shed with your own hands
Advantages and disadvantages of foam blocks for construction work in the country
- Foam concrete is lighter (11 kg) than brick, but is not inferior in strength. The construction will not be as heavy as if it is made from expanded clay concrete blocks.
- High quality concrete. Frost-resistant, sound-proof material, and its heat-insulating properties are several times higher than those of brick.
- The porous material has good thermal conductivity, unlike plastic. The microclimate in the barn will be like in a wooden building.
- Unlike wood, it does not rot and does not burn. Can be exposed to fire for a long time (up to 8 hours) without destruction.
- Processing cellular stone is quite simple using ordinary tools, so it is easier for summer residents to lay it than wood or brick.
- Construction will not take much time, since the size of the finished blocks is relatively large (20x30x60 cm). By the way, if you make foam blocks yourself, you can cut concrete elements from a monolith of a given size.
- Relatively cheap, economical material.
It is still necessary to take into account that, with all the advantages, the foam block also has a number of disadvantages:
- the strength of the blocks is limited, so they should not be used for the construction of high structures and must be transported carefully;
- it easily absorbs moisture;
- After laying the foam blocks, the structure must be additionally plastered due to the unsightly appearance of concrete and the need to protect it from low temperatures.
By the way, foam concrete was invented not so long ago, only 100 years ago. By adding a foaming agent to the usual cement mixture, we obtained a qualitatively new building material. It consists of small cells-air pockets, so it has good thermal conductivity.
Making a foundation for an outbuilding ↑
Any construction begins with the construction of a foundation, which is the foundation. Foundations are different, but for a shed on a garden plot, regardless of the “capitality” of the structure, several types are used, the construction of which we will consider in more detail.
Tape ↑
If you decide to do a capital construction, then it will need a strong foundation. Here you can no longer get by with slightly dug bricks for a temporary structure. It is best to choose a strip foundation. It has a number of advantages:
- not difficult to erect without outside help;
- production times are minimal;
- suitable for most soils;
- withstands the weight of a multi-story building.
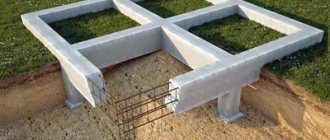
Marking for the foundation
For it you will need concrete, wood for formwork, reinforcement with a diameter of 1.2 cm, sand and crushed stone for the cushion. The process is simple and understandable even for a beginner.
- We clear the ground of debris, stones and roots.
- We outline the dimensions of the foundation with pegs and rope.
- We dig a trench 70-80 cm wide. Its depth should be slightly greater than the freezing depth of the soil in your area.
- We make formwork. It is not necessary to choose high quality wood for it - after the concrete hardens, the boards can be removed. The main thing is that the height of the formwork is above the soil surface, this way you will protect your structure from moisture and dirt.
Formwork for strip foundation
- The bottom of the foundation, and especially the trenches, is covered with two layers of sand and crushed stone, thereby forming a shock-absorbing and drainage cushion. It will protect your future structure from ground vibrations.
Pillow under the foundation
- Then the reinforcement is laid in the form of a mesh. The cell width is approximately 30-40 cm.
Laying reinforcement
- We fill the foundation with concrete, let it set, and remove the formwork. Your foundation is ready. For heavy structures, it is recommended to maintain a time between construction and laying the foundation. But for a light shed, complete drying of the concrete is sufficient.
Ready-made strip foundation for a barn
If you are planning a large building, for example, a large outbuilding or a brick shed, and the soil in your area is quite mobile, then you can strengthen the structure with piles. The pile-strip foundation is made according to the same principle. The only difference is that piles are installed every 1.5-2 meters.
Installation of pile-strip foundation
Slab ↑
This type of foundation is not cheap, but it is not difficult to manufacture. Such a foundation is made for buildings on quicksand, marshy soils, and soils subject to seasonal fluctuations and flooding. It is performed in a similar way to a strip foundation, but there are some differences.
- The sand and gravel cushion must be of high quality and reach a thickness of up to 30 cm. First, sand is poured and compacted, then crushed stone.
- Next, geotextiles are laid.
Laying a slab foundation in layers
- A mesh of reinforcement is installed over the entire base area.
Reinforcement mesh
- The entire space inside the wooden formwork is filled with concrete.
Slab foundation
Columnar ↑
Usually the story begins with the simplest, but in our case we will describe a version of the simple foundation at the end. The fact is that this type of foundation is suitable only for those regions where the soil is not subject to “walking”. Shifting soils will shake the light foundation and quickly destroy the building. This type of base for a shed can be successfully used if:
- The construction is temporary: the calculated service life is no more than several years.
- The level of groundwater rise is low.
- There are no quicksands or deep freezing of the soil.
- There are no seasonal spills or rising waters.
- The soil does not have swampy properties.
Columnar foundation support
If all the conditions suit you, then learning how to make such a foundation is very simple.
- Markings are made for the base of the shed.
- Holes are dug in the corners 15 cm greater than the soil freezing depth.
- A 15 cm layer of sand and crushed stone is compacted at the bottom of the holes.
- Brick or concrete piles are installed in the holes.
If brickwork is used, then it is important not to forget two more points.
- Place a metal rod inside the pile to further strengthen the structure.
- Coat the pile with waterproofing material or wrap it with roofing felt.
A columnar foundation can be used as a foundation for small buildings
We are building a utility block
Most often, owners decide to build outbuildings from foam blocks when this material was used for the construction of the main house and there is a surplus left. In this case, you have to build from what you have, without thinking about selecting stones according to dimensions. Otherwise, the question of block sizes arises.
Note: If you purchased a project for a utility block made of foam blocks, then it will also contain an explanation of the materials - including their types and parameters.
- In principle, many manufacturers produce only one, the most popular version of foam concrete wall products: 600 mm length, 200 mm thickness and 300 mm height.
- But if you wish - if, for example, you need to make thicker walls, you can find other options (250, 300 or 400 mm thick). For this you can take products with a thickness of 100-120 mm.
- In addition to the blocks themselves, you will need a masonry mixture to build the walls. If it is important for you that the building be warm - for example, if you are building a room for winter poultry keeping, a garage or a bathhouse, then it is better to use special glue for masonry.
Note: Since perlite sand is added as a filler to adhesive mixtures for cellular blocks instead of quartz, the joints have the same thermal conductivity as cellular concrete.
If on the site you are simply building a shed, a fence or a gazebo made of foam blocks, then it is quite possible to use ordinary cement-sand mortar for masonry.
Foundation for masonry
Before you start building walls, you need to take care of reliable support for them. There may be several options - but it depends on what exactly you will build.
| Type of foundation | Its advantages as a support for outbuildings |
| If, for example, you are building a garage with a barbecue area, a gazebo or a summer kitchen, it would be most convenient to pour a concrete slab, which will not only serve as a base for the masonry, but will also serve as the floor. However, this is the most time-consuming and expensive option. | |
Monolithic tape is cheaper because:
| |
| It was made from what was available - a prefabricated monolithic version | You can simplify your task if you use large-format hollow blocks to build the foundation, which will serve as permanent formwork. Their advantage is that they take part of the load on themselves and you can start laying within a week, rather than waiting a whole month.
|
In the same way as for a shallow foundation, you can lay out the walls of the basement, if one is provided under the utility block. When using hollow blocks, their cavity can be filled with concrete and reinforced for reliability. When it is necessary to insulate, expanded clay is simply poured into the cavity.
| |
| There are often cases when all the previous options are not suitable for the simple reason that there is water close to the ground, or it is necessary to build on difficult terrain. In these situations, there is only one salvation - piles. There are quite a few types of them, but it is unlikely that anyone will hammer reinforced concrete under a shed. There is an excellent option for this - metal screw piles. They are tied along the heads with a wide channel, the back of which will serve as an excellent base for the masonry. |
Construction of masonry and its protection
Once your foundation is ready, you can begin building the walls. Regardless of the type of base, it is necessary to lay a roll of waterproofing material under the masonry.
And it is better if it is glued to the concrete with mastic. This immutable rule is used not only when working with foam blocks, but also for any other wall materials.
- Even if the blocks are installed using glue, the first row is laid on the DSP. This makes it possible to level out all the unevenness of the foundation surface.
- First, corner blocks are laid, and a mooring cord is pulled between them, which will serve as a guide for further laying.
- The position of the blocks is checked with a level and adjusted using a rubber hammer.
- To continue further work, the first row needs to stand for a day to gain strength.
- From the second row you can already lay the blocks on glue, but for the utility block you can continue to use the solution.
- After bringing the masonry to the required height, you will need to make a roof for your utility block, which can be either single-pitch, gable or hip.
- You can create a slope on a pitched roof due to differences in the heights of opposite walls, or you will have to install wooden posts for this purpose.
In any case, the main load-bearing element of the roof is the mauerlat beam, which is mounted directly to the top of the masonry. To do this, an armored belt is first installed around the perimeter of the walls, into which metal studs with threads are embedded. It is due to them that the timber will stay on the walls.
The design of the roof depends on which version will be constructed. It can be covered with absolutely any material - but it is better if it is similar to what was used for other buildings on the site.
And finally, about protecting the walls. Foam concrete belongs to the category of cellular concrete, and due to its porous structure, it is quite hygroscopic. Therefore, it is advisable to protect the outside of the masonry from moisture. At a minimum, it can be hydrophobic impregnation or plaster.
Ideally, the walls are covered with foam blocks using a ventilated facade system. As in the case of the roof, the same option as on the facade of the house will look ideal, but you can choose something else: siding, corrugated sheets, plastic lining.
Wood is the most popular material for building a shed. But it so happened that a utility block made of foam concrete would have looked more organic on my site, and would have been more reliable. The dimensions of the future barn are 6 by 4 meters.
Let's start with the foundation. I built formwork for the foundation:
Then the concrete was poured. Now there are three weeks of rest - we need to let the foundation settle.
And now, the foundation is ready. You can start building a utility block from foam concrete! Let's start laying:
It is worth noting that, in my opinion, laying foam concrete for a shed is easier than constructing a frame from timber or boards. You put cement, you put a block, you trim the next one. Although on the other hand, there is more routine here.
Meanwhile, the barn has grown to this size:
Soon the frame was finished and I started working on the roof. The roof system is rafter.
I chose tiles as the covering material. The main house is finished in the same way, so the barn will look harmonious:
That's almost all. The roof was laid:
Finally, all that remains is to install the door and the foam block shed is ready! Not counting the time spent preparing and settling the foundation, the barn was built in 4 weeks. Built alone.
I didn’t count the exact costs of building the utility block, but about 150 thousand were spent on materials.
A utility block is any room on a suburban area that is not intended for residential purposes. You can provide such an extension with a functional load depending on your own preferences: as a rule, it is convenient to store canned goods here, place garden tools, equip a workshop and an outdoor shower, etc. Some owners of country houses prefer to equip storage here for harvest during field work.
If you have a lot of work in the garden, you simply cannot do without a small summer “relaxation room”. Here you can always take a shower and lie down in the cool, store unnecessary equipment and work clothes. If you spend most of your time in the carpentry workshop, you need to equip an additional room. A summer kitchen is another functional option that is suitable for housewives who are accustomed to making preparations for the winter in specially designated rooms.
Projects with drawings for building a barn ↑
Before you build, you need to imagine it and draw a detailed drawing, otherwise your shed will not only be ugly, but may not work out at all. Although the project begins not even with a drawing, but with the formation of a clear construction goal. For example, sheds are divided into: permanent and temporary. A permanent shed has a completely different cost and labor costs than a temporary one. Again, which roof do you prefer: single-pitched or gable with a ridge? Both options are quite acceptable for an outdoor utility room, but the financial and time costs are different. Maybe you need a combined barn that can house a poultry house, a woodshed and an outdoor shower at the same time. Or a mini shed for gardening tools will satisfy your needs. In addition to its size, the barn can be frame, brick or built from foam blocks.
Small shed
If you are not endowed with the talent of a draftsman and cannot choose from a variety of building options, this section is for you. It describes how to build a barn with your own hands in projects and drawings. We choose and build!
Sometimes there is not enough space on the site, but you want to fit a lot. Then projects of utility buildings, which combine several utility rooms, come to the rescue.
Project of a barn with a pantry and poultry house
Utility rooms have different directions. Some people store old things in a barn, while others need a barn for livestock.
Livestock barn project
The next project is for those who need a small space in their summer cottage, for example, to store garden tools. It can be placed anywhere in the garden or garden.
Project of a small barn for a summer residence
A regular shed frame with a sloped roof can be used for any purpose.
Shed frame drawing
Design and calculation of material quantities
Foam blocks allow you to build buildings of any length and width. It is better to choose a rectangular shape for the barn, and the room inside can be equipped with partitions.
To calculate the required amount of material for the construction of an outbuilding, you only need to know the dimensions of the blocks and sketch out a plan of the barn.
The most common size of foam blocks is 200x300x600 mm. The smallest indicator is thickness; it is not needed for calculations. Knowing the length of the barn wall and the length of the block (600 mm), you can easily calculate how many pieces will go into one row, and the required number of rows is also determined. For example, for a 3-meter wall you will need 5 foam blocks, and for a height of 2.5 meters you need 8.3 rows, round the value up - we get 9. Thus, for one wall of the barn you need to purchase 45 foam blocks.
In addition to the main material, you will need wooden beams for the bottom trim. But this is the case if a columnar foundation is used; they are not needed for strip and solid foundations. Also needed are boards and beams for the floor, joists and roof truss system, metal corners that will serve as fasteners, screws and nails.
Different types of materials can be used as insulation:
- Mineral wool;
- Penoplex;
- Styrofoam;
- Cork plates;
- Penofol.
In regions with low temperatures and long winters, it may be necessary to insulate the interior walls of the shed, ceiling and floor.
To decorate the facade, you can use plaster, painting, corrugated board or siding.
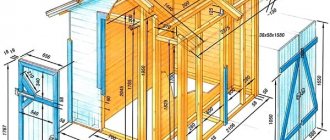
Building a frame wooden shed with your own hands: step-by-step instructions ↑
Let's start the description with a simple project. If the shed is needed urgently, and there is very little time to build it, say, a week. Then they choose a lightweight version of construction made of wood on a columnar or shallow foundation. This design can last for several years or more - everything will depend on the mobility and seasonal fluctuations of the soil. The initial stage of construction of a standard frame wooden shed with dimensions of 3x6 m with a pitched roof of 3 and 2.4 meters looks like this:
- We choose a place, taking into account all the features.
- We form a columnar foundation, which was discussed in the previous sections. Either we make a shallow foundation from standard blocks or 600x300x200
- We lay roofing felt or any other waterproofing on the protruding parts of the foundation. This must be done to protect the entire building from rotting due to the rise of groundwater, dirt, and rain.
Foundation for construction on concrete blocks with waterproofing
- Now we install a frame made of wooden beams 150x150 - this is the optimal cross-section for the base. We impregnate and process the wood and fasten it together. More experienced craftsmen can fasten “in half boards”, and novice builders “in a joint” using metal corners. We fasten the floor joists in the same way.
Fastening beams with corners
- We line the floor with moisture-resistant OSB or thick plywood. And we begin to assemble the frame.
The floor is covered with moisture-resistant OSB
We proceed directly to the construction of the frame. If you have second hands, but not only one, then you can use the assembly method on the ground. With this option, each wall is assembled separately and mounted to the base.
Installation of finished walls of a frame shed
If you work alone, it will be difficult to install a finished wall. In this case, we build the frame from the floor. We mount the beams level, taking into account the places under the windows and the doorway. In the case of construction without assistants, it will be difficult to immediately set the level of the vertical bars. To do this, use sticks.
Shed frame with slope sticks
After the vertical posts, you can begin installing the roof. Horizontal beams with cuts are placed on the frame, which will serve as the base of the roof.
Structure of a pitched roof frame
The next stage will be covering the walls and laying the roof. The simplest option for wall material is OSB boards, which must be painted to protect them from weathering. The roof can be covered with a board, and roofing material can be laid on top of the board. If funds allow, cover the roof with slate, corrugated sheets or metal tiles.
Installation of corrugated sheets on the roof
Frame shed covered with OSB
Building a frame shed with your own hands: video master class
Types and brands of foam concrete
There are natural and synthetic foam blocks (aerated concrete).
- Natural cellular stone is the result of the mechanical addition of organic (protein) foam; concrete evenly filled with air bubbles. Absolutely safe, environmentally friendly material, unlike synthetic ones. Placed on a cement-sand composition.
- Synthetic foam concrete, gas silicate. In addition to sand, it contains lime, aluminum powder and water. The cellular structure of the material is formed as a result of chemical reactions with the release of gas. Unlike foam concrete, it undergoes thermal firing in an oven. The result is smooth finished blocks. It has pronounced quality characteristics of foam blocks. It is laid with glue, which also distinguishes it from foam concrete blocks. Belongs to class 4 in terms of the content of harmful substances.
Foam concrete grades were distributed according to the degree of density, highlighting 3 main types:
- thermal insulation;
- structural;
- structural and thermal insulation.
The preparatory stage of construction must be taken very seriously - the quality of the future shed made of foam blocks depends on it.
Construction of a permanent shed from foam blocks ↑
Why did the choice fall on this material, and not on brick, for example? The fact is that foam block has a number of huge advantages. This is a warm, breathable material that is lightweight, so building from it is not labor-intensive. The lightness of foam concrete allows you to build houses alone, and the speed will increase several times, since the blocks are several times larger than bricks. Plus, foam concrete blocks are easy to install. Foam blocks are different, and you need to know about this.
Characteristics of foam blocks
The sizes of these building blocks also vary.
Foam block sizes
Another advantage of this material is that installation can take place either with a special glue or with a solution.
Tools for foam block construction
Let's look at the stages of building a shed from foam blocks in more detail.
- This is a capital structure, and it is not worth putting it on a light foundation, so we build a strip, pile or slab foundation, as described in the section above.
- Starting the construction of walls, we line the base of the foundation with roofing felt and liquid waterproofing.
- We start building from the corners of the barn, leveling them using a level and plumb line.
First row of foam blocks
We pull the mooring cord and continue to build the wall along it. Bandaging the seams, as in the photo, will protect against leaks during heavy downpours and protect against drafts.
Laying aerated concrete
The solution or glue is applied generously, and its residues are removed with a tool and thoroughly cleaned.
Applying the solution to aerated concrete blocks
After the walls are erected, the roof must be installed. To do this, a mauerlat is mounted on the top masonry, on which the rafter legs will be laid.
Installation of the rafter system
After installing the supporting roof system, it is covered with boards or OSB, waterproofed, insulated and roofing material is applied.
Roofing
A foam concrete shed is a very profitable building. It is durable and warm. Such a room can be adapted for a workshop, poultry house and utility unit.
Construction from foam concrete
Interior decoration and arrangement of a country shed
The inside of the shed can have a variety of finishes depending on its functionality. The most common method of finishing work is clapboard cladding, which makes the building look like a modern metal barn.
In the case where a shower is installed in the change house, it is better to protect the wooden walls from moisture. To solve this problem, a partition is erected from plasterboard (moisture-resistant). In the future, it can be tiled with inexpensive tiles.
The barn is illuminated. The owner arranges the various shelves and cabinets with the help of which the change house is equipped at his own discretion. If the building serves as a safety net for small vehicles, a concrete descent can be made near the steps, which will help facilitate the task of entry.
When building a country shed, you should think about the fact that one of its walls can be used to build a canopy, which will serve, for example, to store firewood or to create an open terrace. This idea will definitely come to the owner in the future and then he will have to put extra effort into creating it.
Why foam block
Of course, there is a huge temptation to simply ignore this point, because we just have a barn, and in fact we should not be interested in what we will build it from. However, this is a room in which you can arrange a warehouse for certain food products, tools, and equipment.
That is, we can still make certain demands on the internal atmosphere.
So, building a shed from foam blocks allows us to talk about the following features of the material:
- Thermal insulation
, how important it is for a shed, depends on its purpose. - Easy to use
. We will consider this point especially carefully below. - Relatively low cost
.
Where to begin
Of course, we are not talking about any project here, but we still need to do some sketches and calculations.
Our building will not stand on the ground; we need a simple foundation - pour it, calculate the amount of material. Decide on the construction site.
- Selecting foam block parameters. Let the standard size be 200x300x600 mm.
- We calculate the perimeter of the barn. For us it is 4x3, that is, 14 meters.
- The wall area will be, at a height of 2.5 meters, 35 square meters.
- The standard amount of material per square is approximately 5.6 blocks, which means we need 196 blocks.
- Next, we subtract the area of the door and window, if there is one, and we get a completely accurate version of the number of foam block products.
Important! This instruction allows us to make calculations without jointing, which, however, will be minimal if we use special glue.
From the point of view of masonry, we are almost ready, but we will still need reinforcement for laying into the walls and a set of simple tools:
- Roulette and corner.
- A pair of trowels and a hammer.
- Twine for guides and a weight for a vertical plumb line.
- Wood saw.
Foundation
For this:
- We dig trenches 30 cm wide and 30-40 cm deep.
- According to technology, we pour sand to the bottom and tamp it tightly.
- We install reinforcement, it can be metal with a cross-section of 8 mm.
- We install the formwork, 15-20 centimeters above the ground level, the shed made of foam blocks with your own hands should rise slightly above the soil, since foam concrete easily absorbs moisture.
We also mix concrete in standard proportions, one portion of cement to four portions of sand and gravel. In total, we will get 1.8 cubic meters of concrete, and we can pour this ourselves. That is, there is no question of a mixer.
A small volume will allow us to fill everything in one go, therefore, this will only add strength to the entire base.
In a few days we will remove the formwork and carry out waterproofing. This is a mandatory condition; foam blocks should not constantly gain moisture from the foundation. For waterproofing, we use a simple mastic, with which we prime the base in several layers and cover the top with roofing felt.
Important! In principle, laying can be done within 3-5 days. The concrete has already fully bonded by this point, and the additional load that will be exerted by the masonry of the walls, on the contrary, will only strengthen the foundation.
Masonry
The principle of laying a foam block structure is not much different from a brick one, however, of course, there are some differences:
- Seam size. This is the first thing that immediately catches your eye. Such a small thickness of the seam is achieved because we have glue, and it allows us to make masonry with a joint of 3 mm.
- The rows, as in the masonry of a house, are necessarily connected with metal mortgages. In any case, the barn must have strong walls.
- We work with the level and along the guides, trying not to deviate.
The simplicity of masonry and convenient material parameters allow even one person to build a shed within one day, at least the walls can definitely be erected.
The question of how to build a shed from cinder blocks can practically be closed: however, we have at least a few more things to do.
First, constructing a lintel over the doorway. This can be done in several ways, but if we still have concrete, we can simply pour it with reinforcement. There is no concrete left, you can put a lintel in the form of two steel corners or buy a cast concrete column.
The roof remains. But here we will do everything very simply:
- We waterproof the top row of masonry and install a block on it, possibly with a cross-section of 100 mm.
- We make the second parallel wall one row higher and also lay the throw.
- Now we make the sheathing, installing a beam with a cross-section of 50 mm perpendicularly, in increments of a meter.
- Cover everything with plain plywood.
- Cover the plywood with roofing felt.
- We install slate sheets as the simplest, inexpensive option, and the price will be minimal.
Advice! The sides can be laid with foam blocks, cutting them at the desired angle; fortunately, they are cut with a simple hacksaw for wood.
Roofing and finishing works
To install a wooden floor, boards with a thickness of 30-40 mm should be used.
For outbuildings, the simplest pitched roofs are most often constructed. The base consists of guide bars 100/150 mm, between which crossbars are mounted. The step between the beams is 1 m. Vertical posts should be installed in the middle of the rafters. Sheds are most often covered with simple slate. Laying the sheets begins from the bottom, the sheets are overlapped and secured with self-tapping screws or nails. The barn does not require complex finishing. The most important thing is to install the door and windows (if provided) and lay the floor. If the walls are made of gas silicate blocks, then you can plaster them using ready-made mixtures. Such treatment will only improve the properties of gas silicate, thereby extending the service life of the building. The floor is easy to install. You need to fill the entire area of the barn with sand, then lay logs (wooden beams) and lay boards (or other material). To install a door, you first need to install the door frame into the opening. Further actions depend on what will be stored in the new building. If you only have the simplest garden tools, then the door can be made of wood. If someone plans to store more expensive equipment in such a place, then a cheap iron flap can be attached to a good box using self-tapping screws.
You can literally build a shed from blocks in just a few days, if you have skillful hands and high-quality material. If all installation rules are followed, it is possible to obtain a structure that will last a couple of decades.
Features of foam blocks
Foam block, or lightweight building stone, is an inexpensive material that has proven itself excellent in the construction of small houses. It is produced by mixing cement, sand, water and a synthetic or natural foaming agent. During the mixing process, a homogeneous mass is obtained, cut into measured pieces and left to harden outside. The process does not require special skills or expensive equipment, so when purchasing material there is a high risk of purchasing a low-quality foam block.
- Polyethylene film
for protection against moisture;
Marking
, containing information about the characteristics of the foam block.
Do not confuse foam block and aerated concrete block. In the second case, lime is added to the mixture. During a chemical reaction with aluminum powder, it releases hydrogen, which causes the porous structure of the material. After the blocks are formed and dried, they are subjected to heat treatment. This significantly increases the price of aerated concrete.
You can distinguish a foam block from aerated concrete with the naked eye: it does not have through pores, due to this the moisture resistance of the material increases.
Source stroy-inform.com
On our website you can get acquainted with the most popular projects of buildings made of foam concrete blocks from construction companies presented at the exhibition of houses “Low-Rise Country”.
Advantages
There are several reasons to build a utility block from foam concrete blocks:
- The building is being erected in a short time
due to the ease of laying blocks;
Porous structure
The material provides slight thermal insulation of the room. due to this, animals can be kept in the building during the winter;
Foam block does not burn
, and during a fire does not emit harmful substances;
The blocks are lightweight
with a large volume, this allows the construction of buildings on any soil using a lightweight foundation;
Blocks are easy to cut
, they are given any shape and size;
The walls allow air and steam to pass through well, creating a comfortable microclimate inside the room.
Source pt.decoratex.biz
Flaws
Foam blocks have several disadvantages:
- The material has unsightly appearance
and requires external finishing;
The outer layer of the foam block absorbs water
, therefore waterproofing is desirable for him;
When temperature changes
Moisture-saturated blocks quickly collapse due to the alternate freezing and thawing of water inside the pores.
On our website you can find contacts of construction companies that specialize in the construction of houses and other objects made of foam concrete. You can communicate directly with representatives by visiting the “Low-Rise Country” exhibition of houses.
Installation of windows and doors
Openings in buildings made of foam blocks cannot be adjusted after construction, so it is better to make windows and doors to order according to the final dimensions. They will require full-fledged boxes and platbands, especially if the barn is “warm” and it is planned to be used for keeping livestock.
You can install windows and doors in the openings yourself. To do this, holes are made in the frames and on the slopes of the walls for long screws: on a single-leaf door - 10 pcs. (3 on the sides and 2 on top and bottom), on the window - 6 pcs. The seam is sealed with polyurethane foam. After completing the exterior finishing and insulation, it is decorated with platbands.
Types of foam blocks
There are several types of foam blocks according to different criteria:
Density:
- Low-density thermal insulation blocks weigh 11–19 kg, thermal conductivity coefficient 0.12 W/m °C. Found application in insulation of internal walls of buildings. Brands D400 and D500. Not used for the construction of load-bearing structures;
Structural thermal insulation blocks have an average weight of 23–35 kg, thermal conductivity coefficient of 0.14–0.29 W/m °C. Brands D600 and D900. Used for the construction of load-bearing walls of low-rise buildings;
Structural blocks have a high density and sufficient strength for the construction of load-bearing walls or ceilings. The average weight of one block is 39–47 kg, the thermal conductivity coefficient is 0.36 W/m °C. Block brands D1000 and D1100/
Source nauka-i-religia.ru
Manufacturing technology:
- Rifled blocks
formed from a mixture by cutting with a steel wire. This type of block has improved geometry and edge integrity;
Shaped blocks
Not as precise, they are made by pouring material into partitioned molds. The manufacturing process is very simple, does not require special equipment and skills, so the material is characterized by low cost;
Reinforced blocks
with polypropylene fiber have increased strength and are used for the construction of load-bearing walls.
On our website you can familiarize yourself with the most. In the filters you can set the desired direction, the presence of gas, water, electricity and other communications.
Purpose:
- Wall
has a standard size;
Septal
half-blocks are used to erect walls inside the building;
Non-standard
blocks are made to order.
Source rust-mint.ru
It is recommended to build a shed made of foam blocks from D600 grade material. Structural and thermal insulation blocks have the necessary strength, and low thermal conductivity will protect the shed from freezing. The blocks are relatively light in weight, so a small number of workers can be used for construction.
If special glue is used to hold the blocks together, then construction can only be done from cut materials.